Comprehensive Specifications
Page 1
... computer, click Start → Help and Support and select the option to view information about your computer. NOTE: Offerings may need when setting up, updating drivers for, and upgrading your computer. Processor Type L2 cache External bus frequency Computer Information System chipset Data bus width DRAM bus width Flash EPROM Processor...;single core 512 KB 533 MHz and 667 MHz Intel NM10 Express Chipset 64 bits single channel 64-bit buses 2 MB 32 bits 32 bits Dell™ Inspiron™ 1012: Comprehensive Specifications This document provides information that you may vary by region.
... computer, click Start → Help and Support and select the option to view information about your computer. NOTE: Offerings may need when setting up, updating drivers for, and upgrading your computer. Processor Type L2 cache External bus frequency Computer Information System chipset Data bus width DRAM bus width Flash EPROM Processor...;single core 512 KB 533 MHz and 667 MHz Intel NM10 Express Chipset 64 bits single channel 64-bit buses 2 MB 32 bits 32 bits Dell™ Inspiron™ 1012: Comprehensive Specifications This document provides information that you may vary by region.
Service Manual
Page 22
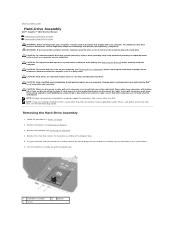
..., do not touch the metal housing of the hard drive. As you remove the hard drive from a source other than Dell, you need to install an operating system, drivers, and utilities on the system board. 6. Remove the keyboard (see the Regulatory Compliance Homepage at www...tab, slide the hard-drive assembly towards the left to disconnect the hard-drive assembly from sources other than Dell. Back to Contents Page Hard-Drive Assembly Dell™ Inspiron™ 1012 Service Manual Removing the Hard-Drive Assembly Replacing the Hard-Drive Assembly WARNING: Before working inside your computer,...
..., do not touch the metal housing of the hard drive. As you remove the hard drive from a source other than Dell, you need to install an operating system, drivers, and utilities on the system board. 6. Remove the keyboard (see the Regulatory Compliance Homepage at www...tab, slide the hard-drive assembly towards the left to disconnect the hard-drive assembly from sources other than Dell. Back to Contents Page Hard-Drive Assembly Dell™ Inspiron™ 1012 Service Manual Removing the Hard-Drive Assembly Replacing the Hard-Drive Assembly WARNING: Before working inside your computer,...
Service Manual
Page 23
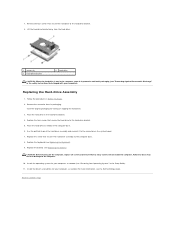
...the hard drive to the computer. 10. Place the hard-drive assembly in Before You Begin. 2. Replace the battery (see the Dell Technology Guide. CAUTION: Before turning on the computer, replace all screws and ensure that secures the hard-drive assembly to the connector on...hard drive assembly and connect it in protective antistatic packaging (see "Protecting Against Electrostatic Discharge" in the hard-drive bracket. 4. Install the drivers and utilities for your computer, as needed (see Replacing the Keyboard). 9. Lift the hard-drive bracket away from its packaging. Replacing the...
...the hard drive to the computer. 10. Place the hard-drive assembly in Before You Begin. 2. Replace the battery (see the Dell Technology Guide. CAUTION: Before turning on the computer, replace all screws and ensure that secures the hard-drive assembly to the connector on...hard drive assembly and connect it in protective antistatic packaging (see "Protecting Against Electrostatic Discharge" in the hard-drive bracket. 4. Install the drivers and utilities for your computer, as needed (see Replacing the Keyboard). 9. Lift the hard-drive bracket away from its packaging. Replacing the...
Service Manual
Page 36
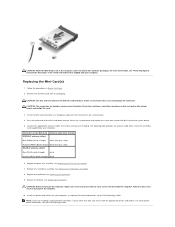
...CAUTION: Use firm and even pressure to slide the card into the slot on the system board and replace the screw that secures the Mini-Card to the computer. 10. Replace the palm rest assembly (see Replacing the Hard-Drive Assembly). 8. Replace the hard-drive assembly ...utilities. CAUTION: Before turning on the system board, and realign the card. 3. For more generic driver information, see the Dell Technology Guide. CAUTION: The connectors are installing. Press the other than Dell, you feel resistance, check the connectors on the card and on the computer, replace all screws ...
...CAUTION: Use firm and even pressure to slide the card into the slot on the system board and replace the screw that secures the Mini-Card to the computer. 10. Replace the palm rest assembly (see Replacing the Hard-Drive Assembly). 8. Replace the hard-drive assembly ...utilities. CAUTION: Before turning on the system board, and realign the card. 3. For more generic driver information, see the Dell Technology Guide. CAUTION: The connectors are installing. Press the other than Dell, you feel resistance, check the connectors on the card and on the computer, replace all screws ...

Service Manual
Page 56
... ensure that no stray screws remain inside the computer. NOTE: If you may result in damage to the computer. 9. For more information, see the Dell Technology Guide. Back to Contents Page Insert the video accelerator card connector at a 45-degree angle into place. Replace the keyboard (see Replacing the Palm...even pressure to slide the card into the connector on the system board. 4. Replace the palm rest assembly (see Replacing the Keyboard). 8. For more generic driver information, see the Dell Technology Guide. Install the drivers and utilities for your computer, as required.
... ensure that no stray screws remain inside the computer. NOTE: If you may result in damage to the computer. 9. For more information, see the Dell Technology Guide. Back to Contents Page Insert the video accelerator card connector at a 45-degree angle into place. Replace the keyboard (see Replacing the Palm...even pressure to slide the card into the connector on the system board. 4. Replace the palm rest assembly (see Replacing the Keyboard). 8. For more generic driver information, see the Dell Technology Guide. Install the drivers and utilities for your computer, as required.

Setup Guide
Page 11
... and you will take some time to reinstall the operating system. Setting Up Your Inspiron Laptop Set Up the Operating System Your Dell computer is preconfigured with the operating system you selected at support.dell.com. NOTE: For optimal performance of purchase. Ubuntu® To set up an... Internet connection. Doing so may take you download and install the latest BIOS and drivers for your computer available at the time of your ...
... and you will take some time to reinstall the operating system. Setting Up Your Inspiron Laptop Set Up the Operating System Your Dell computer is preconfigured with the operating system you selected at support.dell.com. NOTE: For optimal performance of purchase. Ubuntu® To set up an... Internet connection. Doing so may take you download and install the latest BIOS and drivers for your computer available at the time of your ...
Setup Guide
Page 44
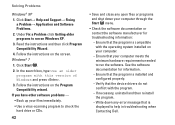
...the program. --Write down any open files or programs and shut down your computer. --Ensure that is installed and configured properly. --Verify that the device drivers do not conflict with this version of Windows and press . 3. If you have other software problems - • Back up your files immediately. •... the software documentation or contact the software manufacturer for information. --Ensure that the program is displayed to help in troubleshooting when Contacting Dell. Click Start→ Help and Support→ Fixing a Problem→ Application and Software Problems. 2.
...the program. --Write down any open files or programs and shut down your computer. --Ensure that is installed and configured properly. --Verify that the device drivers do not conflict with this version of Windows and press . 3. If you have other software problems - • Back up your files immediately. •... the software documentation or contact the software manufacturer for information. --Ensure that the program is displayed to help in troubleshooting when Contacting Dell. Click Start→ Help and Support→ Fixing a Problem→ Application and Software Problems. 2.
Setup Guide
Page 48
... connected to an electrical outlet that you want to enter the System Setup (BIOS) utility. Select Diagnostics from the Drivers and Utilities disc. NOTE: The Drivers and Utilities disc is active. When the DELL™ logo appears, press immediately. This may not ship with your computer, perform the checks in the system setup...
... connected to an electrical outlet that you want to enter the System Setup (BIOS) utility. Select Diagnostics from the Drivers and Utilities disc. NOTE: The Drivers and Utilities disc is active. When the DELL™ logo appears, press immediately. This may not ship with your computer, perform the checks in the system setup...

Setup Guide
Page 49
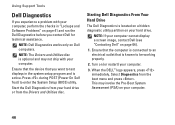
The PSA will take about 30 minutes or more. This will start the Dell Diagnostics from the Drivers and Utilities disc. c. The following message is not invoked: Press any key to start running the tests. Select the test you want to continue? (Recommended)."... If PSA is displayed: "No problems have been found , run the Dell Diagnostics from the diagnostics utility partition on your screen. If you ...
The PSA will take about 30 minutes or more. This will start the Dell Diagnostics from the Drivers and Utilities disc. c. The following message is not invoked: Press any key to start running the tests. Select the test you want to continue? (Recommended)."... If PSA is displayed: "No problems have been found , run the Dell Diagnostics from the diagnostics utility partition on your screen. If you ...

Setup Guide
Page 50
.../DVD/CD-RW and press . 4. Select the test you identify your computer and try again. Starting Dell Diagnostics From the Drivers and Utilities Disc NOTE: Your computer does not have an internal optical drive. Insert the Drivers and Utilities disc. 2. then, shut down and restart the computer. Type 1 to start -up, the computer... the top of each test screen. Use an external optical drive or any external storage device for the procedures that appears and press . 5. When the DELL logo appears, press immediately. Using Support Tools NOTE: The Service Tag for one time only.
.../DVD/CD-RW and press . 4. Select the test you identify your computer and try again. Starting Dell Diagnostics From the Drivers and Utilities Disc NOTE: Your computer does not have an internal optical drive. Insert the Drivers and Utilities disc. 2. then, shut down and restart the computer. Type 1 to start -up, the computer... the top of each test screen. Use an external optical drive or any external storage device for the procedures that appears and press . 5. When the DELL logo appears, press immediately. Using Support Tools NOTE: The Service Tag for one time only.

Setup Guide
Page 51
... a problem during a test, a message with the error code and a description of each test screen. To exit the Dell Diagnostics and to the Choose An Option window. 9. If you contact Dell. 8. When the tests are complete, close the test screen to return to restart the computer, click Exit. 10. Using... Support Tools 49 Write down the error code and problem description and contact Dell (see "Contacting Dell" on your computer is displayed at the top of the problem will appear on page 64). NOTE: The Service Tag for your screen....
... a problem during a test, a message with the error code and a description of each test screen. To exit the Dell Diagnostics and to the Choose An Option window. 9. If you contact Dell. 8. When the tests are complete, close the test screen to return to restart the computer, click Exit. 10. Using... Support Tools 49 Write down the error code and problem description and contact Dell (see "Contacting Dell" on your computer is displayed at the top of the problem will appear on page 64). NOTE: The Service Tag for your screen....

Setup Guide
Page 54
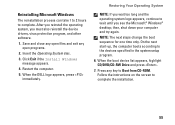
...Performing Dell Factory Image Restore 1. Restoring Your Operating System Dell Factory Image Restore CAUTION: Using Dell Factory Image Restore permanently deletes all data before using Dell Factory Image Restore. If possible, back up all data on the hard drive and removes any programs or drivers installed...Options window. Data files include documents, spreadsheets, e-mail messages, digital photos, music files, and so on the computer. When the Dell logo appears, press several times to restore your computer and try again. 2. The System Recovery Options window appears. 4. NOTE: ...
...Performing Dell Factory Image Restore 1. Restoring Your Operating System Dell Factory Image Restore CAUTION: Using Dell Factory Image Restore permanently deletes all data before using Dell Factory Image Restore. If possible, back up all data on the hard drive and removes any programs or drivers installed...Options window. Data files include documents, spreadsheets, e-mail messages, digital photos, music files, and so on the computer. When the Dell logo appears, press several times to restore your computer and try again. 2. The System Recovery Options window appears. 4. NOTE: ...

Setup Guide
Page 55
...The Confirm Data Deletion screen appears. To roll back a device driver: Windows XP 1. Click the Drivers tab→ Roll Back Driver. 53 Click Dell Factory Image Restore. Right-click the device for which the new driver is installed and click Properties. 5. Click Finish to factory ...operating system to proceed with a newly installed driver, first try using Windows Device Driver Rollback. A message appears when the operating system and factory-installed applications have been restored to reboot the computer. The Dell Factory Image Restore welcome screen appears. Click ...
...The Confirm Data Deletion screen appears. To roll back a device driver: Windows XP 1. Click the Drivers tab→ Roll Back Driver. 53 Click Dell Factory Image Restore. Right-click the device for which the new driver is installed and click Properties. 5. Click Finish to factory ...operating system to proceed with a newly installed driver, first try using Windows Device Driver Rollback. A message appears when the operating system and factory-installed applications have been restored to reboot the computer. The Dell Factory Image Restore welcome screen appears. Click ...

Setup Guide
Page 56
...Device Manager. 4. Right-click the device for the procedures that involve discs. • Dell Operating System disc • Dell Drivers and Utilities disc NOTE: The Drivers and Utilities disc contains drivers that were installed during the assembly of the computer. See "System Restore" on your ...to the operating state it was in before you installed the new device driver. For conventional hard drive configurations, the primary hard drive is installed, and click Properties. 5. Use the Dell Drivers and Utilities disc to return your primary hard drive. To reinstall Windows...
...Device Manager. 4. Right-click the device for the procedures that involve discs. • Dell Operating System disc • Dell Drivers and Utilities disc NOTE: The Drivers and Utilities disc contains drivers that were installed during the assembly of the computer. See "System Restore" on your ...to the operating state it was in before you installed the new device driver. For conventional hard drive configurations, the primary hard drive is installed, and click Properties. 5. Use the Dell Drivers and Utilities disc to return your primary hard drive. To reinstall Windows...
Setup Guide
Page 57
When the DELL logo appears, press immediately. then, shut down your computer and try again. On the next start-up, the computer boots according to complete the installation. ... Your Operating System NOTE: If you wait too long and the operating system logo appears, continue to wait until you must also reinstall the device drivers, virus protection program, and other software. 1. Save and close any open programs. 2. After you reinstall the operating system, you see the Microsoft® Windows®...
When the DELL logo appears, press immediately. then, shut down your computer and try again. On the next start-up, the computer boots according to complete the installation. ... Your Operating System NOTE: If you wait too long and the operating system logo appears, continue to wait until you must also reinstall the device drivers, virus protection program, and other software. 1. Save and close any open programs. 2. After you reinstall the operating system, you see the Microsoft® Windows®...

Setup Guide
Page 68
run a diagnostic program for your computer, reinstall notebook system software, or update drivers for your computer, and readme files learn more about your operating system, maintaining peripherals, Internet, Bluetooth®, networking, and e-mail upgrade your ...NOTE: Drivers and documentation updates can be found at support.dell.com the Dell Technology Guide available on your hard drive or at support.dell.com/manuals the Service Manual at support.dell.com/manuals NOTE: In some countries, opening and replacing parts of your computer may void your operating system. INSPIRON Finding More...
run a diagnostic program for your computer, reinstall notebook system software, or update drivers for your computer, and readme files learn more about your operating system, maintaining peripherals, Internet, Bluetooth®, networking, and e-mail upgrade your ...NOTE: Drivers and documentation updates can be found at support.dell.com the Dell Technology Guide available on your hard drive or at support.dell.com/manuals the Service Manual at support.dell.com/manuals NOTE: In some countries, opening and replacing parts of your computer may void your operating system. INSPIRON Finding More...

Setup Guide
Page 69
You must use the service tag to identify your computer on support.dell.com or to contact technical support find drivers and downloads access technical support and product help check on your order status for new purchases find solutions and answers to common ...questions locate information for last-minute updates about technical changes to : find your computer the Dell Support Center. To launch the Dell Support Center, ...
You must use the service tag to identify your computer on support.dell.com or to contact technical support find drivers and downloads access technical support and product help check on your order status for new purchases find solutions and answers to common ...questions locate information for last-minute updates about technical changes to : find your computer the Dell Support Center. To launch the Dell Support Center, ...
Setup Guide
Page 70
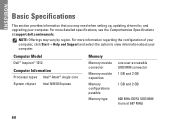
... computer, click Start→ Help and Support and select the option to view information about your computer. Computer Model Dell™ Inspiron™ 1012 Computer Information Processor types Intel® Atom™ single core System chipset Intel NM10 Express Memory Memory module connector Memory... connector 1 GB and 2 GB 1 GB and 2 GB 800 MHz DDR2 SODIMM (runs at support.dell.com/manuals. INSPIRON Basic Specifications This section provides information that you may vary by region. NOTE: Offerings may need when setting up, updating drivers for, and upgrading your computer.
... computer, click Start→ Help and Support and select the option to view information about your computer. Computer Model Dell™ Inspiron™ 1012 Computer Information Processor types Intel® Atom™ single core System chipset Intel NM10 Express Memory Memory module connector Memory... connector 1 GB and 2 GB 1 GB and 2 GB 800 MHz DDR2 SODIMM (runs at support.dell.com/manuals. INSPIRON Basic Specifications This section provides information that you may vary by region. NOTE: Offerings may need when setting up, updating drivers for, and upgrading your computer.

Setup Guide
Page 78
Index Diagnostic Checklist 63 drivers and downloads 67 DVDs, playing and creating 32 E email addresses for technical support 58 energy conserving 33 F finding more information 66 FTP login, anonymous 58 H hardware problems diagnosing 45 76 Hardware Troubleshooter 45 help getting assistance and support 56 I Internet connection 14 ISP Internet Service Provider 14 M memory problems solving 40 N network connection fixing 38
Index Diagnostic Checklist 63 drivers and downloads 67 DVDs, playing and creating 32 E email addresses for technical support 58 energy conserving 33 F finding more information 66 FTP login, anonymous 58 H hardware problems diagnosing 45 76 Hardware Troubleshooter 45 help getting assistance and support 56 I Internet connection 14 ISP Internet Service Provider 14 M memory problems solving 40 N network connection fixing 38


