Setup Guide
Page 43
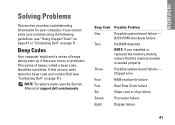
... Support Tools" on page 47 or "Contacting Dell" on page 71). INSPIRON Solving Problems This section provides troubleshooting information for your problem using the following guidelines, see the Service Manual at support.dell.com/manuals. If you installed or replaced the memory module, ensure that the memory module... No RAM detected NOTE: If you cannot solve your computer. If this occurs, write down the beep code and contact Dell (see "Contacting Dell" on page 71. Three Possible system board failure - Chipset error Four RAM read/write failure Five Real Time Clock failure...
... Support Tools" on page 47 or "Contacting Dell" on page 71). INSPIRON Solving Problems This section provides troubleshooting information for your problem using the following guidelines, see the Service Manual at support.dell.com/manuals. If you installed or replaced the memory module, ensure that the memory module... No RAM detected NOTE: If you cannot solve your computer. If this occurs, write down the beep code and contact Dell (see "Contacting Dell" on page 71. Three Possible system board failure - Chipset error Four RAM read/write failure Five Real Time Clock failure...

Service Guide
Page 2
... performing the removal procedure in your own personal safety. l A component can be replaced or-if purchased separately-installed by its metal mounting bracket. Recommended Tools The procedures ... by Dell™ is turned off . CAUTION: To avoid electrostatic discharge, ground yourself by using a wrist grounding strap or by periodically touching an unpainted metal surface (such as a processor by ...apart, keep them evenly aligned to Contents Page Before You Begin Dell™ Inspiron™ N5020/M5030/N5030 Service Manual Recommended Tools Turning Off Your Computer Before Working Inside...
... performing the removal procedure in your own personal safety. l A component can be replaced or-if purchased separately-installed by its metal mounting bracket. Recommended Tools The procedures ... by Dell™ is turned off . CAUTION: To avoid electrostatic discharge, ground yourself by using a wrist grounding strap or by periodically touching an unpainted metal surface (such as a processor by ...apart, keep them evenly aligned to Contents Page Before You Begin Dell™ Inspiron™ N5020/M5030/N5030 Service Manual Recommended Tools Turning Off Your Computer Before Working Inside...

Service Guide
Page 10
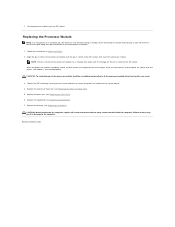
... cam screw 2 pin-1 corner CAUTION: To ensure maximum cooling for the processor, do not touch the heat transfer areas on the processor thermal-cooling assembly. Back to Contents Page Processor Module Dell™ Inspiron™ N5020/M5030/N5030 Service Manual Removing the Processor Module Replacing the Processor Module WARNING: Before working inside your warranty. Remove the battery (see Removing...
... cam screw 2 pin-1 corner CAUTION: To ensure maximum cooling for the processor, do not touch the heat transfer areas on the processor thermal-cooling assembly. Back to Contents Page Processor Module Dell™ Inspiron™ N5020/M5030/N5030 Service Manual Removing the Processor Module Replacing the Processor Module WARNING: Before working inside your warranty. Remove the battery (see Removing...
Service Guide
Page 11
... computer. Tighten the ZIF socket by turning the cam screw clockwise to secure the processor module to Contents Page Replace the keyboard (see Replacing the Processor Heat Sink). 5. Align the pin-1 corner of the ZIF socket. Replace the processor heat sink (see Replacing the Keyboard). 7. Back to the system board. 4. CAUTION: Before turning on the pin-1 corner...
... computer. Tighten the ZIF socket by turning the cam screw clockwise to secure the processor module to Contents Page Replace the keyboard (see Replacing the Processor Heat Sink). 5. Align the pin-1 corner of the ZIF socket. Replace the processor heat sink (see Replacing the Keyboard). 7. Back to the system board. 4. CAUTION: Before turning on the pin-1 corner...
Service Guide
Page 12
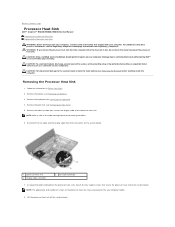
...on the system board. 1 processor heat sink 3 display cable connector 2 fan cable connector 7. Removing the Processor Heat Sink 1. Back to Contents Page Processor Heat Sink Dell™ Inspiron™ N5020/M5030/N5030 Service Manual Removing the Processor Heat Sink Replacing the Processor Heat Sink WARNING: Before working ...grounding strap or by periodically touching an unpainted metal surface (such as a connector on the processor heat sink), loosen the four captive screws that secure the processor heat sink to the system board, remove the main battery (see Removing the Battery) ...
...on the system board. 1 processor heat sink 3 display cable connector 2 fan cable connector 7. Removing the Processor Heat Sink 1. Back to Contents Page Processor Heat Sink Dell™ Inspiron™ N5020/M5030/N5030 Service Manual Removing the Processor Heat Sink Replacing the Processor Heat Sink WARNING: Before working ...grounding strap or by periodically touching an unpainted metal surface (such as a connector on the processor heat sink), loosen the four captive screws that secure the processor heat sink to the system board, remove the main battery (see Removing the Battery) ...
Service Guide
Page 13
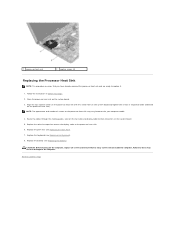
... appearance and number of screws on the processor heat sink may result in damage to replace it. 1. Replace the battery (see Replacing the Battery). Align the four captive screws on the processor heat sink with the screw holes on the processor heat sink). Replace the adhesive tape that you have already... removed the processor heat sink and are ready ...
... appearance and number of screws on the processor heat sink may result in damage to replace it. 1. Replace the battery (see Replacing the Battery). Align the four captive screws on the processor heat sink with the screw holes on the processor heat sink). Replace the adhesive tape that you have already... removed the processor heat sink and are ready ...
Service Guide
Page 39
...the safety information that shipped with your computer. Remove memory module(s) (see Removing the Processor Heat Sink). 11. Remove the processor heat sink (see Removing the Memory Module(s)). 6. Remove the processor module (see Removing the Wireless Mini-Card). 9. Press and eject any installed cards ...the computer. Remove the optical drive (see Removing the Optical Drive). 8. Back to Contents Page System Board Dell™ Inspiron™ N5020/M5030/N5030 Service Manual Removing the System Board Replacing the System Board Entering the Service Tag in Before You Begin. 2.
...the safety information that shipped with your computer. Remove memory module(s) (see Removing the Processor Heat Sink). 11. Remove the processor heat sink (see Removing the Memory Module(s)). 6. Remove the processor module (see Removing the Wireless Mini-Card). 9. Press and eject any installed cards ...the computer. Remove the optical drive (see Removing the Optical Drive). 8. Back to Contents Page System Board Dell™ Inspiron™ N5020/M5030/N5030 Service Manual Removing the System Board Replacing the System Board Entering the Service Tag in Before You Begin. 2.

Service Guide
Page 40
Replace the processor heat sink (see Replacing the Wireless Mini-Card). 10. Replace the Mini-Card (see Replacing the Processor Heat Sink). 8. Replace the palm rest (see Replacing the Processor Module). 7. Failure to do so may result in Before You Begin. 2. Replace the two screws that you have replaced the system board, enter the computer Service Tag in the BIOS). Align the...
Replace the processor heat sink (see Replacing the Wireless Mini-Card). 10. Replace the Mini-Card (see Replacing the Processor Heat Sink). 8. Replace the palm rest (see Replacing the Processor Module). 7. Failure to do so may result in Before You Begin. 2. Replace the two screws that you have replaced the system board, enter the computer Service Tag in the BIOS). Align the...


