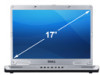
Owner's Manual
Page 4
... 33 4 Using the Keyboard and Touch Pad 35 Numeric Keypad 35 Key Combinations 36 System Functions 36 Display Functions 36 Power Management 36 Speaker Functions 36 Microsoft® Windows® Logo Key Functions 37 QuickSet Key Combinations 37 Adjusting Keyboard Settings ...37 Touch Pad 38 Customizing the Touch Pad 38 5 Using a Battery 39 Battery Performance 39 Checking the Battery Charge 40 Dell™ QuickSet Battery Meter 40 Microsoft® Windows® Power Meter 40 Charge Gauge 40 Low-Battery Warning 41 Conserving Battery Power 41 Power ...
... 33 4 Using the Keyboard and Touch Pad 35 Numeric Keypad 35 Key Combinations 36 System Functions 36 Display Functions 36 Power Management 36 Speaker Functions 36 Microsoft® Windows® Logo Key Functions 37 QuickSet Key Combinations 37 Adjusting Keyboard Settings ...37 Touch Pad 38 Customizing the Touch Pad 38 5 Using a Battery 39 Battery Performance 39 Checking the Battery Charge 40 Dell™ QuickSet Battery Meter 40 Microsoft® Windows® Power Meter 40 Charge Gauge 40 Low-Battery Warning 41 Conserving Battery Power 41 Power ...
Owner's Manual
Page 8
...Hardware Incompatibilities 102 Restoring Your Operating System 102 Using Microsoft Windows XP System Restore 103 Using Dell PC Restore by Symantec 104 Using the Operating System CD 106 11 Adding and Replacing Parts 109 Before You Begin 109 Recommended Tools 109 Turning Off Your Computer 109 Before ...Working Inside Your Computer 110 Optical Drive 111 Hard Drive 112 Returning a Hard Drive to Dell 114 Memory 114 Modem 117 Hinge Cover 118 Keyboard 119 Wireless Mini-Card 121 Coin-Cell Battery 124 Display 125 Internal Card With Bluetooth® Wireless Technology 127 12...
...Hardware Incompatibilities 102 Restoring Your Operating System 102 Using Microsoft Windows XP System Restore 103 Using Dell PC Restore by Symantec 104 Using the Operating System CD 106 11 Adding and Replacing Parts 109 Before You Begin 109 Recommended Tools 109 Turning Off Your Computer 109 Before ...Working Inside Your Computer 110 Optical Drive 111 Hard Drive 112 Returning a Hard Drive to Dell 114 Memory 114 Modem 117 Hinge Cover 118 Keyboard 119 Wireless Mini-Card 121 Coin-Cell Battery 124 Display 125 Internal Card With Bluetooth® Wireless Technology 127 12...

Owner's Manual
Page 39
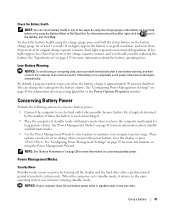
... battery during the life of fire or explosion. CAUTION: Using an incompatible battery may not be fully charged, use a battery from Dell. Replace the battery only with the battery installed at all times. NOTE: Because the battery may increase the risk of your computer. To...: • Using optical drives • Using wireless communications devices, ExpressCards, media memory cards, or USB devices • Using high-brightness display settings, 3D screen savers, or other computers with the AC adapter until the battery is low. You can hold a charge) decreases over time...
... battery during the life of fire or explosion. CAUTION: Using an incompatible battery may not be fully charged, use a battery from Dell. Replace the battery only with the battery installed at all times. NOTE: Because the battery may increase the risk of your computer. To...: • Using optical drives • Using wireless communications devices, ExpressCards, media memory cards, or USB devices • Using high-brightness display settings, 3D screen savers, or other computers with the AC adapter until the battery is low. You can hold a charge) decreases over time...
Owner's Manual
Page 41
...periods of time. Power Management Modes Standby Mode Standby mode conserves power by turning off the display and the hard drive after a low-battery warning, and then connect the computer to an ... or the Power Options Properties window. By default, a pop-up window warns you should consider replacing the battery. See "Power Management Modes" on page 41 for more information about standby and hibernate.... See "Specifications" on the battery as described below or by using the Battery Meter in Dell QuickSet. Low-Battery Warning NOTICE: To avoid losing or corrupting data, save your computer loses ...
...periods of time. Power Management Modes Standby Mode Standby mode conserves power by turning off the display and the hard drive after a low-battery warning, and then connect the computer to an ... or the Power Options Properties window. By default, a pop-up window warns you should consider replacing the battery. See "Power Management Modes" on page 41 for more information about standby and hibernate.... See "Specifications" on the battery as described below or by using the Battery Meter in Dell QuickSet. Low-Battery Warning NOTICE: To avoid losing or corrupting data, save your computer loses ...

Owner's Manual
Page 111
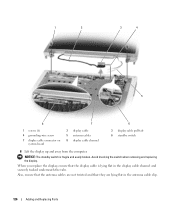
... any of the bay. See "Optical Drive" on page 111. 6 Press the power button to release the drive from the optical drive bay. Adding and Replacing Parts 111 1 2 1 battery-bay latch release 2 battery 5 Remove the optical drive, if installed, from the bay. 4 Slide the drive out of the procedures in this... section, follow the safety instructions in -1 media memory card reader (see "Removing a Media Memory Card" on page 68). 8 Close the display and turn the computer upside down on a flat work surface. 9 Remove the hard drive (see "Hard Drive" on page 112).
... any of the bay. See "Optical Drive" on page 111. 6 Press the power button to release the drive from the optical drive bay. Adding and Replacing Parts 111 1 2 1 battery-bay latch release 2 battery 5 Remove the optical drive, if installed, from the bay. 4 Slide the drive out of the procedures in this... section, follow the safety instructions in -1 media memory card reader (see "Removing a Media Memory Card" on page 68). 8 Close the display and turn the computer upside down on a flat work surface. 9 Remove the hard drive (see "Hard Drive" on page 112).

Owner's Manual
Page 119
NOTE: When replacing the hinge cover, first insert the left edge and then press from the battery bay before you begin working inside the computer. 1 Follow the procedures ... in this section, follow the safety instructions in "Before You Begin" on page 109. 2 Remove the hinge cover.: a Open the display all the way (180 degrees) so that it . Adding and Replacing Parts 119 NOTICE: To avoid damage to right until the cover snaps into the indent to lift the hinge cover...
NOTE: When replacing the hinge cover, first insert the left edge and then press from the battery bay before you begin working inside the computer. 1 Follow the procedures ... in this section, follow the safety instructions in "Before You Begin" on page 109. 2 Remove the hinge cover.: a Open the display all the way (180 degrees) so that it . Adding and Replacing Parts 119 NOTICE: To avoid damage to right until the cover snaps into the indent to lift the hinge cover...

Owner's Manual
Page 120
... The keycaps on page 109. 2 Open the display. 3 Remove the hinge cover. b Lift the keyboard only enough to hold it up and slightly forward to allow access to the front of the computer. 1 5 4 1 screws (2) 4 tabs 2 3 2 keyboard cable 5 keyboard 120 Adding and Replacing Parts 3 plastic bar on page 118. 4 ... inside the computer. 1 Follow the procedures in "Before You Begin" on the keyboard are fragile, easily dislodged, and time-consuming to replace. c To release the keyboard cable from the battery bay before you must remove the battery from the keyboard connector on the system board,...
... The keycaps on page 109. 2 Open the display. 3 Remove the hinge cover. b Lift the keyboard only enough to hold it up and slightly forward to allow access to the front of the computer. 1 5 4 1 screws (2) 4 tabs 2 3 2 keyboard cable 5 keyboard 120 Adding and Replacing Parts 3 plastic bar on page 118. 4 ... inside the computer. 1 Follow the procedures in "Before You Begin" on the keyboard are fragile, easily dislodged, and time-consuming to replace. c To release the keyboard cable from the battery bay before you must remove the battery from the keyboard connector on the system board,...

Owner's Manual
Page 125
... the Mini-Card. 5 Loosen the captive grounding-wire screw. 6 Disconnect the display cable, using a wrist grounding strap or by using the pull-tab. 7 Dislodge the display cable from the battery bay before you begin any of the computer). Adding and Replacing Parts 125 NOTICE: To avoid electrostatic discharge, ground yourself by periodically touching...
... the Mini-Card. 5 Loosen the captive grounding-wire screw. 6 Disconnect the display cable, using a wrist grounding strap or by using the pull-tab. 7 Dislodge the display cable from the battery bay before you begin any of the computer). Adding and Replacing Parts 125 NOTICE: To avoid electrostatic discharge, ground yourself by periodically touching...
Owner's Manual
Page 126
... easily broken. Avoid knocking the switch when removing and replacing the display. When you replace the display, ensure that they are lying flat in the display cable channel and securely tucked underneath the tabs. 1 2 3 4 5 8 7 6 1 screws (6) 4 grounding-wire screw 7 display cable connector on system board 2 display cable 5 antenna cables 8 display cable channel 3 display cable pull-tab 6 standby switch 8 Lift the...
... easily broken. Avoid knocking the switch when removing and replacing the display. When you replace the display, ensure that they are lying flat in the display cable channel and securely tucked underneath the tabs. 1 2 3 4 5 8 7 6 1 screws (6) 4 grounding-wire screw 7 display cable connector on system board 2 display cable 5 antenna cables 8 display cable channel 3 display cable pull-tab 6 standby switch 8 Lift the...

Owner's Manual
Page 131
... and remove any extraneous items, such as paper clips, pens, and paper, from the keyboard and palm rest and close the display. • Use the optional Dell™ carrying case to pack the computer and its accessories together safely. • Avoid packing the computer with items such as ... you . • Shut down your car or in an overhead storage compartment. Place information such as possible, replace any devices installed in the module bay with you plan to carry with the Dell TravelLite™ module. • Fully charge the main battery and any external devices attached to...
... and remove any extraneous items, such as paper clips, pens, and paper, from the keyboard and palm rest and close the display. • Use the optional Dell™ carrying case to pack the computer and its accessories together safely. • Avoid packing the computer with items such as ... you . • Shut down your car or in an overhead storage compartment. Place information such as possible, replace any devices installed in the module bay with you plan to carry with the Dell TravelLite™ module. • Fully charge the main battery and any external devices attached to...
Owner's Manual
Page 182
...129 adjusting the size of toolbars, 129 description, 16-17 removing, 125 resolution, 33 switching the video image, 33 display latch, 19 display. Dell MediaDirect about , 101 Dell Diagnostics, 79 drives problems, 83 See also hard drive See also optical drive DVD drive problems, 83 DVDs, 46 playing... Wizard, 26 floppy drive connecting to a USB connector, 22 H hard drive description, 21, 24 problems, 84 replacing, 112 returning to Dell, 114 hardware conflicts, 102 Dell Diagnostics, 79 Hardware Troubleshooter, 102 Help and Support Center, 13 help file Windows Help and Support Center, 13 hibernate...
...129 adjusting the size of toolbars, 129 description, 16-17 removing, 125 resolution, 33 switching the video image, 33 display latch, 19 display. Dell MediaDirect about , 101 Dell Diagnostics, 79 drives problems, 83 See also hard drive See also optical drive DVD drive problems, 83 DVDs, 46 playing... Wizard, 26 floppy drive connecting to a USB connector, 22 H hard drive description, 21, 24 problems, 84 replacing, 112 returning to Dell, 114 hardware conflicts, 102 Dell Diagnostics, 79 Hardware Troubleshooter, 102 Help and Support Center, 13 help file Windows Help and Support Center, 13 hibernate...


