Inspiron 17 5000 Service Manual
Page 4
Replacing the battery 28 Procedure 28 Post-requisites 28 Removing the hard drive 29 Prerequisites 29 Procedure 29 Replacing the hard drive 32 Procedure 32 Post-requisites 32 Removing the memory modules 33 Prerequisites 33 Procedure 33 Replacing the memory modules 35 Procedure 35 Post-requisites 37 Removing the wireless card 38 Prerequisites 38 Procedure 38 Replacing the wireless card 40 Procedure 40 Post-requisites 42 Removing the coin-cell battery 43 Prerequisites 43 Procedure 43 4
Replacing the battery 28 Procedure 28 Post-requisites 28 Removing the hard drive 29 Prerequisites 29 Procedure 29 Replacing the hard drive 32 Procedure 32 Post-requisites 32 Removing the memory modules 33 Prerequisites 33 Procedure 33 Replacing the memory modules 35 Procedure 35 Post-requisites 37 Removing the wireless card 38 Prerequisites 38 Procedure 38 Replacing the wireless card 40 Procedure 40 Post-requisites 42 Removing the coin-cell battery 43 Prerequisites 43 Procedure 43 4
Inspiron 17 5000 Service Manual
Page 32
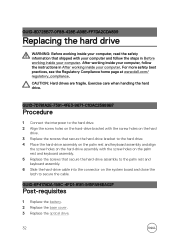
... practices, see the Regulatory Compliance home page at www.dell.com/ regulatory_compliance. GUID-7D781A2E-7391-4FE3-9671-C1DAC25889B7 Procedure 1 Connect the interposer to the hard drive. 2 Align the screw holes on the hard-drive bracket with the screw holes on the hard drive. 3 Replace the screws that secure the hard-drive assembly to the palm rest and keyboard assembly. 6 Slide...
... practices, see the Regulatory Compliance home page at www.dell.com/ regulatory_compliance. GUID-7D781A2E-7391-4FE3-9671-C1DAC25889B7 Procedure 1 Connect the interposer to the hard drive. 2 Align the screw holes on the hard-drive bracket with the screw holes on the hard drive. 3 Replace the screws that secure the hard-drive assembly to the palm rest and keyboard assembly. 6 Slide...
Inspiron 17 5000 Service Manual
Page 49
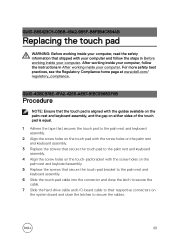
For more safety best practices, see the Regulatory Compliance home page at www.dell.com/ regulatory_compliance. After working inside your computer, follow the steps in After working inside your computer. GUID-4DBC978E-4FA2-4265-AE67-91EC5568DF0B Procedure NOTE: ...46A2-9B5F-B8F3B4C854AB Replacing the touch pad WARNING: Before working inside your computer, read the safety information that secure the touch-pad bracket to the palm rest and keyboard assembly. 6 Slide the touch-pad cable into the connector and close the latch to secure the cable. 7 Slide the hard-drive cable and I/O-board...
For more safety best practices, see the Regulatory Compliance home page at www.dell.com/ regulatory_compliance. After working inside your computer, follow the steps in After working inside your computer. GUID-4DBC978E-4FA2-4265-AE67-91EC5568DF0B Procedure NOTE: ...46A2-9B5F-B8F3B4C854AB Replacing the touch pad WARNING: Before working inside your computer, read the safety information that secure the touch-pad bracket to the palm rest and keyboard assembly. 6 Slide the touch-pad cable into the connector and close the latch to secure the cable. 7 Slide the hard-drive cable and I/O-board...
Inspiron 17 5000 Service Manual
Page 56
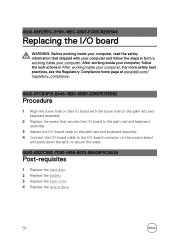
GUID-98F27B1C-9F09-48EC-83D7-FC85C825E6A4 Replacing the I /O-board connector on the system board and press down the latch to the I /O board WARNING: Before working inside your computer, read the safety ...board cable to secure the cable. GUID-B1D7C98D-7D90-481B-8EF3-9BA08F5CBA26 Post-requisites 1 Replace the hard drive. 2 Replace the battery. 3 Replace the base cover. 4 Replace the optical drive. 56 For more safety best practices, see the Regulatory Compliance home page at www.dell.com/ regulatory_compliance. After working inside your computer, follow the steps in After working inside...
GUID-98F27B1C-9F09-48EC-83D7-FC85C825E6A4 Replacing the I /O-board connector on the system board and press down the latch to the I /O board WARNING: Before working inside your computer, read the safety ...board cable to secure the cable. GUID-B1D7C98D-7D90-481B-8EF3-9BA08F5CBA26 Post-requisites 1 Replace the hard drive. 2 Replace the battery. 3 Replace the base cover. 4 Replace the optical drive. 56 For more safety best practices, see the Regulatory Compliance home page at www.dell.com/ regulatory_compliance. After working inside your computer, follow the steps in After working inside...
Inspiron 17 5000 Service Manual
Page 60
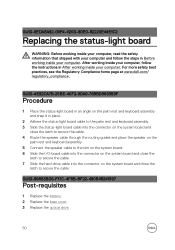
GUID-8EDA8A82-09F4-420D-8DE0-82220E44E1C2 Replacing the status-light board WARNING: Before working inside your computer, read the safety information that shipped with your computer and follow the instructions in After ... cable. 7 Slide the hard-drive cable into the connector on the system board and close the latch to secure the cable. GUID-89853BD6-F17C-4F8B-BF22-480B48241997 Post-requisites 1 Replace the battery. 2 Replace the base cover. 3 Replace the optical drive. 60 For more safety best practices, see the Regulatory Compliance home page at www.dell.com/ regulatory_compliance.
GUID-8EDA8A82-09F4-420D-8DE0-82220E44E1C2 Replacing the status-light board WARNING: Before working inside your computer, read the safety information that shipped with your computer and follow the instructions in After ... cable. 7 Slide the hard-drive cable into the connector on the system board and close the latch to secure the cable. GUID-89853BD6-F17C-4F8B-BF22-480B48241997 Post-requisites 1 Replace the battery. 2 Replace the base cover. 3 Replace the optical drive. 60 For more safety best practices, see the Regulatory Compliance home page at www.dell.com/ regulatory_compliance.
Inspiron 17 5000 Service Manual
Page 76
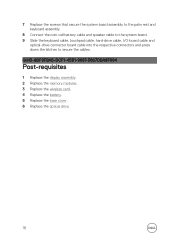
... assembly. 2 Replace the memory modules. 3 Replace the wireless card. 4 Replace the battery. 5 Replace the base cover. 6 Replace the optical drive. 76 7 Replace the screws that secure the system board assembly to the palm rest and keyboard assembly. 8 Connect the coin-cell battery cable and speaker cable to the system board. 9 Slide the keyboard cable, touchpad cable, hard-drive cable...
... assembly. 2 Replace the memory modules. 3 Replace the wireless card. 4 Replace the battery. 5 Replace the base cover. 6 Replace the optical drive. 76 7 Replace the screws that secure the system board assembly to the palm rest and keyboard assembly. 8 Connect the coin-cell battery cable and speaker cable to the system board. 9 Slide the keyboard cable, touchpad cable, hard-drive cable...
Inspiron 17 5000 Service Manual
Page 88
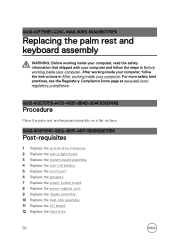
...-AD11-1B0D822E51D0 Post-requisites 1 Replace the optical-drive interposer. 2 Replace the status-light board. 3 Replace the system-board assembly. 4 Replace the coin-cell battery. 5 Replace the touch pad. 6 Replace the speakers. 7 Replace the power-button board. 8 Replace the power-adapter port. 9 Replace the display assembly. 10 Replace the heat-sink assembly. 11 Replace the I/O board. 12 Replace the hard drive. 88 GUID-A7F798E1-C24C-44A0...
...-AD11-1B0D822E51D0 Post-requisites 1 Replace the optical-drive interposer. 2 Replace the status-light board. 3 Replace the system-board assembly. 4 Replace the coin-cell battery. 5 Replace the touch pad. 6 Replace the speakers. 7 Replace the power-button board. 8 Replace the power-adapter port. 9 Replace the display assembly. 10 Replace the heat-sink assembly. 11 Replace the I/O board. 12 Replace the hard drive. 88 GUID-A7F798E1-C24C-44A0...


