
Inspiron 17 5000 Service Manual
Page 7
Replacing the heat-sink assembly 79 Procedure 79 Post-requisites 79 Removing the power-button board 80 Prerequisites 80 Procedure 80 Replacing the power-button board 82 Procedure 82 Post-requisites 82 Removing the power-adapter port 83 Prerequisites 83 Procedure 83 Replacing the power-adapter port 85 Procedure 85 Post-requisites 85 Removing the palm rest and keyboard assembly.......... 86 Prerequisites 86 Procedure 87 Replacing the palm rest and keyboard assembly.......... 88 Procedure 88 Post-requisites 88 Removing the display bezel 90 Prerequisites 90 Procedure 90 7
Replacing the heat-sink assembly 79 Procedure 79 Post-requisites 79 Removing the power-button board 80 Prerequisites 80 Procedure 80 Replacing the power-button board 82 Procedure 82 Post-requisites 82 Removing the power-adapter port 83 Prerequisites 83 Procedure 83 Replacing the power-adapter port 85 Procedure 85 Post-requisites 85 Removing the palm rest and keyboard assembly.......... 86 Prerequisites 86 Procedure 87 Replacing the palm rest and keyboard assembly.......... 88 Procedure 88 Post-requisites 88 Removing the display bezel 90 Prerequisites 90 Procedure 90 7

Inspiron 17 5000 Service Manual
Page 24
GUID-5A0A3E0A-720F-48B5-BD03-76DB5B250255 Procedure CAUTION: To avoid accidental damage to the power-adapter port, do not press the base cover against the power-adapter port when you snap the base cover to the computer base. 1 Place the base cover on the palm rest and keyboard assembly, and snap the base cover into place starting from the power-adapter port. 1 base cover 2 power-adapter port 2 Replace the screws that secure the base cover to the palm rest and keyboard assembly. 24
GUID-5A0A3E0A-720F-48B5-BD03-76DB5B250255 Procedure CAUTION: To avoid accidental damage to the power-adapter port, do not press the base cover against the power-adapter port when you snap the base cover to the computer base. 1 Place the base cover on the palm rest and keyboard assembly, and snap the base cover into place starting from the power-adapter port. 1 base cover 2 power-adapter port 2 Replace the screws that secure the base cover to the palm rest and keyboard assembly. 24
Inspiron 17 5000 Service Manual
Page 28
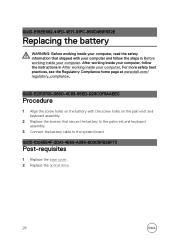
...-E2313708-D89D-4C83-85ED-D29C0F5AAEEC Procedure 1 Align the screw holes on the palm rest and keyboard assembly. 2 Replace the screws that secure the battery to the palm rest and keyboard assembly. 3 Connect the battery cable to the system board. GUID-1D065E4F-2DA1-4E69-A085-BD905FB2BF73... Post-requisites 1 Replace the base cover. 2 Replace the optical drive. 28 For more safety best practices, see the Regulatory Compliance home page at www.dell.com/ regulatory_compliance....
...-E2313708-D89D-4C83-85ED-D29C0F5AAEEC Procedure 1 Align the screw holes on the palm rest and keyboard assembly. 2 Replace the screws that secure the battery to the palm rest and keyboard assembly. 3 Connect the battery cable to the system board. GUID-1D065E4F-2DA1-4E69-A085-BD905FB2BF73... Post-requisites 1 Replace the base cover. 2 Replace the optical drive. 28 For more safety best practices, see the Regulatory Compliance home page at www.dell.com/ regulatory_compliance....
Inspiron 17 5000 Service Manual
Page 32
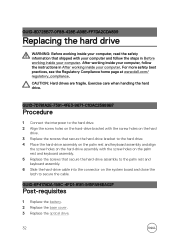
...the screw holes on the hard-drive bracket with the screw holes on the palm rest and keyboard assembly. 5 Replace the screws that shipped with the screw holes on the hard drive. 3 Replace the screws that secure the hard-drive bracket to secure the cable. For more safety best ...practices, see the Regulatory Compliance home page at www.dell.com/ regulatory_compliance. Exercise care when handling the hard drive. GUID-8D72BB77-0F8B-428E-A98E-FF7DA2CDA899 Replacing the hard drive WARNING: Before working inside your computer, read the safety information that ...
...the screw holes on the hard-drive bracket with the screw holes on the palm rest and keyboard assembly. 5 Replace the screws that shipped with the screw holes on the hard drive. 3 Replace the screws that secure the hard-drive bracket to secure the cable. For more safety best ...practices, see the Regulatory Compliance home page at www.dell.com/ regulatory_compliance. Exercise care when handling the hard drive. GUID-8D72BB77-0F8B-428E-A98E-FF7DA2CDA899 Replacing the hard drive WARNING: Before working inside your computer, read the safety information that ...
Inspiron 17 5000 Service Manual
Page 45
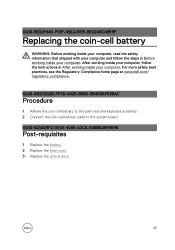
...Compliance home page at www.dell.com/ regulatory_compliance. GUID-82A605F2-0000-4068-A2CA-306BEA949646 Post-requisites 1 Replace the battery. 2 Replace the base cover. 3 Replace the optical drive. 45 GUID-5E22F4A0-F01F-4522-8155-BE22A8CA6E5F Replacing the coin-cell battery ...WARNING: Before working inside your computer, read the safety information that shipped with your computer and follow the instructions in Before working inside your computer. GUID-6B230D2B-FF0D-4425-B680-5B40D8F606AC Procedure 1 Adhere the coin-cell battery to the palm rest and keyboard...
...Compliance home page at www.dell.com/ regulatory_compliance. GUID-82A605F2-0000-4068-A2CA-306BEA949646 Post-requisites 1 Replace the battery. 2 Replace the base cover. 3 Replace the optical drive. 45 GUID-5E22F4A0-F01F-4522-8155-BE22A8CA6E5F Replacing the coin-cell battery ...WARNING: Before working inside your computer, read the safety information that shipped with your computer and follow the instructions in Before working inside your computer. GUID-6B230D2B-FF0D-4425-B680-5B40D8F606AC Procedure 1 Adhere the coin-cell battery to the palm rest and keyboard...
Inspiron 17 5000 Service Manual
Page 49
.... 4 Align the screw holes on the touch-pad bracket with the screw holes on the palm rest and keyboard assembly. 3 Replace the screws that secure the touch pad to secure the cables. 49 GUID-4DBC978E-4FA2-4265-AE67-91EC5568DF0B Procedure NOTE: Ensure that ...with the screw holes on the palm rest and keyboard assembly. 5 Replace the screws that shipped with your computer and follow the instructions in Before working inside your computer. For more safety best practices, see the Regulatory Compliance home page at www.dell.com/ regulatory_compliance. After working inside your computer, ...
.... 4 Align the screw holes on the touch-pad bracket with the screw holes on the palm rest and keyboard assembly. 3 Replace the screws that secure the touch pad to secure the cables. 49 GUID-4DBC978E-4FA2-4265-AE67-91EC5568DF0B Procedure NOTE: Ensure that ...with the screw holes on the palm rest and keyboard assembly. 5 Replace the screws that shipped with your computer and follow the instructions in Before working inside your computer. For more safety best practices, see the Regulatory Compliance home page at www.dell.com/ regulatory_compliance. After working inside your computer, ...
Inspiron 17 5000 Service Manual
Page 53
...working inside your computer. GUID-260703BA-0C4F-455B-85A4-5BEFE0E08DA6 Post-requisites 1 Replace the battery. 2 Replace the base cover. 3 Replace the optical drive. 53 GUID-40DC76F7-B3EC-450A-848E-632D68C352E2 Replacing the speakers WARNING: Before working inside your computer, read the safety information ...practices, see the Regulatory Compliance home page at www.dell.com/ regulatory_compliance. GUID-34C0FE2C-E9F6-4813-A295-FFEBD227ACFE Procedure 1 Using the alignment posts, align and place the speakers on the palm rest and keyboard assembly. 2 Route the speaker cable through the routing...
...working inside your computer. GUID-260703BA-0C4F-455B-85A4-5BEFE0E08DA6 Post-requisites 1 Replace the battery. 2 Replace the base cover. 3 Replace the optical drive. 53 GUID-40DC76F7-B3EC-450A-848E-632D68C352E2 Replacing the speakers WARNING: Before working inside your computer, read the safety information ...practices, see the Regulatory Compliance home page at www.dell.com/ regulatory_compliance. GUID-34C0FE2C-E9F6-4813-A295-FFEBD227ACFE Procedure 1 Using the alignment posts, align and place the speakers on the palm rest and keyboard assembly. 2 Route the speaker cable through the routing...
Inspiron 17 5000 Service Manual
Page 56
... Regulatory Compliance home page at www.dell.com/ regulatory_compliance. GUID-B1D7C98D-7D90-481B-8EF3-9BA08F5CBA26 Post-requisites 1 Replace the hard drive. 2 Replace the battery. 3 Replace the base cover. 4 Replace the optical drive. 56 GUID-98F27B1C-9F09-48EC-83D7-FC85C825E6A4 Replacing the I/O board WARNING: Before working...shipped with the screw hole on the palm rest and keyboard assembly. 2 Replace the screw that secures the I/O board to the palm rest and keyboard assembly. 3 Adhere the I/O-board cable to the palm rest and keyboard assembly. 4 Connect the I/O-board cable to the I/O-...
... Regulatory Compliance home page at www.dell.com/ regulatory_compliance. GUID-B1D7C98D-7D90-481B-8EF3-9BA08F5CBA26 Post-requisites 1 Replace the hard drive. 2 Replace the battery. 3 Replace the base cover. 4 Replace the optical drive. 56 GUID-98F27B1C-9F09-48EC-83D7-FC85C825E6A4 Replacing the I/O board WARNING: Before working...shipped with the screw hole on the palm rest and keyboard assembly. 2 Replace the screw that secures the I/O board to the palm rest and keyboard assembly. 3 Adhere the I/O-board cable to the palm rest and keyboard assembly. 4 Connect the I/O-board cable to the I/O-...
Inspiron 17 5000 Service Manual
Page 60
...-BF22-480B48241997 Post-requisites 1 Replace the battery. 2 Replace the base cover. 3 Replace the optical drive. 60 After working inside your computer, follow the steps in Before working inside your computer. For more safety best practices, see the Regulatory Compliance home page at www.dell.com/ regulatory_compliance. GUID-4E82CA7B-...the latch to secure the cable. 4 Route the speaker cable through the routing guides and place the speaker on the palm rest and keyboard assembly. 5 Connect the speaker cable to the slot on the system board. 6 Slide the I/O-board cable into the connector on ...
...-BF22-480B48241997 Post-requisites 1 Replace the battery. 2 Replace the base cover. 3 Replace the optical drive. 60 After working inside your computer, follow the steps in Before working inside your computer. For more safety best practices, see the Regulatory Compliance home page at www.dell.com/ regulatory_compliance. GUID-4E82CA7B-...the latch to secure the cable. 4 Route the speaker cable through the routing guides and place the speaker on the palm rest and keyboard assembly. 5 Connect the speaker cable to the slot on the system board. 6 Slide the I/O-board cable into the connector on ...
Inspiron 17 5000 Service Manual
Page 63
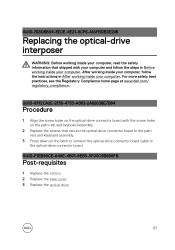
..., see the Regulatory Compliance home page at www.dell.com/ regulatory_compliance. GUID-F1EB99CE-84AE-4B01-9EB3-3F00C9B856FB Post-requisites 1 Replace the battery. 2 Replace the base cover. 3 Replace the optical drive. 63 GUID-7D3D6B04-3ECE-4E21-8CF6-A1AFBDE2E206 Replacing the optical-drive interposer WARNING: Before working inside...read the safety information that secure the optical-drive connector board to the palm rest and keyboard assembly. 3 Press down on the palm rest and keyboard assembly. 2 Replace the screws that shipped with the screw holes on the latch to connect the optical-drive...
..., see the Regulatory Compliance home page at www.dell.com/ regulatory_compliance. GUID-F1EB99CE-84AE-4B01-9EB3-3F00C9B856FB Post-requisites 1 Replace the battery. 2 Replace the base cover. 3 Replace the optical drive. 63 GUID-7D3D6B04-3ECE-4E21-8CF6-A1AFBDE2E206 Replacing the optical-drive interposer WARNING: Before working inside...read the safety information that secure the optical-drive connector board to the palm rest and keyboard assembly. 3 Press down on the palm rest and keyboard assembly. 2 Replace the screws that shipped with the screw holes on the latch to connect the optical-drive...
Inspiron 17 5000 Service Manual
Page 67
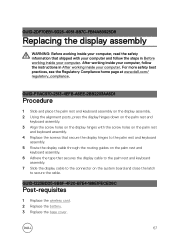
... Compliance home page at www.dell.com/ regulatory_compliance. GUID-2DF70EB1-9D26-4051-8B7C-FB14A89925D8 Replacing the display assembly WARNING: Before working inside your computer, read the safety information that shipped with the screw holes on the palm rest and keyboard assembly. 4 Replace the screws that secure the ...display hinges to the palm rest and keyboard assembly. 5 Route the display cable through the routing guides on the palm rest and...
... Compliance home page at www.dell.com/ regulatory_compliance. GUID-2DF70EB1-9D26-4051-8B7C-FB14A89925D8 Replacing the display assembly WARNING: Before working inside your computer, read the safety information that shipped with the screw holes on the palm rest and keyboard assembly. 4 Replace the screws that secure the ...display hinges to the palm rest and keyboard assembly. 5 Route the display cable through the routing guides on the palm rest and...
Inspiron 17 5000 Service Manual
Page 75
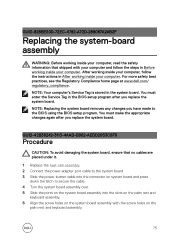
... inside your computer. NOTE: Your computer's Service Tag is stored in the system board. NOTE: Replacing the system board removes any changes you have made to secure the cable. 4 Turn the system...5 Slide the ports on the system board assembly into the slots on the palm rest and keyboard assembly. 6 Align the screw holes on the system board assembly with your computer and follow the...setup program. For more safety best practices, see the Regulatory Compliance home page at www.dell.com/ regulatory_compliance. GUID-42B39242-3113-4AAD-B862-AEDD2053C6F9 Procedure CAUTION: To avoid damaging the ...
... inside your computer. NOTE: Your computer's Service Tag is stored in the system board. NOTE: Replacing the system board removes any changes you have made to secure the cable. 4 Turn the system...5 Slide the ports on the system board assembly into the slots on the palm rest and keyboard assembly. 6 Align the screw holes on the system board assembly with your computer and follow the...setup program. For more safety best practices, see the Regulatory Compliance home page at www.dell.com/ regulatory_compliance. GUID-42B39242-3113-4AAD-B862-AEDD2053C6F9 Procedure CAUTION: To avoid damaging the ...
Inspiron 17 5000 Service Manual
Page 76
GUID-8BF9FBA6-DCF1-45B1-9687-5867DDA6F094 Post-requisites 1 Replace the display assembly. 2 Replace the memory modules. 3 Replace the wireless card. 4 Replace the battery. 5 Replace the base cover. 6 Replace the optical drive. 76 7 Replace the screws that secure the system board assembly to the palm rest and keyboard assembly. 8 Connect the coin-cell battery cable and speaker cable to the...
GUID-8BF9FBA6-DCF1-45B1-9687-5867DDA6F094 Post-requisites 1 Replace the display assembly. 2 Replace the memory modules. 3 Replace the wireless card. 4 Replace the battery. 5 Replace the base cover. 6 Replace the optical drive. 76 7 Replace the screws that secure the system board assembly to the palm rest and keyboard assembly. 8 Connect the coin-cell battery cable and speaker cable to the...
Inspiron 17 5000 Service Manual
Page 82
...at www.dell.com/ regulatory_compliance. GUID-6803E3C0-FDC7-47ED-BDC7-966ED45C5058 Post-requisites 1 Replace the display assembly. 2 Replace the battery. 3 Replace the base cover. 4 Replace the optical drive. 82 GUID-1DD2C01D-4283-4247-B489-4694A4F5C610 Procedure 1 Place the power-button board on the palm rest and keyboard assembly .... 2 Adhere the tape that secures the power-button board to the palm rest and keyboard assembly. 3 Replace the screw that secures the power-button board to the palm rest and keyboard assembly. 4 Slide the power-button cable to the power-button board and close the ...
...at www.dell.com/ regulatory_compliance. GUID-6803E3C0-FDC7-47ED-BDC7-966ED45C5058 Post-requisites 1 Replace the display assembly. 2 Replace the battery. 3 Replace the base cover. 4 Replace the optical drive. 82 GUID-1DD2C01D-4283-4247-B489-4694A4F5C610 Procedure 1 Place the power-button board on the palm rest and keyboard assembly .... 2 Adhere the tape that secures the power-button board to the palm rest and keyboard assembly. 3 Replace the screw that secures the power-button board to the palm rest and keyboard assembly. 4 Slide the power-button cable to the power-button board and close the ...
Inspiron 17 5000 Service Manual
Page 85
... Compliance home page at www.dell.com/ regulatory_compliance. GUID-A99140DB-7AF3-4218-B305-532FF94DF51D Replacing the power-adapter port WARNING: Before working inside your computer, read the safety information that secures the power-adapter port to the palm rest and keyboard assembly. 3 Route the power...-adapter-port cable through the routing guides on the palm rest and keyboard assembly. 2 Replace the screw that shipped with your computer and follow the instructions in Before...
... Compliance home page at www.dell.com/ regulatory_compliance. GUID-A99140DB-7AF3-4218-B305-532FF94DF51D Replacing the power-adapter port WARNING: Before working inside your computer, read the safety information that secures the power-adapter port to the palm rest and keyboard assembly. 3 Route the power...-adapter-port cable through the routing guides on the palm rest and keyboard assembly. 2 Replace the screw that shipped with your computer and follow the instructions in Before...
Inspiron 17 5000 Service Manual
Page 88
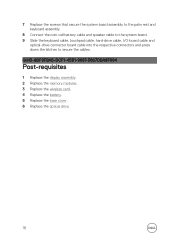
... more safety best practices, see the Regulatory Compliance home page at www.dell.com/ regulatory_compliance. After working inside your computer, follow the steps in After working inside your computer. GUID-A7F798E1-C24C-44A0-9D6E-60A24BC170F6 Replacing the palm rest and keyboard assembly WARNING: Before working inside your computer, read the safety information that...
... more safety best practices, see the Regulatory Compliance home page at www.dell.com/ regulatory_compliance. After working inside your computer, follow the steps in After working inside your computer. GUID-A7F798E1-C24C-44A0-9D6E-60A24BC170F6 Replacing the palm rest and keyboard assembly WARNING: Before working inside your computer, read the safety information that...


