
Owner's Manual
Page 3
... Tools 9 Safety Instructions 10 After Working Inside Your Computer 11 Removing the Battery 12 Procedure 12 Replacing the Battery 13 Procedure 13 Removing the Optical Drive 14 Prerequisites 14 Procedure 14 Replacing the Optical Drive 16 Procedure 16 Postrequisites 16 Removing the Keyboard 17 Prerequisites 17 Procedure 17 Replacing the Keyboard 19 Procedure 19 Postrequisites 19 Removing the Base Cover 20 Prerequisites 20 Procedure 20 Replacing the Base Cover 21 Procedure...
... Tools 9 Safety Instructions 10 After Working Inside Your Computer 11 Removing the Battery 12 Procedure 12 Replacing the Battery 13 Procedure 13 Removing the Optical Drive 14 Prerequisites 14 Procedure 14 Replacing the Optical Drive 16 Procedure 16 Postrequisites 16 Removing the Keyboard 17 Prerequisites 17 Procedure 17 Replacing the Keyboard 19 Procedure 19 Postrequisites 19 Removing the Base Cover 20 Prerequisites 20 Procedure 20 Replacing the Base Cover 21 Procedure...

Owner's Manual
Page 4
... Memory Module(s 23 Procedure 23 Postrequisites 23 Removing the Hard Drive 24 Prerequisites 24 Procedure 24 Replacing the Hard Drive 26 Procedure 26 Postrequisites 26 Removing the Coin-Cell Battery 27 Prerequisites 27 Procedure 27 Replacing the Coin-Cell Battery 28 Procedure 28 Postrequisites 28 Removing the Palm Rest 29 Prerequisites 29 Procedure 29 Replacing the Palm Rest 32 Procedure 32 Postrequisites 32 Removing the Wireless...
... Memory Module(s 23 Procedure 23 Postrequisites 23 Removing the Hard Drive 24 Prerequisites 24 Procedure 24 Replacing the Hard Drive 26 Procedure 26 Postrequisites 26 Removing the Coin-Cell Battery 27 Prerequisites 27 Procedure 27 Replacing the Coin-Cell Battery 28 Procedure 28 Postrequisites 28 Removing the Palm Rest 29 Prerequisites 29 Procedure 29 Replacing the Palm Rest 32 Procedure 32 Postrequisites 32 Removing the Wireless...
Owner's Manual
Page 7
Removing the Camera Module 65 Prerequisites 65 Procedure 66 Replacing the Camera Module 67 Procedure 67 Postrequisites 67 Removing the Power-Adapter Port 68 Prerequisites 68 Procedure 69 Replacing the Power-Adapter Port 70 Procedure 70 Postrequisites 70 Flashing the BIOS 71 Contents | 7
Removing the Camera Module 65 Prerequisites 65 Procedure 66 Replacing the Camera Module 67 Procedure 67 Postrequisites 67 Removing the Power-Adapter Port 68 Prerequisites 68 Procedure 69 Replacing the Power-Adapter Port 70 Procedure 70 Postrequisites 70 Flashing the BIOS 71 Contents | 7
Owner's Manual
Page 9
... click Settings→ Power→ Shut down. • Windows 7: Click Start → Shut down , disconnect it from your computer. 4 Disconnect all peripherals from the electrical outlet. 3 Disconnect all cables - NOTE: If you turn off your computer. 1 Save and close all open files, exit all open programs, and turn off your computer. • Windows 8: Point to open programs before you are using a different operating...
... click Settings→ Power→ Shut down. • Windows 7: Click Start → Shut down , disconnect it from your computer. 4 Disconnect all peripherals from the electrical outlet. 3 Disconnect all cables - NOTE: If you turn off your computer. 1 Save and close all open files, exit all open programs, and turn off your computer. • Windows 8: Point to open programs before you are using a different operating...

Owner's Manual
Page 10
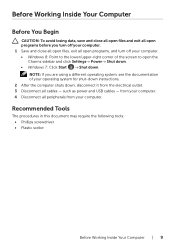
... that shipped with locking tabs or thumb-screws that you work surface is authorized to the power source. Safety Instructions Use the following safety guidelines to dissipate static electricity, which could harm internal components. WARNING: Disconnect all covers, panels, and screws before opening the computer cover or panels. CAUTION: Only a certified service technician is flat and clean. After you disconnect a cable, pull on...
... that shipped with locking tabs or thumb-screws that you work surface is authorized to the power source. Safety Instructions Use the following safety guidelines to dissipate static electricity, which could harm internal components. WARNING: Disconnect all covers, panels, and screws before opening the computer cover or panels. CAUTION: Only a certified service technician is flat and clean. After you disconnect a cable, pull on...
Owner's Manual
Page 22
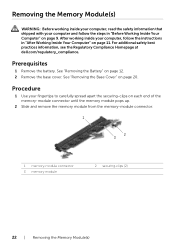
... (2) 22 | Removing the Memory Module(s) Prerequisites 1 Remove the battery. Removing the Memory Module(s) WARNING: Before working inside your computer, read the safety information that shipped with your computer and follow the instructions in "Before Working Inside Your Computer" on page 9. For additional safety best practices information, see the Regulatory Compliance Homepage at dell.com/regulatory_compliance. Procedure 1 Use your fingertips to carefully spread apart the...
... (2) 22 | Removing the Memory Module(s) Prerequisites 1 Remove the battery. Removing the Memory Module(s) WARNING: Before working inside your computer, read the safety information that shipped with your computer and follow the instructions in "Before Working Inside Your Computer" on page 9. For additional safety best practices information, see the Regulatory Compliance Homepage at dell.com/regulatory_compliance. Procedure 1 Use your fingertips to carefully spread apart the...

Owner's Manual
Page 23
... press the memory module down until it . Procedure 1 Align the notch on the memory module with your computer and follow the instructions in "Before Working Inside Your Computer" on page 9. Postrequisites 1 Replace the base cover. Replacing the Memory Module(s) WARNING: Before working inside your computer, read the safety information that shipped with the tab on the memory-module connector. 2 Slide the memory module firmly, at dell.com...
... press the memory module down until it . Procedure 1 Align the notch on the memory module with your computer and follow the instructions in "Before Working Inside Your Computer" on page 9. Postrequisites 1 Replace the base cover. Replacing the Memory Module(s) WARNING: Before working inside your computer, read the safety information that shipped with the tab on the memory-module connector. 2 Slide the memory module firmly, at dell.com...

Owner's Manual
Page 25
4 Remove the screws that secure the hard-drive bracket to the hard drive. 5 Using the pull-tab, lift the hard-drive bracket off the hard drive. 1 1 hard drive 3 hard-drive bracket 2 3 2 screws (4) Removing the Hard Drive | 25
4 Remove the screws that secure the hard-drive bracket to the hard drive. 5 Using the pull-tab, lift the hard-drive bracket off the hard drive. 1 1 hard drive 3 hard-drive bracket 2 3 2 screws (4) Removing the Hard Drive | 25
Owner's Manual
Page 27
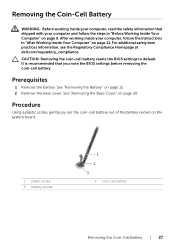
... Working Inside Your Computer" on the system board. 1 plastic scribe 3 battery socket 1 2 3 2 coin-cell battery Removing the Coin-Cell Battery | 27 Procedure Using a plastic scribe, gently pry out the coin-cell battery out of the battery socket on page 9. For additional safety best practices information, see the Regulatory Compliance Homepage at dell.com/regulatory_compliance. CAUTION: Removing the coin-cell battery resets the BIOS settings to default...
... Working Inside Your Computer" on the system board. 1 plastic scribe 3 battery socket 1 2 3 2 coin-cell battery Removing the Coin-Cell Battery | 27 Procedure Using a plastic scribe, gently pry out the coin-cell battery out of the battery socket on page 9. For additional safety best practices information, see the Regulatory Compliance Homepage at dell.com/regulatory_compliance. CAUTION: Removing the coin-cell battery resets the BIOS settings to default...
Owner's Manual
Page 33
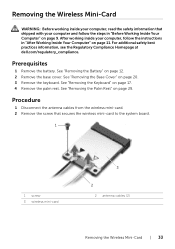
... screw that shipped with your computer and follow the instructions in "Before Working Inside Your Computer" on page 9. Prerequisites 1 Remove the battery. Removing the Wireless Mini-Card WARNING: Before working inside your computer, read the safety information that secures the wireless mini-card to the system board. 1 1 screw 3 wireless mini-card 3 2 2 antenna cables (2) Removing the Wireless Mini-Card | 33 See "Removing the Palm Rest" on page 20. 3 Remove the keyboard.
... screw that shipped with your computer and follow the instructions in "Before Working Inside Your Computer" on page 9. Prerequisites 1 Remove the battery. Removing the Wireless Mini-Card WARNING: Before working inside your computer, read the safety information that secures the wireless mini-card to the system board. 1 1 screw 3 wireless mini-card 3 2 2 antenna cables (2) Removing the Wireless Mini-Card | 33 See "Removing the Palm Rest" on page 20. 3 Remove the keyboard.
Owner's Manual
Page 35
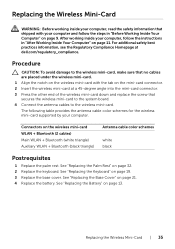
... wireless mini-card to the system board. 4 Connect the antenna cables to the wireless mini-card. See "Replacing the Palm Rest" on page 21. 4 Replace the battery. See "Replacing the Base Cover" on page 32. 2 Replace the keyboard. See "Replacing the Battery" on the mini-card connector. 2 Insert the wireless mini-card at dell.com/regulatory_compliance. Replacing the Wireless Mini-Card | 35 Procedure CAUTION: To avoid damage to the wireless mini-card, make sure that no cables...
... wireless mini-card to the system board. 4 Connect the antenna cables to the wireless mini-card. See "Replacing the Palm Rest" on page 21. 4 Replace the battery. See "Replacing the Base Cover" on page 32. 2 Replace the keyboard. See "Replacing the Battery" on the mini-card connector. 2 Insert the wireless mini-card at dell.com/regulatory_compliance. Replacing the Wireless Mini-Card | 35 Procedure CAUTION: To avoid damage to the wireless mini-card, make sure that no cables...
Owner's Manual
Page 36
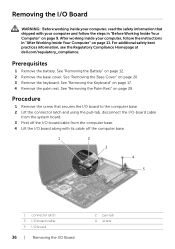
... "Removing the Keyboard" on page 20. 3 Remove the keyboard. Prerequisites 1 Remove the battery. After working inside your computer and follow the instructions in "Before Working Inside Your Computer" on page 11. Removing the I/O Board WARNING: Before working inside your computer, read the safety information that secures the I/O board to the computer base. 2 Lift the connector latch and using the pull-tab, disconnect the I/O-board cable from...
... "Removing the Keyboard" on page 20. 3 Remove the keyboard. Prerequisites 1 Remove the battery. After working inside your computer and follow the instructions in "Before Working Inside Your Computer" on page 11. Removing the I/O Board WARNING: Before working inside your computer, read the safety information that secures the I/O board to the computer base. 2 Lift the connector latch and using the pull-tab, disconnect the I/O-board cable from...
Owner's Manual
Page 38
... Drive" on page 14. 3 Remove the base cover. Removing the System Board WARNING: Before working inside your computer, read the safety information that you can reconnect them correctly after you replace the system board. Prerequisites 1 Remove the battery. See "Removing the Memory Module(s)" on page 17. 8 Remove the palm rest. See "Removing the Keyboard" on page 22. 5 Remove the coin-cell battery. See "Removing the Wireless Mini-Card" on page 20. 4 Remove the memory module...
... Drive" on page 14. 3 Remove the base cover. Removing the System Board WARNING: Before working inside your computer, read the safety information that you can reconnect them correctly after you replace the system board. Prerequisites 1 Remove the battery. See "Removing the Memory Module(s)" on page 17. 8 Remove the palm rest. See "Removing the Keyboard" on page 22. 5 Remove the coin-cell battery. See "Removing the Wireless Mini-Card" on page 20. 4 Remove the memory module...
Owner's Manual
Page 42
... Homepage at dell.com/regulatory_compliance. After working inside your computer and follow the instructions in "Before Working Inside Your Computer" on page 9. Procedure 1 Replace the heat sink. NOTE: Your computer's Service Tag is stored in the system setup after you replace the system board. See "Replacing the Heat Sink" on the connector latch to secure the cable. 11 Connect the power-adapter-port cable and the...
... Homepage at dell.com/regulatory_compliance. After working inside your computer and follow the instructions in "Before Working Inside Your Computer" on page 9. Procedure 1 Replace the heat sink. NOTE: Your computer's Service Tag is stored in the system setup after you replace the system board. See "Replacing the Heat Sink" on the connector latch to secure the cable. 11 Connect the power-adapter-port cable and the...

Owner's Manual
Page 44
... page 29. 7 Remove the wireless mini-card. See "Removing the Battery" on page 12. 2 Follow the instructions from step 1 to step 2 in "Removing the Optical Drive" on page 14. 3 Follow the instructions from the system board. 2 Remove the screw that shipped with its cable, off the system board. 2 1 1 screw 3 fan 44 | Removing the Fan 3 2 fan cable See "Removing the Base Cover" on page 24. 4 Remove the base cover. See "Removing the Keyboard" on page...
... page 29. 7 Remove the wireless mini-card. See "Removing the Battery" on page 12. 2 Follow the instructions from step 1 to step 2 in "Removing the Optical Drive" on page 14. 3 Follow the instructions from the system board. 2 Remove the screw that shipped with its cable, off the system board. 2 1 1 screw 3 fan 44 | Removing the Fan 3 2 fan cable See "Removing the Base Cover" on page 24. 4 Remove the base cover. See "Removing the Keyboard" on page...
Owner's Manual
Page 62
... 3 in "Removing the Hard Drive" on page 24. 4 Remove the base cover. See "Removing the Display Hinges" on page 56. 12 Remove the display hinges. After working inside your computer and follow the instructions in "After Working Inside Your Computer" on page 11. For additional safety best practices information, see the Regulatory Compliance Homepage at dell.com/regulatory_compliance. See "Removing the Wireless Mini-Card" on page...
... 3 in "Removing the Hard Drive" on page 24. 4 Remove the base cover. See "Removing the Display Hinges" on page 56. 12 Remove the display hinges. After working inside your computer and follow the instructions in "After Working Inside Your Computer" on page 11. For additional safety best practices information, see the Regulatory Compliance Homepage at dell.com/regulatory_compliance. See "Removing the Wireless Mini-Card" on page...
Owner's Manual
Page 64
... 13. 64 | Replacing the Display Panel For additional safety best practices information, see the Regulatory Compliance Homepage at dell.com/regulatory_compliance. Procedure 1 Connect the display cable to the display panel and adhere the tape that secure the display panel to the display back-cover. See "Replacing the Keyboard" on page 26. 12 Replace the battery. After working inside your computer and follow the instructions in "After Working Inside Your Computer...
... 13. 64 | Replacing the Display Panel For additional safety best practices information, see the Regulatory Compliance Homepage at dell.com/regulatory_compliance. Procedure 1 Connect the display cable to the display panel and adhere the tape that secure the display panel to the display back-cover. See "Replacing the Keyboard" on page 26. 12 Replace the battery. After working inside your computer and follow the instructions in "After Working Inside Your Computer...
Owner's Manual
Page 65
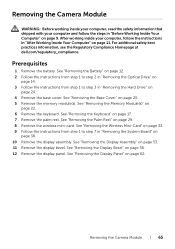
.... 4 Remove the base cover. See "Removing the Display Bezel" on page 29. 8 Remove the wireless mini-card. See "Removing the Palm Rest" on page 56. 12 Remove the display panel. Prerequisites 1 Remove the battery. See "Removing the Battery" on page 12. 2 Follow the instructions from step 1 to step 2 in "Removing the Optical Drive" on page 14. 3 Follow the instructions from step 1 to step 3 in "Removing the Hard Drive" on page 11. After working...
.... 4 Remove the base cover. See "Removing the Display Bezel" on page 29. 8 Remove the wireless mini-card. See "Removing the Palm Rest" on page 56. 12 Remove the display panel. Prerequisites 1 Remove the battery. See "Removing the Battery" on page 12. 2 Follow the instructions from step 1 to step 2 in "Removing the Optical Drive" on page 14. 3 Follow the instructions from step 1 to step 3 in "Removing the Hard Drive" on page 11. After working...

Owner's Manual
Page 66
Procedure 1 Disconnect the camera cable from the camera module. 2 Remove the screw that secures the camera module to the display back-cover. 3 Lift the camera module off the display back-cover. 4 1 2 3 1 screw 3 display back-cover 2 camera module 4 camera cable 66 | Removing the Camera Module
Procedure 1 Disconnect the camera cable from the camera module. 2 Remove the screw that secures the camera module to the display back-cover. 3 Lift the camera module off the display back-cover. 4 1 2 3 1 screw 3 display back-cover 2 camera module 4 camera cable 66 | Removing the Camera Module
Owner's Manual
Page 68
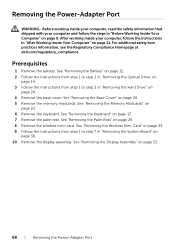
... "Removing the Keyboard" on page 29. 8 Remove the wireless mini-card. For additional safety best practices information, see the Regulatory Compliance Homepage at dell.com/regulatory_compliance. See "Removing the Memory Module(s)" on page 53. 68 | Removing the Power-Adapter Port After working inside your computer and follow the instructions in "After Working Inside Your Computer" on page 11. See "Removing the Display Assembly" on page 22. 6 Remove the keyboard. Removing the Power-Adapter Port...
... "Removing the Keyboard" on page 29. 8 Remove the wireless mini-card. For additional safety best practices information, see the Regulatory Compliance Homepage at dell.com/regulatory_compliance. See "Removing the Memory Module(s)" on page 53. 68 | Removing the Power-Adapter Port After working inside your computer and follow the instructions in "After Working Inside Your Computer" on page 11. See "Removing the Display Assembly" on page 22. 6 Remove the keyboard. Removing the Power-Adapter Port...


