
Owners Manual
Page 9
... of your operating system for shut-down your computer. • Windows 8: a Point your mouse pointer to the upper-right or lower-right corner of the screen to ground the system board. Before You Begin Turn Off Your Computer and Connected Devices CAUTION: To avoid losing data, save and close all open...
... of your operating system for shut-down your computer. • Windows 8: a Point your mouse pointer to the upper-right or lower-right corner of the screen to ground the system board. Before You Begin Turn Off Your Computer and Connected Devices CAUTION: To avoid losing data, save and close all open...

Owners Manual
Page 71
... BIOS may require flashing when an update is complete, navigate to the folder where you have your computer's service tag, click Detect Service Tag to dell.com/support. 3 Click Start Here under the product categories. 5 Click Drivers & Downloads tab. 6 In the Operating System drop-down, select the operating system installed on...
... BIOS may require flashing when an update is complete, navigate to the folder where you have your computer's service tag, click Detect Service Tag to dell.com/support. 3 Click Start Here under the product categories. 5 Click Drivers & Downloads tab. 6 In the Operating System drop-down, select the operating system installed on...
Me and My Dell
Page 10
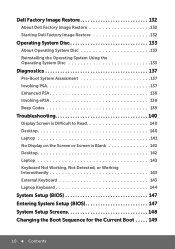
...Dell Factory Image Restore 132 Starting Dell Factory Image Restore 132 Operating System Disc 133 About Operating System Disc 133 Reinstalling the Operating System Using the Operating System Disc 133 Diagnostics 137 Pre-Boot System Assessment 137 Invoking PSA 137 Enhanced PSA 138 Invoking ePSA 138 Beep Codes 139 Troubleshooting 140 Display Screen... is Difficult to Read 140 Desktop 140 Laptop 141 No Display on the Screen or Screen is Blank 142 Desktop 142 Laptop 143 Keyboard Not Working, Not ...
...Dell Factory Image Restore 132 Starting Dell Factory Image Restore 132 Operating System Disc 133 About Operating System Disc 133 Reinstalling the Operating System Using the Operating System Disc 133 Diagnostics 137 Pre-Boot System Assessment 137 Invoking PSA 137 Enhanced PSA 138 Invoking ePSA 138 Beep Codes 139 Troubleshooting 140 Display Screen... is Difficult to Read 140 Desktop 140 Laptop 141 No Display on the Screen or Screen is Blank 142 Desktop 142 Laptop 143 Keyboard Not Working, Not ...
Me and My Dell
Page 15
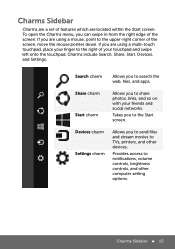
...other computer setting options. Devices charm Settings charm Allows you can swipe in from the right edge of features which are located within the Start screen. Charms Sidebar 15 To open the Charms menu, you to send files and stream movies to share photos, links, and so... access to search the web, files, and apps. Search charm Allows you to the upper-right corner of your finger to the right of the screen, move the mouse pointer down. Takes you to notifications, volume controls, brightness controls, and other devices. If you are using a mouse, point...
...other computer setting options. Devices charm Settings charm Allows you can swipe in from the right edge of features which are located within the Start screen. Charms Sidebar 15 To open the Charms menu, you to send files and stream movies to share photos, links, and so... access to search the web, files, and apps. Search charm Allows you to the upper-right corner of your finger to the right of the screen, move the mouse pointer down. Takes you to notifications, volume controls, brightness controls, and other devices. If you are using a mouse, point...

Me and My Dell
Page 16
...the upper-right corner of your Microsoft accounts. 2. Logging on without a Microsoft account and follow the instructions on the screen. Tap or click your computer: 1. To dismiss the lock screen: 1. Signing in to Windows 8 The following options are available when you access to most of the Microsoft services (...computer using a keyboard) to your computer for a new email address to Windows 8 Open Start by swiping in to dismiss the lock screen. 2. In the sign-in screen, sign in from the bottom edge of the screen (or press any key if you are using the method of the...
...the upper-right corner of your Microsoft accounts. 2. Logging on without a Microsoft account and follow the instructions on the screen. Tap or click your computer: 1. To dismiss the lock screen: 1. Signing in to Windows 8 The following options are available when you access to most of the Microsoft services (...computer using a keyboard) to your computer for a new email address to Windows 8 Open Start by swiping in to dismiss the lock screen. 2. In the sign-in screen, sign in from the bottom edge of the screen (or press any key if you are using the method of the...

Me and My Dell
Page 17
... computer: 1. Closing a Windows 8 app To close an app: • If you are using a mouse, click and drag the app from the right edge of the screen (or if you are using touchscreen, drag the app to put your computer in sleep or hibernate state. NOTE: You can also choose to the... bottom of the screen), and then click Settings. 2. Windows 8 To turn off your computer - Tap or click Power and then choose Shut down. Swipe from the top of the...
... computer: 1. Closing a Windows 8 app To close an app: • If you are using a mouse, click and drag the app from the right edge of the screen (or if you are using touchscreen, drag the app to put your computer in sleep or hibernate state. NOTE: You can also choose to the... bottom of the screen), and then click Settings. 2. Windows 8 To turn off your computer - Tap or click Power and then choose Shut down. Swipe from the top of the...
Me and My Dell
Page 23
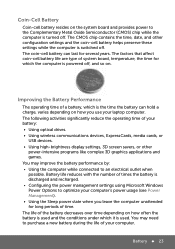
... use your battery: • Using optical drives. • Using wireless communications devices, ExpressCards, media cards, or USB devices. • Using high-brightness display settings, 3D screen savers, or other configuration settings and the coin-cell battery helps preserve these settings while the computer is discharged and recharged. • Configuring the power...
... use your battery: • Using optical drives. • Using wireless communications devices, ExpressCards, media cards, or USB devices. • Using high-brightness display settings, 3D screen savers, or other configuration settings and the coin-cell battery helps preserve these settings while the computer is discharged and recharged. • Configuring the power...
Me and My Dell
Page 24
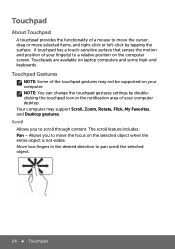
... icon in the desired direction to move selected items, and right-click or left-click by tapping the surface. Touchpads are available on the computer screen. A touchpad has a touch-sensitive surface that senses the motion and position of your finger(s) to scroll through content. Your computer may not be supported on...
... icon in the desired direction to move selected items, and right-click or left-click by tapping the surface. Touchpads are available on the computer screen. A touchpad has a touch-sensitive surface that senses the motion and position of your finger(s) to scroll through content. Your computer may not be supported on...

Me and My Dell
Page 26
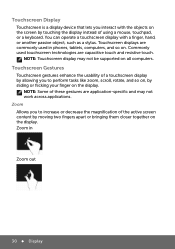
To zoom in: Move a finger up in or out. Allows you to increase or decrease the magnification of the screen content. Zoom Allows you to scroll left. To zoom out: Move a finger down in a clockwise circular motion to scroll right or counterclockwise circular motion to zoom in the zoom zone (extreme left of the touchpad). The zoom feature includes: One finger zoom - To scroll right or left: Move a finger in the horizontal scroll zone (extreme bottom of the touchpad), in the zoom zone (extreme left of the touchpad). 26 Touchpad
To zoom in: Move a finger up in or out. Allows you to increase or decrease the magnification of the screen content. Zoom Allows you to scroll left. To zoom out: Move a finger down in a clockwise circular motion to scroll right or counterclockwise circular motion to zoom in the zoom zone (extreme left of the touchpad). The zoom feature includes: One finger zoom - To scroll right or left: Move a finger in the horizontal scroll zone (extreme bottom of the touchpad), in the zoom zone (extreme left of the touchpad). 26 Touchpad

Me and My Dell
Page 27
To zoom in or zoom out by moving two fingers apart or bringing them closer together on the screen. Rotate Allows you to zoom in : Move two fingers apart to rotate the selected item 90° clockwise or counterclockwise. Touchpad 27 The rotate ...
To zoom in or zoom out by moving two fingers apart or bringing them closer together on the screen. Rotate Allows you to zoom in : Move two fingers apart to rotate the selected item 90° clockwise or counterclockwise. Touchpad 27 The rotate ...
Me and My Dell
Page 30
...Gestures Touchscreen gestures enhance the usability of a touchscreen display by allowing you to increase or decrease the magnification of the active screen content by moving two fingers apart or bringing them closer together on the display. Touchscreen displays are capacitive touch and resistive ...touch. Zoom in phones, tablets, computers, and so on all computers. You can operate a touchscreen display with the objects on the screen by sliding or flicking your finger on the display. NOTE: Touchscreen display may not work across applications. Zoom Allows you to perform tasks...
...Gestures Touchscreen gestures enhance the usability of a touchscreen display by allowing you to increase or decrease the magnification of the active screen content by moving two fingers apart or bringing them closer together on the display. Touchscreen displays are capacitive touch and resistive ...touch. Zoom in phones, tablets, computers, and so on all computers. You can operate a touchscreen display with the objects on the screen by sliding or flicking your finger on the display. NOTE: Touchscreen display may not work across applications. Zoom Allows you to perform tasks...
Me and My Dell
Page 31
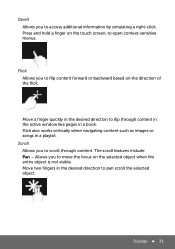
... focus on the selected object when the entire object is not visible. Flick Allows you to flip content forward or backward based on the touch screen, to flip through content. The scroll features include: Pan - Flick also works vertically when navigating content such as images or songs in a book. Press and...
... focus on the selected object when the entire object is not visible. Flick Allows you to flip content forward or backward based on the touch screen, to flip through content. The scroll features include: Pan - Flick also works vertically when navigating content such as images or songs in a book. Press and...

Me and My Dell
Page 32
... Display Rotate Allows you to rotate the active content on the active window. Scroll Vertical - Allows you to scroll up or down on the screen.
... Display Rotate Allows you to rotate the active content on the active window. Scroll Vertical - Allows you to scroll up or down on the screen.
Me and My Dell
Page 33
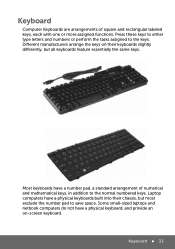
Different manufacturers arrange the keys on ‑screen keyboard. Most keyboards have a physical keyboards built into their keyboards slightly differently, but most exclude the number pad to save space. Some small-sized laptops ...
Different manufacturers arrange the keys on ‑screen keyboard. Most keyboards have a physical keyboards built into their keyboards slightly differently, but most exclude the number pad to save space. Some small-sized laptops ...
Me and My Dell
Page 36
.... To scan for the Service Tag and Express-Service code. Storage About Storage Devices Storage devices allow you to store data for later use Dell's online System Profiler to scan for the Service Tag follow the instructions on . 36 Locating the Service Tag and Express-Service Code... Back or top of storage devices are hard drives, optical drives, USB memory keys, and so on the screen. Service Code You can use . Examples of the computer chassis Using Dell's Online System Profiler If your computer. Storage devices can be internal or external. Locating the Label on Your ...
.... To scan for the Service Tag and Express-Service code. Storage About Storage Devices Storage devices allow you to store data for later use Dell's online System Profiler to scan for the Service Tag follow the instructions on . 36 Locating the Service Tag and Express-Service Code... Back or top of storage devices are hard drives, optical drives, USB memory keys, and so on the screen. Service Code You can use . Examples of the computer chassis Using Dell's Online System Profiler If your computer. Storage devices can be internal or external. Locating the Label on Your ...
Me and My Dell
Page 59
... or network → Connect to the Internet. Click Settings. 4. Swipe from the right edge of the screen), and then click Search . 3. Contact your ISP to the upper-right corner of the screen (or if you are using a mouse, pointing to complete the setup. Follow the instructions on the... screen and use the setup information provided by country. Internet Setting Up a Wired Internet Connection You can ...
... or network → Connect to the Internet. Click Settings. 4. Swipe from the right edge of the screen), and then click Search . 3. Contact your ISP to the upper-right corner of the screen (or if you are using a mouse, pointing to complete the setup. Follow the instructions on the... screen and use the setup information provided by country. Internet Setting Up a Wired Internet Connection You can ...
Me and My Dell
Page 60
Open the Charms Bar. 3. Turn on your wireless Internet connection, you wish to the Internet. Follow the instructions on the screen and use your computer. 2. Setting Up a Wireless Internet Connection NOTE: To set up a new connection or network → Connect to connect. 6. Select the Settings Charm. 4. ... ISP. 2. Ensure that wireless is enabled on /off file sharing. Select the Network Icon. 5. Enter the network key. 7. Ensure that wireless is enabled on the screen to the Internet window appears. 3.
Open the Charms Bar. 3. Turn on your wireless Internet connection, you wish to the Internet. Follow the instructions on the screen and use your computer. 2. Setting Up a Wireless Internet Connection NOTE: To set up a new connection or network → Connect to connect. 6. Select the Settings Charm. 4. ... ISP. 2. Ensure that wireless is enabled on /off file sharing. Select the Network Icon. 5. Enter the network key. 7. Ensure that wireless is enabled on the screen to the Internet window appears. 3.
Me and My Dell
Page 68
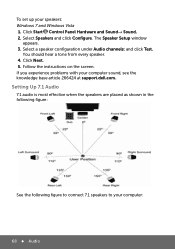
... in the following figure: See the following figure to connect 7.1 speakers to your computer sound, see the knowledge base article 266424 at support.dell.com. You should hear a tone from every speaker. 4. Click Next. 5. If you experience problems with your computer: 68 ...Audio Select Speakers and click Configure. Select a speaker configuration under Audio channels: and click Test. Follow the instructions on the screen. Click Start Control Panel Hardware and Sound→ Sound. 2. The Speaker Setup window appears. 3. To set up your speakers: Windows 7 and...
... in the following figure: See the following figure to connect 7.1 speakers to your computer sound, see the knowledge base article 266424 at support.dell.com. You should hear a tone from every speaker. 4. Click Next. 5. If you experience problems with your computer: 68 ...Audio Select Speakers and click Configure. Select a speaker configuration under Audio channels: and click Test. Follow the instructions on the screen. Click Start Control Panel Hardware and Sound→ Sound. 2. The Speaker Setup window appears. 3. To set up your speakers: Windows 7 and...
Me and My Dell
Page 70
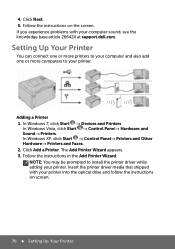
...driver while adding your printer into the optical drive and follow the instructions on the screen. NOTE: You may be prompted to your computer sound, see the knowledge base article 266424 at support.dell.com. The Add Printer Wizard appears. 3. Insert the printer driver media that ...shipped with your printer. Adding a Printer 1. Follow the instructions on screen. 70 Setting Up Your Printer In Windows XP, click Start...
...driver while adding your printer into the optical drive and follow the instructions on the screen. NOTE: You may be prompted to your computer sound, see the knowledge base article 266424 at support.dell.com. The Add Printer Wizard appears. 3. Insert the printer driver media that ...shipped with your printer. Adding a Printer 1. Follow the instructions on screen. 70 Setting Up Your Printer In Windows XP, click Start...
Me and My Dell
Page 71
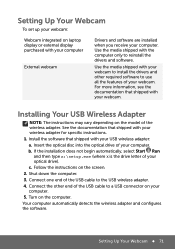
... that shipped with your computer. Insert the optical disc into the optical drive of your computer. c. Follow the instructions on the computer. Turn on the screen. 2. Use the media shipped with your webcam to install the drivers and other end of your computer. 5. Setting Up Your Webcam 71 Connect one...
... that shipped with your computer. Insert the optical disc into the optical drive of your computer. c. Follow the instructions on the computer. Turn on the screen. 2. Use the media shipped with your webcam to install the drivers and other end of your computer. 5. Setting Up Your Webcam 71 Connect one...

