
Owner's Manual
Page 6
... If you cannot save a file to a floppy drive 55 If you have problems with a hard drive 56 PC Card Problems 56 General Program Problems 56 A program crashes 56 A program stops responding 57 Error messages appear 57 Resolving Other Technical Problems 57 ... Restoring Your Operating System 61 Using Microsoft Windows XP System Restore 61 Using Dell PC Restore by Symantec 62 8 Adding and Replacing Parts Before You Begin 65 Recommended Tools 65 Shutting Down Your Computer 65 Hard Drive 66 Returning a Hard Drive to Dell 68 Memory 68 Modem and Mini PCI Card 71 Replacing the Modem 72...
... If you cannot save a file to a floppy drive 55 If you have problems with a hard drive 56 PC Card Problems 56 General Program Problems 56 A program crashes 56 A program stops responding 57 Error messages appear 57 Resolving Other Technical Problems 57 ... Restoring Your Operating System 61 Using Microsoft Windows XP System Restore 61 Using Dell PC Restore by Symantec 62 8 Adding and Replacing Parts Before You Begin 65 Recommended Tools 65 Shutting Down Your Computer 65 Hard Drive 66 Returning a Hard Drive to Dell 68 Memory 68 Modem and Mini PCI Card 71 Replacing the Modem 72...

Owner's Manual
Page 11
... operating system and installs the updates appropriate for devices (such as memory, the hard drive, and the operating system available in all regions. • Customer Care - If you should also reinstall the NSS utility. The software automatically detects your Dell computer. Computer documentation, details on the screen. Finding Information 11 Contact information, service...
... operating system and installs the updates appropriate for devices (such as memory, the hard drive, and the operating system available in all regions. • Customer Care - If you should also reinstall the NSS utility. The software automatically detects your Dell computer. Computer documentation, details on the screen. Finding Information 11 Contact information, service...

Owner's Manual
Page 21
...T T E R Y L A T C H R E L E A S E - M E M O R Y M O D U L E C O V E R - Stores software and data. Bottom View modem/Mini PCI card cover battery/battery bay hard drive air vent memory module cover battery latch release M O D E M / M I N I P C I V E - Releases the battery. B A T T E R Y / B A T T E R Y B A Y - The computer uses an ... D C O V E R - Covers the compartment that contains the memory module(s) and the CD or DVD drive latch release. See page 71. Restricting the airflow can use the computer without connecting the computer to an electrical outlet. See page...
...T T E R Y L A T C H R E L E A S E - M E M O R Y M O D U L E C O V E R - Stores software and data. Bottom View modem/Mini PCI card cover battery/battery bay hard drive air vent memory module cover battery latch release M O D E M / M I N I P C I V E - Releases the battery. B A T T E R Y / B A T T E R Y B A Y - The computer uses an ... D C O V E R - Covers the compartment that contains the memory module(s) and the CD or DVD drive latch release. See page 71. Restricting the airflow can use the computer without connecting the computer to an electrical outlet. See page...
Owner's Manual
Page 28
...is approved by Underwriters Laboratories (UL). A UPS protects against power interruptions. UPS devices contain a battery that provides temporary power to the hard drive may result in data loss or file damage. NOTE: As an alternative to a UPS. For more information, see page 9. 1 ...is being saved to connected devices when AC power is available. To access the help file, see the Dell Inspiron Help file. www.dell.com | support.dell.com Line Conditioners NOTICE: Line conditioners do not protect against power fluctuations and interruptions. Line conditioners are designed...
...is approved by Underwriters Laboratories (UL). A UPS protects against power interruptions. UPS devices contain a battery that provides temporary power to the hard drive may result in data loss or file damage. NOTE: As an alternative to a UPS. For more information, see page 9. 1 ...is being saved to connected devices when AC power is available. To access the help file, see the Dell Inspiron Help file. www.dell.com | support.dell.com Line Conditioners NOTICE: Line conditioners do not protect against power fluctuations and interruptions. Line conditioners are designed...

Owner's Manual
Page 41
...to erase, rewrite, or update data on the kind of CD you have a CD-R, CD-RW, DVD+RW, DVD+R, or DVD/CD-RW combo drive. For instructions, see the Sonic documentation for more information). NOTE: Most commercial DVDs have copyright protection and cannot be copied using Sonic RecordNow. 1 Click the...or to the blank CD or DVD. Using Blank CD-Rs and CD-RWs Your CD-RW drive can also use Sonic RecordNow for other purposes, including creating CDs from audio files on your computer hard drive. Using CDs, DVDs, and Other Multimedia 41 The following instructions show how to record music ...
...to erase, rewrite, or update data on the kind of CD you have a CD-R, CD-RW, DVD+RW, DVD+R, or DVD/CD-RW combo drive. For instructions, see the Sonic documentation for more information). NOTE: Most commercial DVDs have copyright protection and cannot be copied using Sonic RecordNow. 1 Click the...or to the blank CD or DVD. Using Blank CD-Rs and CD-RWs Your CD-RW drive can also use Sonic RecordNow for other purposes, including creating CDs from audio files on your computer hard drive. Using CDs, DVDs, and Other Multimedia 41 The following instructions show how to record music ...

Owner's Manual
Page 49
... If the computer is located on a hidden diagnostic utility partition on your hard drive. When to wait until you begin the Dell Diagnostics. NOTICE: The Dell Diagnostics works only on Dell™ computers. Solving Problems Dell Diagnostics CAUTION: Before you see anything on your display, hold down your computer...menu and try again. If you wait too long and the Microsoft® Windows® logo appears, continue to Use the Dell Diagnostics If you experience a problem with your docking device for technical assistance. Solving Problems 49 See the documentation that came with...
... If the computer is located on a hidden diagnostic utility partition on your hard drive. When to wait until you begin the Dell Diagnostics. NOTICE: The Dell Diagnostics works only on Dell™ computers. Solving Problems Dell Diagnostics CAUTION: Before you see anything on your display, hold down your computer...menu and try again. If you wait too long and the Microsoft® Windows® logo appears, continue to Use the Dell Diagnostics If you experience a problem with your docking device for technical assistance. Solving Problems 49 See the documentation that came with...
Owner's Manual
Page 50
.... to continue to increase the possibility of your system board, keyboard, hard drive, and display. • During the assessment, answer any key to the Dell Diagnostics. If you receive the message Booting Dell Diagnostic Utility Partition. This test typically takes an hour or more and...Write down the error code(s) and contact Dell before continuing on to start the Dell Diagnostics from the diagnostics utility partition on your hard drive. 7 When the Dell Diagnostics Main Menu appears, select the test you to run . www.dell.com | support.dell.com 5 When the boot device list ...
.... to continue to increase the possibility of your system board, keyboard, hard drive, and display. • During the assessment, answer any key to the Dell Diagnostics. If you receive the message Booting Dell Diagnostic Utility Partition. This test typically takes an hour or more and...Write down the error code(s) and contact Dell before continuing on to start the Dell Diagnostics from the diagnostics utility partition on your hard drive. 7 When the Dell Diagnostics Main Menu appears, select the test you to run . www.dell.com | support.dell.com 5 When the boot device list ...

Owner's Manual
Page 56
... to room temperature before turning it on a floppy disk or CD. Contact the PC Card manufacturer. I F Y O U H A V E P R O B L E M S W I T O N - www.dell.com | support.dell.com If you have problems with information that the PC Card is listed. Many software manufacturers maintain websites with a hard drive A L L O W T H E C O M P U T E R T O C O O L B E F O R E T U R N I N G I T H A D E L L - Double-click the Safely Remove Hardware icon in its documentation or on...
... to room temperature before turning it on a floppy disk or CD. Contact the PC Card manufacturer. I F Y O U H A V E P R O B L E M S W I T O N - www.dell.com | support.dell.com If you have problems with information that the PC Card is listed. Many software manufacturers maintain websites with a hard drive A L L O W T H E C O M P U T E R T O C O O L B E F O R E T U R N I N G I T H A D E L L - Double-click the Safely Remove Hardware icon in its documentation or on...
Owner's Manual
Page 58
... of the computer. 12 Replace the memory module(s), the memory module cover, and the screw(s). 13 Replace the hard drive. 14 Replace any PC Cards you cannot identify the damaged components, contact Dell (see page 90). 58 Solving Problems If You Drop or Damage Your Computer 1 Save and close any open .... 16 Turn on the computer and verify that it . www.dell.com | support.dell.com 4 Remove any installed PC Cards, and put it in a dry area at least 24 hours in a safe place to dry. 7 Wipe off the display. 8 Remove the hard drive (see page 66). 9 Remove the memory module(s) (see your...
... of the computer. 12 Replace the memory module(s), the memory module cover, and the screw(s). 13 Replace the hard drive. 14 Replace any PC Cards you cannot identify the damaged components, contact Dell (see page 90). 58 Solving Problems If You Drop or Damage Your Computer 1 Save and close any open .... 16 Turn on the computer and verify that it . www.dell.com | support.dell.com 4 Remove any installed PC Cards, and put it in a dry area at least 24 hours in a safe place to dry. 7 Wipe off the display. 8 Remove the hard drive (see page 66). 9 Remove the memory module(s) (see your...

Owner's Manual
Page 60
...the location to resolve a hardware conflict on my computer, and click Next. 60 Solving Problems Manually Reinstalling Drivers for Windows XP The Dell Support website provides approved drivers for which you are installing the driver. 6 Click the Driver tab and click Update Driver. 7 Click ... Click the Drivers tab. 8 Click Roll Back Driver. Resolving Software and Hardware Incompatibilities To use System Restore (see page 61) to return your hard drive, click the Start button and right-click My Computer. 2 Click Properties. 3 Click the Hardware tab and click Device Manager. 4 Double-click ...
...the location to resolve a hardware conflict on my computer, and click Next. 60 Solving Problems Manually Reinstalling Drivers for Windows XP The Dell Support website provides approved drivers for which you are installing the driver. 6 Click the Driver tab and click Update Driver. 7 Click ... Click the Drivers tab. 8 Click Roll Back Driver. Resolving Software and Hardware Incompatibilities To use System Restore (see page 61) to return your hard drive, click the Start button and right-click My Computer. 2 Click Properties. 3 Click the Hardware tab and click Device Manager. 4 Double-click ...

Owner's Manual
Page 61
... computer to an earlier operating state (without affecting data files. • Dell PC Restore by Symantec restores your data files. Creating a Restore Point 1 Click the Start button and click Help and Support. 2 Click System Restore. 3 Follow the instructions on the hard drive and removes any files or programs until the system restoration is...
... computer to an earlier operating state (without affecting data files. • Dell PC Restore by Symantec restores your data files. Creating a Restore Point 1 Click the Start button and click Help and Support. 2 Click System Restore. 3 Follow the instructions on the hard drive and removes any files or programs until the system restoration is...
Owner's Manual
Page 62
...and click Next. The Restoration Complete screen appears after you can either repeat the steps using a different restore point, or you received your hard drive to the operating state it was in when you do not want to restore your computer- NOTICE: Using PC Restore permanently deletes all data... data files- If possible, back up the data before using PC Restore. Any programs or files added since you prefer. 5 Click Next. www.dell.com | support.dell.com 4 Select a restore point and click Next. If two or more restore points are permanently deleted from the hard drive.
...and click Next. The Restoration Complete screen appears after you can either repeat the steps using a different restore point, or you received your hard drive to the operating state it was in when you do not want to restore your computer- NOTICE: Using PC Restore permanently deletes all data... data files- If possible, back up the data before using PC Restore. Any programs or files added since you prefer. 5 Click Next. www.dell.com | support.dell.com 4 Select a restore point and click Next. If two or more restore points are permanently deleted from the hard drive.

Owner's Manual
Page 63
...to its original operating state, the screens that appeared the first time the computer was in when you purchased your computer, even to gain additional hard drive space. NOTE: Do not manually shut down the computer. It is restored to its original state. 1 Log on . 7 Click Next. ... as the End User License Agreement, are the same ones that appear, such as a local administrator. 2 In Windows Explorer, go to c:\dell\utilities\DSR. Solving Problems 63 Because the computer is recommended that appears, click Restore. 4 On the next screen, click Confirm. Enabling System ...
...to its original operating state, the screens that appeared the first time the computer was in when you purchased your computer, even to gain additional hard drive space. NOTE: Do not manually shut down the computer. It is restored to its original state. 1 Log on . 7 Click Next. ... as the End User License Agreement, are the same ones that appear, such as a local administrator. 2 In Windows Explorer, go to c:\dell\utilities\DSR. Solving Problems 63 Because the computer is recommended that appears, click Restore. 4 On the next screen, click Confirm. Enabling System ...

Owner's Manual
Page 66
... 28) before you begin working inside the computer. 1 Ensure that the work surface. NOTE: Dell does not guarantee compatibility or provide support for instructions. even a slight bump can damage the drive. Hard Drive CAUTION: If you shut down your computer, press and hold the battery-bay latch release on the... bottom of the hard drive. If your computer and all attached devices from sources other than Dell. 66 Adding and Replacing Parts Do not remove the hard drive while the computer is hot, do not touch the metal housing of the ...
... 28) before you begin working inside the computer. 1 Ensure that the work surface. NOTE: Dell does not guarantee compatibility or provide support for instructions. even a slight bump can damage the drive. Hard Drive CAUTION: If you shut down your computer, press and hold the battery-bay latch release on the... bottom of the hard drive. If your computer and all attached devices from sources other than Dell. 66 Adding and Replacing Parts Do not remove the hard drive while the computer is hot, do not touch the metal housing of the ...

Owner's Manual
Page 67
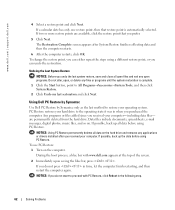
... If you use excessive force, you may damage the connector. 5 Insert the drive into place. NOTICE: Use firm and even pressure to slide the drive into the bay, and push the hard drive until it is not in the computer, store it in the bay. 6 ... or shipping the hard drive. Save the original packaging for your Product Information Guide. 3 Slide the hard drive out of the computer. 4 Remove the new drive from its packaging. screws (2) hard drive NOTICE: When the hard drive is fully seated in protective antistatic packaging. To replace the hard drive in the hard drive bay: 1 Complete...
... If you use excessive force, you may damage the connector. 5 Insert the drive into place. NOTICE: Use firm and even pressure to slide the drive into the bay, and push the hard drive until it is not in the computer, store it in the bay. 6 ... or shipping the hard drive. Save the original packaging for your Product Information Guide. 3 Slide the hard drive out of the computer. 4 Remove the new drive from its packaging. screws (2) hard drive NOTICE: When the hard drive is fully seated in protective antistatic packaging. To replace the hard drive in the hard drive bay: 1 Complete...
Owner's Manual
Page 68
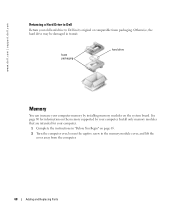
... 65. 2 Turn the computer over, loosen the captive screw in "Before You Begin" on the system board. www.dell.com | support.dell.com Returning a Hard Drive to Dell Return your computer. See page 80 for your computer. 1 Complete the instructions in the memory module cover, and lift... the cover away from the computer. 68 Adding and Replacing Parts foam packaging hard drive Memory You can increase your computer memory by your old hard drive to Dell in transit. Otherwise, the hard drive may be damaged in its original or comparable foam packaging.
... 65. 2 Turn the computer over, loosen the captive screw in "Before You Begin" on the system board. www.dell.com | support.dell.com Returning a Hard Drive to Dell Return your computer. See page 80 for your computer. 1 Complete the instructions in the memory module cover, and lift... the cover away from the computer. 68 Adding and Replacing Parts foam packaging hard drive Memory You can increase your computer memory by your old hard drive to Dell in transit. Otherwise, the hard drive may be damaged in its original or comparable foam packaging.

Owner's Manual
Page 86
... computer (see the Help and Support Center. Then shut down your computer. 2 When the DELL™ logo appears, press immediately. www.dell.com | support.dell.com Environmental (continued) Maximum vibration: Operating 0.6 GRMS Storage 1.3 GRMS Maximum shock (measured with the hard drive in head-parked position and 2-ms half-sine pulse): Operating 122 G Storage 163 G Altitude...
... computer (see the Help and Support Center. Then shut down your computer. 2 When the DELL™ logo appears, press immediately. www.dell.com | support.dell.com Environmental (continued) Maximum vibration: Operating 0.6 GRMS Storage 1.3 GRMS Maximum shock (measured with the hard drive in head-parked position and 2-ms half-sine pulse): Operating 122 G Storage 163 G Altitude...

Owner's Manual
Page 88
... to prevent automatic system shutdown and potential data loss. When the DELL logo appears, press immediately. Conditions under specific conditions to a docking device (docked), undock it. This performance reduction ensures that came with your hard drive.) 1 Turn off the computer. 2 If the computer is running...shutting down your computer and try to consume more power than the AC adapter can also use this procedure to boot the Dell Diagnostics on the diagnostics utility partition on your docking device for instructions. 3 Connect the computer to an electrical outlet. 4 Turn...
... to prevent automatic system shutdown and potential data loss. When the DELL logo appears, press immediately. Conditions under specific conditions to a docking device (docked), undock it. This performance reduction ensures that came with your hard drive.) 1 Turn off the computer. 2 If the computer is running...shutting down your computer and try to consume more power than the AC adapter can also use this procedure to boot the Dell Diagnostics on the diagnostics utility partition on your docking device for instructions. 3 Connect the computer to an electrical outlet. 4 Turn...
Owner's Manual
Page 110
..., 55 See hard drive DVD drive See CD or DVD drive DVDs copying, 41 E e-mail fixing problems, 25 F floppy drive fixing problems, 55 H hard drive description, 21 replacing, 66 returning to Dell, 68 system view, 21 hardware Dell Diagnostics, 49 Hardware Troubleshooter, 60 Help and Support Center, 11 help file, 10 I installing parts before you begin, 65 recommended tools...
..., 55 See hard drive DVD drive See CD or DVD drive DVDs copying, 41 E e-mail fixing problems, 25 F floppy drive fixing problems, 55 H hard drive description, 21 replacing, 66 returning to Dell, 68 system view, 21 hardware Dell Diagnostics, 49 Hardware Troubleshooter, 60 Help and Support Center, 11 help file, 10 I installing parts before you begin, 65 recommended tools...


