Users Guide
Page 3
Contents About Your Monitor 5 Package Contents 5 Product Features 6 Identifying Parts and Controls 7 Monitor Specifications 8 Plug and Play Capability 16 LCD Monitor Quality & Pixel Policy 16 Maintenance Guidelines 16 Setting Up the Monitor 17 Attaching the Stand 17 Connecting Your Monitor 18 Organizing Your Cables 19 Removing the Monitor Stand 19 Wall Mounting (Optional 20 Operating the Monitor 21 Power On the Monitor 21 Using the Front-Panel Controls 21 Using the On-Screen Display (OSD) Menu 22 Setting the Maximum Resolution 34 Using the Tilt 36 │ 3
Contents About Your Monitor 5 Package Contents 5 Product Features 6 Identifying Parts and Controls 7 Monitor Specifications 8 Plug and Play Capability 16 LCD Monitor Quality & Pixel Policy 16 Maintenance Guidelines 16 Setting Up the Monitor 17 Attaching the Stand 17 Connecting Your Monitor 18 Organizing Your Cables 19 Removing the Monitor Stand 19 Wall Mounting (Optional 20 Operating the Monitor 21 Power On the Monitor 21 Using the Front-Panel Controls 21 Using the On-Screen Display (OSD) Menu 22 Setting the Maximum Resolution 34 Using the Tilt 36 │ 3
Users Guide
Page 6
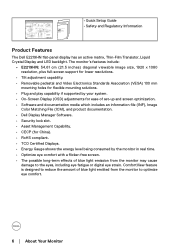
... lower resolutions. • Tilt adjustment capability. • Removable pedestal and Video Electronics Standards Association (VESA) 100 mm mounting holes for flexible mounting solutions. • Plug and play capability if supported by your system. • On-Screen Display (OSD) adjustments for ease of set-up and screen optimization. • Software and documentation media which includes an information file (INF), Image Color Matching File (ICM), and product documentation. • Dell Display Manager Software. • Security lock...
... lower resolutions. • Tilt adjustment capability. • Removable pedestal and Video Electronics Standards Association (VESA) 100 mm mounting holes for flexible mounting solutions. • Plug and play capability if supported by your system. • On-Screen Display (OSD) adjustments for ease of set-up and screen optimization. • Software and documentation media which includes an information file (INF), Image Color Matching File (ICM), and product documentation. • Dell Display Manager Software. • Security lock...

Users Guide
Page 8
TFT LCD In-Plane Switching Technology 8 │ About Your Monitor To connect your computer to the monitor using a HDMI cable. Monitor Specifications Flat-Panel Specifications Model number Screen type Panel type E2219HN Active matrix - To attach the optional Dell Soundbar. Side view Right side Bottom View 1 23 4 Label Description 1 AC power connector 2 HDMI connector 3 VGA connector 4 Dell soundbar mounting slots Use To connect the monitor power cable. To connect your computer to the monitor using a VGA cable.
TFT LCD In-Plane Switching Technology 8 │ About Your Monitor To connect your computer to the monitor using a HDMI cable. Monitor Specifications Flat-Panel Specifications Model number Screen type Panel type E2219HN Active matrix - To attach the optional Dell Soundbar. Side view Right side Bottom View 1 23 4 Label Description 1 AC power connector 2 HDMI connector 3 VGA connector 4 Dell soundbar mounting slots Use To connect the monitor power cable. To connect your computer to the monitor using a VGA cable.
Users Guide
Page 9
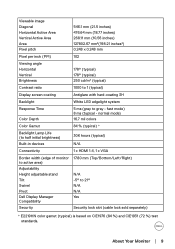
... - normal mode) 16.7 mil colors Color Gamut 84 % (typical) * Backlight Lamp Life (to half initial brightness) Built-in devices 30K hours (typical) N/A Connectivity 1 x HDMI 1.4, 1 x VGA Border width (edge of monitor to active area) Adjustability Height adjustable stand Tilt Swivel Pivot Dell Display Manager Compatibility Security 17.80 mm (Top/Bottom/Left/Right) N/A -5° to gray - Viewable image Diagonal Horizontal Active Area Vertical Active Area Area Pixel pitch 546.1 mm (21.5 inches) 476...
... - normal mode) 16.7 mil colors Color Gamut 84 % (typical) * Backlight Lamp Life (to half initial brightness) Built-in devices 30K hours (typical) N/A Connectivity 1 x HDMI 1.4, 1 x VGA Border width (edge of monitor to active area) Adjustability Height adjustable stand Tilt Swivel Pivot Dell Display Manager Compatibility Security 17.80 mm (Top/Bottom/Left/Right) N/A -5° to gray - Viewable image Diagonal Horizontal Active Area Vertical Active Area Area Pixel pitch 546.1 mm (21.5 inches) 476...
Users Guide
Page 16
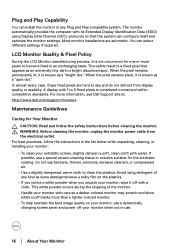
... any Plug and Play compatible system. You can configure itself and optimize the monitor settings. When the pixel remains permanently lit, it is considered normal and within competitive standards. When the pixel remains black, it is a fixed pixel that the system can select different settings if required. WARNING: Before cleaning the monitor, unplug the monitor power cable from display quality or usability. If possible, use a dynamically changing screen saver and power...
... any Plug and Play compatible system. You can configure itself and optimize the monitor settings. When the pixel remains permanently lit, it is considered normal and within competitive standards. When the pixel remains black, it is a fixed pixel that the system can select different settings if required. WARNING: Before cleaning the monitor, unplug the monitor power cable from display quality or usability. If possible, use a dynamically changing screen saver and power...
Users Guide
Page 21
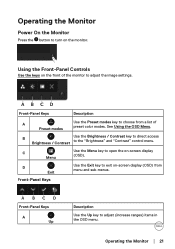
... A Up Description Use the Up key to the "Brightness" and "Contrast" control menu. Operating the Monitor Power On the Monitor Press the button to turn on -screen display (OSD) from a list of the monitor to adjust the image settings. C Menu Use the Menu key to open the on the front of preset color modes. Operating the Monitor │ 21 Using the Front-Panel Controls Use the keys on -screen display (OSD). B Use the Brightness / Contrast key to direct access Brightness / Contrast to adjust (increase ranges) items in the OSD menu.
... A Up Description Use the Up key to the "Brightness" and "Contrast" control menu. Operating the Monitor Power On the Monitor Press the button to turn on -screen display (OSD) from a list of the monitor to adjust the image settings. C Menu Use the Menu key to open the on the front of preset color modes. Operating the Monitor │ 21 Using the Front-Panel Controls Use the keys on -screen display (OSD). B Use the Brightness / Contrast key to direct access Brightness / Contrast to adjust (increase ranges) items in the OSD menu.
Users Guide
Page 24
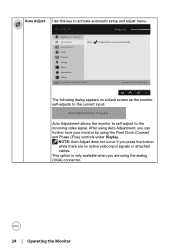
... the incoming video signal. Maximum: 1920x1080. 60Hz The following dialog appears on a black screen as the monitor self-adjusts to adjust the screen automatically. After using Auto Adjustment, you are no active video input signals or attached cables. Dell E2219HN Energy Use Brightness / Contrast Auto Adjust Press Input Source Color Display Energy Menu Personalize Others Resolution: 1280x1024, 60Hz to the current input: Auto Adjustment in Progress... This option is only available when you can further tune your monitor by using the analog (VGA) connector. 24 │...
... the incoming video signal. Maximum: 1920x1080. 60Hz The following dialog appears on a black screen as the monitor self-adjusts to adjust the screen automatically. After using Auto Adjustment, you are no active video input signals or attached cables. Dell E2219HN Energy Use Brightness / Contrast Auto Adjust Press Input Source Color Display Energy Menu Personalize Others Resolution: 1280x1024, 60Hz to the current input: Auto Adjustment in Progress... This option is only available when you can further tune your monitor by using the analog (VGA) connector. 24 │...
Users Guide
Page 25
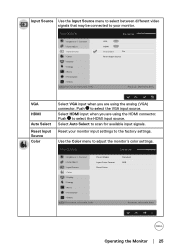
...Use the Color menu to select the VGA input source. Dell E2219HN Energy Use Brightness / Contrast Auto Adjust Input Source Color Display Energy Menu Personalize Others Resolution: 1280x1024, 60Hz VGA HDMI Auto Select On Reset Input Source Maximum: 1920x1080. 60Hz VGA HDMI Auto Select Reset Input Source Color Select VGA input when you are using the HDMI connector. Reset your monitor. Select Auto Select to select the HDMI input source. Input Source Use the Input Source menu to select between different video signals that may be connected to your monitor input settings...
...Use the Color menu to select the VGA input source. Dell E2219HN Energy Use Brightness / Contrast Auto Adjust Input Source Color Display Energy Menu Personalize Others Resolution: 1280x1024, 60Hz VGA HDMI Auto Select On Reset Input Source Maximum: 1920x1080. 60Hz VGA HDMI Auto Select Reset Input Source Color Select VGA input when you are using the HDMI connector. Reset your monitor. Select Auto Select to select the HDMI input source. Input Source Use the Input Source menu to select between different video signals that may be connected to your monitor input settings...
Users Guide
Page 26
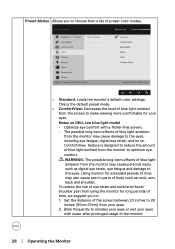
... 20 inches to 28 inches (50cm-70cm) from the monitor may also cause pain in parts of time may cause personal injury such as neck, arm, back and shoulder. Blink frequently to the eyes. Dell E2219HN Energy Use Brightness / Contrast Preset Modes Auto Adjust Input Color Format Input Source Reset Color Color Display Energy Menu Personalize Others Resolution: 1280x1024, 60Hz Standard ComfortView Multimedia Warm Cool Custom Color Maximum: 1920x1080. 60Hz • Standard: Loads the monitor's default color settings. Using monitor...
... 20 inches to 28 inches (50cm-70cm) from the monitor may also cause pain in parts of time may cause personal injury such as neck, arm, back and shoulder. Blink frequently to the eyes. Dell E2219HN Energy Use Brightness / Contrast Preset Modes Auto Adjust Input Color Format Input Source Reset Color Color Display Energy Menu Personalize Others Resolution: 1280x1024, 60Hz Standard ComfortView Multimedia Warm Cool Custom Color Maximum: 1920x1080. 60Hz • Standard: Loads the monitor's default color settings. Using monitor...
Users Guide
Page 27
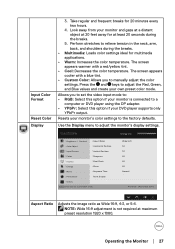
.... Dell E2219HN Energy Use Brightness / Contrast Aspect Ratio Auto Adjust Horizontal Position Input Source Vertical Position Color Sharpness Display Pixel Clock Energy Phase Menu Response Time Personalize Reset Display Others Resolution: 1280x1024, 60Hz Wide 16:9 50 50 50 50 50 Normal Maximum: 1920x1080. 60Hz Aspect Ratio Adjusts the image ratio as Wide 16:9, 4:3, or 5:4. The screen appears cooler with a red/yellow tint. • Cool: Decreases the color temperature. Press the and keys to manually adjust the color settings. NOTE: Wide 16:9 adjustment is connected...
.... Dell E2219HN Energy Use Brightness / Contrast Aspect Ratio Auto Adjust Horizontal Position Input Source Vertical Position Color Sharpness Display Pixel Clock Energy Phase Menu Response Time Personalize Reset Display Others Resolution: 1280x1024, 60Hz Wide 16:9 50 50 50 50 50 Normal Maximum: 1920x1080. 60Hz Aspect Ratio Adjusts the image ratio as Wide 16:9, 4:3, or 5:4. The screen appears cooler with a red/yellow tint. • Cool: Decreases the color temperature. Press the and keys to manually adjust the color settings. NOTE: Wide 16:9 adjustment is connected...
Users Guide
Page 28
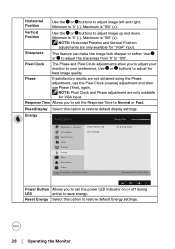
... to save energy. Response Time Allows you to adjust your monitor to Normal or Fast. Minimum is '100' (+). Energy Dell E2219HN Energy Use Brightness / Contrast Power Button LED Auto Adjust Reset Energy Input Source Color Display Energy Menu Personalize Others Resolution: 1280x1024, 60Hz On During Active Maximum: 1920x1080. 60Hz Power Button Allows you to set the Response Time to your preference. Use or buttons to restore default display settings. Maximum is '0' (-). NOTE: Horizontal Position and Vertical Position adjustments are only available for VGA input.
... to save energy. Response Time Allows you to adjust your monitor to Normal or Fast. Minimum is '100' (+). Energy Dell E2219HN Energy Use Brightness / Contrast Power Button LED Auto Adjust Reset Energy Input Source Color Display Energy Menu Personalize Others Resolution: 1280x1024, 60Hz On During Active Maximum: 1920x1080. 60Hz Power Button Allows you to set the Response Time to your preference. Use or buttons to restore default display settings. Maximum is '0' (-). NOTE: Horizontal Position and Vertical Position adjustments are only available for VGA input.
Users Guide
Page 29
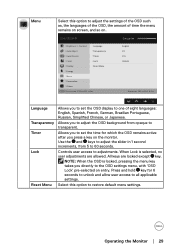
... opaque to adjust the settings of the OSD such as, the languages of the OSD, the amount of eight languages: English, Spanish, French, German, Brazilian Portuguese, Russian, Simplified Chinese, or Japanese. Select this option to transparent. Dell E2219HN Energy Use Brightness / Contrast Language Auto Adjust Transparency Input Source Timer Color Lock Display Reset Menu Energy Menu Personalize Others Resolution: 1280x1024, 60Hz English 20 20 s Unlock Maximum: 1920x1080. 60Hz Language Transparency Timer Lock Reset Menu Allows you press a key on . Controls user access...
... opaque to adjust the settings of the OSD such as, the languages of the OSD, the amount of eight languages: English, Spanish, French, German, Brazilian Portuguese, Russian, Simplified Chinese, or Japanese. Select this option to transparent. Dell E2219HN Energy Use Brightness / Contrast Language Auto Adjust Transparency Input Source Timer Color Lock Display Reset Menu Energy Menu Personalize Others Resolution: 1280x1024, 60Hz English 20 20 s Unlock Maximum: 1920x1080. 60Hz Language Transparency Timer Lock Reset Menu Allows you press a key on . Controls user access...
Users Guide
Page 30
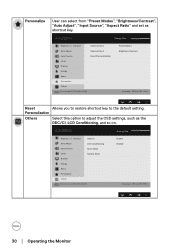
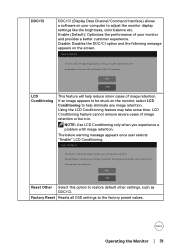
... shortcut key to adjust the OSD settings, such as shortcut key. Personalization Others Select this option to the default setting. Dell E2219HN Brightness / Contrast DDC/CI Auto Adjust LCD Conditioning Input Source Reset Other Color Factory Reset Display Energy Menu Personalize Others Resolution: 1280x1024, 60Hz Energy Use Enable Disable Maximum: 1920x1080. 60Hz 30 │ Operating the Monitor Personalize User can select from "Preset Modes", "Brightness/Contrast", "Auto Adjust", "Input Source", "Aspect Ratio" and set as the DDC/CI, LCD Conditioning, and so...
... shortcut key to adjust the OSD settings, such as shortcut key. Personalization Others Select this option to the default setting. Dell E2219HN Brightness / Contrast DDC/CI Auto Adjust LCD Conditioning Input Source Reset Other Color Factory Reset Display Energy Menu Personalize Others Resolution: 1280x1024, 60Hz Energy Use Enable Disable Maximum: 1920x1080. 60Hz 30 │ Operating the Monitor Personalize User can select from "Preset Modes", "Brightness/Contrast", "Auto Adjust", "Input Source", "Aspect Ratio" and set as the DDC/CI, LCD Conditioning, and so...
Users Guide
Page 31
... cannot remove severe cases of adjusting display setting using PC application will help reduce minor cases of image retention, the program may take some time. Dell E2219HN The feature will be stuck on the monitor, select LCD Conditioning to help reduce minor cases of your computer to adjust the monitor display settings like the brightness, color balance etc. Factory Reset Resets all OSD settings to restore default other settings, such as DDC/CI. Using the LCD Conditioning...
... cannot remove severe cases of adjusting display setting using PC application will help reduce minor cases of image retention, the program may take some time. Dell E2219HN The feature will be stuck on the monitor, select LCD Conditioning to help reduce minor cases of your computer to adjust the monitor display settings like the brightness, color balance etc. Factory Reset Resets all OSD settings to restore default other settings, such as DDC/CI. Using the LCD Conditioning...
Users Guide
Page 35
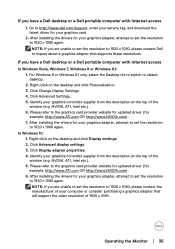
... Display adapter properties. 4. After installing the drivers for your graphics adapter, attempt to set the resolution to http://www.dell.com/support, enter your service tag, and download the latest driver for your graphics adapter, attempt to set the resolution to the graphics card provider website for updated driver (for your computer or consider purchasing a graphics adapter that supports these resolutions. NVIDIA, ATI, Intel etc.). 6. Go to 1920 x 1080 again. Click Change Display Settings...
... Display adapter properties. 4. After installing the drivers for your graphics adapter, attempt to set the resolution to http://www.dell.com/support, enter your service tag, and download the latest driver for your graphics adapter, attempt to set the resolution to the graphics card provider website for updated driver (for your computer or consider purchasing a graphics adapter that supports these resolutions. NVIDIA, ATI, Intel etc.). 6. Go to 1920 x 1080 again. Click Change Display Settings...
Users Guide
Page 37
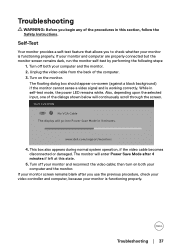
... screen. Dell E2219HN No VGA Cable The display will enter Power Save Mode after you use the previous procedure, check your video controller and computer, because your monitor and computer are properly connected but the monitor screen remains dark, run the monitor self-test by performing the following steps: 1. Turn off both your monitor and reconnect the video cable; then turn on both your monitor is working correctly. If your monitor is functioning properly. www.dell.com/support/monitors...
... screen. Dell E2219HN No VGA Cable The display will enter Power Save Mode after you use the previous procedure, check your video controller and computer, because your monitor and computer are properly connected but the monitor screen remains dark, run the monitor self-test by performing the following steps: 1. Turn off both your monitor and reconnect the video cable; then turn on both your monitor is working correctly. If your monitor is functioning properly. www.dell.com/support/monitors...

Users Guide
Page 39
... via the Input Source Select menu. • Run the built-in the video cable connector. • Ensure that the correct input source is selected via OSD. • Eliminate video extension cables. • Reset the monitor to Factory Settings. • Change the video resolution to Factory Settings. • Check environmental factors. • Relocate the monitor and test in OSD Menu. No picture or no brightness • Increase brightness & contrast controls via OSD. • Perform monitor self-test feature check. • Check for bent or...
... via the Input Source Select menu. • Run the built-in the video cable connector. • Ensure that the correct input source is selected via OSD. • Eliminate video extension cables. • Reset the monitor to Factory Settings. • Change the video resolution to Factory Settings. • Check environmental factors. • Relocate the monitor and test in OSD Menu. No picture or no brightness • Increase brightness & contrast controls via OSD. • Perform monitor self-test feature check. • Check for bent or...

Users Guide
Page 40
.... • Reset the monitor to Factory Settings. • Auto Adjust via OSD. • Adjust brightness & contrast controls via OSD. • Perform monitor self-test feature check and determine if these lines are also in self-test mode. • Check for bent or broken pins in the video cable connector. NOTE: When using 'HDMI', the positioning adjustments are not available. 40 │ Troubleshooting Missing Pixels Stuck-on Pixels Brightness Problems Geometric Distortion Horizontal/Vertical Lines LCD screen has spots LCD screen has bright spots Picture too dim...
.... • Reset the monitor to Factory Settings. • Auto Adjust via OSD. • Adjust brightness & contrast controls via OSD. • Perform monitor self-test feature check and determine if these lines are also in self-test mode. • Check for bent or broken pins in the video cable connector. NOTE: When using 'HDMI', the positioning adjustments are not available. 40 │ Troubleshooting Missing Pixels Stuck-on Pixels Brightness Problems Geometric Distortion Horizontal/Vertical Lines LCD screen has spots LCD screen has bright spots Picture too dim...

Users Guide
Page 41
...; Reset the monitor to Factory Settings. • Perform monitor self-test feature check to Graphics or Video depending on the monitor for more information, see Power Management Modes. • Alternatively, use (for a long period of smoke or sparks • Do not perform any troubleshooting steps. • Contact Dell immediately. Wrong Color Picture color not good • Change the Color Mode in the Color OSD to determine if the intermittent problem occurs in Color OSD. Image...
...; Reset the monitor to Factory Settings. • Perform monitor self-test feature check to Graphics or Video depending on the monitor for more information, see Power Management Modes. • Alternatively, use (for a long period of smoke or sparks • Do not perform any troubleshooting steps. • Contact Dell immediately. Wrong Color Picture color not good • Change the Color Mode in the Color OSD to determine if the intermittent problem occurs in Color OSD. Image...

Users Guide
Page 42
... video formats (aspect ratio) of the screen • Due to unlock (for more information, see Lock). No picture, the LED • Check the signal source. When computer is centered on screen, but does not fill entire viewing area • Check the Aspect Ratio setting in the Display OSD. • Reset the monitor to Factory Settings. Product-Specific Problems Specific Symptoms Screen image is too small Cannot adjust the monitor with the buttons on the front panel No Input Signal when user controls...
... video formats (aspect ratio) of the screen • Due to unlock (for more information, see Lock). No picture, the LED • Check the signal source. When computer is centered on screen, but does not fill entire viewing area • Check the Aspect Ratio setting in the Display OSD. • Reset the monitor to Factory Settings. Product-Specific Problems Specific Symptoms Screen image is too small Cannot adjust the monitor with the buttons on the front panel No Input Signal when user controls...


