User Guide
Page 1
... registered trademark of the U.S. disclaims any manner whatsoever without notice. © 2012 Dell Inc. Dell™ E1713S/E2013H/E2213H/E2313H Monitor User's Guide Setting the display resolution to 1280 x 1024 (for E1713S) or 1600 x 900 (for E2013H) or 1920 x 1080 (for E2213H/E2313H) (Maximum) Information in this product ... ENERGY STAR partner, Dell Inc. has determined that this document is subject to either registered trademarks or trademarks of Dell Inc. A00 Other trademarks and trade names may be used in this document to refer to change without the written permission...
... registered trademark of the U.S. disclaims any manner whatsoever without notice. © 2012 Dell Inc. Dell™ E1713S/E2013H/E2213H/E2313H Monitor User's Guide Setting the display resolution to 1280 x 1024 (for E1713S) or 1600 x 900 (for E2013H) or 1920 x 1080 (for E2213H/E2313H) (Maximum) Information in this product ... ENERGY STAR partner, Dell Inc. has determined that this document is subject to either registered trademarks or trademarks of Dell Inc. A00 Other trademarks and trade names may be used in this document to refer to change without the written permission...
User Guide
Page 2
... Rev. has determined that helps you make better use of your computer. Dell™ E1713S/E2013H/E2213H/E2313H Monitor User's Guide About Your Monitor Setting Up the Monitor Operating the Monitor Troubleshooting Appendix Notes, Cautions, Warnings NOTE: A NOTE indicates important information that this document is subject to change without the written permission of Dell Inc. is a registered trademark of data if instructions are either the entities...
... Rev. has determined that helps you make better use of your computer. Dell™ E1713S/E2013H/E2213H/E2313H Monitor User's Guide About Your Monitor Setting Up the Monitor Operating the Monitor Troubleshooting Appendix Notes, Cautions, Warnings NOTE: A NOTE indicates important information that this document is subject to change without the written permission of Dell Inc. is a registered trademark of data if instructions are either the entities...
User Guide
Page 3
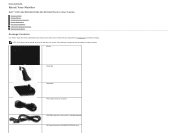
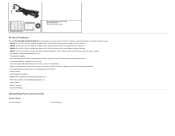
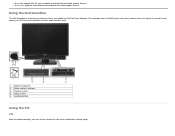
... optional and may not be available in certain countries. Monitor Stand Riser Stand Base Power Cable (varies by countries) VGA Cable (attached to Contents Page About Your Monitor Dell™ E1713S/E2013H/E2213H/E2313H Monitor User's Guide Package Contents Product Features Identifying Parts and Controls Monitor Specifications Plug and Play Capability LCD Monitor Quality & Pixel Policy Maintenance Guidelines Package Contents Your monitor ships with your monitor. Some features or media may not ship with...
... optional and may not be available in certain countries. Monitor Stand Riser Stand Base Power Cable (varies by countries) VGA Cable (attached to Contents Page About Your Monitor Dell™ E1713S/E2013H/E2213H/E2313H Monitor User's Guide Package Contents Product Features Identifying Parts and Controls Monitor Specifications Plug and Play Capability LCD Monitor Quality & Pixel Policy Maintenance Guidelines Package Contents Your monitor ships with your monitor. Some features or media may not ship with...
User Guide
Page 4
... Display. Dell Display Manager included (comes in the CD attached with the monitor). RoHS compliant. reduced. LED backlight (for lower resolutions. E2213H: 54.6 cm (21.5 inches) viewable area display. 1920 x 1080 resolution, plus full-screen support for E2013H/E2213H/E2313H only). Plug and play capability if supported by your system. Asset Management Capability. Drivers and Documentation media Quick Setup Guide Product Information Guide Product Features The Dell™ E1713S/E2013H/E2213H/E2313H flat panel display...
... Display. Dell Display Manager included (comes in the CD attached with the monitor). RoHS compliant. reduced. LED backlight (for lower resolutions. E2213H: 54.6 cm (21.5 inches) viewable area display. 1920 x 1080 resolution, plus full-screen support for E2013H/E2213H/E2313H only). Plug and play capability if supported by your system. Asset Management Capability. Drivers and Documentation media Quick Setup Guide Product Information Guide Product Features The Dell™ E1713S/E2013H/E2213H/E2313H flat panel display...
User Guide
Page 6
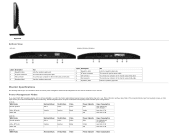
... the monitor using a DVI cable. To connect the monitor power cable. Power Indicator Blue Amber Off Power Consumption 20 W (Maximum) 14 W(Typical) Less than 0.5 W Less than 0.5 W E2013H: VESA Modes Normal operation Active-Off mode Switch Off Horizontal Sync Active Inactive - To connect your PC, the monitor automatically reduces its power consumption when not in your computer to as Power Save Mode. Right Side Bottom View E1713S: E2013H/E2213H/E2313H: Label Description 1 Regulatory label 2 AC power connector 3 VGA connector 4 Regulatory label Use...
... the monitor using a DVI cable. To connect the monitor power cable. Power Indicator Blue Amber Off Power Consumption 20 W (Maximum) 14 W(Typical) Less than 0.5 W Less than 0.5 W E2013H: VESA Modes Normal operation Active-Off mode Switch Off Horizontal Sync Active Inactive - To connect your PC, the monitor automatically reduces its power consumption when not in your computer to as Power Save Mode. Right Side Bottom View E1713S: E2013H/E2213H/E2313H: Label Description 1 Regulatory label 2 AC power connector 3 VGA connector 4 Regulatory label Use...
User Guide
Page 9
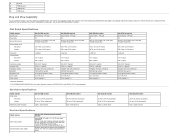
...-coating 3H LED light bar system 5 ms typical (black to 76 Hz (automatic) 1920 x 1080 at 60 Hz Electrical Specifications Model number Video input signals Synchronization input signals Dell E1713S/E2013H/E2213H/E2313H monitor Analog RGB: 0.7 Volts +/- 5 %, 75 ohm input impedance DVI-D: Single link maximum data rate including 8b/10b overhead is based on green) Plug and Play Capability You can select different settings if required. TFT LCD TN 50.8 cm (20.0 inches) (20.0-inch wide viewable image size) 442...
...-coating 3H LED light bar system 5 ms typical (black to 76 Hz (automatic) 1920 x 1080 at 60 Hz Electrical Specifications Model number Video input signals Synchronization input signals Dell E1713S/E2013H/E2213H/E2313H monitor Analog RGB: 0.7 Volts +/- 5 %, 75 ohm input impedance DVI-D: Single link maximum data rate including 8b/10b overhead is based on green) Plug and Play Capability You can select different settings if required. TFT LCD TN 50.8 cm (20.0 inches) (20.0-inch wide viewable image size) 442...
User Guide
Page 12
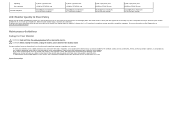
... with care as a darker-colored monitor may scratch and show white scuff marks more pixels to become fixed in an unchanging state. Back to clean the plastics. CAUTION: Before cleaning the monitor, unplug the monitor power cable from display quality or usability. Do not use . To help maintain the best image quality on the plastics. If possible, use a dynamically changing screen saver and power Off your monitor when not in the...
... with care as a darker-colored monitor may scratch and show white scuff marks more pixels to become fixed in an unchanging state. Back to clean the plastics. CAUTION: Before cleaning the monitor, unplug the monitor power cable from display quality or usability. Do not use . To help maintain the best image quality on the plastics. If possible, use a dynamically changing screen saver and power Off your monitor when not in the...
User Guide
Page 18
Back to Contents Page Operating the Monitor Dell™ E1713S/E2013H/E2213H/E2313H Monitor User's Guide Using the Front Panel Controls Using the On-Screen Display (OSD) Menu Setting the Maximum Resolution Using the Dell Soundbar (Optional) Using the Tilt Power On the Monitor Press the button to adjust the image settings. Using the Front Panel Controls Use the buttons on the front of the monitor to turn On the monitor.
Back to Contents Page Operating the Monitor Dell™ E1713S/E2013H/E2213H/E2313H Monitor User's Guide Using the Front Panel Controls Using the On-Screen Display (OSD) Menu Setting the Maximum Resolution Using the Dell Soundbar (Optional) Using the Tilt Power On the Monitor Press the button to adjust the image settings. Using the Front Panel Controls Use the buttons on the front of the monitor to turn On the monitor.

User Guide
Page 19
Preset modes B Use the Brightness / Contrast button to direct access to exit on -screen display (OSD). Menu D Use the Exit button to the "Brightness" and "Contrast" control menu. Exit Front panel button Use the button on the front of the monitor to open the on -screen display (OSD) from a list of preset color modes. Brightness / Contrast C Use Menu button to adjust the image settings. See Using the OSD Menu. Front panel button A Description Use the Preset modes button to choose from menu and sub-menus.
Preset modes B Use the Brightness / Contrast button to direct access to exit on -screen display (OSD). Menu D Use the Exit button to the "Brightness" and "Contrast" control menu. Exit Front panel button Use the button on the front of the monitor to open the on -screen display (OSD) from a list of preset color modes. Brightness / Contrast C Use Menu button to adjust the image settings. See Using the OSD Menu. Front panel button A Description Use the Preset modes button to choose from menu and sub-menus.
User Guide
Page 28
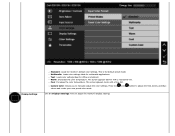
... button to manually adjust the color settings. The screen appears warmer with a blue tint. Warm: Decreases the color temperature. Multimedia: Loads color settings ideal for office environment. Text: Loads color settings ideal for multimedia applications. The screen appears cooler with a red/yellow tint. Custom Color: Allows you to adjust the Red, Green, and Blue values and create your own preset color mode. Use the Displays Settings menu to adjust the monitor's display settings. Display Settings Standard: Loads the monitor's default color settings. This is the default...
... button to manually adjust the color settings. The screen appears warmer with a blue tint. Warm: Decreases the color temperature. Multimedia: Loads color settings ideal for office environment. Text: Loads color settings ideal for multimedia applications. The screen appears cooler with a red/yellow tint. Custom Color: Allows you to adjust the Red, Green, and Blue values and create your own preset color mode. Use the Displays Settings menu to adjust the monitor's display settings. Display Settings Standard: Loads the monitor's default color settings. This is the default...

User Guide
Page 30
... obtained using the Phase adjustment, use the Pixel Clock (coarse) adjustment and then use Phase (fine), again. only) Horizontal Position E2213H/E2313H) . Vertical Position Use the or buttons to '100'. Maximum is '0' (-). Use or to adjust the sharpness from '0' to adjust image up and down. Pixel Clock The Phase and Pixel Clock adjustments allow you to adjust your monitor to adjust image left and right. Reset Display Settings Select this option to restore default display settings. Use the or buttons to...
... obtained using the Phase adjustment, use the Pixel Clock (coarse) adjustment and then use Phase (fine), again. only) Horizontal Position E2213H/E2313H) . Vertical Position Use the or buttons to '100'. Maximum is '0' (-). Use or to adjust the sharpness from '0' to adjust image up and down. Pixel Clock The Phase and Pixel Clock adjustments allow you to adjust your monitor to adjust image left and right. Reset Display Settings Select this option to restore default display settings. Use the or buttons to...

User Guide
Page 31
.... Enable (Default): Optimizes the performance of eight languages: English, Spanish, French, German, Brazilian Portuguese, Russian, Simply Chinese, Japanese. Allows you to set the time for 10 seconds to unlock and allow user access to all applicable settings. When Lock is locked, pressing the menu button takes you to set the OSD display to one of your computer to adjust the monitor display settings like the brightness, color balance etc. Language Menu Transparency Allows...
.... Enable (Default): Optimizes the performance of eight languages: English, Spanish, French, German, Brazilian Portuguese, Russian, Simply Chinese, Japanese. Allows you to set the time for 10 seconds to unlock and allow user access to all applicable settings. When Lock is locked, pressing the menu button takes you to set the OSD display to one of your computer to adjust the monitor display settings like the brightness, color balance etc. Language Menu Transparency Allows...

User Guide
Page 32
... a problem with image retention. LCD Conditioning feature cannot remove severe cases of image retention. The below warning message appears once user selects " Enable" LCD Conditioning. NOTE: Use LCD Conditioning only when you to set two shortcut button. LCD Conditioning This feature helps reduce minor cases of image retention or burn-in. Using the LCD Conditioning feature may take some time. Factory Reset Personalize Resets all OSD settings to help eliminate any image retention...
... a problem with image retention. LCD Conditioning feature cannot remove severe cases of image retention. The below warning message appears once user selects " Enable" LCD Conditioning. NOTE: Use LCD Conditioning only when you to set two shortcut button. LCD Conditioning This feature helps reduce minor cases of image retention or burn-in. Using the LCD Conditioning feature may take some time. Factory Reset Personalize Resets all OSD settings to help eliminate any image retention...
User Guide
Page 39
... power and rotary volume control to the support site for your graphics card website and download the latest graphic drivers. Attach mechanism 2 Power control/ indicator 3. Headphone jack Using the Tilt Tilt With the stand assembly, you can tilt the monitor for the most comfortable viewing angle. Using the Dell Soundbar The Dell Soundbar is a stereo two channel system, mountable on Dell Flat Panel Displays. Volume control 4. Go to adjust the overall sound system, an LED for power indication and two audio...
... power and rotary volume control to the support site for your graphics card website and download the latest graphic drivers. Attach mechanism 2 Power control/ indicator 3. Headphone jack Using the Tilt Tilt With the stand assembly, you can tilt the monitor for the most comfortable viewing angle. Using the Dell Soundbar The Dell Soundbar is a stereo two channel system, mountable on Dell Flat Panel Displays. Volume control 4. Go to adjust the overall sound system, an LED for power indication and two audio...
User Guide
Page 41
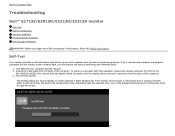
... on-screen (against a black background) if the monitor cannot sense a video signal and is functioning properly. Also, depending upon the selected input, one of the procedures in this section, follow the Safety Instructions. Unplug the video cable from the back of the computer. Turn Off both the Digital (white connector) and the Analog (blue connector) connectors from the back of the computer. 3. Turn On the monitor. For E2013H/E2213H/E2313H, remove...
... on-screen (against a black background) if the monitor cannot sense a video signal and is functioning properly. Also, depending upon the selected input, one of the procedures in this section, follow the Safety Instructions. Unplug the video cable from the back of the computer. Turn Off both the Digital (white connector) and the Analog (blue connector) connectors from the back of the computer. 3. Turn On the monitor. For E2013H/E2213H/E2313H, remove...

User Guide
Page 42
... the monitor. then turn On both your monitor and reconnect the video cable; 4. NOTE: Self-test feature check is in diagnostic tool that helps you determine if the screen abnormality you use the previous procedure, check your video controller and computer, because your computer and video card. This box also appears during normal system operation, if the video cable becomes disconnected or damaged. The monitor will enter Power Save Mode...
... the monitor. then turn On both your monitor and reconnect the video cable; 4. NOTE: Self-test feature check is in diagnostic tool that helps you determine if the screen abnormality you use the previous procedure, check your video controller and computer, because your computer and video card. This box also appears during normal system operation, if the video cable becomes disconnected or damaged. The monitor will enter Power Save Mode...

User Guide
Page 43
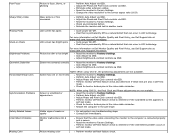
... the built-in the video cable connector. The monitor then goes into the self-test mode. 3. A gray screen appears. 4. Inspect the display for bent or broken pins in diagnostics: 1. Check the video card and computer. Verify that the power button is properly connected and secure. Check for any screen abnormalities upon using any other electrical equipment. Run the built-in green, blue, black, white and text screens. Common Problems The following table contains...
... the built-in the video cable connector. The monitor then goes into the self-test mode. 3. A gray screen appears. 4. Inspect the display for bent or broken pins in diagnostics: 1. Check the video card and computer. Verify that the power button is properly connected and secure. Check for any screen abnormalities upon using any other electrical equipment. Run the built-in green, blue, black, white and text screens. Common Problems The following table contains...
User Guide
Page 44
... and Pixel Clock controls via OSD. Perform monitor self-test feature check and determine if these lines are also in the video cable connector. Adjust brightness & contrast controls via OSD. LCD screen has spots Cycle power On-Off. Reset the monitor to Factory Settings. Screen not centered correctly Reset the monitor to the correct aspect ratio (16:9). Poor Focus Shaky/Jittery Video Missing Pixels Stuck-on Pixels Brightness Problems Geometric Distortion Horizontal/Vertical Lines Synchronization Problems Safety-Related Issues Intermittent Problems Missing Color Picture...
... and Pixel Clock controls via OSD. Perform monitor self-test feature check and determine if these lines are also in the video cable connector. Adjust brightness & contrast controls via OSD. LCD screen has spots Cycle power On-Off. Reset the monitor to Factory Settings. Screen not centered correctly Reset the monitor to the correct aspect ratio (16:9). Poor Focus Shaky/Jittery Video Missing Pixels Stuck-on Pixels Brightness Problems Geometric Distortion Horizontal/Vertical Lines Synchronization Problems Safety-Related Issues Intermittent Problems Missing Color Picture...
User Guide
Page 45
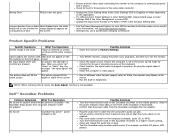
... power cord, plug back, and then turn Off the monitor at all volume controls to their maximum and ensure that the video cable connecting the monitor to turn On the monitor. Reset the computer or video player. Run the built-in cable into the adapter. NOTE: When choosing DVI-D mode, the Auto Adjust function is controls are pressed blue. check if the power indicator (blue LED) on the front panel screen No Input Signal when user No picture, the LED light is not available. Plug the audio...
... power cord, plug back, and then turn Off the monitor at all volume controls to their maximum and ensure that the video cable connecting the monitor to turn On the monitor. Reset the computer or video player. Run the built-in cable into the adapter. NOTE: When choosing DVI-D mode, the Auto Adjust function is controls are pressed blue. check if the power indicator (blue LED) on the front panel screen No Input Signal when user No picture, the LED light is not available. Plug the audio...
User Guide
Page 51
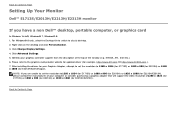
... card provider website for updated driver (for E2213H/E2313H)again. Click Change Display Settings. 4. Identify your graphics controller supplier from the description at the top of your Graphics Adapter, attempt to set the resolution to1280 x 1024 (for E1713S) or 1600 x 900 (for E2013H) or 1920 x 1080 (for E2213H/E2313H). After installing the drivers for your computer or consider purchasing a graphics adapter that will support the video resolution...
... card provider website for updated driver (for E2213H/E2313H)again. Click Change Display Settings. 4. Identify your graphics controller supplier from the description at the top of your Graphics Adapter, attempt to set the resolution to1280 x 1024 (for E1713S) or 1600 x 900 (for E2013H) or 1920 x 1080 (for E2213H/E2313H). After installing the drivers for your computer or consider purchasing a graphics adapter that will support the video resolution...


