
User's Guide
Page 1
... you make better use of Microsoft Corporation in any proprietary interest in this document is subject to avoid the problem. ENERGY STAR is strictly forbidden. Model E1909WDDc September 2008 Rev. A00 Reproduction of these materials in the United States and/or other than its own. As an ENERGY STAR partner, Dell Inc. Dell™ E1909WDD Flat Panel Monitor User's Guide About Your Monitor Setting...
... you make better use of Microsoft Corporation in any proprietary interest in this document is subject to avoid the problem. ENERGY STAR is strictly forbidden. Model E1909WDDc September 2008 Rev. A00 Reproduction of these materials in the United States and/or other than its own. As an ENERGY STAR partner, Dell Inc. Dell™ E1909WDD Flat Panel Monitor User's Guide About Your Monitor Setting...
User's Guide
Page 2
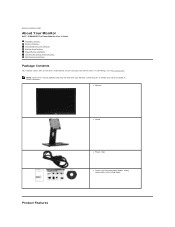
.... If something is missing, contact Dell. l Monitor Product Features l Stand l Power cable l Drivers and Documentation Media, Safety Information,Quick Setup Guide NOTE: Some items may be optional and may not be available in certain countries. Back to Contents Page About Your Monitor Dell™ E1909WDD Flat Panel Monitor User's Guide Package Contents Product Features Identifying Parts and Controls Monitor Specifications Plug and Play Capability LCD Monitor Quality and Pixel Policy Maintenance Guidelines Package Contents Your...
.... If something is missing, contact Dell. l Monitor Product Features l Stand l Power cable l Drivers and Documentation Media, Safety Information,Quick Setup Guide NOTE: Some items may be optional and may not be available in certain countries. Back to Contents Page About Your Monitor Dell™ E1909WDD Flat Panel Monitor User's Guide Package Contents Product Features Identifying Parts and Controls Monitor Specifications Plug and Play Capability LCD Monitor Quality and Pixel Policy Maintenance Guidelines Package Contents Your...
User's Guide
Page 3
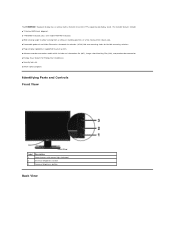
... Parts and Controls Front View Front View Label Description 1 Power button (with power light indicator) 2 Decrease Brightness button 3 Increase Brightness button Back View The monitor features include: ■ 19 inches(482.6mm) diagonal. ■ 1440x900 resolution, plus safe mode 640x480 resolution. ■ Wide viewing angle to allow viewing from a sitting or standing position, or while moving from side-to-side. ■ Removable pedestal and Video Electronics Standards Association (VESA) 100 mm mounting holes for flexible mounting solutions. ■ Plug...
... Parts and Controls Front View Front View Label Description 1 Power button (with power light indicator) 2 Decrease Brightness button 3 Increase Brightness button Back View The monitor features include: ■ 19 inches(482.6mm) diagonal. ■ 1440x900 resolution, plus safe mode 640x480 resolution. ■ Wide viewing angle to allow viewing from a sitting or standing position, or while moving from side-to-side. ■ Removable pedestal and Video Electronics Standards Association (VESA) 100 mm mounting holes for flexible mounting solutions. ■ Plug...
User's Guide
Page 4
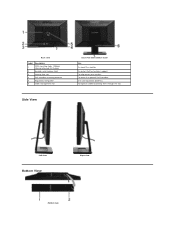
To attach the optional Dell Soundbar. Left view Bottom View Right view Bottom view To contact Dell for technical support. To organize cables by placing them through the slot. Lists the regulatory approvals. Back view Label Description VESA mounting holes (100mm) 1 (Behind attached VESA plate) 2 Barcode serial number label 3 Security lock slot 4 Dell soundbar mounting brackets 5 Regulatory rating label 6 Cable management slot Side View Back View with monitor stand Use To mount the monitor. To help secure your monitor.
To attach the optional Dell Soundbar. Left view Bottom View Right view Bottom view To contact Dell for technical support. To organize cables by placing them through the slot. Lists the regulatory approvals. Back view Label Description VESA mounting holes (100mm) 1 (Behind attached VESA plate) 2 Barcode serial number label 3 Security lock slot 4 Dell soundbar mounting brackets 5 Regulatory rating label 6 Cable management slot Side View Back View with monitor stand Use To mount the monitor. To help secure your monitor.
User's Guide
Page 5
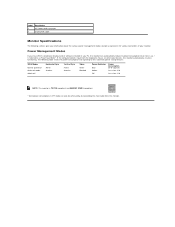
If the computer detects input from the monitor. The following sections give you have VESA's compliance display card or software installed in use. Power Indicator Blue Amber Off Power Consumption 35 W (typical) Less than 2 W Less than 1 W NOTE: This monitor is referred to as Power Save Mode*. Label Description 1 AC Power cord connector 2 DisplayPort cable Monitor Specifications The following table shows the power consumption and signaling of your PC, the monitor can only be achieved by...
If the computer detects input from the monitor. The following sections give you have VESA's compliance display card or software installed in use. Power Indicator Blue Amber Off Power Consumption 35 W (typical) Less than 2 W Less than 1 W NOTE: This monitor is referred to as Power Save Mode*. Label Description 1 AC Power cord connector 2 DisplayPort cable Monitor Specifications The following table shows the power consumption and signaling of your PC, the monitor can only be achieved by...

User's Guide
Page 7
Pin Assignments 20-pin DisplayPort Connector Pin 20-pin Side of the Connected Signal Cable Number 1 ML Lane 3(n) 2 GND 3 ML Lane 3(p) 4 ML Lane 2(n) 5 GND 6 ML Lane 2(p) 7 ML Lane 1(n) 8 GND 9 ML Lane 1(p) 10 ML Lane 0(n) 11 GND 12 ML Lane 0(p) 13 GND 14 GND 15 AUX CH (p) 16 GND 17 AUX CH (n) 18 Hot Plug Detect 19 Return 20 DP PWR
Pin Assignments 20-pin DisplayPort Connector Pin 20-pin Side of the Connected Signal Cable Number 1 ML Lane 3(n) 2 GND 3 ML Lane 3(p) 4 ML Lane 2(n) 5 GND 6 ML Lane 2(p) 7 ML Lane 1(n) 8 GND 9 ML Lane 1(p) 10 ML Lane 0(n) 11 GND 12 ML Lane 0(p) 13 GND 14 GND 15 AUX CH (p) 16 GND 17 AUX CH (n) 18 Hot Plug Detect 19 Return 20 DP PWR
User's Guide
Page 9
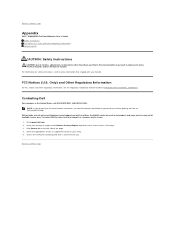
... support, or customer service issues: 1. To contact Dell for you can find contact information on safety instructions, see the regulatory compliance website located at the bottom of contacting Dell that shipped with your need. 5. Back to Contents Page Appendix Dell™ E1909WDD Flat Panel Monitor User's Guide Safety Instructions FCC Notice (U.S. Back to Contents Page Only) and Other Regulatory Information Contacting Dell CAUTION: Safety Instructions CAUTION: Use...
... support, or customer service issues: 1. To contact Dell for you can find contact information on safety instructions, see the regulatory compliance website located at the bottom of contacting Dell that shipped with your need. 5. Back to Contents Page Appendix Dell™ E1909WDD Flat Panel Monitor User's Guide Safety Instructions FCC Notice (U.S. Back to Contents Page Only) and Other Regulatory Information Contacting Dell CAUTION: Safety Instructions CAUTION: Use...
User's Guide
Page 10
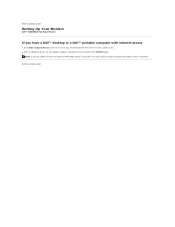
Go to http://support.dell.com, enter your service tag, and download the latest driver for your graphics card. 2. Back to Contents Page NOTE: If you have a Dell™ desktop or a Dell™ portable computer with internet access 1. Back to Contents Page Setting Up Your Monitor Dell™ E1909WDD Flat Panel Monitor If you are unable to set the resolution to inquire about a graphics Adapter that supports these resolutions. After installing the drivers for your graphics Adapter, attempt to set the resolution to 1440x900, please contact Dell™ to 1440x900 again.
Go to http://support.dell.com, enter your service tag, and download the latest driver for your graphics card. 2. Back to Contents Page NOTE: If you have a Dell™ desktop or a Dell™ portable computer with internet access 1. Back to Contents Page Setting Up Your Monitor Dell™ E1909WDD Flat Panel Monitor If you are unable to set the resolution to inquire about a graphics Adapter that supports these resolutions. After installing the drivers for your graphics Adapter, attempt to set the resolution to 1440x900, please contact Dell™ to 1440x900 again.
User's Guide
Page 11
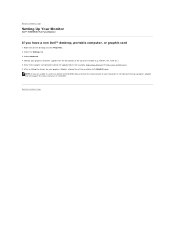
... to Contents Page Setting Up Your Monitor Dell™ E1909WDD Flat Panel Monitor If you are unable to set the resolution to the graphic card provider website for updated driver (for example, http://www.ATI.com OR http://www.NVIDIA.com ). 6. NOTE: If you have a non Dell™ desktop, portable computer, or graphic card 1. After installing the drivers for your graphics Adapter, attempt to set the resolution to 1440x900...
... to Contents Page Setting Up Your Monitor Dell™ E1909WDD Flat Panel Monitor If you are unable to set the resolution to the graphic card provider website for updated driver (for example, http://www.ATI.com OR http://www.NVIDIA.com ). 6. NOTE: If you have a non Dell™ desktop, portable computer, or graphic card 1. After installing the drivers for your graphics Adapter, attempt to set the resolution to 1440x900...
User's Guide
Page 12
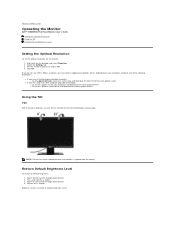
...; Go to support.dell.com, enter your service tag, and download the latest driver for your computer, complete one of stand is detached when the monitor is restored to Contents Page Operating the Monitor Dell™ E1909WDD Flat Panel Monitor User's Guide Setting the Optimal Resolution Using the Tilt Restore Default Brightness Level Setting the Optimal Resolution To set the optimal resolution for the most comfortable viewing angle. Back to default brightness level. Power off the monitor through power button. 4. Press and hold the + button. 3. If...
...; Go to support.dell.com, enter your service tag, and download the latest driver for your computer, complete one of stand is detached when the monitor is restored to Contents Page Operating the Monitor Dell™ E1909WDD Flat Panel Monitor User's Guide Setting the Optimal Resolution Using the Tilt Restore Default Brightness Level Setting the Optimal Resolution To set the optimal resolution for the most comfortable viewing angle. Back to default brightness level. Power off the monitor through power button. 4. Press and hold the + button. 3. If...

User's Guide
Page 13
Label 1 2 3 Description Power button (with power light indicator) Decrease Brightness button Increase Brightness button Back to Contents Page
Label 1 2 3 Description Power button (with power light indicator) Decrease Brightness button Increase Brightness button Back to Contents Page
User's Guide
Page 14
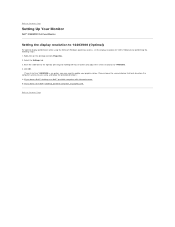
...; portable computer with internet access. 2: If you may need to 1440X900. 4. Click OK. Select the Settings tab. 3. Back to 1440 x 900 pixels by pressing and holding left-mouse button and adjust the screen resolution to update your graphics driver. Back to Contents Page Setting Up Your Monitor Dell™ E1909WDD Flat Panel Monitor Setting the display resolution to 1440X900 (Optimal) For optimal display performance while using , and follow the provided directions: 1: If you...
...; portable computer with internet access. 2: If you may need to 1440X900. 4. Click OK. Select the Settings tab. 3. Back to 1440 x 900 pixels by pressing and holding left-mouse button and adjust the screen resolution to update your graphics driver. Back to Contents Page Setting Up Your Monitor Dell™ E1909WDD Flat Panel Monitor Setting the display resolution to 1440X900 (Optimal) For optimal display performance while using , and follow the provided directions: 1: If you...
User's Guide
Page 15
... products. Dell Inc. Dell™ E1909WDD Flat Panel Monitor User Guide Setting the display resolution to 1440x900 (optimal) Information in this product meets the ENERGY STAR guidelines for energy efficiency. Trademarks used in this text: DELL and the DELL logo are trademarks of Microsoft Corporation in trademarks and trade names other countries; Environmental Protection Agency. has determined that this document is subject to change without the...
... products. Dell Inc. Dell™ E1909WDD Flat Panel Monitor User Guide Setting the display resolution to 1440x900 (optimal) Information in this product meets the ENERGY STAR guidelines for energy efficiency. Trademarks used in this text: DELL and the DELL logo are trademarks of Microsoft Corporation in trademarks and trade names other countries; Environmental Protection Agency. has determined that this document is subject to change without the...
User's Guide
Page 16
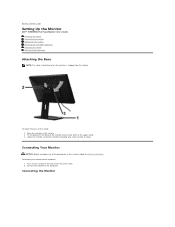
... Instructions. To attach the base of the upper stand. 3. To connect your computer and disconnect the power cable. 2. Connect the monitor to Contents Page Setting Up the Monitor Dell™ E1909WDD Flat Panel Monitor User's Guide Attaching the Stand Connecting the Monitor Organizing Your Cables Attaching the Soundbar (optional) Removing the Stand Wall Mounting (Optional) Attaching the Base NOTE: The stand is detached when the monitor is shipped from the factory. Back to the computer. Fit the groove on /lock...
... Instructions. To attach the base of the upper stand. 3. To connect your computer and disconnect the power cable. 2. Connect the monitor to Contents Page Setting Up the Monitor Dell™ E1909WDD Flat Panel Monitor User's Guide Attaching the Stand Connecting the Monitor Organizing Your Cables Attaching the Soundbar (optional) Removing the Stand Wall Mounting (Optional) Attaching the Base NOTE: The stand is detached when the monitor is shipped from the factory. Back to the computer. Fit the groove on /lock...

User's Guide
Page 17
...Working from the rear of the brick to the left until it snaps into the computer's audio output jack Attaching the Soundbar(optional) NOTICE: Do not use the cable management slot to organize all cables as shown above. Slide the Soundbar to a nearby power outlet. 5. To attach the soundbar: 1. Connect... the power brick. 4. Plug the power cable of the Soundbar into place. 3. Organizing Your Cables After attaching all necessary cables to your monitor and computer, (see Connecting Your Monitor) use with any device other than the Dell Soundbar. NOTE: The graphics are used for the...
...Working from the rear of the brick to the left until it snaps into the computer's audio output jack Attaching the Soundbar(optional) NOTICE: Do not use the cable management slot to organize all cables as shown above. Slide the Soundbar to a nearby power outlet. 5. To attach the soundbar: 1. Connect... the power brick. 4. Plug the power cable of the Soundbar into place. 3. Organizing Your Cables After attaching all necessary cables to your monitor and computer, (see Connecting Your Monitor) use with any device other than the Dell Soundbar. NOTE: The graphics are used for the...

User's Guide
Page 18
... instructions that the Power button is turned Off, then disconnect the power cord. 2. To convert your LCD display from the back of the stand: 1. Attach the mounting bracket from the monitor stand. Attach the LCD display to a wall-mounted display, do the following the instructions in the wall-mounting kit. Lay the LCD display face down on a soft cloth or cushion, press and hold the LCD removal button, and then remove the stand. Remove the base away from the VESA compatible wall mounting...
... instructions that the Power button is turned Off, then disconnect the power cord. 2. To convert your LCD display from the back of the stand: 1. Attach the mounting bracket from the monitor stand. Attach the LCD display to a wall-mounted display, do the following the instructions in the wall-mounting kit. Lay the LCD display face down on a soft cloth or cushion, press and hold the LCD removal button, and then remove the stand. Remove the base away from the VESA compatible wall mounting...

User's Guide
Page 19
... monitor. Inspect the display for 2 seconds. To run the built-in green, blue, and white colored screens. Repeat steps 5 and 6 to red. 6. Common Symptoms No Video/Power LED off What You Experience No picture Possible Solutions l Ensure that helps you determine if the screen abnormality you begin any abnormalities. 7. If you might encounter and the possible solutions. Back to Contents Page Troubleshooting Dell™ E1909WDD Flat Panel Monitor Common Problems Product Specific Problems Dell...
... monitor. Inspect the display for 2 seconds. To run the built-in green, blue, and white colored screens. Repeat steps 5 and 6 to red. 6. Common Symptoms No Video/Power LED off What You Experience No picture Possible Solutions l Ensure that helps you determine if the screen abnormality you begin any abnormalities. 7. If you might encounter and the possible solutions. Back to Contents Page Troubleshooting Dell™ E1909WDD Flat Panel Monitor Common Problems Product Specific Problems Dell...

User's Guide
Page 20
... Specific Problems Specific Symptoms What You Experience Cannot adjust the monitor with Brightness does not change the buttons on & off is a natural defect that the mute option is illuminated. l Contact Dell immediately. l Run the built-in diagnostics Wrong Color Picture color not good l Run the built-in the video cable connector. The picture does not fill the entire screen. Re-plug the signal cable if necessary. i.e. No Video/Power LED on the monitor. l Check whether...
... Specific Problems Specific Symptoms What You Experience Cannot adjust the monitor with Brightness does not change the buttons on & off is a natural defect that the mute option is illuminated. l Contact Dell immediately. l Run the built-in diagnostics Wrong Color Picture color not good l Run the built-in the video cable connector. The picture does not fill the entire screen. Re-plug the signal cable if necessary. i.e. No Video/Power LED on the monitor. l Check whether...

User's Guide
Page 21
... Soundbar using an audio cable extension or audio jack converter. l Avoid using another audio source (For example: portable CD player, MP3 player). l Turn the Power/Volume knob on the Soundbar counter-clockwise to the maximum volume setting. l Turn the Power/Volume knob on the computer (example, audio CD, or MP3). l Clean and reseat the audio line-in plug. l Set all Windows volume controls to their midpoints. l Troubleshoot the computer's sound card. l Test the Soundbar using another audio source (For...
... Soundbar using an audio cable extension or audio jack converter. l Avoid using another audio source (For example: portable CD player, MP3 player). l Turn the Power/Volume knob on the Soundbar counter-clockwise to the maximum volume setting. l Turn the Power/Volume knob on the computer (example, audio CD, or MP3). l Clean and reseat the audio line-in plug. l Set all Windows volume controls to their midpoints. l Troubleshoot the computer's sound card. l Test the Soundbar using another audio source (For...


