Owner's Manual
Page 1
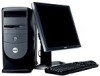
Dell™ Dimension™ 8300 Series USB 2.0 connectors (2) headphone connector Service Tag power connector voltage selection switch serial connector keyboard connector center/LFE connector line-out connector microphone connector USB 2.0 connectors (6) CD or DVD activity light CD or DVD drive eject button floppy drive eject button* floppy drive light* hard drive light power button *On computers with an optional...
Dell™ Dimension™ 8300 Series USB 2.0 connectors (2) headphone connector Service Tag power connector voltage selection switch serial connector keyboard connector center/LFE connector line-out connector microphone connector USB 2.0 connectors (6) CD or DVD activity light CD or DVD drive eject button floppy drive eject button* floppy drive light* hard drive light power button *On computers with an optional...
Owner's Manual
Page 4
... Turning Off Your Computer 27 2 Solving Problems Finding Solutions 30 Finding Help Information 32 Battery Problems 32 Drive Problems 33 Floppy drive problems 33 CD drive problems 34 Problems writing to a CD-RW drive 34 DVD drive problems 35 Hard drive problems 35 E-Mail, Modem, and Internet Problems 35 Error Messages 37 General Problems 38 The computer...
... Turning Off Your Computer 27 2 Solving Problems Finding Solutions 30 Finding Help Information 32 Battery Problems 32 Drive Problems 33 Floppy drive problems 33 CD drive problems 34 Problems writing to a CD-RW drive 34 DVD drive problems 35 Hard drive problems 35 E-Mail, Modem, and Internet Problems 35 Error Messages 37 General Problems 38 The computer...
Owner's Manual
Page 6
... 4-GB Configurations 88 Installing Memory 88 Adding or Replacing the AGP Card 91 Removing an AGP Card 91 Installing an AGP Card 92 Adding a Second Hard Drive 93 Adding a Floppy Drive 96 Removing the Front-Panel Insert 97 Installing a Floppy...
... 4-GB Configurations 88 Installing Memory 88 Adding or Replacing the AGP Card 91 Removing an AGP Card 91 Installing an AGP Card 92 Adding a Second Hard Drive 93 Adding a Floppy Drive 96 Removing the Front-Panel Insert 97 Installing a Floppy...
Owner's Manual
Page 14
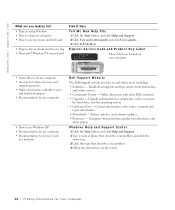
Drivers, patches, and software updates • Reference - Online discussion with other Dell customers • Upgrades - Upgrade information for components, such as a modem) Dell Support Website The Dell Support website provides several online tools, including: • Solutions - Express Service ...; Documentation for devices (such as memory, the hard drive, and the operating system • Customer Care - Troubleshooting hints and tips, articles from technicians, and online courses • Community Forum - www.dell.com | support.dell.com What are located on your problem. 4...
Drivers, patches, and software updates • Reference - Online discussion with other Dell customers • Upgrades - Upgrade information for components, such as a modem) Dell Support Website The Dell Support website provides several online tools, including: • Solutions - Express Service ...; Documentation for devices (such as memory, the hard drive, and the operating system • Customer Care - Troubleshooting hints and tips, articles from technicians, and online courses • Community Forum - www.dell.com | support.dell.com What are located on your problem. 4...

Owner's Manual
Page 25
...3 Click Exact Copy. 4 To copy the CD or DVD: • If you have one CD or DVD drive, ensure that the settings are correct and click Copy. For instructions, see the Sonic RecordNow documentation that have a... CD-R, CD-RW, DVD+RW, DVD+R, or DVD/CD-RW combo drive. The computer reads your source CD or DVD and copies it to a temporary folder on the kind of... you follow all copyright laws when you create CDs or DVDs. Once you have inserted your computer hard drive. The computer copies the data on your computer. How to Copy a CD or DVD NOTE: If...
...3 Click Exact Copy. 4 To copy the CD or DVD: • If you have one CD or DVD drive, ensure that the settings are correct and click Copy. For instructions, see the Sonic RecordNow documentation that have a... CD-R, CD-RW, DVD+RW, DVD+R, or DVD/CD-RW combo drive. The computer reads your source CD or DVD and copies it to a temporary folder on the kind of... you follow all copyright laws when you create CDs or DVDs. Once you have inserted your computer hard drive. The computer copies the data on your computer. How to Copy a CD or DVD NOTE: If...
Owner's Manual
Page 35
...remove viruses. Solving Problems 35 Viruses can sometimes prevent Windows from recognizing the drive. C H E C K F O R I N T E R R U P T R E Q U E S T C O N F L I O N - If the DVD drive is connected to it is not listed, perform a full scan with your DVDs. Hard drive problems RUN CHECK DISK - 1 Click the Start button and click My Computer.... 2 Right-click the drive letter (local disk) that the original DVD is connected to the jack ...
...remove viruses. Solving Problems 35 Viruses can sometimes prevent Windows from recognizing the drive. C H E C K F O R I N T E R R U P T R E Q U E S T C O N F L I O N - If the DVD drive is connected to it is not listed, perform a full scan with your DVDs. Hard drive problems RUN CHECK DISK - 1 Click the Start button and click My Computer.... 2 Right-click the drive letter (local disk) that the original DVD is connected to the jack ...

Owner's Manual
Page 40
...does not work. • A sound card emits noise or demonstrates other Dell customers about the website. E N S U R E T H A T Y O U P R O P E R L Y I N S T A L L E D A N D C O N F I T E - See "Dell Technical Support Policy (U.S. Use a virus-scanning program to technical support through...dell.com for a description of by Dell. www.dell.com | support.dell.com C H E C K F O R V I R U S E S - Go to run the software. See "Dell Support Website" on your computer and that your computer exhibits one or more information about their computers and gain access to check the hard drive...
...does not work. • A sound card emits noise or demonstrates other Dell customers about the website. E N S U R E T H A T Y O U P R O P E R L Y I N S T A L L E D A N D C O N F I T E - See "Dell Technical Support Policy (U.S. Use a virus-scanning program to technical support through...dell.com for a description of by Dell. www.dell.com | support.dell.com C H E C K F O R V I R U S E S - Go to run the software. See "Dell Support Website" on your computer and that your computer exhibits one or more information about their computers and gain access to check the hard drive...
Owner's Manual
Page 55
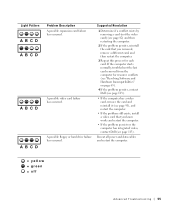
... 3 Repeat this process for resource conflicts (see "Resolving Software and Hardware Incompatibilities" on page 65). 4 If the problem persists, contact Dell (see page 113). • If the computer has a video card, remove the card and reinstall it (see page 91), and ...• If the problem persists or the computer has integrated video, contact Dell (see page 113). Light Pattern A B C D A B C D A B C D A B C D Problem Description A possible expansion card failure has occurred. A possible floppy or hard drive failure has occurred. A possible video card failure has occurred. If the computer...
... 3 Repeat this process for resource conflicts (see "Resolving Software and Hardware Incompatibilities" on page 65). 4 If the problem persists, contact Dell (see page 113). • If the computer has a video card, remove the card and reinstall it (see page 91), and ...• If the problem persists or the computer has integrated video, contact Dell (see page 113). Light Pattern A B C D A B C D A B C D A B C D Problem Description A possible expansion card failure has occurred. A possible floppy or hard drive failure has occurred. A possible video card failure has occurred. If the computer...

Owner's Manual
Page 57
check system setup (see page 107) to make sure that the cables are properly connected from the hard drive, CD drive, and DVD drive to the system board (see page 81). • If the problem persists, contact Dell (see page 113). • If there is an error message on your screen identifying a problem ...with a device (such as the floppy drive or hard drive), check the device to make sure it is functioning properly. • The...
check system setup (see page 107) to make sure that the cables are properly connected from the hard drive, CD drive, and DVD drive to the system board (see page 81). • If the problem persists, contact Dell (see page 113). • If there is an error message on your screen identifying a problem ...with a device (such as the floppy drive or hard drive), check the device to make sure it is functioning properly. • The...

Owner's Manual
Page 58
... test results can result in "Solving Problems" (see page 59). Start the Dell Diagnostics from the Dell Dimension ResourceCD (see page 29) and run the Dell Diagnostics before you contact Dell for Dell's service and support personnel. If you wait too long and the Microsoft® Windows... status messages that no diagnostics utility partition has been found, run the Dell Diagnostics from your hard drive (see page 58) or from either your ResourceCD (see page 59). Starting the Dell Diagnostics From Your Hard Drive 1 Shut down your computer, perform the checks in error messages.
... test results can result in "Solving Problems" (see page 59). Start the Dell Diagnostics from the Dell Dimension ResourceCD (see page 29) and run the Dell Diagnostics before you contact Dell for Dell's service and support personnel. If you wait too long and the Microsoft® Windows... status messages that no diagnostics utility partition has been found, run the Dell Diagnostics from your hard drive (see page 58) or from either your ResourceCD (see page 59). Starting the Dell Diagnostics From Your Hard Drive 1 Shut down your computer, perform the checks in error messages.

Owner's Manual
Page 66
... installation, back up all the steps in the following items: • Dell™ Operating System CD • Dell ResourceCD NOTE: The ResourceCD contains drivers that came with the software for reinstalling Windows XP. For conventional hard drive configurations, the primary hard drive is the first drive detected by the computer. Use the ResourceCD to load any virus...
... installation, back up all the steps in the following items: • Dell™ Operating System CD • Dell ResourceCD NOTE: The ResourceCD contains drivers that came with the software for reinstalling Windows XP. For conventional hard drive configurations, the primary hard drive is the first drive detected by the computer. Use the ResourceCD to load any virus...
Owner's Manual
Page 67
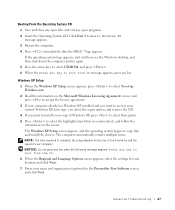
Click Exit if Install Windows XP message appears. 3 Restart the computer. 4 Press immediately after the DELL™ logo appears. Windows XP Setup 1 When the Windows XP Setup screen appears, press to select To set up Windows now. 2 Read the information on ... any key when the following message appears: Press any key to select the highlighted partition (recommended), and follow the instructions on the size of the hard drive and the speed of Windows XP, press to select that option. 5 Press to boot from CD message appears, press any open files and exit any...
Click Exit if Install Windows XP message appears. 3 Restart the computer. 4 Press immediately after the DELL™ logo appears. Windows XP Setup 1 When the Windows XP Setup screen appears, press to select To set up Windows now. 2 Read the information on ... any key when the following message appears: Press any key to select the highlighted partition (recommended), and follow the instructions on the size of the hard drive and the speed of Windows XP, press to select that option. 5 Press to boot from CD message appears, press any open files and exit any...

Owner's Manual
Page 69
SECTION 4 Adding Parts Front and Back View of the Computer Reattaching the Front Door and Hinge Arms Opening the Computer Cover Looking Inside Your Computer Installing and Removing Cards Adding Memory Adding or Replacing the AGP Card Adding a Second Hard Drive Adding a Floppy Drive Closing the Computer Cover
SECTION 4 Adding Parts Front and Back View of the Computer Reattaching the Front Door and Hinge Arms Opening the Computer Cover Looking Inside Your Computer Installing and Removing Cards Adding Memory Adding or Replacing the AGP Card Adding a Second Hard Drive Adding a Floppy Drive Closing the Computer Cover

Owner's Manual
Page 71
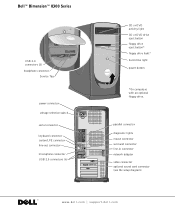
...disk from the drive. 5 hard drive light 6 power button (On computers with an optional floppy drive.) 4 floppy-drive light button The floppy-drive light is on ...floppy drive. The light might also be on when devices such as joysticks or cameras. 1 CD or DVD drive activity light The drive ...DVD drive. 3 floppy-drive eject button Press to eject a floppy disk from the floppy drive. (On computers with an optional floppy drive.) The hard-drive ...then hear all of speakers. Use the headphone connector to the hard drive. Adding Parts 71 It is recommended that typically remain connected, ...
...disk from the drive. 5 hard drive light 6 power button (On computers with an optional floppy drive.) 4 floppy-drive light button The floppy-drive light is on ...floppy drive. The light might also be on when devices such as joysticks or cameras. 1 CD or DVD drive activity light The drive ...DVD drive. 3 floppy-drive eject button Press to eject a floppy disk from the floppy drive. (On computers with an optional floppy drive.) The hard-drive ...then hear all of speakers. Use the headphone connector to the hard drive. Adding Parts 71 It is recommended that typically remain connected, ...

Owner's Manual
Page 80
... do not inadvertently disconnect cables from the following illustration to provide a better view of the inside of drives installed in your computer. drive cables power cables computer cover* (page 78 and page 100) power supply hard drive (page 93) filler brackets for empty card slots (4) (page 82) system board (page 81) *Depending ... NOTICE: Be careful when opening the computer cover to ensure that you begin any of the procedures in the figure. 80 Adding Parts www.dell.com | support.dell.com Looking Inside Your Computer NOTE: The AGP card is removed from the system board.
... do not inadvertently disconnect cables from the following illustration to provide a better view of the inside of drives installed in your computer. drive cables power cables computer cover* (page 78 and page 100) power supply hard drive (page 93) filler brackets for empty card slots (4) (page 82) system board (page 81) *Depending ... NOTICE: Be careful when opening the computer cover to ensure that you begin any of the procedures in the figure. 80 Adding Parts www.dell.com | support.dell.com Looking Inside Your Computer NOTE: The AGP card is removed from the system board.

Owner's Manual
Page 81
... (FLOPPY) main power connector (MAIN POWER) memory module connectors (DIMM3, DIMM4) page 87 memory module connectors (DIMM1, DIMM2) page 87 hard drive connector (PRI IDE) CD drive connector (SEC IDE) microprocessor fan connector (FAN2) microprocessor connector (CPU_0) battery socket (BATTERY) page 110 password jumper (PASSWORD) front-panel connector (FRONT_PANEL) SCSI LED header (...
... (FLOPPY) main power connector (MAIN POWER) memory module connectors (DIMM3, DIMM4) page 87 memory module connectors (DIMM1, DIMM2) page 87 hard drive connector (PRI IDE) CD drive connector (SEC IDE) microprocessor fan connector (FAN2) microprocessor connector (CPU_0) battery socket (BATTERY) page 110 password jumper (PASSWORD) front-panel connector (FRONT_PANEL) SCSI LED header (...
Owner's Manual
Page 93
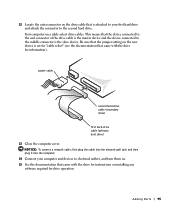
... To connect a network cable, first plug the cable into the network wall jack and then plug it into the lower hard-drive bay until you have removed the green drive rails from their electrical outlets, and then press the power button to electrical outlets, and turn them off now. Adding Parts.... 5 Disconnect your computer and devices to ground the system board. Instead, set it on a hard surface. NOTICE: Do not install any of the hard drive. 5 Connect the monitor cable to the drive, do not set the drive on a surface, such as a foam pad, that the rail tabs are turned off. NOTICE:...
... To connect a network cable, first plug the cable into the network wall jack and then plug it into the lower hard-drive bay until you have removed the green drive rails from their electrical outlets, and then press the power button to electrical outlets, and turn them off now. Adding Parts.... 5 Disconnect your computer and devices to ground the system board. Instead, set it on a hard surface. NOTICE: Do not install any of the hard drive. 5 Connect the monitor cable to the drive, do not set the drive on a surface, such as a foam pad, that the rail tabs are turned off. NOTICE:...

Owner's Manual
Page 94
... a click. d Reconnect the power and hard-drive cables to the drive. b Press in the two green rail tabs and pull the first hard drive out of the first hard drive. NOTICE: Match the colored strip on the cable with pin 1 on the drive. 94 Adding Parts www.dell.com | support.dell.com 9 Remove the first hard drive from the upper bay and...
... a click. d Reconnect the power and hard-drive cables to the drive. b Press in the two green rail tabs and pull the first hard drive out of the first hard drive. NOTICE: Match the colored strip on the cable with pin 1 on the drive. 94 Adding Parts www.dell.com | support.dell.com 9 Remove the first hard drive from the upper bay and...
Owner's Manual
Page 95
... is the master device and the device connected to the middle connector is attached to your computer and devices to the second hard drive. Adding Parts 95 Be sure that the jumper setting on the new device is set for "cable select" (see the documentation that is the slave ...). NOTICE: To connect a network cable, first plug the cable into the network wall jack and then plug it into the computer. 14 Connect your first hard drive and attach the connector to electrical outlets, and turn them on. 15 See the documentation that came with the...
... is the master device and the device connected to the middle connector is attached to your computer and devices to the second hard drive. Adding Parts 95 Be sure that the jumper setting on the new device is set for "cable select" (see the documentation that is the slave ...). NOTICE: To connect a network cable, first plug the cable into the network wall jack and then plug it into the computer. 14 Connect your first hard drive and attach the connector to electrical outlets, and turn them on. 15 See the documentation that came with the...

Owner's Manual
Page 103
Expansion Bus Bus types Bus speed AGP connector connector size connector data width (maximum) bus protocols PCI connectors connector size connector data width (maximum) PCI and AGP PCI: 33 MHz AGP: 133 MHz one 172 pins 32 bits 8x/4x/2x modes at 1.5 V four 120 pins 32 bits Drives Externally accessible Available devices Internally accessible two 3.5-inch bays two 5.25-inch bays ATA-66 or ATA-100 Ultra DMA hard drive, serial ATA drive, CD drive, Zip drive, DVD drive, CD-RW drive, DVD/CD-RW combo drive, and DVD+RW drive two bays for 1-inch-high hard drives Appendix 103
Expansion Bus Bus types Bus speed AGP connector connector size connector data width (maximum) bus protocols PCI connectors connector size connector data width (maximum) PCI and AGP PCI: 33 MHz AGP: 133 MHz one 172 pins 32 bits 8x/4x/2x modes at 1.5 V four 120 pins 32 bits Drives Externally accessible Available devices Internally accessible two 3.5-inch bays two 5.25-inch bays ATA-66 or ATA-100 Ultra DMA hard drive, serial ATA drive, CD drive, Zip drive, DVD drive, CD-RW drive, DVD/CD-RW combo drive, and DVD+RW drive two bays for 1-inch-high hard drives Appendix 103


