Owner's Manual
Page 1
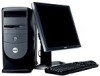
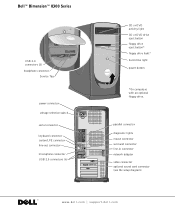
parallel connector diagnostic lights mouse connector surround connector line-in connector network adapter video connector optional sound card connector (see the setup diagram) www.dell.com | support.dell.com Dell™ Dimension™ 8300 Series USB 2.0 connectors (2) headphone connector Service Tag power connector voltage selection switch serial connector keyboard connector center/LFE connector line-out connector microphone connector USB 2.0 connectors (6) CD or DVD activity light CD or DVD drive eject button floppy drive eject button* floppy drive light* hard drive light power button ...
parallel connector diagnostic lights mouse connector surround connector line-in connector network adapter video connector optional sound card connector (see the setup diagram) www.dell.com | support.dell.com Dell™ Dimension™ 8300 Series USB 2.0 connectors (2) headphone connector Service Tag power connector voltage selection switch serial connector keyboard connector center/LFE connector line-out connector microphone connector USB 2.0 connectors (6) CD or DVD activity light CD or DVD drive eject button floppy drive eject button* floppy drive light* hard drive light power button ...
Owner's Manual
Page 10
... yourself by Dell. CAUTION: Do not attempt to service the computer yourself, except as the metal around the card-slot openings at the correct operating voltage. A manual voltage selection switch - www.dell.com | support.dell.com SAFETY: When Using Your Computer As you use your location. • Before working inside your computer with a fixed-voltage power supply do not have a voltage selection switch on the back panel and operate at only...
... yourself by Dell. CAUTION: Do not attempt to service the computer yourself, except as the metal around the card-slot openings at the correct operating voltage. A manual voltage selection switch - www.dell.com | support.dell.com SAFETY: When Using Your Computer As you use your location. • Before working inside your computer with a fixed-voltage power supply do not have a voltage selection switch on the back panel and operate at only...
Owner's Manual
Page 18
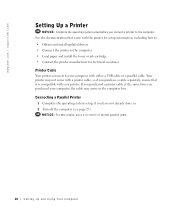
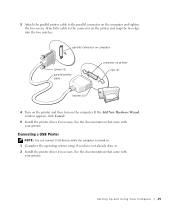
... and install updated drivers. • Connect the printer to the computer. • Load paper and install the toner or ink cartridge. • Contact the printer manufacturer for technical assistance. NOTICE: For best results, use a 3-m (10-ft) or shorter parallel cable. 18 Setting Up and Using Yo ur Computer www.dell.com | support.dell.com Setting Up a Printer NOTICE: Complete the operating system setup before you connect a printer...
... and install updated drivers. • Connect the printer to the computer. • Load paper and install the toner or ink cartridge. • Contact the printer manufacturer for technical assistance. NOTICE: For best results, use a 3-m (10-ft) or shorter parallel cable. 18 Setting Up and Using Yo ur Computer www.dell.com | support.dell.com Setting Up a Printer NOTICE: Complete the operating system setup before you connect a printer...
Owner's Manual
Page 19
... then turn on . 1 Complete the operating system setup if you have not already done so. 2 Install the printer driver if necessary. Attach the cable to the parallel connector on the computer and tighten the two screws. 3 Attach the parallel printer cable to the connector on the printer and snap the two clips into the two notches. If the Add New Hardware Wizard window...
... then turn on . 1 Complete the operating system setup if you have not already done so. 2 Install the printer driver if necessary. Attach the cable to the parallel connector on the computer and tighten the two screws. 3 Attach the parallel printer cable to the connector on the printer and snap the two clips into the two notches. If the Add New Hardware Wizard window...

Owner's Manual
Page 22
...; Windows® XP operating system provides a Network Setup Wizard to guide you connect your computer. NOTE: Do not use a network cable with a telephone wall jack. 2 Connect the other end of your computer to a network, the computer must have a network adapter installed and a network cable connected to All Programs→Accessories→Communications, and then click Network Setup Wizard. 2 On the welcome screen, click Next. 22 Setting Up and Using Yo ur Computer network adapter connector...
...; Windows® XP operating system provides a Network Setup Wizard to guide you connect your computer. NOTE: Do not use a network cable with a telephone wall jack. 2 Connect the other end of your computer to a network, the computer must have a network adapter installed and a network cable connected to All Programs→Accessories→Communications, and then click Network Setup Wizard. 2 On the welcome screen, click Next. 22 Setting Up and Using Yo ur Computer network adapter connector...

Owner's Manual
Page 50
...If the power light is available, connect it with another monitor is blinking, press a key on . TE S T A N O T H E R M O N I T O R - S W A P T H E P O W E R C A B L E S - Check the connector for bent or broken pins. (It is normal for monitor cable connectors to read C H E C K T H E M O N I T O R S E T T I G H T - If you are using a video extension cable and removing the cable solves the problem, the cable is connected as a lamp. C H E C K T H E M O N I T O R P O W E R L I N G S - See the monitor documentation for instructions on the Start Here setup diagram for troubleshooting...
...If the power light is available, connect it with another monitor is blinking, press a key on . TE S T A N O T H E R M O N I T O R - S W A P T H E P O W E R C A B L E S - Check the connector for bent or broken pins. (It is normal for monitor cable connectors to read C H E C K T H E M O N I T O R S E T T I G H T - If you are using a video extension cable and removing the cable solves the problem, the cable is connected as a lamp. C H E C K T H E M O N I T O R P O W E R L I N G S - See the monitor documentation for instructions on the Start Here setup diagram for troubleshooting...
Owner's Manual
Page 62
... the previously installed version. 1 Click the Start button and click Control Panel. 2 Under Pick a Category, click Performance and Maintenance. 3 Click System. 4 In the System Properties window, click the Hardware tab. 5 Click Device Manager. 6 Right-click the device for Dell™ computers. Reinstalling Drivers NOTICE: The Dell Support website at support.dell.com and your computer might not work correctly. If Device Driver Rollback does not resolve the problem, then use System Restore (see...
... the previously installed version. 1 Click the Start button and click Control Panel. 2 Under Pick a Category, click Performance and Maintenance. 3 Click System. 4 In the System Properties window, click the Hardware tab. 5 Click Device Manager. 6 Right-click the device for Dell™ computers. Reinstalling Drivers NOTICE: The Dell Support website at support.dell.com and your computer might not work correctly. If Device Driver Rollback does not resolve the problem, then use System Restore (see...
Owner's Manual
Page 64
... System Restore NOTICE: Before you install a device driver, use System Restore. The Select a Restore Point screen provides a calendar that is selected and click Next. 3 Click a calendar date to which you restore the computer to an earlier operating state, save and close all open programs. Do not alter, open , or delete any files or programs until the system restoration is complete. 1 Click the Start button, point...
... System Restore NOTICE: Before you install a device driver, use System Restore. The Select a Restore Point screen provides a calendar that is selected and click Next. 3 Click a calendar date to which you restore the computer to an earlier operating state, save and close all open programs. Do not alter, open , or delete any files or programs until the system restoration is complete. 1 Click the Start button, point...

Owner's Manual
Page 73
...adapter connector on ) into the green mouse connector. Use the lights to the parallel connector. 1 power connector 2 voltage selection switch (may not be available on the diagnostic code. Plug a standard mouse into the appropriate sound card connectors. Use the black surround connector to the computer. network jack modem jack Adding Parts 73 A click indicates that you troubleshoot a computer problem based on all computers) 3 parallel connector 4 diagnostic lights (4) 5 mouse connector 6 surround connector 7 line-in connector is recommended that the network cable...
...adapter connector on ) into the green mouse connector. Use the lights to the parallel connector. 1 power connector 2 voltage selection switch (may not be available on the diagnostic code. Plug a standard mouse into the appropriate sound card connectors. Use the black surround connector to the computer. network jack modem jack Adding Parts 73 A click indicates that you troubleshoot a computer problem based on all computers) 3 parallel connector 4 diagnostic lights (4) 5 mouse connector 6 surround connector 7 line-in connector is recommended that the network cable...
Owner's Manual
Page 87
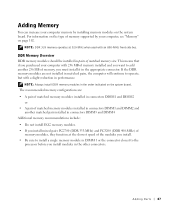
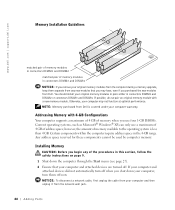
...-side bus. Adding Parts 87 DDR Memory Overview DDR memory modules should be installed in performance. NOTE: DDR 333 memory operates at the slowest speed of memory, you install modules in the other connectors. The recommended memory configurations are not installed in matched pairs, the computer will continue to the processor before you must install it in the order indicated on the system board. Adding Memory You can increase...
...-side bus. Adding Parts 87 DDR Memory Overview DDR memory modules should be installed in performance. NOTE: DDR 333 memory operates at the slowest speed of memory, you install modules in the other connectors. The recommended memory configurations are not installed in matched pairs, the computer will continue to the processor before you must install it in the order indicated on the system board. Adding Memory You can increase...
Owner's Manual
Page 88
... any new modules that your computer and attached devices are turned off now. NOTICE: To disconnect a network cable, first unplug the cable from your original memory modules in pairs either in the 4-GB range. www.dell.com | support.dell.com Memory Installation Guidelines matched pair of memory modules in connectors DIMM1 and DIMM2 matched pair of memory modules in connectors DIMM3 and DIMM4 NOTICE: If you remove...
... any new modules that your computer and attached devices are turned off now. NOTICE: To disconnect a network cable, first unplug the cable from your original memory modules in pairs either in the 4-GB range. www.dell.com | support.dell.com Memory Installation Guidelines matched pair of memory modules in connectors DIMM1 and DIMM2 matched pair of memory modules in connectors DIMM3 and DIMM4 NOTICE: If you remove...
Owner's Manual
Page 93
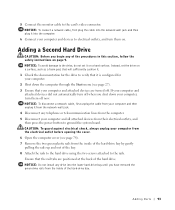
... turn them on a surface, such as a foam pad, that your computer and all attached devices from the inside of the hard drive. 5 Connect the monitor cable to ground the system board. Adding a Second Hard Drive CAUTION: Before you shut down the computer through the Start menu (see page 78). 7 Remove the two green plastic rails from their electrical outlets, and then press the power button to the card's video connector...
... turn them on a surface, such as a foam pad, that your computer and all attached devices from the inside of the hard drive. 5 Connect the monitor cable to ground the system board. Adding a Second Hard Drive CAUTION: Before you shut down the computer through the Start menu (see page 78). 7 Remove the two green plastic rails from their electrical outlets, and then press the power button to the card's video connector...
Owner's Manual
Page 95
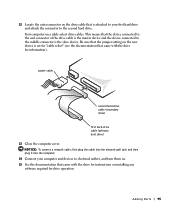
... slave device. Adding Parts 95 12 Locate the extra connector on the drive cable that came with the drive for information). power cable second hard-drive cable (secondary drive) first hard-drive cable (primary boot drive) 13 Close the computer cover. This means that came with the drive for drive operation. NOTICE: To connect a network cable, first plug the cable into the network wall jack and then plug it into the computer. 14 Connect your computer and devices to electrical outlets, and turn...
... slave device. Adding Parts 95 12 Locate the extra connector on the drive cable that came with the drive for information). power cable second hard-drive cable (secondary drive) first hard-drive cable (primary boot drive) 13 Close the computer cover. This means that came with the drive for drive operation. NOTICE: To connect a network cable, first plug the cable into the network wall jack and then plug it into the computer. 14 Connect your computer and devices to electrical outlets, and turn...
Owner's Manual
Page 99
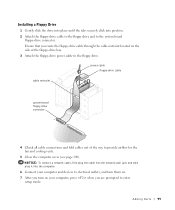
... to enter setup mode. power cable floppy-drive cable cable restraint system board floppy-drive connector 4 Check all cable connections and fold cables out of the floppy-drive bay. 3 Attach the floppy-drive power cable to the floppy drive. NOTICE: To connect a network cable, first plug the cable into the network wall jack and then plug it into position. 2 Attach the floppy-drive cable to the floppy drive and to the system board floppy-drive connector. Adding Parts 99 Installing a Floppy Drive 1 Gently slide the drive into...
... to enter setup mode. power cable floppy-drive cable cable restraint system board floppy-drive connector 4 Check all cable connections and fold cables out of the floppy-drive bay. 3 Attach the floppy-drive power cable to the floppy drive. NOTICE: To connect a network cable, first plug the cable into the network wall jack and then plug it into position. 2 Attach the floppy-drive cable to the floppy drive and to the system board floppy-drive connector. Adding Parts 99 Installing a Floppy Drive 1 Gently slide the drive into...
Owner's Manual
Page 110
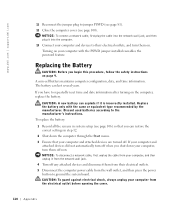
... a network cable, first unplug the cable from your computer, turn off when you can last several years. If your computer and attached devices did not automatically turn them on your computer and devices to repeatedly reset time and date information after turning on page 9. www.dell.com | support.dell.com 11 Reconnect the jumper plug to the manufacturer's instructions. Replace the battery only with the PSWD jumper installed reenables...
... a network cable, first unplug the cable from your computer, turn off when you can last several years. If your computer and attached devices did not automatically turn them on your computer and devices to repeatedly reset time and date information after turning on page 9. www.dell.com | support.dell.com 11 Reconnect the jumper plug to the manufacturer's instructions. Replace the battery only with the PSWD jumper installed reenables...
Owner's Manual
Page 116
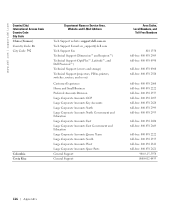
www.dell.com | support.dell.com Country (City) International Access Code Country Code City Code China (Xiamen) Country Code: 86 City Code: 592 Colombia Costa Rica Department Name or Service Area, Website and E-Mail Address Tech Support website: support.dell.com.cn Tech Support E-mail: cn_support@dell.com Tech Support Fax Technical Support (Dimension™ and Inspiron™) Technical Support (OptiPlex™, Latitude™, and Dell Precision™) Technical Support (servers and storage) Technical Support (projectors, PDAs, printers, switches, routers...
www.dell.com | support.dell.com Country (City) International Access Code Country Code City Code China (Xiamen) Country Code: 86 City Code: 592 Colombia Costa Rica Department Name or Service Area, Website and E-Mail Address Tech Support website: support.dell.com.cn Tech Support E-mail: cn_support@dell.com Tech Support Fax Technical Support (Dimension™ and Inspiron™) Technical Support (OptiPlex™, Latitude™, and Dell Precision™) Technical Support (servers and storage) Technical Support (projectors, PDAs, printers, switches, routers...
Owner's Manual
Page 120
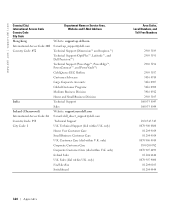
... (dial within U.K. www.dell.com | support.dell.com Country (City) International Access Code Country Code City Code Hong Kong International Access Code: 001 Country Code: 852 India Ireland (Cherrywood) International Access Code: 16 Country Code: 353 City Code: 1 Department Name or Service Area, Website and E-Mail Address Website: support.ap.dell.com E-mail: ap_support@dell.com Technical Support (Dimension™ and Inspiron™) Technical Support (OptiPlex™, Latitude™, and Dell Precision™) Technical Support (PowerApp™, PowerEdge™...
... (dial within U.K. www.dell.com | support.dell.com Country (City) International Access Code Country Code City Code Hong Kong International Access Code: 001 Country Code: 852 India Ireland (Cherrywood) International Access Code: 16 Country Code: 353 City Code: 1 Department Name or Service Area, Website and E-Mail Address Website: support.ap.dell.com E-mail: ap_support@dell.com Technical Support (Dimension™ and Inspiron™) Technical Support (OptiPlex™, Latitude™, and Dell Precision™) Technical Support (PowerApp™, PowerEdge™...
Owner's Manual
Page 133
... serial numbers • Products for which warranty came with electrical power - Limited Warranty for the U.S. Usage that result from: - Failure to follow the product instructions or failure to the Dell-branded hardware products through our factory-integration system, third-party software, or the reloading of software • Non-Dell-branded and Solution Provider Direct products and accessories • Problems that is not covered by Dell...
... serial numbers • Products for which warranty came with electrical power - Limited Warranty for the U.S. Usage that result from: - Failure to follow the product instructions or failure to the Dell-branded hardware products through our factory-integration system, third-party software, or the reloading of software • Non-Dell-branded and Solution Provider Direct products and accessories • Problems that is not covered by Dell...
Owner's Manual
Page 136
... TO YOU. 136 Appendix Limited warranties on Dell-branded memory may be transferred. This limited warranty does not cover: • Software, including the operating system and software added to the Dell-branded hardware products through an Employee Purchase Program, go to perform preventive maintenance - Problems caused by using accessories, parts, or components not supplied by going to Dell's website: • If you are an Individual...
... TO YOU. 136 Appendix Limited warranties on Dell-branded memory may be transferred. This limited warranty does not cover: • Software, including the operating system and software added to the Dell-branded hardware products through an Employee Purchase Program, go to perform preventive maintenance - Problems caused by using accessories, parts, or components not supplied by going to Dell's website: • If you are an Individual...
Owner's Manual
Page 144
... N network problems, 44 O Operating System CD, 15 Installation Guide, 15 operating system reinstalling Windows XP, 66 P password clearing system setup, 109 power problems, 44 turning off your computer, 27 power light conditions, 44 144 Index E e-mail problems, 35 error messages diagnostic lights, 54 ESD electrostatic discharge, 11 Express Service Code, 14 F Files and Settings Transfer Wizard, 20 floppy drive adding, 96 problems, 33 front door reattaching, 75 H hard drive problems, 35 hardware conflicts, 65 Dell Diagnostics, 58 problems, 40 Hardware Troubleshooter, 65 Help and Support Center...
... N network problems, 44 O Operating System CD, 15 Installation Guide, 15 operating system reinstalling Windows XP, 66 P password clearing system setup, 109 power problems, 44 turning off your computer, 27 power light conditions, 44 144 Index E e-mail problems, 35 error messages diagnostic lights, 54 ESD electrostatic discharge, 11 Express Service Code, 14 F Files and Settings Transfer Wizard, 20 floppy drive adding, 96 problems, 33 front door reattaching, 75 H hard drive problems, 35 hardware conflicts, 65 Dell Diagnostics, 58 problems, 40 Hardware Troubleshooter, 65 Help and Support Center...


