Dell Dimension 8100 Solutions Guide
Page 5
Reinstalling Windows Me 35 Reinstalling Windows 2000 37 3 Adding Parts Removing the Computer Cover 40 Looking Inside Your Computer 42 System Board 43 Rotating the Power Supply 44 Removing and Replacing the Front Panel 45 Adding Cards 46 Installing a Card 47 Removing Cards 49 Removing and Replacing the AGP Card 49 Adding Memory 51 Adding or Replacing Other Drives 52 Replacing the Computer Cover 57 4 Appendix Specifications 60 Standard Settings 64 Viewing Settings 64 System Setup Screens 65 Clearing Forgotten Passwords 65 Replacing the Battery 66 Contents 5
Reinstalling Windows Me 35 Reinstalling Windows 2000 37 3 Adding Parts Removing the Computer Cover 40 Looking Inside Your Computer 42 System Board 43 Rotating the Power Supply 44 Removing and Replacing the Front Panel 45 Adding Cards 46 Installing a Card 47 Removing Cards 49 Removing and Replacing the AGP Card 49 Adding Memory 51 Adding or Replacing Other Drives 52 Replacing the Computer Cover 57 4 Appendix Specifications 60 Standard Settings 64 Viewing Settings 64 System Setup Screens 65 Clearing Forgotten Passwords 65 Replacing the Battery 66 Contents 5
Dell Dimension 8100 Solutions Guide
Page 7
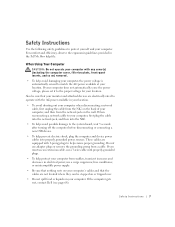
..., please set it to the proper voltage for your computer. Do not use a surge suppressor, line conditioner, or uninterruptible power supply. • Be sure that nothing rests on your computer's cables and that your monitor and attached devices are not located where they can be sure ...adapter plugs or remove the grounding prong from the network jack on ) removed. • To help ensure proper grounding. If the computer gets wet, contact Dell (see page 68). Also be stepped on or tripped over. • Do not spill food or liquids on your computer. Use the following safety guidelines...
..., please set it to the proper voltage for your computer. Do not use a surge suppressor, line conditioner, or uninterruptible power supply. • Be sure that nothing rests on your computer's cables and that your monitor and attached devices are not located where they can be sure ...adapter plugs or remove the grounding prong from the network jack on ) removed. • To help ensure proper grounding. If the computer gets wet, contact Dell (see page 68). Also be stepped on or tripped over. • Do not spill food or liquids on your computer. Use the following safety guidelines...

Dell Dimension 8100 Solutions Guide
Page 39
SECTION 3 Removing the Computer Cover Looking Inside Your Computer Rotating the Power Supply Removing and Replacing the Front Panel Adding Cards Removing Cards Removing and Replacing the AGP Card Adding Memory Adding or Replacing Other Drives Replacing the Computer Cover www.dell.com | support.dell.com
SECTION 3 Removing the Computer Cover Looking Inside Your Computer Rotating the Power Supply Removing and Replacing the Front Panel Adding Cards Removing Cards Removing and Replacing the AGP Card Adding Memory Adding or Replacing Other Drives Replacing the Computer Cover www.dell.com | support.dell.com

Dell Dimension 8100 Solutions Guide
Page 42
www.dell.com | support.dell.com power supply (page 44) front-panel release button (page 45) drive cage (page 52) hard drive bracket (page 52) drive cable (page 52) 42 Adding Parts
www.dell.com | support.dell.com power supply (page 44) front-panel release button (page 45) drive cage (page 52) hard drive bracket (page 52) drive cable (page 52) 42 Adding Parts

Dell Dimension 8100 Solutions Guide
Page 44
www.dell.com | support.dell.com CAUTION: Before you may need to drain the power from the computer, and then remove the computer cover (see page 40). 2 Make sure that the power cable is disconnected from the power receptacle on the system board, you begin any of the way: 1 Turn off ...and devices, disconnect them from the securing tab by pressing the release tab. Then rotate the power supply upward until it locks in this section, follow the safety instructions on page 7. power supply power cable 44 Adding Parts securing tab release tab To access some of the components on the back...
www.dell.com | support.dell.com CAUTION: Before you may need to drain the power from the computer, and then remove the computer cover (see page 40). 2 Make sure that the power cable is disconnected from the power receptacle on the system board, you begin any of the way: 1 Turn off ...and devices, disconnect them from the securing tab by pressing the release tab. Then rotate the power supply upward until it locks in this section, follow the safety instructions on page 7. power supply power cable 44 Adding Parts securing tab release tab To access some of the components on the back...

Dell Dimension 8100 Solutions Guide
Page 45
... front-panel release button, rotate the top of the procedures in this section, follow the safety instructions on the system board, rotate the power supply back to drain the power from the computer. To remove the front panel, you begin any of the panel outward, away from the computer. Adding Parts 45 With... release button. CAUTION: Before you first must remove the computer cover (see page 40). Lift the panel away from the computer. 4 Press and release the power button to its original position until the release tab snaps into the securing tab.
... front-panel release button, rotate the top of the procedures in this section, follow the safety instructions on the system board, rotate the power supply back to drain the power from the computer. To remove the front panel, you begin any of the panel outward, away from the computer. Adding Parts 45 With... release button. CAUTION: Before you first must remove the computer cover (see page 40). Lift the panel away from the computer. 4 Press and release the power button to its original position until the release tab snaps into the securing tab.

Dell Dimension 8100 Solutions Guide
Page 51
... board. CAUTION: Before you upgrade the memory, the RIMMs must be upgraded in matched pairs of identical MB capacity in the connector. Free the power supply from the securing tab by installing memory modules on page 7. NOTICE: To avoid breaking the memory module, do not press near the middle of... begin any of the module with the crossbars in both sockets 1 and 2 or sockets 3 and 4. You can increase your computer. Then rotate the power supply upward until it locks in its extended position. 3 Press out the securing clip at each end of the memory connector. 4 Align the notches on the...
... board. CAUTION: Before you upgrade the memory, the RIMMs must be upgraded in matched pairs of identical MB capacity in the connector. Free the power supply from the securing tab by installing memory modules on page 7. NOTICE: To avoid breaking the memory module, do not press near the middle of... begin any of the module with the crossbars in both sockets 1 and 2 or sockets 3 and 4. You can increase your computer. Then rotate the power supply upward until it locks in its extended position. 3 Press out the securing clip at each end of the memory connector. 4 Align the notches on the...

Dell Dimension 8100 Solutions Guide
Page 52
www.dell.com | support.dell.com 5 Insert the module straight down into the connector, making sure that it fits into the cutouts at each end of the module. To remove a ... drives, SuperDisk LS-120 drives, CD-RW drives, and additional CD drives, using the following procedure: 1 Remove the computer cover (see page 40). 2 Rotate the power supply away from the connector. CAUTION: Before you must install another module in this section, follow the safety instructions on page 7. Press firmly on the computer...
www.dell.com | support.dell.com 5 Insert the module straight down into the connector, making sure that it fits into the cutouts at each end of the module. To remove a ... drives, SuperDisk LS-120 drives, CD-RW drives, and additional CD drives, using the following procedure: 1 Remove the computer cover (see page 40). 2 Rotate the power supply away from the connector. CAUTION: Before you must install another module in this section, follow the safety instructions on page 7. Press firmly on the computer...

Dell Dimension 8100 Solutions Guide
Page 63
Power DC power supply: Wattage Heat dissipation Voltage (auto-sensing) Backup battery Physical Height x Width x Depth Weight Environmental Temperature: Operating Storage Relative humidity Maximum vibration: Operating Storage Maximum shock: ...
Power DC power supply: Wattage Heat dissipation Voltage (auto-sensing) Backup battery Physical Height x Width x Depth Weight Environmental Temperature: Operating Storage Relative humidity Maximum vibration: Operating Storage Maximum shock: ...

Dell Dimension 8100 Solutions Guide
Page 90
... connectors, 43 system setup program, 64 T technical assistance telephone numbers and addresses, 68 warranty repair or credit, 82 troubleshooting, 16 turning off , 14 power supply, 44 printer connecting, 12 fixing problems, 23 reinstalling driver, 13 setting up, 12 troubleshooting, 23 R regulatory notices, 84 reinstalling drivers and utilities, 32..., 51 messages start-up, 19 Windows, 29 modem fixing problems, 24 monitor fixing problems, 20 mouse fixing problems, 25 PCI card, 46 power fixing problems, 18 turning off the computer, 14 V video fixing problems, 20 volume adjusting, 22 90 Index
... connectors, 43 system setup program, 64 T technical assistance telephone numbers and addresses, 68 warranty repair or credit, 82 troubleshooting, 16 turning off , 14 power supply, 44 printer connecting, 12 fixing problems, 23 reinstalling driver, 13 setting up, 12 troubleshooting, 23 R regulatory notices, 84 reinstalling drivers and utilities, 32..., 51 messages start-up, 19 Windows, 29 modem fixing problems, 24 monitor fixing problems, 20 mouse fixing problems, 25 PCI card, 46 power fixing problems, 18 turning off the computer, 14 V video fixing problems, 20 volume adjusting, 22 90 Index


