Owner's Manual
Page 10
The Express Service Code is not available in all countries. • Solutions - support.dell.com NOTE: Select your region to direct your computer when you use the customized Dell Premier Support website • Upgrades - Certified drivers, patches, and software updates 10 Finding Information Online discussion with technical support • Reference - Service call and order...
The Express Service Code is not available in all countries. • Solutions - support.dell.com NOTE: Select your region to direct your computer when you use the customized Dell Premier Support website • Upgrades - Certified drivers, patches, and software updates 10 Finding Information Online discussion with technical support • Reference - Service call and order...
Owner's Manual
Page 51
...Allows you to customize the test by changing the test settings. 4 Close the test screen to return to you : • Upgrade your operating system • Reinstall your hardware configuration for all devices attached to install drivers if you with your computer. All devices... require a driver program. Describes the test and may need to your Microsoft® Windows® operating system. The Dell Diagnostics obtains configuration information for the selected device. A driver acts like a translator between the device and any error conditions encountered. ...
...Allows you to customize the test by changing the test settings. 4 Close the test screen to return to you : • Upgrade your operating system • Reinstall your hardware configuration for all devices attached to install drivers if you with your computer. All devices... require a driver program. Describes the test and may need to your Microsoft® Windows® operating system. The Dell Diagnostics obtains configuration information for the selected device. A driver acts like a translator between the device and any error conditions encountered. ...
Owner's Manual
Page 69
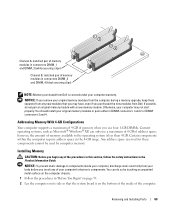
NOTICE: If you remove your computer may have, even if you purchased the new modules from Dell. Otherwise, your original memory modules from the computer during a memory upgrade, keep them separate from any new modules that the system board is on the bottom of the inside your computer, ...DIMM_2 (white securing clips) Channel B: matched pair of memory modules in connectors DIMM_3 and DIMM_4 (black securing clips) NOTE: Memory purchased from Dell is less than 4 GB. Any address space reserved for these components cannot be used by touching an unpainted metal surface on its side so...
NOTICE: If you remove your computer may have, even if you purchased the new modules from Dell. Otherwise, your original memory modules from the computer during a memory upgrade, keep them separate from any new modules that the system board is on the bottom of the inside your computer, ...DIMM_2 (white securing clips) Channel B: matched pair of memory modules in connectors DIMM_3 and DIMM_4 (black securing clips) NOTE: Memory purchased from Dell is less than 4 GB. Any address space reserved for these components cannot be used by touching an unpainted metal surface on its side so...

Owner's Manual
Page 83
... When you connect two IDE devices to the middle connector on the interface cable is the slave device (drive 1). See the drive documentation in your upgrade kit for information on configuring devices for the cable select setting, the device attached to the last connector on the interface cable is the master...
... When you connect two IDE devices to the middle connector on the interface cable is the slave device (drive 1). See the drive documentation in your upgrade kit for information on configuring devices for the cable select setting, the device attached to the last connector on the interface cable is the master...

Service Manual
Page 19
... however, the amount of memory available to the operating system is covered under your original memory modules from the computer during a memory upgrade, keep them separate from any of the procedures in this section, follow the safety instructions in DIMM connector 1, the connector closest to ...components inside your computer, discharge static electricity from Dell. Be sure to 533 MHz. You should install your computer may have, even if you may not start properly. Any address space...
... however, the amount of memory available to the operating system is covered under your original memory modules from the computer during a memory upgrade, keep them separate from any of the procedures in this section, follow the safety instructions in DIMM connector 1, the connector closest to ...components inside your computer, discharge static electricity from Dell. Be sure to 533 MHz. You should install your computer may have, even if you may not start properly. Any address space...

Service Manual
Page 34
... hole on the other connector. Keyed connectors ensure that is usually indicated by the colored stripe along one connector matches a tab or a filled-in your upgrade kit for information on configuring devices for the cable select setting. that the pin-1 wire in the cable (indicated by a silk-screened "1" printed directly on...
... hole on the other connector. Keyed connectors ensure that is usually indicated by the colored stripe along one connector matches a tab or a filled-in your upgrade kit for information on configuring devices for the cable select setting. that the pin-1 wire in the cable (indicated by a silk-screened "1" printed directly on...
Service Manual
Page 49
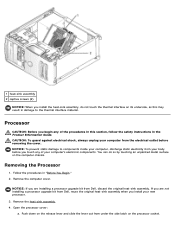
...its underside, as this section, follow the safety instructions in "Before You Begin." 2. If you are installing a processor upgrade kit from Dell, reuse the original heat-sink assembly when you install your computer, discharge static electricity from under the side latch on the... components. Processor CAUTION: Before you begin any of your body before removing the cover. NOTICE: If you are not installing a processor upgrade kit from Dell, discard the original heat-sink assembly. Removing the Processor 1. Remove the heat-sink assembly. 4. 1 heat-sink assembly 2 captive screws...
...its underside, as this section, follow the safety instructions in "Before You Begin." 2. If you are installing a processor upgrade kit from Dell, reuse the original heat-sink assembly when you install your computer, discharge static electricity from under the side latch on the... components. Processor CAUTION: Before you begin any of your body before removing the cover. NOTICE: If you are not installing a processor upgrade kit from Dell, discard the original heat-sink assembly. Removing the Processor 1. Remove the heat-sink assembly. 4. 1 heat-sink assembly 2 captive screws...
Service Manual
Page 51
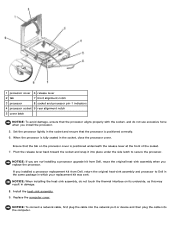
... snap it into the computer. When the processor is positioned correctly. 6. If you installed a processor replacement kit from Dell, reuse the original heat-sink assembly when you are not installing a processor upgrade kit from Dell, return the original heat-sink assembly and processor to secure the processor. NOTICE: To connect a network cable, first...
... snap it into the computer. When the processor is positioned correctly. 6. If you installed a processor replacement kit from Dell, reuse the original heat-sink assembly when you are not installing a processor upgrade kit from Dell, return the original heat-sink assembly and processor to secure the processor. NOTICE: To connect a network cable, first...


