Owner's Manual
Page 6
... Installing Memory 69 Removing Memory 71 Cards 72 PCI Cards 72 PCI Express Cards 76 Drive Panel 80 Removing the Drive Panel 80 Removing the Drive-Panel Insert 81 Replacing the Drive-Panel Insert 82 Replacing the Drive Panel 82 Drives 83 IDE Drive Addressing 83 Connecting Drive Cables 84 Drive Interface Connectors 84 Power...
... Installing Memory 69 Removing Memory 71 Cards 72 PCI Cards 72 PCI Express Cards 76 Drive Panel 80 Removing the Drive Panel 80 Removing the Drive-Panel Insert 81 Replacing the Drive-Panel Insert 82 Replacing the Drive Panel 82 Drives 83 IDE Drive Addressing 83 Connecting Drive Cables 84 Drive Interface Connectors 84 Power...
Owner's Manual
Page 17
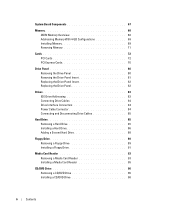
... Volume NOTE: When the speakers are using too much memory and preventing DVD playback, adjust the display properties: 1 Click the Start button and click Control Panel. 2 Under Pick a category, click Appearance and Themes. 3 Under Pick a task..., click Change the screen resolution. 4 In the Display Properties window, click and drag the bar...
... Volume NOTE: When the speakers are using too much memory and preventing DVD playback, adjust the display properties: 1 Click the Start button and click Control Panel. 2 Under Pick a category, click Appearance and Themes. 3 Under Pick a task..., click Change the screen resolution. 4 In the Display Properties window, click and drag the bar...

Owner's Manual
Page 21
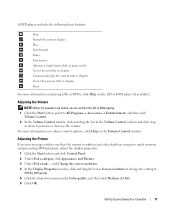
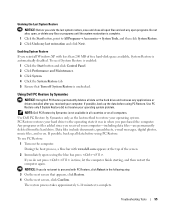
... how to connect either two monitors (each with a VGA connector), one monitor with a DVI connector, or a TV. The instructions tell you are connecting two flat-panel monitors, at least one of the procedures in this section, follow these instructions to determine the proper orientation for insertion. 2 Slide the media or card...
... how to connect either two monitors (each with a VGA connector), one monitor with a DVI connector, or a TV. The instructions tell you are connecting two flat-panel monitors, at least one of the procedures in this section, follow these instructions to determine the proper orientation for insertion. 2 Slide the media or card...
Owner's Manual
Page 25
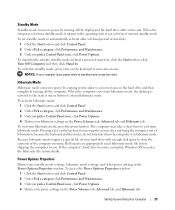
To immediately activate standby mode without a period of the computer memory, Dell creates an appropriately sized hibernate mode file before shipping the computer to you. If the computer's hard drive becomes corrupted, Windows XP recreates the ...Power Schemes tab, Advanced tab, and Hibernate tab. To activate hibernate mode: 1 Click the Start button and click Control Panel. 2 Under Pick a category, click Performance and Maintenance. 3 Under or pick a Control Panel icon, click Power Options. 4 Define your hibernate settings on the hard drive and then completely turning off the display and...
To immediately activate standby mode without a period of the computer memory, Dell creates an appropriately sized hibernate mode file before shipping the computer to you. If the computer's hard drive becomes corrupted, Windows XP recreates the ...Power Schemes tab, Advanced tab, and Hibernate tab. To activate hibernate mode: 1 Click the Start button and click Control Panel. 2 Under Pick a category, click Performance and Maintenance. 3 Under or pick a Control Panel icon, click Power Options. 4 Define your hibernate settings on the hard drive and then completely turning off the display and...

Owner's Manual
Page 34
... All Programs, and then click Modem Helper. If all computers.) VERIFY THAT THE MODEM IS COMMUNICATING WITH WINDOWS - 1 Click the Start button and click Control Panel. 2 Click Printers and Other Hardware. 3 Click Phone and Modem Options. 4 Click the Modems tab. 5 Click the COM port for the operating system or the program...
... All Programs, and then click Modem Helper. If all computers.) VERIFY THAT THE MODEM IS COMMUNICATING WITH WINDOWS - 1 Click the Start button and click Control Panel. 2 Click Printers and Other Hardware. 3 Click Phone and Modem Options. 4 Click the Modems tab. 5 Click the COM port for the operating system or the program...
Owner's Manual
Page 35
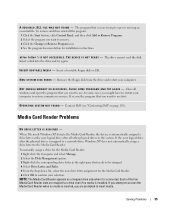
... media is missing an essential file. The drive cannot read the disk. To remove and then reinstall the program: 1 Click the Start button, click Control Panel, and then click Add or Remove Programs. 2 Select the program you are mapped to the Media Card Reader. C L O S E S O M E P R O G R A M S A N D T R Y A G A I R E ... assign a drive letter to a drive even if no media is inserted, you want to use first. Solving Problems 35 Contact Dell (see "Contacting Dell" on page 120). To manually assign a drive for the Media Card Reader: 1 Right-click My Computer and select Manage. ...
... media is missing an essential file. The drive cannot read the disk. To remove and then reinstall the program: 1 Click the Start button, click Control Panel, and then click Add or Remove Programs. 2 Select the program you are mapped to the Media Card Reader. C L O S E S O M E P R O G R A M S A N D T R Y A G A I R E ... assign a drive letter to a drive even if no media is inserted, you want to use first. Solving Problems 35 Contact Dell (see "Contacting Dell" on page 120). To manually assign a drive for the Media Card Reader: 1 Right-click My Computer and select Manage. ...
Owner's Manual
Page 39
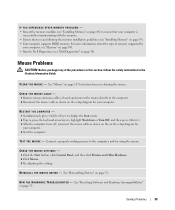
...you begin any of memory supported by your computer, see "Memory" on page 103. • Run the Dell Diagnostics (see "Dell Diagnostics" on page 52. See "Reinstalling Drivers" on page 50). See "Mouse" on page 117 for ... turns off, reconnect the mouse cable as shown on the setup diagram for your computer. C L E A N T H E M O U S E - CHECK THE MOUSE SETTINGS - 1 Click the Start button, click Control Panel, and then click Printers and Other Hardware. 2 Click Mouse. 3 Try adjusting the settings. R E I N S T A L L T H E M O U S E D R I V E R - R U N T H E H A R D W A R ...
...you begin any of memory supported by your computer, see "Memory" on page 103. • Run the Dell Diagnostics (see "Dell Diagnostics" on page 52. See "Reinstalling Drivers" on page 50). See "Mouse" on page 117 for ... turns off, reconnect the mouse cable as shown on the setup diagram for your computer. C L E A N T H E M O U S E - CHECK THE MOUSE SETTINGS - 1 Click the Start button, click Control Panel, and then click Printers and Other Hardware. 2 Click Mouse. 3 Try adjusting the settings. R E I N S T A L L T H E M O U S E D R I V E R - R U N T H E H A R D W A R ...
Owner's Manual
Page 41
... computer is plugged into a power strip, ensure that the power strip is plugged into an electrical outlet and that the main power cable and front panel cable are : • Power, keyboard, and mouse extension cables • Too many devices on a power strip • Multiple power strips connected to the system board...
... computer is plugged into a power strip, ensure that the power strip is plugged into an electrical outlet and that the main power cable and front panel cable are : • Power, keyboard, and mouse extension cables • Too many devices on a power strip • Multiple power strips connected to the system board...
Owner's Manual
Page 42
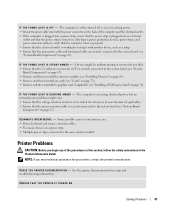
VERIFY THAT THE PRINTER IS RECOGNIZED BY WINDOWS - 1 Click the Start button, click Control Panel, and then click Printers and Other Hardware. 2 Click View installed printers or fax printers. NOTE: If you begin any of the procedures in this section, ...
VERIFY THAT THE PRINTER IS RECOGNIZED BY WINDOWS - 1 Click the Start button, click Control Panel, and then click Printers and Other Hardware. 2 Click View installed printers or fax printers. NOTE: If you begin any of the procedures in this section, ...

Owner's Manual
Page 43
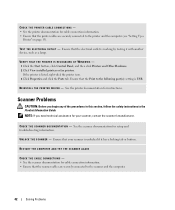
... the Windows volume setting. Solving Problems 43 If your speakers have been listening to the computer's front-panel headphone connector. VERIFY THAT THE SCANNER IS RECOGNIZED BY MICROSOFT WINDOWS - 1 Click the Start button, click Control Panel, and then click Printers and Other Hardware. 2 Click Scanners and Cameras. See the setup diagram supplied...
... the Windows volume setting. Solving Problems 43 If your speakers have been listening to the computer's front-panel headphone connector. VERIFY THAT THE SCANNER IS RECOGNIZED BY MICROSOFT WINDOWS - 1 Click the Start button, click Control Panel, and then click Printers and Other Hardware. 2 Click Scanners and Cameras. See the setup diagram supplied...
Owner's Manual
Page 45
...) away from the monitor. ROTATE THE MONITOR TO ELIMINATE SUNLIGHT GLARE AND POSSIBLE INTERFERENCE ADJUST THE WINDOWS DISPLAY SETTINGS - 1 Click the Start button, click Control Panel, and then click Appearance and Themes. 2 Click Display and click the Settings tab. 3 Try different settings for Screen resolution and Color quality.
...) away from the monitor. ROTATE THE MONITOR TO ELIMINATE SUNLIGHT GLARE AND POSSIBLE INTERFERENCE ADJUST THE WINDOWS DISPLAY SETTINGS - 1 Click the Start button, click Control Panel, and then click Appearance and Themes. 2 Click Display and click the Settings tab. 3 Try different settings for Screen resolution and Color quality.
Owner's Manual
Page 47
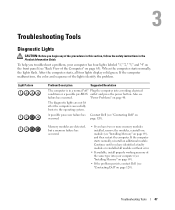
... installed, remove the modules, reinstall one module (see "Back View of the Computer" on occurred. Also see "Contacting Dell" on page 63). page 120). Troubleshooting Tools 47 To help you troubleshoot a problem, your computer (see "Installing Memory...Dell (see failure has occurred. Troubleshooting Tools Diagnostic Lights CAUTION: Before you begin any of the procedures in this section, follow the safety instructions in a normal "off" Plug the computer into a working memory of the same type into your computer has four lights labeled "1," "2," "3," and "4" on the front panel...
... installed, remove the modules, reinstall one module (see "Back View of the Computer" on occurred. Also see "Contacting Dell" on page 63). page 120). Troubleshooting Tools 47 To help you troubleshoot a problem, your computer (see "Installing Memory...Dell (see failure has occurred. Troubleshooting Tools Diagnostic Lights CAUTION: Before you begin any of the procedures in this section, follow the safety instructions in a normal "off" Plug the computer into a working memory of the same type into your computer has four lights labeled "1," "2," "3," and "4" on the front panel...

Owner's Manual
Page 52
...Troubleshooting Tools Using Windows XP Device Driver Rollback If a problem occurs on the device icon. Reinstalling Drivers NOTICE: The Dell Support website at support.dell.com provides approved drivers for which the new driver was installed and click Properties. 7 Click the Drivers tab. 8...experience a problem with any device has an exclamation point (a yellow circle with the previously installed version. 1 Click the Start button and click Control Panel. 2 Under Pick a Category, click Performance and Maintenance. 3 Click System. 4 In the System Properties window, click the Hardware tab. 5 ...
...Troubleshooting Tools Using Windows XP Device Driver Rollback If a problem occurs on the device icon. Reinstalling Drivers NOTICE: The Dell Support website at support.dell.com provides approved drivers for which the new driver was installed and click Properties. 7 Click the Drivers tab. 8...experience a problem with any device has an exclamation point (a yellow circle with the previously installed version. 1 Click the Start button and click Control Panel. 2 Under Pick a Category, click Performance and Maintenance. 3 Click System. 4 In the System Properties window, click the Hardware tab. 5 ...
Owner's Manual
Page 55
...click Reboot in time, let the computer finish starting, and then restart the computer again. During the boot process, a blue bar with www.dell.com appears at the top of free hard-disk space available, System Restore is complete. 1 Click the Start button, point to the operating... any files or programs until the system restoration is automatically disabled. To see if System Restore is enabled: 1 Click the Start button and click Control Panel. 2 Click Performance and Maintenance. 3 Click System. 4 Click the System Restore tab. 5 Ensure that appears, click Restore. 4 On the next screen, ...
...click Reboot in time, let the computer finish starting, and then restart the computer again. During the boot process, a blue bar with www.dell.com appears at the top of free hard-disk space available, System Restore is complete. 1 Click the Start button, point to the operating... any files or programs until the system restoration is automatically disabled. To see if System Restore is enabled: 1 Click the Start button and click Control Panel. 2 Click Performance and Maintenance. 3 Click System. 4 Click the System Restore tab. 5 Ensure that appears, click Restore. 4 On the next screen, ...

Owner's Manual
Page 63
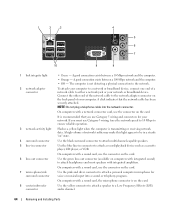
Access connectors for more information. Plug USB, audio, and other devices into the appropriate connector. Removing and Installing Parts 63 Insert the power cable. Back View of the Computer 1 2 3 4 1 voltage selection switch 2 power connector 3 back panel connectors 4 card slots See the safety instructions in the Product Information Guide for any installed PCI and PCI Express cards.
Access connectors for more information. Plug USB, audio, and other devices into the appropriate connector. Removing and Installing Parts 63 Insert the power cable. Back View of the Computer 1 2 3 4 1 voltage selection switch 2 power connector 3 back panel connectors 4 card slots See the safety instructions in the Product Information Guide for any installed PCI and PCI Express cards.
Owner's Manual
Page 64
... one end of network traffic may make this light appear to be in a steady "on computers with a sound card, use the connector on the back panel of the network cable to the network adapter connector on the card. Flashes a yellow light when the computer is recommended that the network cable has...
... one end of network traffic may make this light appear to be in a steady "on computers with a sound card, use the connector on the back panel of the network cable to the network adapter connector on the card. Flashes a yellow light when the computer is recommended that the network cable has...

Owner's Manual
Page 65
It is resting. 2 Lay your computer on its side with the computer cover facing up. 3 Pull back the cover latch release located on the top panel. CAUTION: To guard against electrical shock, always unplug your computer from the electrical outlet before removing the cover. 1 Follow the procedures in the Product Information ...
It is resting. 2 Lay your computer on its side with the computer cover facing up. 3 Pull back the cover latch release located on the top panel. CAUTION: To guard against electrical shock, always unplug your computer from the electrical outlet before removing the cover. 1 Follow the procedures in the Product Information ...
Owner's Manual
Page 67
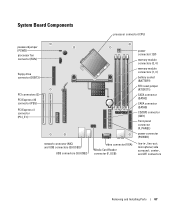
... (12V) memory module connectors (2, 4) memory module connectors (1, 3) battery socket (BATTERY) RTC reset jumper (RTCRST1) SATA connector (SATA2) SATA connector (SATA0) CD/DVD connector (IDE1) front-panel connector (F_PANEL) power connector (POWER) line-in-, line-out-, microphone/ side surround-, center-, and LFE connectors Removing and Installing Parts 67
... (12V) memory module connectors (2, 4) memory module connectors (1, 3) battery socket (BATTERY) RTC reset jumper (RTCRST1) SATA connector (SATA2) SATA connector (SATA0) CD/DVD connector (IDE1) front-panel connector (F_PANEL) power connector (POWER) line-in-, line-out-, microphone/ side surround-, center-, and LFE connectors Removing and Installing Parts 67

Owner's Manual
Page 75
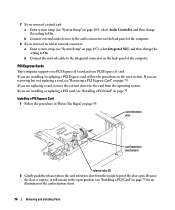
...be attached to secure the card(s). Do not connect the network cable to Off. Removing a PCI Card 1 Follow the procedures in connectors on the back panel. 12 If you installed a sound card: a Enter system setup (see "System Setup" on page 107), select Audio Controller, and then change the ...for the card for the card as described in network adapter and want to disable the integrated network adapter: a Enter system setup (see "Contacting Dell" on page 107), select Integrated NIC, and then change the setting to maintain FCC certification of your computer. 4 Close the card retention door ...
...be attached to secure the card(s). Do not connect the network cable to Off. Removing a PCI Card 1 Follow the procedures in connectors on the back panel. 12 If you installed a sound card: a Enter system setup (see "System Setup" on page 107), select Audio Controller, and then change the ...for the card for the card as described in network adapter and want to disable the integrated network adapter: a Enter system setup (see "Contacting Dell" on page 107), select Integrated NIC, and then change the setting to maintain FCC certification of your computer. 4 Close the card retention door ...
Owner's Manual
Page 76
...on page 107), select Integrated NIC, and then change the setting to On. b Connect external audio devices to the audio connectors on the back panel of the computer. Installing a PCI Express Card 1 Follow the procedures in the next section. b Connect the network cable to the integrated connector on... the back panel of the computer. 8 If you removed an add-in the open position (see "Installing a PCI Card" on page 73 for the card from...
...on page 107), select Integrated NIC, and then change the setting to On. b Connect external audio devices to the audio connectors on the back panel of the computer. Installing a PCI Express Card 1 Follow the procedures in the next section. b Connect the network cable to the integrated connector on... the back panel of the computer. 8 If you removed an add-in the open position (see "Installing a PCI Card" on page 73 for the card from...


