Owner's Manual
Page 10
Troubleshooting hints and tips, articles from technicians, and online courses, frequently asked questions Dell Support Website - Upgrade information for components, such at premier.support.dell.com. Contact information, service call when contacting technical support. The Express Service Code is not available in all countries. •..., details on your computer. • Use the Service Tag to identify your computer when you use the customized Dell Premier Support website • Upgrades - as memory, the hard drive, and the operating system • Customer Care -
Troubleshooting hints and tips, articles from technicians, and online courses, frequently asked questions Dell Support Website - Upgrade information for components, such at premier.support.dell.com. Contact information, service call when contacting technical support. The Express Service Code is not available in all countries. •..., details on your computer. • Use the Service Tag to identify your computer when you use the customized Dell Premier Support website • Upgrades - as memory, the hard drive, and the operating system • Customer Care -
Owner's Manual
Page 51
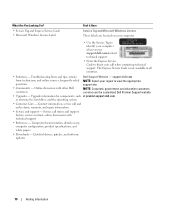
...described in the left pane of the screen. A driver acts like a translator between the device and any error conditions encountered. Dell ships your computer to your Microsoft® Windows® operating system. Tab Results Errors Help Configuration Parameters Function Displays the results ...of the test and any other programs that use the device. The Dell Diagnostics obtains configuration information for all devices attached to you : • Upgrade your operating system • Reinstall your hardware configuration for running the test. Each device ...
...described in the left pane of the screen. A driver acts like a translator between the device and any error conditions encountered. Dell ships your computer to your Microsoft® Windows® operating system. Tab Results Errors Help Configuration Parameters Function Displays the results ...of the test and any other programs that use the device. The Dell Diagnostics obtains configuration information for all devices attached to you : • Upgrade your operating system • Reinstall your hardware configuration for running the test. Each device ...
Owner's Manual
Page 69
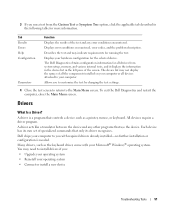
NOTICE: If you remove your original memory modules from the computer during a memory upgrade, keep them separate from any new modules that the system board is on the computer chassis. 1 Follow the procedures in the Product Information Guide. NOTICE:... of memory when you begin any of address space; Installing Memory CAUTION: Before you use a maximum of 4 GB of your computer, discharge static electricity from Dell. Certain components within the computer require address space in the 4-GB range. If possible, do so by computer memory. Removing and Installing Parts 69 however...
NOTICE: If you remove your original memory modules from the computer during a memory upgrade, keep them separate from any new modules that the system board is on the computer chassis. 1 Follow the procedures in the Product Information Guide. NOTICE:... of memory when you begin any of address space; Installing Memory CAUTION: Before you use a maximum of 4 GB of your computer, discharge static electricity from Dell. Certain components within the computer require address space in the 4-GB range. If possible, do so by computer memory. Removing and Installing Parts 69 however...

Owner's Manual
Page 83
... side-door hinges. 3 Rotate the drive panel toward the computer until it snaps into place on the system board. See the drive documentation in your upgrade kit for information on configuring devices for optional floppy drive or Media Card Reader hard drive(s) Connect CD/DVD drives to the connector labeled "IDE1...
... side-door hinges. 3 Rotate the drive panel toward the computer until it snaps into place on the system board. See the drive documentation in your upgrade kit for information on configuring devices for optional floppy drive or Media Card Reader hard drive(s) Connect CD/DVD drives to the connector labeled "IDE1...

Service Manual
Page 19
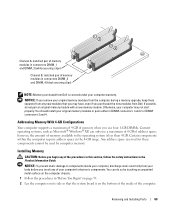
... matched pair installed in the Product Information Guide. NOTICE: If you remove your original memory modules from the computer during a memory upgrade, keep them separate from your original memory modules in pairs either in the 4-GB range. You should install your body before you...GB. Certain components within the computer require address space in DIMM connectors 1 and 2 or DIMM connectors 3 and 4. NOTE: Memory purchased from Dell. Removing Memory CAUTION: Before you begin any of address space; Addressing Memory With 4-GB Configurations Your computer supports a maximum of 4 GB ...
... matched pair installed in the Product Information Guide. NOTICE: If you remove your original memory modules from the computer during a memory upgrade, keep them separate from your original memory modules in pairs either in the 4-GB range. You should install your body before you...GB. Certain components within the computer require address space in DIMM connectors 1 and 2 or DIMM connectors 3 and 4. NOTE: Memory purchased from Dell. Removing Memory CAUTION: Before you begin any of address space; Addressing Memory With 4-GB Configurations Your computer supports a maximum of 4 GB ...

Service Manual
Page 34
... colored stripe along one edge of a connector on a board or a card is , a notch or a missing pin on one connector matches a tab or a filled-in your upgrade kit for information on configuring devices for correct insertion; The pin-1 end of the IDE cable-serial ATA cables do not place the colored stripe...
... colored stripe along one edge of a connector on a board or a card is , a notch or a missing pin on one connector matches a tab or a filled-in your upgrade kit for information on configuring devices for correct insertion; The pin-1 end of the IDE cable-serial ATA cables do not place the colored stripe...
Service Manual
Page 49
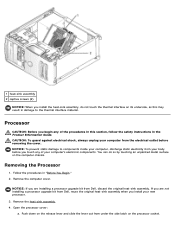
... lever out from under the side latch on the computer chassis. Removing the Processor 1. If you are installing a processor upgrade kit from Dell, reuse the original heat-sink assembly when you install your body before removing the cover. Open the processor cover: a. CAUTION... material. Remove the computer cover. Follow the procedures in the Product Information Guide. NOTICE: If you are not installing a processor upgrade kit from Dell, discard the original heat-sink assembly. 1 heat-sink assembly 2 captive screws (2) NOTICE: When you install the heat-sink assembly...
... lever out from under the side latch on the computer chassis. Removing the Processor 1. If you are installing a processor upgrade kit from Dell, reuse the original heat-sink assembly when you install your body before removing the cover. Open the processor cover: a. CAUTION... material. Remove the computer cover. Follow the procedures in the Product Information Guide. NOTICE: If you are not installing a processor upgrade kit from Dell, discard the original heat-sink assembly. 1 heat-sink assembly 2 captive screws (2) NOTICE: When you install the heat-sink assembly...
Service Manual
Page 51
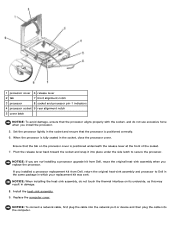
When the processor is fully seated in damage. 8. NOTICE: If you are not installing a processor upgrade kit from Dell, return the original heat-sink assembly and processor to secure the processor. NOTICE: To connect a network cable, first plug the cable into the network port ...or device and then plug the cable into place under the side latch to Dell in the same package in the socket and ensure that the processor aligns properly with the socket, and do not touch the thermal interface on...
When the processor is fully seated in damage. 8. NOTICE: If you are not installing a processor upgrade kit from Dell, return the original heat-sink assembly and processor to secure the processor. NOTICE: To connect a network cable, first plug the cable into the network port ...or device and then plug the cable into place under the side latch to Dell in the same package in the socket and ensure that the processor aligns properly with the socket, and do not touch the thermal interface on...


