
Service Manual
Page 19
...you remove your original memory modules from the computer during a memory upgrade, keep them separate from any new modules that you begin any... components within the computer require address space in the Product Information Guide. NOTE: Memory purchased from Dell is supported. Removing Memory CAUTION: Before you may not start properly. Only unbuffered, non-ECC ...of the procedures in this section, follow the safety instructions in the 4-GB range. Be sure to the processor, before you use a maximum of 4 GB of address space; or A pair of matched memory modules installed...
...you remove your original memory modules from the computer during a memory upgrade, keep them separate from any new modules that you begin any... components within the computer require address space in the Product Information Guide. NOTE: Memory purchased from Dell is supported. Removing Memory CAUTION: Before you may not start properly. Only unbuffered, non-ECC ...of the procedures in this section, follow the safety instructions in the 4-GB range. Be sure to the processor, before you use a maximum of 4 GB of address space; or A pair of matched memory modules installed...
Service Manual
Page 49
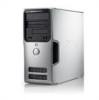
...prevent static damage to the thermal interface material. Push down on the release lever and slide the lever out from Dell, discard the original heat-sink assembly. Processor CAUTION: Before you touch any of your computer's electronic components. Remove the heat-sink assembly. 4. 1 heat-...sink assembly 2 captive screws (2) NOTICE: When you install your new processor. 3. Removing the Processor 1. If you are installing a processor upgrade kit from under the side latch on the computer chassis. Remove the computer cover. NOTICE: If you are not...
...prevent static damage to the thermal interface material. Push down on the release lever and slide the lever out from Dell, discard the original heat-sink assembly. Processor CAUTION: Before you touch any of your computer's electronic components. Remove the heat-sink assembly. 4. 1 heat-...sink assembly 2 captive screws (2) NOTICE: When you install your new processor. 3. Removing the Processor 1. If you are installing a processor upgrade kit from under the side latch on the computer chassis. Remove the computer cover. NOTICE: If you are not...
Service Manual
Page 51
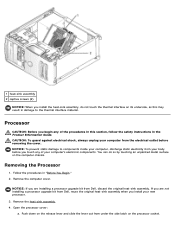
... underside, as this may result in damage. 8. NOTICE: If you are not installing a processor upgrade kit from Dell, reuse the original heat-sink assembly when you installed a processor replacement kit from Dell, return the original heat-sink assembly and processor to secure the processor. Pivot the release lever back toward the socket and snap it into the...
... underside, as this may result in damage. 8. NOTICE: If you are not installing a processor upgrade kit from Dell, reuse the original heat-sink assembly when you installed a processor replacement kit from Dell, return the original heat-sink assembly and processor to secure the processor. Pivot the release lever back toward the socket and snap it into the...


