Owner's Manual
Page 1
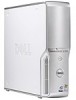
www.dell.com | support.dell.com Dell™ Dimension™ 5100C front-panel door (open) front-panel door (push to open) power button hard-drive light diagnostic lights headphone connector microphone connector IEEE 1394 connector optional floppy drive or media card reader* CD or DVD drive light USB 2.0 connectors (2) voltage selection switch line-out connector line-in connector surround sound...
www.dell.com | support.dell.com Dell™ Dimension™ 5100C front-panel door (open) front-panel door (push to open) power button hard-drive light diagnostic lights headphone connector microphone connector IEEE 1394 connector optional floppy drive or media card reader* CD or DVD drive light USB 2.0 connectors (2) voltage selection switch line-out connector line-in connector surround sound...

Owner's Manual
Page 4
2 Solving Problems Troubleshooting Tips 27 Battery Problems 27 Drive Problems 27 CD and DVD drive problems 28 Hard drive problems 29 E-Mail, Modem, and Internet Problems 29 Error Messages 30 Media Card Reader Problems 31 IEEE 1394 Device Problems 31 Keyboard Problems 32 Lockups ...
2 Solving Problems Troubleshooting Tips 27 Battery Problems 27 Drive Problems 27 CD and DVD drive problems 28 Hard drive problems 29 E-Mail, Modem, and Internet Problems 29 Error Messages 30 Media Card Reader Problems 31 IEEE 1394 Device Problems 31 Keyboard Problems 32 Lockups ...

Owner's Manual
Page 6
... Connector 72 Connecting and Disconnecting Drive Cables 73 Hard Drive 73 Removing a Hard Drive 73 Installing a Hard Drive 75 CD/DVD Drive 76 Removing a CD/DVD Drive 76 Installing a CD/DVD Drive 78 Media Card Reader 79 Removing a Media Card Reader 80 Installing a Media Card Reader 81 Floppy Drive (Optional 83 Removing a Floppy Drive 83 Installing a Floppy Drive 85 Modem 87 Replacing the...
... Connector 72 Connecting and Disconnecting Drive Cables 73 Hard Drive 73 Removing a Hard Drive 73 Installing a Hard Drive 75 CD/DVD Drive 76 Removing a CD/DVD Drive 76 Installing a CD/DVD Drive 78 Media Card Reader 79 Removing a Media Card Reader 80 Installing a Media Card Reader 81 Floppy Drive (Optional 83 Removing a Floppy Drive 83 Installing a Floppy Drive 85 Modem 87 Replacing the...

Owner's Manual
Page 10
Upgrade information for Dell™ 3.5inch USB floppy drives, Intel® Pentium® M processors, optical drives, and USB devices. DSS provides critical updates for your configuration. 10 Finding Information The website may not be available in all regions....you reinstall the operating system for your operating system and support for components, such as memory, the hard drive, and the operating system • Corporate, government, and education customers can also use support.dell.com or contact technical support. • Enter the Express Service Code to direct your computer, ...
Upgrade information for Dell™ 3.5inch USB floppy drives, Intel® Pentium® M processors, optical drives, and USB devices. DSS provides critical updates for your configuration. 10 Finding Information The website may not be available in all regions....you reinstall the operating system for your operating system and support for components, such as memory, the hard drive, and the operating system • Corporate, government, and education customers can also use support.dell.com or contact technical support. • Enter the Express Service Code to direct your computer, ...

Owner's Manual
Page 22
... to that you want to four different types of CD or DVD you created automatically ejects. Your DVD-writable drive can read DVD-RAM media. The DVD-writable drives installed in Dell™ computers can write to DVD+R and DVD+RW media, and can write to play in regular stereos.... that disc later. When prompted, insert a blank CD or DVD disc into the optical drive and click OK. • If you have two optical drives, select the drive into which you have inserted your computer hard drive. Helpful Tips • Use Microsoft® Windows® Explorer to drag and drop files to a ...
... to that you want to four different types of CD or DVD you created automatically ejects. Your DVD-writable drive can read DVD-RAM media. The DVD-writable drives installed in Dell™ computers can write to DVD+R and DVD+RW media, and can write to play in regular stereos.... that disc later. When prompted, insert a blank CD or DVD disc into the optical drive and click OK. • If you have two optical drives, select the drive into which you have inserted your computer hard drive. Helpful Tips • Use Microsoft® Windows® Explorer to drag and drop files to a ...

Owner's Manual
Page 23
...can erase the data on and you are familiar with Sonic RecordNow. • Music MP3 files can reduce power to just the monitor or the hard drive, or you are not using it entered the mode. Power Management The Microsoft® Windows® XP power management features can reduce the amount ...activate after a defined period of inactivity, click the Start button, click Turn Off Computer, and then click Stand by turning off the display and the hard drive after a time-out. You can be played only on MP3 players or on the keyboard or move the mouse. When a Windows XP Professional computer ...
...can erase the data on and you are familiar with Sonic RecordNow. • Music MP3 files can reduce power to just the monitor or the hard drive, or you are not using it entered the mode. Power Management The Microsoft® Windows® XP power management features can reduce the amount ...activate after a defined period of inactivity, click the Start button, click Turn Off Computer, and then click Stand by turning off the display and the hard drive after a time-out. You can be played only on MP3 players or on the keyboard or move the mouse. When a Windows XP Professional computer ...

Owner's Manual
Page 24
...dell.com Hibernate Mode Hibernate mode conserves power by copying system data to a reserved area on the keyboard or moving the mouse does not bring the computer out of hibernation, because the keyboard and the mouse do not function when the computer is in hibernate mode. Pressing a key on the hard drive... and then completely turning off the hard drive. The Power schemes drop-down menu. If your hibernate settings on the Power Schemes tab, Advanced tab, and Hibernate...
...dell.com Hibernate Mode Hibernate mode conserves power by copying system data to a reserved area on the keyboard or moving the mouse does not bring the computer out of hibernation, because the keyboard and the mouse do not function when the computer is in hibernate mode. Pressing a key on the hard drive... and then completely turning off the hard drive. The Power schemes drop-down menu. If your hibernate settings on the Power Schemes tab, Advanced tab, and Hibernate...

Owner's Manual
Page 25
...extended periods of performing certain tasks simultaneously. To avoid this problem, always set the hard drive (hard disk) to time-out before the monitor does, your computer to run your Windows password before the hard drive. For more information on power management options: 1 Click the Start button and ... from standby mode or hibernate mode. • Program the power button to activate standby mode, activate hibernate mode, or turn off hard disks, System stand by allowing one physical processor to use the Microsoft® Windows® XP Service Pack 1 Setting Up and Using...
...extended periods of performing certain tasks simultaneously. To avoid this problem, always set the hard drive (hard disk) to time-out before the monitor does, your computer to run your Windows password before the hard drive. For more information on power management options: 1 Click the Start button and ... from standby mode or hibernate mode. • Program the power button to activate standby mode, activate hibernate mode, or turn off hard disks, System stand by allowing one physical processor to use the Microsoft® Windows® XP Service Pack 1 Setting Up and Using...

Owner's Manual
Page 29
... Outlook Express, click Tools, click Options, and then click Security. 2 Click Do not allow attachments to an analog telephone jack only. CHECK THE TELEPHONE JACK - Hard drive problems RUN CHECK DISK - 1 Click the Start button and click My Computer. 2 Right-click Local Disk C:. 3 Click Properties. 4 Click the Tools tab. 5 Under Error-checking...
... Outlook Express, click Tools, click Options, and then click Security. 2 Click Do not allow attachments to an analog telephone jack only. CHECK THE TELEPHONE JACK - Hard drive problems RUN CHECK DISK - 1 Click the Start button and click My Computer. 2 Right-click Local Disk C:. 3 Click Properties. 4 Click the Tools tab. 5 Under Error-checking...
Owner's Manual
Page 34
...communicating with the memory. • Run the Dell Diagnostics (see if that your computer meets the minimum hardware requirements needed to see page 46). 34 Solving Problems BACK UP YOUR FILES IMMEDIATELY USE A VIRUS-SCANNING PROGRAM TO CHECK THE HARD DRIVE, FLOPPY DISKS, OR CDS SAVE AND CLOSE ...ANY OPEN FILES OR PROGRAMS AND SHUT DOWN YOUR COMPUTER THROUGH THE START MENU Memory Problems CAUTION: Before you are not using to run the software. www.dell.com | support.dell.com Other software problems CHECK...
...communicating with the memory. • Run the Dell Diagnostics (see if that your computer meets the minimum hardware requirements needed to see page 46). 34 Solving Problems BACK UP YOUR FILES IMMEDIATELY USE A VIRUS-SCANNING PROGRAM TO CHECK THE HARD DRIVE, FLOPPY DISKS, OR CDS SAVE AND CLOSE ...ANY OPEN FILES OR PROGRAMS AND SHUT DOWN YOUR COMPUTER THROUGH THE START MENU Memory Problems CAUTION: Before you are not using to run the software. www.dell.com | support.dell.com Other software problems CHECK...

Owner's Manual
Page 44
... computer (see page 63). • If the problem persists, contact Dell (see page 108). 44 Troubleshooting Tools If the computer starts normally, reinstall an additional module. restart the computer. Memory modules are detected. A possible USB failure has occurred. A possible floppy or hard drive failure has Reseat all USB devices, check cable connections, and...
... computer (see page 63). • If the problem persists, contact Dell (see page 108). 44 Troubleshooting Tools If the computer starts normally, reinstall an additional module. restart the computer. Memory modules are detected. A possible USB failure has occurred. A possible floppy or hard drive failure has Reseat all USB devices, check cable connections, and...

Owner's Manual
Page 45
...persists, contact Dell (see page 108). • Ensure that you removed, remove a different card, and then restart the computer. 3 Repeat this process for the devices installed on your screen identifying a problem with a device (such as the floppy drive or hard drive), check the... device to the system board from a device (such as the floppy drive or hard drive); Troubleshooting Tools 45 Suggested Resolution 1 Determine if a conflict exists by removing a card ...
...persists, contact Dell (see page 108). • Ensure that you removed, remove a different card, and then restart the computer. 3 Repeat this process for the devices installed on your screen identifying a problem with a device (such as the floppy drive or hard drive), check the... device to the system board from a device (such as the floppy drive or hard drive); Troubleshooting Tools 45 Suggested Resolution 1 Determine if a conflict exists by removing a card ...

Owner's Manual
Page 48
...Maintenance. 3 Click System. 4 In the System Properties window, click the Hardware tab. 5 Click Device Manager. 6 Right-click the device for Dell™ computers. If an exclamation point is the source of your computer to reinstall the driver or install a new driver (see if any ...any device has an exclamation point (a yellow circle with a [!]) on your computer after you install drivers obtained from other sources, your hard drive, click the Start button and right-click My Computer. 2 Click Properties. 48 Troubleshooting Tools Manually Reinstalling Drivers 1 After copying the driver...
...Maintenance. 3 Click System. 4 In the System Properties window, click the Hardware tab. 5 Click Device Manager. 6 Right-click the device for Dell™ computers. If an exclamation point is the source of your computer to reinstall the driver or install a new driver (see if any ...any device has an exclamation point (a yellow circle with a [!]) on your computer after you install drivers obtained from other sources, your hard drive, click the Start button and right-click My Computer. 2 Click Properties. 48 Troubleshooting Tools Manually Reinstalling Drivers 1 After copying the driver...

Owner's Manual
Page 49
...you previously extracted the driver files. 9 When the name of the appropriate driver appears, click Next. 10 Click Finish and restart your hard drive to start the search. 3 Click Hardware Troubleshooter in certain regions. To resolve incompatibilities using System Restore. Using Microsoft Windows XP System ...files. • Dell PC Restore by Symantec restores your computer. 3 Click the Hardware tab and click Device Manager. 4 Double-click the type of device for which you are installing the driver. 5 Double-click the name of the device for information on the hard drive and removes any ...
...you previously extracted the driver files. 9 When the name of the appropriate driver appears, click Next. 10 Click Finish and restart your hard drive to start the search. 3 Click Hardware Troubleshooter in certain regions. To resolve incompatibilities using System Restore. Using Microsoft Windows XP System ...files. • Dell PC Restore by Symantec restores your computer. 3 Click the Hardware tab and click Device Manager. 4 Double-click the type of device for which you are installing the driver. 5 Double-click the name of the device for information on the hard drive and removes any ...

Owner's Manual
Page 51
Using Dell PC Restore by Symantec only as the last method to restore your hard drive to the operating state it was in the following ... Restore. 2 Click Undo my last restoration and click Next. Use Dell PC Restore by Symantec NOTE: Dell PC Restore is available only on the hard drive and removes any files or programs until the system restoration is automatically ...possible, back up the data before using PC Restore. including data files-are permanently deleted from the hard drive. To use PC Restore: 1 Turn on . PC Restore restores your operating system. Troubleshooting Tools 51...
Using Dell PC Restore by Symantec only as the last method to restore your hard drive to the operating state it was in the following ... Restore. 2 Click Undo my last restoration and click Next. Use Dell PC Restore by Symantec NOTE: Dell PC Restore is available only on the hard drive and removes any files or programs until the system restoration is automatically ...possible, back up the data before using PC Restore. including data files-are permanently deleted from the hard drive. To use PC Restore: 1 Turn on . PC Restore restores your operating system. Troubleshooting Tools 51...

Owner's Manual
Page 56
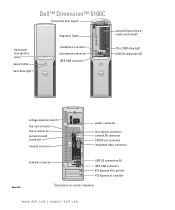
...light illuminates and blinks or remains solid to attach a personal computer microphone for devices that typically remain connected, such as external hard drives and other storage devices. The computer is in a normal operating state. • Blinking green - The computer is turned off... the computer. Press this button to turn off . • Steady green - www.dell.com | support.dell.com 1 CD/DVD drive eject button 2 CD/DVD drive-activity light 3 USB 2.0 connectors (2) 4 IEEE 1394 connector 5 power button 6 power light 7 front-panel door release ...
...light illuminates and blinks or remains solid to attach a personal computer microphone for devices that typically remain connected, such as external hard drives and other storage devices. The computer is in a normal operating state. • Blinking green - The computer is turned off... the computer. Press this button to turn off . • Steady green - www.dell.com | support.dell.com 1 CD/DVD drive eject button 2 CD/DVD drive-activity light 3 USB 2.0 connectors (2) 4 IEEE 1394 connector 5 power button 6 power light 7 front-panel door release ...

Owner's Manual
Page 61
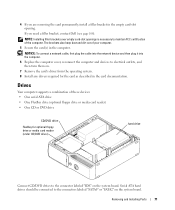
CAUTION: To guard against electrical shock, always unplug your computer from the electrical outlet before opening the cover. CD/DVD drive drive release latch power supply and fan hard drive front-panel door power button system board heat sink and blower assembly Removing and Installing Parts 61 Inside View of Your Computer CAUTION: Before you begin any of the procedures in this section, follow the safety instructions in the Product Information Guide.
CAUTION: To guard against electrical shock, always unplug your computer from the electrical outlet before opening the cover. CD/DVD drive drive release latch power supply and fan hard drive front-panel door power button system board heat sink and blower assembly Removing and Installing Parts 61 Inside View of Your Computer CAUTION: Before you begin any of the procedures in this section, follow the safety instructions in the Product Information Guide.
Owner's Manual
Page 71
... Install any drivers required for optional floppy drive or media card reader (under CD/DVD drive) hard drive Connect CD/DVD drives to the connector labeled "IDE" on the system board. Drives Your computer supports a combination of the ...computer. NOTE: Installing filler brackets over empty card-slot openings is necessary to the connectors labeled "SATA0" or "SATA2" on the system board. 4 If you need a filler bracket, contact Dell...
... Install any drivers required for optional floppy drive or media card reader (under CD/DVD drive) hard drive Connect CD/DVD drives to the connector labeled "IDE" on the system board. Drives Your computer supports a combination of the ...computer. NOTE: Installing filler brackets over empty card-slot openings is necessary to the connectors labeled "SATA0" or "SATA2" on the system board. 4 If you need a filler bracket, contact Dell...

Owner's Manual
Page 73
... keep, back up your files before removing the cover. Removing a Hard Drive 1 Follow the procedures in the Product Information Guide. Connecting and Disconnecting Drive Cables When removing an IDE drive data cable, grasp the colored pull-tab and pull until the connector detaches. Hard Drive CAUTION: Before you are keyed for your computer from the electrical...
... keep, back up your files before removing the cover. Removing a Hard Drive 1 Follow the procedures in the Product Information Guide. Connecting and Disconnecting Drive Cables When removing an IDE drive data cable, grasp the colored pull-tab and pull until the connector detaches. Hard Drive CAUTION: Before you are keyed for your computer from the electrical...

Owner's Manual
Page 74
tabs (2) hard drive 5 Disconnect the power and hard-drive cable from the drive. power cable 74 Removing and Installing Parts serial ATA data cable www.dell.com | support.dell.com 4 Press in on the blue tabs on each side of the drive and slide the drive up and out of the computer.
tabs (2) hard drive 5 Disconnect the power and hard-drive cable from the drive. power cable 74 Removing and Installing Parts serial ATA data cable www.dell.com | support.dell.com 4 Press in on the blue tabs on each side of the drive and slide the drive up and out of the computer.


