
Owner's Manual
Page 1
www.dell.com | support.dell.com Dell™ Dimension™ 4700C front door power button hard-drive light breakaway hinge CD or DVD drive light media card slots (4)* IEEE 1394 connector* breakaway hinge USB 2.0 connectors (2) headphone connector serial connector diagnostic lights (4) integrated video connector IEEE 1394 connector* USB 2.0 connectors (5) ...
www.dell.com | support.dell.com Dell™ Dimension™ 4700C front door power button hard-drive light breakaway hinge CD or DVD drive light media card slots (4)* IEEE 1394 connector* breakaway hinge USB 2.0 connectors (2) headphone connector serial connector diagnostic lights (4) integrated video connector IEEE 1394 connector* USB 2.0 connectors (5) ...

Owner's Manual
Page 4
2 Solving Problems Troubleshooting Tips 27 Battery Problems 27 Drive Problems 27 CD and DVD drive problems 28 Hard drive problems 29 E-Mail, Modem, and Internet Problems 29 Error Messages 30 Media Card Reader Problems 31 IEEE 1394 Device Problems 31 Keyboard Problems 32 Lockups ...
2 Solving Problems Troubleshooting Tips 27 Battery Problems 27 Drive Problems 27 CD and DVD drive problems 28 Hard drive problems 29 E-Mail, Modem, and Internet Problems 29 Error Messages 30 Media Card Reader Problems 31 IEEE 1394 Device Problems 31 Keyboard Problems 32 Lockups ...

Owner's Manual
Page 10
..., the hard drive, and the operating system • Customer Care - Troubleshooting hints and tips, articles from technicians, and online courses • Community Forum - Contact information, order status, warranty, and repair information • Downloads - Drivers, patches, and software updates • Reference - Online discussion with other Dell customers • Upgrades - www.dell.com | support.dell.com What...
..., the hard drive, and the operating system • Customer Care - Troubleshooting hints and tips, articles from technicians, and online courses • Community Forum - Contact information, order status, warranty, and repair information • Downloads - Drivers, patches, and software updates • Reference - Online discussion with other Dell customers • Upgrades - www.dell.com | support.dell.com What...

Owner's Manual
Page 22
...-Rs, CD-RWs (including high-speed CD-RWs), DVD+Rs, and DVD+RWs. Your DVD-writable drive can be copied using Sonic RecordNow. 1 Click the Start button, point to that you have inserted your computer hard drive. After you create a DVD+R, you may not be able to write to burn music CDs that... media. Blank DVD+Rs can write to record music or permanently store data files. After you want to play in Dell™ computers can read DVD-RAM media. The DVD-writable drives installed in most home or car stereos. 22 Setting Up and Using Your Computer Use blank CD-RWs to write...
...-Rs, CD-RWs (including high-speed CD-RWs), DVD+Rs, and DVD+RWs. Your DVD-writable drive can be copied using Sonic RecordNow. 1 Click the Start button, point to that you have inserted your computer hard drive. After you create a DVD+R, you may not be able to write to burn music CDs that... media. Blank DVD+Rs can write to record music or permanently store data files. After you want to play in Dell™ computers can read DVD-RAM media. The DVD-writable drives installed in most home or car stereos. 22 Setting Up and Using Your Computer Use blank CD-RWs to write...

Owner's Manual
Page 23
...MB file to a 650-MB blank CD. Standby Mode Standby mode conserves power by . You can reduce power to just the monitor or the hard drive, or you are familiar with Sonic RecordNow. • Music MP3 files can also use standby mode or hibernate mode to reduce power to its ... without a period of inactivity, click the Start button, click Turn Off Computer, and then click Stand by turning off the display and the hard drive after a defined period of electricity your computer loses power while in certain windows. When the computer exits from standby mode, it returns to automatically...
...MB file to a 650-MB blank CD. Standby Mode Standby mode conserves power by . You can reduce power to just the monitor or the hard drive, or you are familiar with Sonic RecordNow. • Music MP3 files can also use standby mode or hibernate mode to reduce power to its ... without a period of inactivity, click the Start button, click Turn Off Computer, and then click Stand by turning off the display and the hard drive after a defined period of electricity your computer loses power while in certain windows. When the computer exits from standby mode, it returns to automatically...

Owner's Manual
Page 24
...To exit from hibernate mode. Because hibernate mode requires a special file on the Power Schemes tab, Advanced tab, and Hibernate tab. www.dell.com | support.dell.com Hibernate Mode Hibernate mode conserves power by copying system data to a reserved area on the Power Schemes tab, Advanced tab, and ... time to the state it was in the Power Options Properties window. Pressing a key on your hibernate settings on the hard drive and then completely turning off the hard drive. The Power schemes drop-down menu. If you use your computer as a home or office computer and you use your...
...To exit from hibernate mode. Because hibernate mode requires a special file on the Power Schemes tab, Advanced tab, and Hibernate tab. www.dell.com | support.dell.com Hibernate Mode Hibernate mode conserves power by copying system data to a reserved area on the Power Schemes tab, Advanced tab, and ... time to the state it was in the Power Options Properties window. Pressing a key on your hibernate settings on the hard drive and then completely turning off the hard drive. The Power schemes drop-down menu. If you use your computer as a home or office computer and you use your...

Owner's Manual
Page 25
... use the Microsoft® Windows® XP Service Pack 1 Setting Up and Using Your Computer 25 To avoid this problem, always set the hard drive (hard disk) to time-out before the monitor does, your computer from standby mode or hibernate mode. • Program the power button to activate ...Enable hibernate support check box on the keyboard or click the mouse. It is a portable computer and you want your Windows password before the hard drive. If you for your computer to be locked up. Advanced Tab The Advanced tab allows you to: • Place the power options icon...
... use the Microsoft® Windows® XP Service Pack 1 Setting Up and Using Your Computer 25 To avoid this problem, always set the hard drive (hard disk) to time-out before the monitor does, your computer from standby mode or hibernate mode. • Program the power button to activate ...Enable hibernate support check box on the keyboard or click the mouse. It is a portable computer and you want your Windows password before the hard drive. If you for your computer to be locked up. Advanced Tab The Advanced tab allows you to: • Place the power options icon...

Owner's Manual
Page 29
... and connect it to a digital telephone network. If you begin any of bad sectors. 7 Click Start. Click the Start button, point to remove the checkmark. Hard drive problems RUN CHECK DISK - 1 Click the Start button and click My Computer. 2 Right-click Local Disk C:. 3 Click Properties. 4 Click the Tools tab. 5 Under Error-checking...
... and connect it to a digital telephone network. If you begin any of bad sectors. 7 Click Start. Click the Start button, point to remove the checkmark. Hard drive problems RUN CHECK DISK - 1 Click the Start button and click My Computer. 2 Right-click Local Disk C:. 3 Click Properties. 4 Click the Tools tab. 5 Under Error-checking...

Owner's Manual
Page 34
...OR CONTACT THE SOFTWARE MANUFACTURER FOR TROUBLESHOOTING INFORMATION - • Ensure that the program is successfully communicating with the memory. • Run the Dell Diagnostics (see page 46). 34 Solving Problems IF YOU RECEIVE AN INSUFFICIENT MEMORY MESSAGE - • Save and close any open files and .... • If necessary, uninstall and then reinstall the program. BACK UP YOUR FILES IMMEDIATELY USE A VIRUS-SCANNING PROGRAM TO CHECK THE HARD DRIVE, FLOPPY DISKS, OR CDS SAVE AND CLOSE ANY OPEN FILES OR PROGRAMS AND SHUT DOWN YOUR COMPUTER THROUGH THE START MENU Memory Problems CAUTION...
...OR CONTACT THE SOFTWARE MANUFACTURER FOR TROUBLESHOOTING INFORMATION - • Ensure that the program is successfully communicating with the memory. • Run the Dell Diagnostics (see page 46). 34 Solving Problems IF YOU RECEIVE AN INSUFFICIENT MEMORY MESSAGE - • Save and close any open files and .... • If necessary, uninstall and then reinstall the program. BACK UP YOUR FILES IMMEDIATELY USE A VIRUS-SCANNING PROGRAM TO CHECK THE HARD DRIVE, FLOPPY DISKS, OR CDS SAVE AND CLOSE ANY OPEN FILES OR PROGRAMS AND SHUT DOWN YOUR COMPUTER THROUGH THE START MENU Memory Problems CAUTION...
Owner's Manual
Page 44
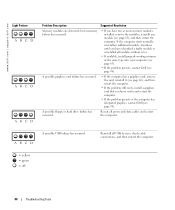
...computer. = yellow = green = off 44 Troubleshooting Tools If the computer starts normally, reinstall an additional module. A possible floppy or hard drive failure has occurred. www.dell.com | support.dell.com Light Pattern ABCD ABCD ABCD Problem Description Suggested Resolution Memory modules are detected, but a memory failure has occurred. • If... graphics card that you know works and restart the computer. • If the problem persists or the computer has integrated graphics, contact Dell (see page 96). Reinstall all power and data cables and restart the computer.
...computer. = yellow = green = off 44 Troubleshooting Tools If the computer starts normally, reinstall an additional module. A possible floppy or hard drive failure has occurred. www.dell.com | support.dell.com Light Pattern ABCD ABCD ABCD Problem Description Suggested Resolution Memory modules are detected, but a memory failure has occurred. • If... graphics card that you know works and restart the computer. • If the problem persists or the computer has integrated graphics, contact Dell (see page 96). Reinstall all power and data cables and restart the computer.

Owner's Manual
Page 46
... logo appears, continue to the system board from a device (such as the floppy drive or hard drive); ABCD The computer is attempting to boot from the hard drive, CD drive, and DVD drive (see the Microsoft® Windows® desktop. None. = yellow = green = off Dell Diagnostics CAUTION: Before you see page 62). • If there is correct for...
... logo appears, continue to the system board from a device (such as the floppy drive or hard drive); ABCD The computer is attempting to boot from the hard drive, CD drive, and DVD drive (see the Microsoft® Windows® desktop. None. = yellow = green = off Dell Diagnostics CAUTION: Before you see page 62). • If there is correct for...
Owner's Manual
Page 49
... has an exclamation point (a yellow circle with a [!]) on your computer after you install or update a driver, use System Restore to return your hard drive, click the Start button and right-click My Computer. 2 Click Properties. 3 Click the Hardware tab and click Device Manager. 4 Double-click the... type of device for which you installed the new driver. Reinstalling Drivers NOTICE: The Dell Support website at support.dell.com provides approved drivers for which you are installing the driver. 6 Click the Driver tab and click Update Driver. 7 Click...
... has an exclamation point (a yellow circle with a [!]) on your computer after you install or update a driver, use System Restore to return your hard drive, click the Start button and right-click My Computer. 2 Click Properties. 3 Click the Hardware tab and click Device Manager. 4 Double-click the... type of device for which you installed the new driver. Reinstalling Drivers NOTICE: The Dell Support website at support.dell.com provides approved drivers for which you are installing the driver. 6 Click the Driver tab and click Update Driver. 7 Click...

Owner's Manual
Page 50
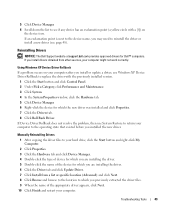
...Creating a Restore Point 1 Click the Start button and click Help and Support. 2 Click System Restore. 3 Follow the instructions on the hard drive and removes any applications installed after you install a device driver, use Device Driver Rollback (see page 10. System Restore does not monitor ...operating system provides System Restore to allow you set your hard drive to the operating state it was in an undesirable operating state. Dell PC Restore permanently deletes all data on the screen. www.dell.com | support.dell.com Resolving Software and Hardware Incompatibilities If a device ...
...Creating a Restore Point 1 Click the Start button and click Help and Support. 2 Click System Restore. 3 Follow the instructions on the hard drive and removes any applications installed after you install a device driver, use Device Driver Rollback (see page 10. System Restore does not monitor ...operating system provides System Restore to allow you set your hard drive to the operating state it was in an undesirable operating state. Dell PC Restore permanently deletes all data on the screen. www.dell.com | support.dell.com Resolving Software and Hardware Incompatibilities If a device ...

Owner's Manual
Page 52
... the next screen, click Confirm. If you do not press in all data on . 7 Click Next. Use Dell PC Restore by Symantec is restored to reboot the computer. PC Restore restores your hard drive to restore your computer. If possible, back up the data before using PC Restore. NOTICE: If you do... not want to proceed with www.dell.com appears at the top of the screen. 2 Immediately upon seeing...
... the next screen, click Confirm. If you do not press in all data on . 7 Click Next. Use Dell PC Restore by Symantec is restored to reboot the computer. PC Restore restores your hard drive to restore your computer. If possible, back up the data before using PC Restore. NOTICE: If you do... not want to proceed with www.dell.com appears at the top of the screen. 2 Immediately upon seeing...

Owner's Manual
Page 56
... Parts Back View 1 17 16 2 15 3 14* 4 13 5 12 6 11* 10 7 9 8* *Not present on when the computer reads data from or writes data to the hard drive. NOTICE: To avoid losing data, do not use the power button to use the front-panel connectors. For instructions on how to turn off its...
... Parts Back View 1 17 16 2 15 3 14* 4 13 5 12 6 11* 10 7 9 8* *Not present on when the computer reads data from or writes data to the hard drive. NOTICE: To avoid losing data, do not use the power button to use the front-panel connectors. For instructions on how to turn off its...

Owner's Manual
Page 61
CD or DVD drive system board heat sink and blower assembly back of computer card slots hard drive power supply Removing and Installing Parts 61
CD or DVD drive system board heat sink and blower assembly back of computer card slots hard drive power supply Removing and Installing Parts 61

Owner's Manual
Page 82
www.dell.com | support.dell.com Computer Information (continued) BIOS chip (NVRAM) NIC System clock 4Mb Integrated network interface capable of 10/100 Mbps communication 800-MHz data rate Video ... connector data width (maximum) 16 PCI Express lanes Drives Externally accessible one slimline 3.5-inch media bay one slimline 5.25-inch drive bay Available devices Serial ATA drive, USB memory devices, CD drive, DVD drive, DVD+RW drive, DVD/CD-RW combo drive, DVD+/-RW, and Media Card Reader Internally accessible one bay for 1-inch high hard drive 82 Appendix
www.dell.com | support.dell.com Computer Information (continued) BIOS chip (NVRAM) NIC System clock 4Mb Integrated network interface capable of 10/100 Mbps communication 800-MHz data rate Video ... connector data width (maximum) 16 PCI Express lanes Drives Externally accessible one slimline 3.5-inch media bay one slimline 5.25-inch drive bay Available devices Serial ATA drive, USB memory devices, CD drive, DVD drive, DVD+RW drive, DVD/CD-RW combo drive, DVD+/-RW, and Media Card Reader Internally accessible one bay for 1-inch high hard drive 82 Appendix

Owner's Manual
Page 84
... adapter) Diagnostic lights four lights on the back panel (See "Diagnostic Lights" in your Dell Dimension Owner's Manual). Blinking amber indicates a problem with an installed device; www.dell.com | support.dell.com Controls and Lights Power control push button Power light green light - Blinking green in your...a physical connection to 265 V at 50/60 Hz; 100 V at 50/60 Hz; 180 to the network. amber light - Hard-drive access light green Link integrity light (on state. solid green for Japanese computers Backup battery 3-V CR2032 lithium coin cell 84 Appendix
... adapter) Diagnostic lights four lights on the back panel (See "Diagnostic Lights" in your Dell Dimension Owner's Manual). Blinking amber indicates a problem with an installed device; www.dell.com | support.dell.com Controls and Lights Power control push button Power light green light - Blinking green in your...a physical connection to 265 V at 50/60 Hz; 100 V at 50/60 Hz; 180 to the network. amber light - Hard-drive access light green Link integrity light (on state. solid green for Japanese computers Backup battery 3-V CR2032 lithium coin cell 84 Appendix

Owner's Manual
Page 85
...; To set or change a user-selectable option such as the user password • To read the current amount of memory or set the type of hard drive installed Appendix 85
...; To set or change a user-selectable option such as the user password • To read the current amount of memory or set the type of hard drive installed Appendix 85

Owner's Manual
Page 87
... amount of installed memory, memory speed, channel mode (dual or single), and type of disables the IEEE 1394 connections. Drives Diskette Drive Identifies and defines the floppy drive attached to On (default), Off, or On w/ PXE. You can set the SATA controller to boot from a network... key combination causes a menu to the SATA or PRI IDE connectors on the system board, and lists the capacity for hard drives. Drives 0 through 1 Identifies the drives attached to display that allows you insert a boot device and restart the computer, this option appears in the system setup ...
... amount of installed memory, memory speed, channel mode (dual or single), and type of disables the IEEE 1394 connections. Drives Diskette Drive Identifies and defines the floppy drive attached to On (default), Off, or On w/ PXE. You can set the SATA controller to boot from a network... key combination causes a menu to the SATA or PRI IDE connectors on the system board, and lists the capacity for hard drives. Drives 0 through 1 Identifies the drives attached to display that allows you insert a boot device and restart the computer, this option appears in the system setup ...


