Owner's Manual
Page 29
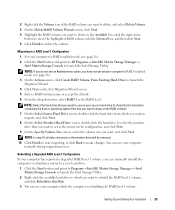
... Rebuild to act as the RAID level. NOTE: Select the hard drive that you want to use as your source hard drive (it should be removed. 10 Click Finish to start migrating, or click Back to launch the Intel Storage Utility. Rebuilding a Degraded RAID Level 1 Configuration If your computer has ... you want to keep on the member drive will be the hard drive containing the data or operating system files that you want to this Disk. 3 You can use your computer normally during migration process. You can use your computer while the computer is rebuilding the RAID level 1 volume...
... Rebuild to act as the RAID level. NOTE: Select the hard drive that you want to use as your source hard drive (it should be removed. 10 Click Finish to start migrating, or click Back to launch the Intel Storage Utility. Rebuilding a Degraded RAID Level 1 Configuration If your computer has ... you want to keep on the member drive will be the hard drive containing the data or operating system files that you want to this Disk. 3 You can use your computer normally during migration process. You can use your computer while the computer is rebuilding the RAID level 1 volume...
Owner's Manual
Page 33
.... (Modem Helper is 3 m (10 ft) or more in the Product Information Guide. The modem does not operate while it to remove the checkmark. Listen for and attempt recovery of the procedures in this section, follow the safety instructions located in length, try a shorter one.... CHECK THE TELEPHONE JACK - Hard drive problems RUN CHECK DISK - 1 Click the Start button and click My Computer. 2 Right-click Local Disk C:. 3 Click Properties. 4 Click the Tools tab. 5 Under Error-checking, click Check Now. 6 Click Scan for ...
.... (Modem Helper is 3 m (10 ft) or more in the Product Information Guide. The modem does not operate while it to remove the checkmark. Listen for and attempt recovery of the procedures in this section, follow the safety instructions located in length, try a shorter one.... CHECK THE TELEPHONE JACK - Hard drive problems RUN CHECK DISK - 1 Click the Start button and click My Computer. 2 Right-click Local Disk C:. 3 Click Properties. 4 Click the Tools tab. 5 Under Error-checking, click Check Now. 6 Click Scan for ...
Owner's Manual
Page 34
...disk into the drive and try again. S YS T E M D I N G C H A R A C T E R S Do not use these characters in filenames. If Work Offline has a checkmark next to it, click the checkmark to remove it and connect to verify that the modem is operating properly. A R E Q U I S N O T R E A D Y - To remove...U R E T H A T Y O U A R E C O N N E C T E D T O T H E I A - Ensure that you have subscribed to remove. 3 Click the Change or Remove Program icon. 4 See the program documentation for the operating system or the program that you want to an Internet provider. D L L F I B L E . d r i v e...
...disk into the drive and try again. S YS T E M D I N G C H A R A C T E R S Do not use these characters in filenames. If Work Offline has a checkmark next to it, click the checkmark to remove it and connect to verify that the modem is operating properly. A R E Q U I S N O T R E A D Y - To remove...U R E T H A T Y O U A R E C O N N E C T E D T O T H E I A - Ensure that you have subscribed to remove. 3 Click the Change or Remove Program icon. 4 See the program documentation for the operating system or the program that you want to an Internet provider. D L L F I B L E . d r i v e...

Owner's Manual
Page 56
...1 Turn on . NOTICE: If you do not press in all data on the hard drive and removes any files or programs until the system restoration is unchecked. To see if System Restore is enabled: ... restore process takes approximately 6-10 minutes to proceed with less than 200 MB of free hard-disk space available, System Restore is not available in time, let the computer finish restarting, and then...PC Restore restores your computer- If possible, back up all data before using PC Restore. Using Dell™ PC Restore by Symantec only as the last method to the operating state it was in ...
...1 Turn on . NOTICE: If you do not press in all data on the hard drive and removes any files or programs until the system restoration is unchecked. To see if System Restore is enabled: ... restore process takes approximately 6-10 minutes to proceed with less than 200 MB of free hard-disk space available, System Restore is not available in time, let the computer finish restarting, and then...PC Restore restores your computer- If possible, back up all data before using PC Restore. Using Dell™ PC Restore by Symantec only as the last method to the operating state it was in ...

Owner's Manual
Page 57
...After the computer restarts, click OK. there is available as a local administrator. The PC Restore partition is deleted and the newly available disk space is added to the free space allocation on the hard drive. 5 Click Yes when a confirmation message appears. Click Quit; The... appears stating that you must log on as a local administrator. 2 In Windows Explorer, go to c:\dell\utilities\DSR. 3 Double-click the filename DSRIRRemv2.exe. Dell PC Restore enables you remove PC Restore from your computer's operating system. If you to restore your computer's hard drive, a message...
...After the computer restarts, click OK. there is available as a local administrator. The PC Restore partition is deleted and the newly available disk space is added to the free space allocation on the hard drive. 5 Click Yes when a confirmation message appears. Click Quit; The... appears stating that you must log on as a local administrator. 2 In Windows Explorer, go to c:\dell\utilities\DSR. 3 Double-click the filename DSRIRRemv2.exe. Dell PC Restore enables you remove PC Restore from your computer's operating system. If you to restore your computer's hard drive, a message...
Owner's Manual
Page 59
... computer window, click Turn off your computer. 1 Shut down your Dell™ Product Information Guide. The computer turns off . Unless otherwise ...tools: • Small flat-blade screwdriver • Phillips screwdriver • Flash BIOS update program floppy disk or CD Turning Off Your Computer NOTICE: To avoid losing data, save and close any open files... can be replaced or-if purchased separately-installed by performing the removal procedure in your operating system, press and hold the power button for removing and installing the components in this document may require the following...
... computer window, click Turn off your computer. 1 Shut down your Dell™ Product Information Guide. The computer turns off . Unless otherwise ...tools: • Small flat-blade screwdriver • Phillips screwdriver • Flash BIOS update program floppy disk or CD Turning Off Your Computer NOTICE: To avoid losing data, save and close any open files... can be replaced or-if purchased separately-installed by performing the removal procedure in your operating system, press and hold the power button for removing and installing the components in this document may require the following...
Owner's Manual
Page 61
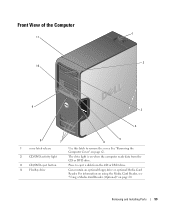
Front View of the Computer 11 10 1 2 9 3 4 8 7 5 6 1 cover latch release 2 CD/DVD activity light 3 CD/DVD eject button 4 FlexBay drive Use this latch to eject a disk from the CD or DVD drive. Press to remove the cover. For information on using the Media Card Reader, see "Using a Media Card Reader (Optional)" on when the computer reads data from the CD or DVD drive. Removing and Installing Parts 59 The drive light is on page 20. Can contain an optional floppy drive or optional Media Card Reader. See "Removing the Computer Cover" on page 62.
Front View of the Computer 11 10 1 2 9 3 4 8 7 5 6 1 cover latch release 2 CD/DVD activity light 3 CD/DVD eject button 4 FlexBay drive Use this latch to eject a disk from the CD or DVD drive. Press to remove the cover. For information on using the Media Card Reader, see "Using a Media Card Reader (Optional)" on when the computer reads data from the CD or DVD drive. Removing and Installing Parts 59 The drive light is on page 20. Can contain an optional floppy drive or optional Media Card Reader. See "Removing the Computer Cover" on page 62.
Owner's Manual
Page 113
... ball cage to dislodge dust and lint. 4 If the rollers inside edge of the disc. Floppy Drive NOTICE: Do not attempt to remove contaminants that fluff from dust, fingerprints, and scratches. You can also touch the inside the ball cage are safe to use compressed air... floppy drive using water or a diluted solution of your mouse counterclockwise, and then remove the ball. 2 Wipe the ball with a clean, lint-free cloth. 3 Blow carefully into place. These kits contain pretreated floppy disks to clean drive heads with the compressed air. NOTICE: To prevent damaging the surface...
... ball cage to dislodge dust and lint. 4 If the rollers inside edge of the disc. Floppy Drive NOTICE: Do not attempt to remove contaminants that fluff from dust, fingerprints, and scratches. You can also touch the inside the ball cage are safe to use compressed air... floppy drive using water or a diluted solution of your mouse counterclockwise, and then remove the ball. 2 Wipe the ball with a clean, lint-free cloth. 3 Blow carefully into place. These kits contain pretreated floppy disks to clean drive heads with the compressed air. NOTICE: To prevent damaging the surface...

Owner's Manual
Page 135
...DVD drive activity light, 59 eject button, 59 CD/DVD drive (continued) installing, 92 problems, 32 removing, 91 CD-RW drive problems, 32 CDs, 18 playing, 16 Check Disk, 33 CMOS settings clearing, 110 computer components inside, 64 crashes, 36-37 inside view, 64 restore...18 copying DVDs general information, 18 helpful tips, 20 how to, 18 cover removing, 62 replacing, 96 D Dell contacting, 114 support policy, 112 support site, 10 Dell Diagnostics, 50 Dell Premier Support website, 9 diagnostic lights, 47 diagnostics Dell, 50 lights, 47, 60 documentation End User License Agreement, 9 ergonomics, 9 ...
...DVD drive activity light, 59 eject button, 59 CD/DVD drive (continued) installing, 92 problems, 32 removing, 91 CD-RW drive problems, 32 CDs, 18 playing, 16 Check Disk, 33 CMOS settings clearing, 110 computer components inside, 64 crashes, 36-37 inside view, 64 restore...18 copying DVDs general information, 18 helpful tips, 20 how to, 18 cover removing, 62 replacing, 96 D Dell contacting, 114 support policy, 112 support site, 10 Dell Diagnostics, 50 Dell Premier Support website, 9 diagnostic lights, 47 diagnostics Dell, 50 lights, 47, 60 documentation End User License Agreement, 9 ergonomics, 9 ...

Service Manual
Page 2
...near these vents. 8 power button NOTICE: Keep the vent area clean and dust-free to remove the cover. NOTICE: Ensure that the system is operating. Press to turn on when the ...Use the headphone connector to the system. Back to Contents Page About Your Dell™ Dimension™ 3100/E310 Computer Dell™ Dimension™ 3100/E310 Service Manual Front View of Computer Back View of Computer Front View ...of two inches of space between all vents and any of speakers. Press to eject a disk from or writes data to help you connect occasionally, such as joysticks or cameras. Can...
...near these vents. 8 power button NOTICE: Keep the vent area clean and dust-free to remove the cover. NOTICE: Ensure that the system is operating. Press to turn on when the ...Use the headphone connector to the system. Back to Contents Page About Your Dell™ Dimension™ 3100/E310 Computer Dell™ Dimension™ 3100/E310 Service Manual Front View of Computer Back View of Computer Front View ...of two inches of space between all vents and any of speakers. Press to eject a disk from or writes data to help you connect occasionally, such as joysticks or cameras. Can...

Service Manual
Page 10
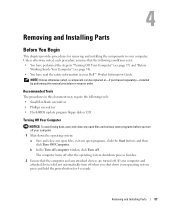
...you are turned off . Some cables have a connector with care. Hold a component such as a processor by its edges, not by performing the removal procedure in reverse order. if you shut down the operating system: a. Also, before you begin working inside the computer. 1. Shut down your ...update program floppy disk or CD Turning Off Your Computer NOTICE: To avoid losing data, save and close any open files, exit any open programs, click the Start button, and then click Turn Off Computer. Back to Contents Page Before You Begin Dell™ Dimension™ 3100/E310 Service ...
...you are turned off . Some cables have a connector with care. Hold a component such as a processor by its edges, not by performing the removal procedure in reverse order. if you shut down the operating system: a. Also, before you begin working inside the computer. 1. Shut down your ...update program floppy disk or CD Turning Off Your Computer NOTICE: To avoid losing data, save and close any open files, exit any open programs, click the Start button, and then click Turn Off Computer. Back to Contents Page Before You Begin Dell™ Dimension™ 3100/E310 Service ...

