Owner's Manual
Page 5
Only 76 Definition of "Dell-Installed" Software and Peripherals 76 Definition of the Computer 45 Front View 45 Back View 47 Removing the Computer Cover 49 Looking Inside Your Computer 50 System Board Components 51 Adding Cards 51 Adding a Floppy Drive 54 Adding a Second CD or DVD Drive 59 Adding ...
Only 76 Definition of "Dell-Installed" Software and Peripherals 76 Definition of the Computer 45 Front View 45 Back View 47 Removing the Computer Cover 49 Looking Inside Your Computer 50 System Board Components 51 Adding Cards 51 Adding a Floppy Drive 54 Adding a Second CD or DVD Drive 59 Adding ...

Owner's Manual
Page 47
Plug a standard mouse into a USB connector. Removing and Installing Parts 47 If you have a USB mouse, plug it into a USB connector. For more information, see "Diagnostic Lights" on the diagnostic code. Use the blue line-in connector 5 cover latch *May not be present on the card.) Releases the cover from the computer. If you...
Plug a standard mouse into a USB connector. Removing and Installing Parts 47 If you have a USB mouse, plug it into a USB connector. For more information, see "Diagnostic Lights" on the diagnostic code. Use the blue line-in connector 5 cover latch *May not be present on the card.) Releases the cover from the computer. If you...

Owner's Manual
Page 49
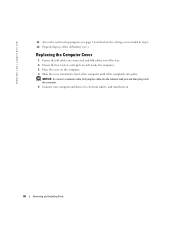
... Disconnect your computer and all attached devices from their electrical outlets, and then press the power button to ground the system board. Removing and Installing Parts 49 If your computer and attached devices did not automatically turn them off . NOTICE: To disconnect a network cable...from the electrical outlet before opening the cover. 5 Lay your computer on its side with the computer cover facing up. 6 If your computer cover has a cover latch, slide and hold the cover latch. 7 Grip the indents on a level surface. Removing the Computer Cover CAUTION: Before you shut down the...
... Disconnect your computer and all attached devices from their electrical outlets, and then press the power button to ground the system board. Removing and Installing Parts 49 If your computer and attached devices did not automatically turn them off . NOTICE: To disconnect a network cable...from the electrical outlet before opening the cover. 5 Lay your computer on its side with the computer cover facing up. 6 If your computer cover has a cover latch, slide and hold the cover latch. 7 Grip the indents on a level surface. Removing the Computer Cover CAUTION: Before you shut down the...
Owner's Manual
Page 50
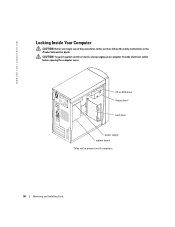
CD or DVD drive floppy drive* hard drive power supply system board *May not be present on all computers. 50 Removing and Installing Parts www.dell.com | support.dell.com Looking Inside Your Computer CAUTION: Before you begin any of the procedures in this section, follow the safety instructions in the Product Information Guide. CAUTION: To guard against electrical shock, always unplug your computer from the electrical outlet before opening the computer cover.
CD or DVD drive floppy drive* hard drive power supply system board *May not be present on all computers. 50 Removing and Installing Parts www.dell.com | support.dell.com Looking Inside Your Computer CAUTION: Before you begin any of the procedures in this section, follow the safety instructions in the Product Information Guide. CAUTION: To guard against electrical shock, always unplug your computer from the electrical outlet before opening the computer cover.

Owner's Manual
Page 52
www.dell.com | support.dell.com NOTICE: To disconnect a network cable, first unplug the cable from your computer and then unplug it is on the bottom of the computer. 7 Unscrew and remove the filler bracket for the card slot you want to use. Gently rock the card into the connector until it... installing any telephone or telecommunication lines from the computer. 4 Disconnect your computer and all attached devices from its electrical outlet before opening the cover. 5 Remove the computer cover (see page 49). 6 Lay the computer on its side so that the system board is fully seated. 52...
www.dell.com | support.dell.com NOTICE: To disconnect a network cable, first unplug the cable from your computer and then unplug it is on the bottom of the computer. 7 Unscrew and remove the filler bracket for the card slot you want to use. Gently rock the card into the connector until it... installing any telephone or telecommunication lines from the computer. 4 Disconnect your computer and all attached devices from its electrical outlet before opening the cover. 5 Remove the computer cover (see page 49). 6 Lay the computer on its side so that the system board is fully seated. 52...
Owner's Manual
Page 54
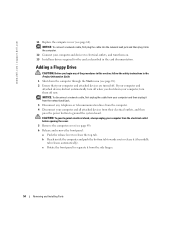
...or telecommunication lines from the computer. 4 Disconnect your computer and all attached devices from the electrical outlet before opening the cover. 5 Remove the computer cover (see page 49). 6 Release and remove the front panel: a Push the release lever to electrical outlets, and turn them on. 13 Install any drivers ...12 Connect your computer and devices to release the top tab. c Rotate the front panel to ground the system board. www.dell.com | support.dell.com 11 Replace the computer cover (see page 18). 2 Ensure that your computer and attached devices are turned off now.
...or telecommunication lines from the computer. 4 Disconnect your computer and all attached devices from the electrical outlet before opening the cover. 5 Remove the computer cover (see page 49). 6 Release and remove the front panel: a Push the release lever to electrical outlets, and turn them on. 13 Install any drivers ...12 Connect your computer and devices to release the top tab. c Rotate the front panel to ground the system board. www.dell.com | support.dell.com 11 Replace the computer cover (see page 18). 2 Ensure that your computer and attached devices are turned off now.

Owner's Manual
Page 58
... and press . 18 Use the left and right arrows to set to Auto. www.dell.com | support.dell.com side hinges (3) front panel 13 Check all cable connections, and fold cables out of the way to Auto. 58 Removing and Installing Parts If necessary, use the left and right arrows to change Diskette... is set it into the network wall jack and then plug it to provide airflow for the fan and cooling vents. 14 Replace the computer cover (see page 68).
... and press . 18 Use the left and right arrows to set to Auto. www.dell.com | support.dell.com side hinges (3) front panel 13 Check all cable connections, and fold cables out of the way to Auto. 58 Removing and Installing Parts If necessary, use the left and right arrows to change Diskette... is set it into the network wall jack and then plug it to provide airflow for the fan and cooling vents. 14 Replace the computer cover (see page 68).
Owner's Manual
Page 59
...CD or DVD Drive CAUTION: Before you install a drive, see page 49). 6 Release and remove the front panel: a Push the release lever to release it from the electrical outlet before opening the cover. 5 Remove the computer cover (see the documentation that came with the drive for instructions on installing any telephone or telecommunication.... 2 Ensure that came with their electrical outlets, and then press the power button to ground the system board. NOTE: Drives sold by Dell come with the drive for drive operation. c Rotate the front panel to Save changes and Exit.
...CD or DVD Drive CAUTION: Before you install a drive, see page 49). 6 Release and remove the front panel: a Push the release lever to release it from the electrical outlet before opening the cover. 5 Remove the computer cover (see the documentation that came with the drive for instructions on installing any telephone or telecommunication.... 2 Ensure that came with their electrical outlets, and then press the power button to ground the system board. NOTE: Drives sold by Dell come with the drive for drive operation. c Rotate the front panel to Save changes and Exit.
Owner's Manual
Page 63
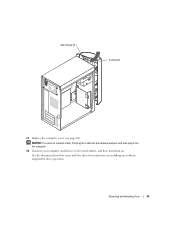
Removing and Installing Parts 63 See the documentation that came with the drive for drive operation. side hinges (3) front panel 17 Replace the computer cover (see page 68). NOTICE: To connect a network cable, first plug the cable into the network wall jack and then plug it into the computer. 18 Connect your computer and devices to electrical outlets, and then turn them on installing any software required for instructions on .
Removing and Installing Parts 63 See the documentation that came with the drive for drive operation. side hinges (3) front panel 17 Replace the computer cover (see page 68). NOTICE: To connect a network cable, first plug the cable into the network wall jack and then plug it into the computer. 18 Connect your computer and devices to electrical outlets, and then turn them on installing any software required for instructions on .
Owner's Manual
Page 64
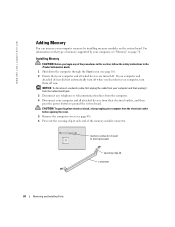
...dell.com Adding Memory You can increase your computer memory by your computer, see "Memory" on the system board. For information on the type of the memory module connector. CAUTION: To guard against electrical shock, always unplug your computer and all attached devices from the electrical outlet before opening the cover. 5 Remove... the computer cover (see page 49). 6 Press out the securing clip at each end of memory supported by installing memory modules...
...dell.com Adding Memory You can increase your computer memory by your computer, see "Memory" on the system board. For information on the type of the memory module connector. CAUTION: To guard against electrical shock, always unplug your computer and all attached devices from the electrical outlet before opening the cover. 5 Remove... the computer cover (see page 49). 6 Press out the securing clip at each end of memory supported by installing memory modules...

Owner's Manual
Page 65
Removing and Installing Parts 65 NOTICE: To connect a network cable, first plug the cable into the network wall jack and then plug it into the computer. ... clips snap into the connector while you apply equal force to electrical outlets, and turn them on the bottom of the module. 9 Replace the computer cover (see page 68). notch memory module cutouts (2) crossbar NOTICE: To avoid damage to the memory module, press the module straight down into the cutouts at...
Removing and Installing Parts 65 NOTICE: To connect a network cable, first plug the cable into the network wall jack and then plug it into the computer. ... clips snap into the connector while you apply equal force to electrical outlets, and turn them on the bottom of the module. 9 Replace the computer cover (see page 68). notch memory module cutouts (2) crossbar NOTICE: To avoid damage to the memory module, press the module straight down into the cutouts at...
Owner's Manual
Page 66
...: To guard against electrical shock, always unplug your computer from Dell is covered under your computer warranty. 1 Shut down the computer through the Start menu (see page 18). 66 Removing and Installing Parts If you have to remove it from their electrical outlets, and then press the power button... the Battery CAUTION: Before you shut down your computer, turn off . NOTE: Memory purchased from the electrical outlet before opening the cover. 5 Remove the computer cover (see page 49). 6 Press out the securing clip at each end of the memory module connector. 7 Grasp the module and...
...: To guard against electrical shock, always unplug your computer from Dell is covered under your computer warranty. 1 Shut down the computer through the Start menu (see page 18). 66 Removing and Installing Parts If you have to remove it from their electrical outlets, and then press the power button... the Battery CAUTION: Before you shut down your computer, turn off . NOTE: Memory purchased from the electrical outlet before opening the cover. 5 Remove the computer cover (see page 49). 6 Press out the securing clip at each end of the memory module connector. 7 Grasp the module and...

Owner's Manual
Page 67
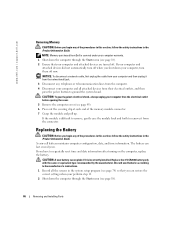
... a plastic screwdriver. CAUTION: To guard against electrical shock, always unplug your computer from the electrical outlet before opening the cover. 6 Remove the computer cover (see page 49). 7 Locate the battery socket (see page 51). 8 Remove the battery by carefully prying it out of its socket with your computer and all attached devices from their...
... a plastic screwdriver. CAUTION: To guard against electrical shock, always unplug your computer from the electrical outlet before opening the cover. 6 Remove the computer cover (see page 49). 7 Locate the battery socket (see page 51). 8 Remove the battery by carefully prying it out of its socket with your computer and all attached devices from their...
Owner's Manual
Page 68
...and then plug it into the computer. 5 Connect your computer and devices to electrical outlets, and turn them on the computer. 4 Slide the cover towards the front of the old battery (see page 74) and restore the settings you recorded in step 1. 12 Properly dispose of the computer until... it fits completely into place. www.dell.com | support.dell.com 11 Access the system setup program (see ). Replacing the Computer Cover 1 Ensure that all cables are connected, and fold cables out of the way. 2 Ensure that no tools...
...and then plug it into the computer. 5 Connect your computer and devices to electrical outlets, and turn them on the computer. 4 Slide the cover towards the front of the old battery (see page 74) and restore the settings you recorded in step 1. 12 Properly dispose of the computer until... it fits completely into place. www.dell.com | support.dell.com 11 Access the system setup program (see ). Replacing the Computer Cover 1 Ensure that all cables are connected, and fold cables out of the way. 2 Ensure that no tools...
Owner's Manual
Page 75
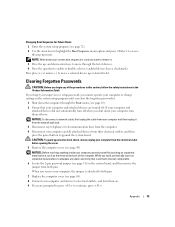
...Disconnect any telephone or telecommunication lines from the computer. 4 Disconnect your computer and all attached devices from the electrical outlet before opening the cover. 5 Remove the computer cover (see page 51) on . 9 If you work, periodically touch an unpainted metal surface to continue, press . NOTICE: To .... If your computer and attached devices did not automatically turn them on the system board, and then remove the jumper from both pins. 7 Replace the computer cover (see page 68). 8 Connect your computer and devices to ground the system board. Changing Boot Sequence...
...Disconnect any telephone or telecommunication lines from the computer. 4 Disconnect your computer and all attached devices from the electrical outlet before opening the cover. 5 Remove the computer cover (see page 51) on . 9 If you work, periodically touch an unpainted metal surface to continue, press . NOTICE: To .... If your computer and attached devices did not automatically turn them on the system board, and then remove the jumper from both pins. 7 Replace the computer cover (see page 68). 8 Connect your computer and devices to ground the system board. Changing Boot Sequence...
Owner's Manual
Page 76
...the system board. 13 Remove the computer cover (see page 18). NOTICE: To connect a network cable, first plug the cable into the network wall jack and then plug it into the computer. 16 Connect your computer. However, Dell also extends a parts ...Dell-Installed" Software and Peripherals Dell-installed software includes the operating system and some of the computer's service contract. www.dell.com | support.dell.com 10 After the Microsoft Windows desktop appears on your computer, shut down the computer (see page 49). 14 Remove the password jumper. In addition to cover all Dell...
...the system board. 13 Remove the computer cover (see page 18). NOTICE: To connect a network cable, first plug the cable into the network wall jack and then plug it into the computer. 16 Connect your computer. However, Dell also extends a parts ...Dell-Installed" Software and Peripherals Dell-installed software includes the operating system and some of the computer's service contract. www.dell.com | support.dell.com 10 After the Microsoft Windows desktop appears on your computer, shut down the computer (see page 49). 14 Remove the password jumper. In addition to cover all Dell...
Owner's Manual
Page 97
... CDs, 16 Check Disk, 21 computer back view, 47 crashes, 24-25 front view, 45 restore to previous state, 41-42 stops responding, 24 computer cover removing, 49 replacing, 68 conflicts resolving software and hardware incompatibilities, 44 copying CDs general information, 16 helpful tips, 17 how to, 16 copying DVDs general information...
... CDs, 16 Check Disk, 21 computer back view, 47 crashes, 24-25 front view, 45 restore to previous state, 41-42 stops responding, 24 computer cover removing, 49 replacing, 68 conflicts resolving software and hardware incompatibilities, 44 copying CDs general information, 16 helpful tips, 17 how to, 16 copying DVDs general information...


