Monitor - User Guide
Page 3
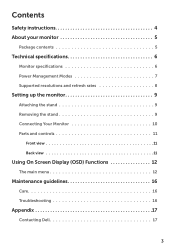
Contents Safety instructions 4 About your monitor 5 Package contents 5 Technical specifications 6 Monitor specifications 6 Power Management Modes 7 Supported resolutions and refresh rates 8 Setting up the monitor 9 Attaching the stand 9 Removing the stand 9 Connecting Your Monitor 10 Parts and controls 11 Front view 11 Back view 11 Using On Screen Display (OSD) Functions 12 The main menu 12 Maintenance guidelines 16 Care 16 Troubleshooting 16 Appendix 17 Contacting Dell 17 3
Contents Safety instructions 4 About your monitor 5 Package contents 5 Technical specifications 6 Monitor specifications 6 Power Management Modes 7 Supported resolutions and refresh rates 8 Setting up the monitor 9 Attaching the stand 9 Removing the stand 9 Connecting Your Monitor 10 Parts and controls 11 Front view 11 Back view 11 Using On Screen Display (OSD) Functions 12 The main menu 12 Maintenance guidelines 16 Care 16 Troubleshooting 16 Appendix 17 Contacting Dell 17 3
Monitor - User Guide
Page 4
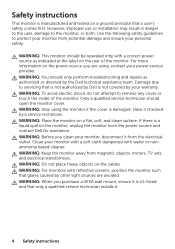
... disconnect it is damaged. WARNING: Keep the monitor away from the electrical outlet. WARNING: For monitors with reflective screens, position the monitor such that is not authorized by Dell is not covered by other light sources are using the monitor if the cover is UL-listed and that a user...electrical transformers. Safety instructions This monitor is manufactured and tested on the monitor, unplug the monitor from the power source and contact Dell for assistance. If there is a liquid spill on a ground principle that only a qualified service technician installs it checked by the...
... disconnect it is damaged. WARNING: Keep the monitor away from the electrical outlet. WARNING: For monitors with reflective screens, position the monitor such that is not authorized by Dell is not covered by other light sources are using the monitor if the cover is UL-listed and that a user...electrical transformers. Safety instructions This monitor is manufactured and tested on the monitor, unplug the monitor from the power source and contact Dell for assistance. If there is a liquid spill on a ground principle that only a qualified service technician installs it checked by the...
Monitor - User Guide
Page 6
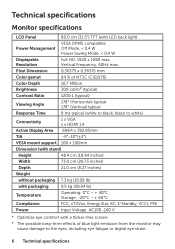
... eye fatigue or digital eye strain. 6 Technical specifications Vertical Frequency, 60Hz max. Technical specifications Monitor specifications LCD Panel 80.0 cm (31.5") TFT (with a flicker-free screen. * The possible long-term effects of blue light emission from the monitor may cause damage to white) Connectivity 1 x VGA 1 x HDMI 1.4 Active Display Area 698.4 x 392...
... eye fatigue or digital eye strain. 6 Technical specifications Vertical Frequency, 60Hz max. Technical specifications Monitor specifications LCD Panel 80.0 cm (31.5") TFT (with a flicker-free screen. * The possible long-term effects of blue light emission from the monitor may cause damage to white) Connectivity 1 x VGA 1 x HDMI 1.4 Active Display Area 698.4 x 392...
Monitor - User Guide
Page 10
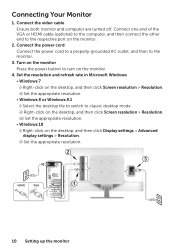
... 3 HDMI VGA 1 10 Setting up the monitor Turn on the monitor Press the power button to the respective port on the desktop, and then click Screen resolution > Resolution. Connect the power cord Connect the power cord to a properly-grounded AC outlet, and then to classic desktop mode. ii) Set the.... • Windows 8 or Windows 8.1 i) Select the desktop tile to switch to the monitor. 3. ii) Right-click on the desktop, and then click Screen resolution > Resolution. Connecting Your Monitor 1. Connect the video cable Ensure both monitor and computer are turned off.
... 3 HDMI VGA 1 10 Setting up the monitor Turn on the monitor Press the power button to the respective port on the desktop, and then click Screen resolution > Resolution. Connect the power cord Connect the power cord to a properly-grounded AC outlet, and then to classic desktop mode. ii) Set the.... • Windows 8 or Windows 8.1 i) Select the desktop tile to switch to the monitor. 3. ii) Right-click on the desktop, and then click Screen resolution > Resolution. Connecting Your Monitor 1. Connect the video cable Ensure both monitor and computer are turned off.
Monitor - User Guide
Page 12
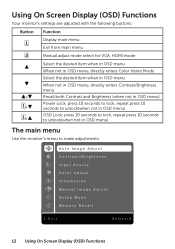
Using On Screen Display (OSD) Functions Your monitor's settings are adjusted with the following buttons: Button + + + Function Display main menu Exit from main menu Manual adjust mode select ... to make adjustments: Auto Image Adjust Contrast/Brightness Input Source Color Adjust Information Manual Image Adjust Setup Menu Memory Recall 1:Exit Select:2 12 Using On Screen Display (OSD) Functions
Using On Screen Display (OSD) Functions Your monitor's settings are adjusted with the following buttons: Button + + + Function Display main menu Exit from main menu Manual adjust mode select ... to make adjustments: Auto Image Adjust Contrast/Brightness Input Source Color Adjust Information Manual Image Adjust Setup Menu Memory Recall 1:Exit Select:2 12 Using On Screen Display (OSD) Functions
Monitor - User Guide
Page 13
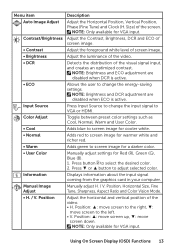
...Press ▼ or ▲ button to select the desired color. 2. Adjust the luminance of screen image. Allows the user to change the input signal to screen image for cooler white. Adds green to the left. • V. Displays information about the input...Warm and User Color. Manually adjust settings for a darker color. NOTE: Only available for VGA input. Position: ▲: move screen up, ▼: move screen to screen image for Red (R), Green (G), Blue (B). 1. NOTE: Only available for VGA input. Position Description Adjust the Horizontal Position, Vertical...
...Press ▼ or ▲ button to select the desired color. 2. Adjust the luminance of screen image. Allows the user to change the input signal to screen image for cooler white. Adds green to the left. • V. Displays information about the input...Warm and User Color. Manually adjust settings for a darker color. NOTE: Only available for VGA input. Position: ▲: move screen up, ▼: move screen to screen image for Red (R), Green (G), Blue (B). 1. NOTE: Only available for VGA input. Position Description Adjust the Horizontal Position, Vertical...
Monitor - User Guide
Page 14
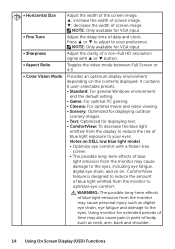
... 4:3. WARNING: The possible long-term effects of time may cause personal injury such as neck, arm, back and shoulder. 14 Using On Screen Display (OSD) Functions It contains 6 user-selectable presets. • Standard: For general Windows environment and the default setting. • Game: For ...light emitted from the monitor may also cause pain in parts of blue light exposure to your eyes. Provides an optimum display environment depending on DELL low blue light model • Optimize eye comfort with ▲ or ▼ button. NOTE: Only available for VGA input. NOTE: ...
... 4:3. WARNING: The possible long-term effects of time may cause personal injury such as neck, arm, back and shoulder. 14 Using On Screen Display (OSD) Functions It contains 6 user-selectable presets. • Standard: For general Windows environment and the default setting. • Game: For ...light emitted from the monitor may also cause pain in parts of blue light exposure to your eyes. Provides an optimum display environment depending on DELL low blue light model • Optimize eye comfort with ▲ or ▼ button. NOTE: Only available for VGA input. NOTE: ...
Monitor - User Guide
Page 15
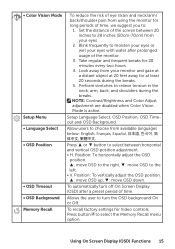
... to the right, ▼: move OSD down. To automatically turn the OSD background On or Off. Using On Screen Display (OSD) Functions 15 Set the distance of the screen between horizontal and vertical OSD position adjustment. • H. Press button to 28 inches (50cm-70cm) from your ...eyes with water after a preset period of time. Perform stretches to turn off On Screen Display (OSD) after prolonged usage of the monitor. 3. Allows the user to relieve tension in the neck, arm, back, and shoulders during the ...
... to the right, ▼: move OSD down. To automatically turn the OSD background On or Off. Using On Screen Display (OSD) Functions 15 Set the distance of the screen between horizontal and vertical OSD position adjustment. • H. Press button to 28 inches (50cm-70cm) from your ...eyes with water after a preset period of time. Perform stretches to turn off On Screen Display (OSD) after prolonged usage of the monitor. 3. Allows the user to relieve tension in the neck, arm, back, and shoulders during the ...


