Users Guide
Page 3
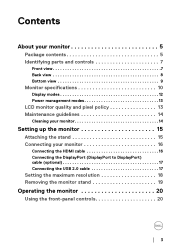
... 5 Identifying parts and controls 7 Front view 7 Back view 8 Bottom view 9 Monitor specifications 10 Display modes 12 Power management modes 13 LCD monitor quality and pixel policy 13 Maintenance guidelines 14 Cleaning your monitor 14 Setting up the monitor 15 Attaching the stand 15 Connecting your monitor 16 Connecting the HDMI cable 16 Connecting the DisplayPort (DisplayPort to DisplayPort) cable (optional 17 Connecting the USB 2.0 cable 17 Setting the maximum resolution 18 Removing the monitor stand 19 Operating the monitor 20 Using the front-panel controls 20 │...
... 5 Identifying parts and controls 7 Front view 7 Back view 8 Bottom view 9 Monitor specifications 10 Display modes 12 Power management modes 13 LCD monitor quality and pixel policy 13 Maintenance guidelines 14 Cleaning your monitor 14 Setting up the monitor 15 Attaching the stand 15 Connecting your monitor 16 Connecting the HDMI cable 16 Connecting the DisplayPort (DisplayPort to DisplayPort) cable (optional 17 Connecting the USB 2.0 cable 17 Setting the maximum resolution 18 Removing the monitor stand 19 Operating the monitor 20 Using the front-panel controls 20 │...
Users Guide
Page 5
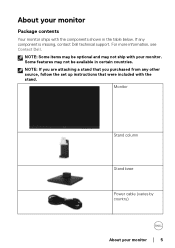
If any other source, follow the set up instructions that were included with the stand. For more information, see Contact Dell. Some features may not be optional and may be available in the table below. Monitor Stand column Stand base Power cable (varies by country) About your monitor. About your monitor Package contents Your monitor ships with your monitor │ 5 NOTE: Some items may not ship with the components shown in certain countries. NOTE: If you are attaching a stand that you purchased from any component is missing, contact Dell technical support.
If any other source, follow the set up instructions that were included with the stand. For more information, see Contact Dell. Some features may not be optional and may be available in the table below. Monitor Stand column Stand base Power cable (varies by country) About your monitor. About your monitor Package contents Your monitor ships with your monitor │ 5 NOTE: Some items may not ship with the components shown in certain countries. NOTE: If you are attaching a stand that you purchased from any component is missing, contact Dell technical support.
Users Guide
Page 8
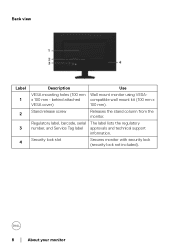
x 100 mm - Security lock slot Secures monitor with security lock (security lock not included). 8 │ About your monitor Stand release screw Releases the stand column from the monitor. behind attached compatible wall mount kit (100 mm x VESA cover) 100 mm). Regulatory label, barcode, serial The label lists the regulatory number, and Service Tag label approvals and technical support information. Back view Label 1 2 3 4 Description Use VESA mounting holes (100 mm Wall mount monitor using VESA-
x 100 mm - Security lock slot Secures monitor with security lock (security lock not included). 8 │ About your monitor Stand release screw Releases the stand column from the monitor. behind attached compatible wall mount kit (100 mm x VESA cover) 100 mm). Regulatory label, barcode, serial The label lists the regulatory number, and Service Tag label approvals and technical support information. Back view Label 1 2 3 4 Description Use VESA mounting holes (100 mm Wall mount monitor using VESA-
Users Guide
Page 9
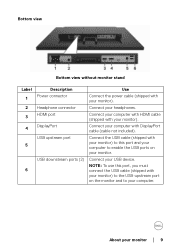
... monitor). Connect the USB cable (shipped with your monitor) to this port, you must connect the USB cable (shipped with your monitor) to your monitor. NOTE: To use this port and your computer to enable the USB ports on the monitor and to the USB-upstream port on your computer. Bottom view Bottom view without monitor stand Label 1 2 3 4 5 6 Description Power connector Headphone connector HDMI port DisplayPort USB upstream port USB downstream ports (2) Use Connect the power cable (shipped with your monitor). Connect your monitor │ 9 About your USB device. Connect...
... monitor). Connect the USB cable (shipped with your monitor) to this port, you must connect the USB cable (shipped with your monitor) to your monitor. NOTE: To use this port and your computer to enable the USB ports on the monitor and to the USB-upstream port on your computer. Bottom view Bottom view without monitor stand Label 1 2 3 4 5 6 Description Power connector Headphone connector HDMI port DisplayPort USB upstream port USB downstream ports (2) Use Connect the power cable (shipped with your monitor). Connect your monitor │ 9 About your USB device. Connect...
Users Guide
Page 10
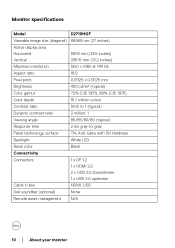
Monitor specifications Model D2719HGF Viewable image size (diagonal) 68.565 cm (27 inches) Active display area Horizontal 597.6 mm (23.5 inches) Vertical 336.15 mm (13.2 inches) Maximum resolution 1920 x 1080 at 144 Hz Aspect ratio 16:9 Pixel pitch 0.31125 x 0.31125 mm Brightness 400 cd/m² (typical) Color gamut 72% (CIE 1931), 88% (CIE 1976) Color depth 16.7 million colors Contrast ratio 1000 to 1 (typical) Dynamic contrast ratio 2 million: 1 Viewing angle 85...
Monitor specifications Model D2719HGF Viewable image size (diagonal) 68.565 cm (27 inches) Active display area Horizontal 597.6 mm (23.5 inches) Vertical 336.15 mm (13.2 inches) Maximum resolution 1920 x 1080 at 144 Hz Aspect ratio 16:9 Pixel pitch 0.31125 x 0.31125 mm Brightness 400 cd/m² (typical) Color gamut 72% (CIE 1931), 88% (CIE 1976) Color depth 16.7 million colors Contrast ratio 1000 to 1 (typical) Dynamic contrast ratio 2 million: 1 Viewing angle 85...
Users Guide
Page 11
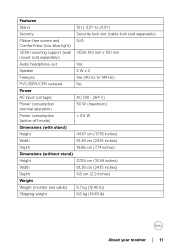
...;) Security Security lock slot (cable lock sold separately) Flicker-free screen and N/A ComfortView (low-blue light) VESA mounting support (wall VESA 100 mm x 100 mm mount sold separately) Audio headphone-out Yes Speaker 2 W x 2 Freesync Yes (40 Hz to 144 Hz) PVC/BFR/CFR-reduced No Power AC input (voltage) AC (90 - 264 V) Power consumption (normal operation) 50 W (maximum) Power consumption (active-off mode) < 0.5 W Dimensions (with stand) Height 44.07 cm (17.35 inches) Width...
...;) Security Security lock slot (cable lock sold separately) Flicker-free screen and N/A ComfortView (low-blue light) VESA mounting support (wall VESA 100 mm x 100 mm mount sold separately) Audio headphone-out Yes Speaker 2 W x 2 Freesync Yes (40 Hz to 144 Hz) PVC/BFR/CFR-reduced No Power AC input (voltage) AC (90 - 264 V) Power consumption (normal operation) 50 W (maximum) Power consumption (active-off mode) < 0.5 W Dimensions (with stand) Height 44.07 cm (17.35 inches) Width...
Users Guide
Page 13
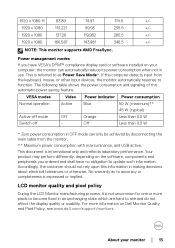
...; compliance display card or software installed on Dell Monitor Quality and Pixel Policy, see and do not affect the display quality or usability. NOTE: This monitor supports AMD FreeSync. If the computer detects input from the monitor. ** Maximum power consumption with max luminance, and USB active. Accordingly, the customer should not rely upon this automatic power saving feature. No warranty as Power Save Mode*. Off Less than 0.5 W Switch off mode Off...
...; compliance display card or software installed on Dell Monitor Quality and Pixel Policy, see and do not affect the display quality or usability. NOTE: This monitor supports AMD FreeSync. If the computer detects input from the monitor. ** Maximum power consumption with max luminance, and USB active. Accordingly, the customer should not rely upon this automatic power saving feature. No warranty as Power Save Mode*. Off Less than 0.5 W Switch off mode Off...
Users Guide
Page 14
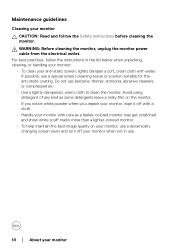
... unpacking, cleaning, or handling your monitor: • To clean your monitor Maintenance guidelines Cleaning your monitor CAUTION: Read and follow the instructions in use. 14 │ About your anti-static screen, lightly dampen a soft, clean cloth with care as a darker-colored monitor may get scratched and show white scuff marks more than a lighter-colored monitor. • To help maintain the best image quality on your monitor, use a dynamically changing screen saver and turn off...
... unpacking, cleaning, or handling your monitor: • To clean your monitor Maintenance guidelines Cleaning your monitor CAUTION: Read and follow the instructions in use. 14 │ About your anti-static screen, lightly dampen a soft, clean cloth with care as a darker-colored monitor may get scratched and show white scuff marks more than a lighter-colored monitor. • To help maintain the best image quality on your monitor, use a dynamically changing screen saver and turn off...
Users Guide
Page 15
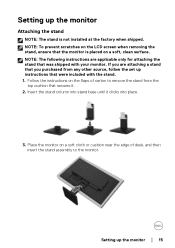
Setting up the monitor Attaching the stand NOTE: The stand is placed on a soft, clean surface. NOTE: To prevent scratches on the LCD screen when removing the stand, ensure that were included with your monitor. Setting up instructions that the monitor is not installed at the factory when shipped. If you are applicable only for attaching the stand that secures it clicks into stand base until it . 2. Follow the...
Setting up the monitor Attaching the stand NOTE: The stand is placed on a soft, clean surface. NOTE: To prevent scratches on the LCD screen when removing the stand, ensure that were included with your monitor. Setting up instructions that the monitor is not installed at the factory when shipped. If you are applicable only for attaching the stand that secures it clicks into stand base until it . 2. Follow the...
Users Guide
Page 16
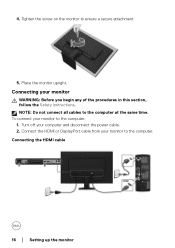
Connecting your monitor to the computer: 1. Connect the HDMI or DisplayPort cable from your monitor WARNING: Before you begin any of the procedures in this section, follow the Safety instructions. 4. NOTE: Do not connect all cables to ensure a secure attachment. 5. Connecting the HDMI cable 16 │ Setting up the monitor To connect your computer and disconnect the power cable. 2. Turn off your monitor to the computer. Tighten the screw on the monitor to the computer at the same time. Place the monitor upright.
Connecting your monitor to the computer: 1. Connect the HDMI or DisplayPort cable from your monitor WARNING: Before you begin any of the procedures in this section, follow the Safety instructions. 4. NOTE: Do not connect all cables to ensure a secure attachment. 5. Connecting the HDMI cable 16 │ Setting up the monitor To connect your computer and disconnect the power cable. 2. Turn off your monitor to the computer. Tighten the screw on the monitor to the computer at the same time. Place the monitor upright.
Users Guide
Page 17
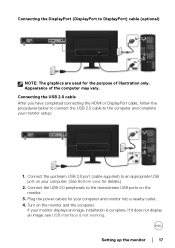
Plug the power cables for your monitor setup: 1. Setting up the monitor │ 17 If it does not display an image, see USB interface is complete. Connecting the USB 2.0 cable After you have completed connecting the HDMI or DisplayPort cable, follow the procedures below to connect the USB 2.0 cable to an appropriate USB port on your monitor displays an image, installation is not working. Turn on the monitor and the computer. Connect the USB 2.0 peripherals to DisplayPort) cable (optional) NOTE: The graphics...
Plug the power cables for your monitor setup: 1. Setting up the monitor │ 17 If it does not display an image, see USB interface is complete. Connecting the USB 2.0 cable After you have completed connecting the HDMI or DisplayPort cable, follow the procedures below to connect the USB 2.0 cable to an appropriate USB port on your monitor displays an image, installation is not working. Turn on the monitor and the computer. Connect the USB 2.0 peripherals to DisplayPort) cable (optional) NOTE: The graphics...

Users Guide
Page 18
... may need to your service tag, and download the latest driver for the monitor: In Windows® 7, Windows® 8, and Windows® 8.1: 1. Click Apply. Right-click on the desktop and click Screen Resolution. 3. For Windows® 8 and Windows® 8.1 only, select the Desktop tile to switch to http://www.dell.com/support, enter your graphics card website and download the latest graphic drivers. 18 │ Setting up the monitor In Windows...
... may need to your service tag, and download the latest driver for the monitor: In Windows® 7, Windows® 8, and Windows® 8.1: 1. Click Apply. Right-click on the desktop and click Screen Resolution. 3. For Windows® 8 and Windows® 8.1 only, select the Desktop tile to switch to http://www.dell.com/support, enter your graphics card website and download the latest graphic drivers. 18 │ Setting up the monitor In Windows...
Users Guide
Page 20
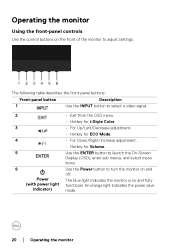
...) The blue light indicates the monitor is on the front of the monitor to turn the monitor on and off. An orange light indicates the power save mode. 20 │ Operating the monitor Operating the monitor Using the front-panel controls Use the control buttons on and fully functional. The following table describes the front-panel buttons: Front-panel button Description 1 Use the INPUT button to select a video signal. 2 • Exit from the OSD menu. • Hotkey for i-Style Color...
...) The blue light indicates the monitor is on the front of the monitor to turn the monitor on and off. An orange light indicates the power save mode. 20 │ Operating the monitor Operating the monitor Using the front-panel controls Use the control buttons on and fully functional. The following table describes the front-panel buttons: Front-panel button Description 1 Use the INPUT button to select a video signal. 2 • Exit from the OSD menu. • Hotkey for i-Style Color...
Users Guide
Page 21
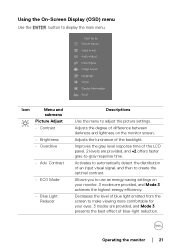
... eyes. 3 modes are provided, and Mode 3 presents the best effect of blue-light reduction. Adjusts the luminance of an input visual signal, and then to automatically detect the distribution of the backlight. Operating the monitor │ 21 Icon Menu and submenu Picture Adjust • Contrast • Brightness • Overdrive • Adv. Activates to create the optimal contrast. Contrast • ECO Mode • Blue Light Reducer Descriptions Use the menu to display the main menu. Allows...
... eyes. 3 modes are provided, and Mode 3 presents the best effect of blue-light reduction. Adjusts the luminance of an input visual signal, and then to automatically detect the distribution of the backlight. Operating the monitor │ 21 Icon Menu and submenu Picture Adjust • Contrast • Brightness • Overdrive • Adv. Activates to create the optimal contrast. Contrast • ECO Mode • Blue Light Reducer Descriptions Use the menu to display the main menu. Allows...
Users Guide
Page 22
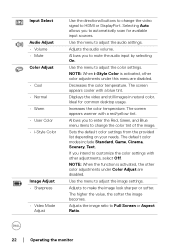
... audio settings. Use the menu to HDMI or DisplayPort. The default color modes include Standard, Game, Cinema, Scenery, Text. Allows you intend to change the video signal to adjust the color settings. The screen appears warmer with other color adjustments under Color Adjust are disabled. The higher the value, the softer the image becomes. The screen appears cooler with a blue tint. Adjusts the audio volume. Input Select Audio Adjust • Volume • Mute Color Adjust • Cool • Normal • Warm • User Color...
... audio settings. Use the menu to HDMI or DisplayPort. The default color modes include Standard, Game, Cinema, Scenery, Text. Allows you intend to change the video signal to adjust the color settings. The screen appears warmer with other color adjustments under Color Adjust are disabled. The higher the value, the softer the image becomes. The screen appears cooler with a blue tint. Adjusts the audio volume. Input Select Audio Adjust • Volume • Mute Color Adjust • Cool • Normal • Warm • User Color...
Users Guide
Page 23
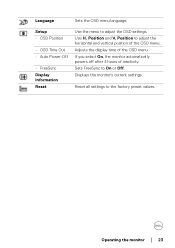
Setup • OSD Position • OSD Time Out • Auto Power-Off • FreeSync Display Information Reset Use the menu to On or Off. Adjusts the display time of inactivity. Sets FreeSync to adjust the OSD settings. If you select On, the monitor automatically powers off after 3 hours of the OSD menu. Reset all settings to adjust the horizontal and vertical position of the OSD menu. Use H. Position to the factory preset values. Operating the monitor │ 23 Position and V. Language Sets the OSD menu language. Displays the monitor's current settings.
Setup • OSD Position • OSD Time Out • Auto Power-Off • FreeSync Display Information Reset Use the menu to On or Off. Adjusts the display time of inactivity. Sets FreeSync to adjust the OSD settings. If you select On, the monitor automatically powers off after 3 hours of the OSD menu. Reset all settings to adjust the horizontal and vertical position of the OSD menu. Use H. Position to the factory preset values. Operating the monitor │ 23 Position and V. Language Sets the OSD menu language. Displays the monitor's current settings.
Users Guide
Page 24
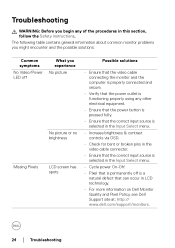
... correct input source is selected in the Input Select menu. • Increase brightness & contrast controls via OSD. • Check for bent or broken pins in the video cable connector. • Ensure that the correct input source is selected in the Input Select menu. • Cycle power On-Off. • Pixel that can occur in this section, follow the Safety instructions. The following table contains general information about common monitor problems you...
... correct input source is selected in the Input Select menu. • Increase brightness & contrast controls via OSD. • Check for bent or broken pins in the video cable connector. • Ensure that the correct input source is selected in the Input Select menu. • Cycle power On-Off. • Pixel that can occur in this section, follow the Safety instructions. The following table contains general information about common monitor problems you...
Users Guide
Page 25
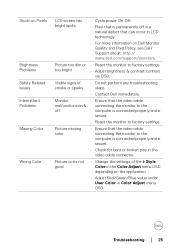
.... • Adjust Red/Green/Blue value under User Color in Color Adjust menu OSD. Troubleshooting │ 25 Picture missing color • Ensure that the video cable connecting the monitor to the computer is connected properly and is secure. • Check for bent or broken pins in LCD technology. • For more information on Dell Monitor Quality and Pixel Policy, see Dell Support site at: http:// www.del l.com/support/monitors. too bright • Adjust brightness & contrast controls via OSD. Stuck-on Pixels Brightness Problems Safety Related...
.... • Adjust Red/Green/Blue value under User Color in Color Adjust menu OSD. Troubleshooting │ 25 Picture missing color • Ensure that the video cable connecting the monitor to the computer is connected properly and is secure. • Check for bent or broken pins in LCD technology. • For more information on Dell Monitor Quality and Pixel Policy, see Dell Support site at: http:// www.del l.com/support/monitors. too bright • Adjust brightness & contrast controls via OSD. Stuck-on Pixels Brightness Problems Safety Related...

Users Guide
Page 26
... in the Image Adjust menu OSD. • Reset the monitor to the computer system. 26 │ Troubleshooting Ensure the computer is plugged in properly. connect the device directly to factory settings. No Input Signal when user controls are not working USB peripherals are pressed No picture, the LED light is centered on the monitor for more information, see Power management modes). • Alternatively, use a dynamically changing screensaver. USB interface is not working • Check that your monitor is turned on...
... in the Image Adjust menu OSD. • Reset the monitor to the computer system. 26 │ Troubleshooting Ensure the computer is plugged in properly. connect the device directly to factory settings. No Input Signal when user controls are not working USB peripherals are pressed No picture, the LED light is centered on the monitor for more information, see Power management modes). • Alternatively, use a dynamically changing screensaver. USB interface is not working • Check that your monitor is turned on...
Users Guide
Page 27
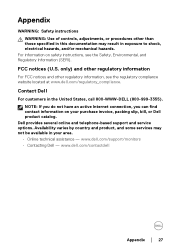
...do not have an active Internet connection, you can find contact information on safety instructions, see the regulatory compliance website located at www.dell.com/regulatory_compliance. only) and ...Dell product catalog. Dell provides several online and telephone-based support and service options. www.dell.com/support/monitors • Contacting Dell - www.dell.com/contactdell Appendix │ 27 Appendix WARNING: Safety instructions WARNING: Use of controls, adjustments, or procedures other regulatory information, see the Safety, Environmental, and Regulatory Information (SERI...
...do not have an active Internet connection, you can find contact information on safety instructions, see the regulatory compliance website located at www.dell.com/regulatory_compliance. only) and ...Dell product catalog. Dell provides several online and telephone-based support and service options. www.dell.com/support/monitors • Contacting Dell - www.dell.com/contactdell Appendix │ 27 Appendix WARNING: Safety instructions WARNING: Use of controls, adjustments, or procedures other regulatory information, see the Safety, Environmental, and Regulatory Information (SERI...


