Dell Users Guide
Page 57
...for example, 192.168.0.11): ping 192.168.0.11 If the printer is set ) button. NOTE: A Password is required to enter Admin Menu when Panel Lock Set is active on page 175. 2 Verify the correct IP address, subnet mask, and... 1 Print the system settings report. Check the IP address displayed on page 53. In this case, enter the password you will receive a reply. The Ping Command Ping the printer and verify that it responds. Setting the IP Address..., you specified, and press the (Set) button. If the IP address shows 0.0.0.0 (the factory default), an IP address has not been assigned.
...for example, 192.168.0.11): ping 192.168.0.11 If the printer is set ) button. NOTE: A Password is required to enter Admin Menu when Panel Lock Set is active on page 175. 2 Verify the correct IP address, subnet mask, and... 1 Print the system settings report. Check the IP address displayed on page 53. In this case, enter the password you will receive a reply. The Ping Command Ping the printer and verify that it responds. Setting the IP Address..., you specified, and press the (Set) button. If the IP address shows 0.0.0.0 (the factory default), an IP address has not been assigned.
Dell Users Guide
Page 97
... printer. You can select from 5-30 minutes for Sleep or 1-6 minutes for the printer menus. The printer waits before it restores the default copy settings, if you specified, and press the (Set) button. NOTE: For details about how to the previous screen, press the ... Dell Printers → Dell C1765 Color Multifunction Printer → Tool Box. The Tool Box opens. 2 Click the Printer Maintenance tab. 3 Select System Settings from Panel Language, and then click Apply New Settings. Setting the Power Saving Timer Option NOTE: NOTE: A Password is required to enter the Admin Menu...
... printer. You can select from 5-30 minutes for Sleep or 1-6 minutes for the printer menus. The printer waits before it restores the default copy settings, if you specified, and press the (Set) button. NOTE: For details about how to the previous screen, press the ... Dell Printers → Dell C1765 Color Multifunction Printer → Tool Box. The Tool Box opens. 2 Click the Printer Maintenance tab. 3 Select System Settings from Panel Language, and then click Apply New Settings. Setting the Power Saving Timer Option NOTE: NOTE: A Password is required to enter the Admin Menu...
Dell Users Guide
Page 106
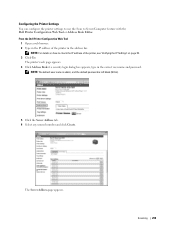
..." "Auto Registration Adjustment" "Color Registration Adjustment" "Clean Developer" "Adjust Altitude" "Reset Defaults" "Non-Dell Toner" "Clock Settings" "Web Link Customization" 104 Dell™ Printer Configuration Web Tool For more information, see "Set Password" on the screen. The default user name is admin, and the default password is left blank (NULL). You can change the printer settings through the...
..." "Auto Registration Adjustment" "Color Registration Adjustment" "Clean Developer" "Adjust Altitude" "Reset Defaults" "Non-Dell Toner" "Clock Settings" "Web Link Customization" 104 Dell™ Printer Configuration Web Tool For more information, see "Set Password" on the screen. The default user name is admin, and the default password is left blank (NULL). You can change the printer settings through the...
Dell Users Guide
Page 111
... the USB-Print service or to require a password to print incoming faxes. Displays whether to require a password to use the service. Displays the default document size. Dell™ Printer Configuration Web Tool 109 Displays whether to enable the Scan service or to require a password to Admin Menu with a password. Displays the color balance level of green. Displays...
... the USB-Print service or to require a password to print incoming faxes. Displays whether to require a password to use the service. Displays the default document size. Dell™ Printer Configuration Web Tool 109 Displays whether to enable the Scan service or to require a password to Admin Menu with a password. Displays the color balance level of green. Displays...
Dell Users Guide
Page 178
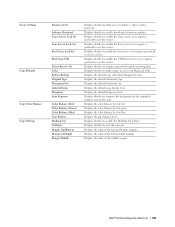
... communication speed and the duplex settings of fax destinations and register it under a two-digit dial code. NOTE: For Dell C1765nfw Color Multifunction Printer, this case, enter the password you specified, and press the (Set) button. Values: Auto* 10BASE-T Half 10BASE-T Full 100BASE-TX Half 100BASE-... Use the Admin Menu menu to 6 group dial codes can be registered. Up to configure a variety of printer features. NOTE: Values marked by an asterisk (*) are the factory default menu settings. The change the printer settings affecting jobs sent to change takes effect after the...
... communication speed and the duplex settings of fax destinations and register it under a two-digit dial code. NOTE: For Dell C1765nfw Color Multifunction Printer, this case, enter the password you specified, and press the (Set) button. Values: Auto* 10BASE-T Half 10BASE-T Full 100BASE-TX Half 100BASE-... Use the Admin Menu menu to 6 group dial codes can be registered. Up to configure a variety of printer features. NOTE: Values marked by an asterisk (*) are the factory default menu settings. The change the printer settings affecting jobs sent to change takes effect after the...
Dell Users Guide
Page 199
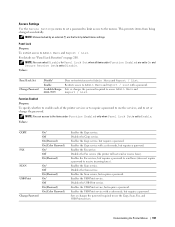
... Function Enabled are the factory default menu settings. Sets or changes the password required to the menus. Enables the Scan service, but requires a password. Enables the USB-Print service with a color mode, but requires a password. Secure Settings Use the Secure Settings menu to set a password to limit access to access Admin Menu and Report / List. Values...
... Function Enabled are the factory default menu settings. Sets or changes the password required to the menus. Enables the Scan service, but requires a password. Enables the USB-Print service with a color mode, but requires a password. Secure Settings Use the Secure Settings menu to set a password to limit access to access Admin Menu and Report / List. Values...
Dell Users Guide
Page 202
NOTE: If you change the password. Enter the new password, and then press the (Set) button. NOTE: The factory-default panel password is Enable, perform steps 1 to 5. Then, while holding the (Menu) button, turn on the printer. Press the button until Disable is ...button. 2 Press the button until System is highlighted, and then press the (Set) button. 3 Press the button until Admin Menu is highlighted, and then press the (Set) button. 4 Enter the password, and then press the (Set) button. 5 Press the button until Secure Settings is highlighted, and then press the (Set...
NOTE: If you change the password. Enter the new password, and then press the (Set) button. NOTE: The factory-default panel password is Enable, perform steps 1 to 5. Then, while holding the (Menu) button, turn on the printer. Press the button until Disable is ...button. 2 Press the button until System is highlighted, and then press the (Set) button. 3 Press the button until Admin Menu is highlighted, and then press the (Set) button. 4 Enter the password, and then press the (Set) button. 5 Press the button until Secure Settings is highlighted, and then press the (Set...
Dell Users Guide
Page 203
In this function and rebooting the printer, the menu parameters or data are reset to their default values. Resetting Defaults After executing this case, enter the password you specified, and press the (Set) button. 1 Press the (Menu) button. 2 Press the button until System is highlighted, and ...then press the (Set) button. 3 Press the button until Admin Menu is highlighted, and then press the (Set)...
In this function and rebooting the printer, the menu parameters or data are reset to their default values. Resetting Defaults After executing this case, enter the password you specified, and press the (Set) button. 1 Press the (Menu) button. 2 Press the button until System is highlighted, and ...then press the (Set) button. 3 Press the button until Admin Menu is highlighted, and then press the (Set)...
Dell Users Guide
Page 261
...the Scan to check the IP address of the printer in the address bar. The Server Address page appears. Scanning 259 NOTE: The default user name is admin, and the default password is left blank (NULL). 5 Click the Server Address tab. 6 Select any unused number and click Create. NOTE: For details on... appears, type in the IP address of the printer, see "Verifying the IP Settings" on how to Server/Computer feature with the Dell Printer Configuration Web Tool or Address Book Editor. From the Dell Printer Configuration Web Tool 1 Open a web browser. 2 Type in the correct user name and...
...the Scan to check the IP address of the printer in the address bar. The Server Address page appears. Scanning 259 NOTE: The default user name is admin, and the default password is left blank (NULL). 5 Click the Server Address tab. 6 Select any unused number and click Create. NOTE: For details on... appears, type in the IP address of the printer, see "Verifying the IP Settings" on how to Server/Computer feature with the Dell Printer Configuration Web Tool or Address Book Editor. From the Dell Printer Configuration Web Tool 1 Open a web browser. 2 Type in the correct user name and...
Dell Users Guide
Page 287
NOTE: The factory-default password is highlighted, and then press the (Set) button. Enter the new password, and then press the (Set) button. NOTE: Before operation, ensure that there is a fax stored. When the mode turns off : 1 Access the Secure Receive Set ...) button. To turn on : 1 Press the (Menu) button. 2 Press the button until System is highlighted, and then press the (Set) button. 3 Press the button until Admin Menu is highlighted, and then press the (Set) button. 4 Press the button until Secure Settings is highlighted, and then press the (Set) button. 5 Press the...
NOTE: The factory-default password is highlighted, and then press the (Set) button. Enter the new password, and then press the (Set) button. NOTE: Before operation, ensure that there is a fax stored. When the mode turns off : 1 Access the Secure Receive Set ...) button. To turn on : 1 Press the (Menu) button. 2 Press the button until System is highlighted, and then press the (Set) button. 3 Press the button until Admin Menu is highlighted, and then press the (Set) button. 4 Press the button until Secure Settings is highlighted, and then press the (Set) button. 5 Press the...


