Dell Users Guide
Page 41
...information about WPS operation on the wireless LAN access point (Registrar) or router, refer to Enable. Connecting Your Printer 39 NOTE: A Password is required to enter Admin Menu when Panel Lock Set is set to the manual supplied with the product. Ensure that Yes appears, and then press the (...) on WPS Router is displayed, and start WPS-PBC (Wi-Fi Protected Setup-Push Button Configuration) from the operator panel. In this case, enter the password you specified, and press the (Set) button. 1 Press the (Menu) button. 2 Press the button until System appears, and then press the (Set...
...information about WPS operation on the wireless LAN access point (Registrar) or router, refer to Enable. Connecting Your Printer 39 NOTE: A Password is required to enter Admin Menu when Panel Lock Set is set to the manual supplied with the product. Ensure that Yes appears, and then press the (...) on WPS Router is displayed, and start WPS-PBC (Wi-Fi Protected Setup-Push Button Configuration) from the operator panel. In this case, enter the password you specified, and press the (Set) button. 1 Press the (Menu) button. 2 Press the button until System appears, and then press the (Set...

Dell Users Guide
Page 42
... 41. WPS-PIN The PIN code of WPS-PIN can only be configured from the router. 7 Enter the passphrase or WEP key. NOTE: A Password is required to enter Admin Menu when Panel Lock Set is set to the manual supplied with the product. 10 When the WPS operation is successful and the... which consists of 8 to "Manual SSID Setup" on the wireless LAN access point (Registrar) or router, refer to Enable. Auto SSID Setup NOTE: A Password is required to enter Admin Menu when Panel Lock Set is set to the manual supplied with the access point or router. 8 The Restart System screen appears and...
... 41. WPS-PIN The PIN code of WPS-PIN can only be configured from the router. 7 Enter the passphrase or WEP key. NOTE: A Password is required to enter Admin Menu when Panel Lock Set is set to the manual supplied with the product. 10 When the WPS operation is successful and the... which consists of 8 to "Manual SSID Setup" on the wireless LAN access point (Registrar) or router, refer to Enable. Auto SSID Setup NOTE: A Password is required to enter Admin Menu when Panel Lock Set is set to the manual supplied with the access point or router. 8 The Restart System screen appears and...
Dell Users Guide
Page 43
Manual SSID Setup NOTE: A Password is required to enter Admin Menu when Panel Lock Set is set to step 10. 9 Select the...the (Menu) button. 2 Press the button until System appears, and then press the (Set) button. 3 Press the button until Admin Menu appears, and then press the (Set) button. 4 Press the button until Network appears, and then press the (Set) button..... 6 Press the button until WEP appears, and then press the (Set) button. In this case, enter the password you do not set security for WPA and WPA2 encryption which consists of 8 to the manual supplied with the access...
Manual SSID Setup NOTE: A Password is required to enter Admin Menu when Panel Lock Set is set to step 10. 9 Select the...the (Menu) button. 2 Press the button until System appears, and then press the (Set) button. 3 Press the button until Admin Menu appears, and then press the (Set) button. 4 Press the button until Network appears, and then press the (Set) button..... 6 Press the button until WEP appears, and then press the (Set) button. In this case, enter the password you do not set security for WPA and WPA2 encryption which consists of 8 to the manual supplied with the access...
Dell Users Guide
Page 55
... the link local address. The cursor is set ) button. To open the Dell Printer Configuration Web Tool, use the Dell™ Printer Configuration Web Tool. NOTE: Depending on the printer. To check ... 3 Press the button until System appears, and then press the (set) button. 4 Press the button until Admin Menu appears, and then press the (set) button. 5 Press the button until Network appears, and then press ...information on using the numeric keypad. 13 Press the button. NOTE: A Password is required to three digits in each section, for example, an IP address in the range...
... the link local address. The cursor is set ) button. To open the Dell Printer Configuration Web Tool, use the Dell™ Printer Configuration Web Tool. NOTE: Depending on the printer. To check ... 3 Press the button until System appears, and then press the (set) button. 4 Press the button until Admin Menu appears, and then press the (set) button. 5 Press the button until Network appears, and then press ...information on using the numeric keypad. 13 Press the button. NOTE: A Password is required to three digits in each section, for example, an IP address in the range...
Dell Users Guide
Page 57
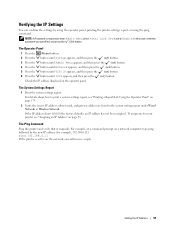
... has not been assigned. To assign one for example, 192.168.0.11): ping 192.168.0.11 If the printer is set ) button. NOTE: A Password is required to enter Admin Menu when Panel Lock Set is active on the network, you specified, and press the (Set) button. In this case, enter the... password you will receive a reply. Setting the IP Address 55 For example, at a command prompt on a network computer, type ping followed by using the operator...
... has not been assigned. To assign one for example, 192.168.0.11): ping 192.168.0.11 If the printer is set ) button. NOTE: A Password is required to enter Admin Menu when Panel Lock Set is active on the network, you specified, and press the (Set) button. In this case, enter the... password you will receive a reply. Setting the IP Address 55 For example, at a command prompt on a network computer, type ping followed by using the operator...
Dell Users Guide
Page 97
...; Dell Printers → Dell C1765 Color Multifunction Printer → Tool Box. The Tool Box opens. 2 Click the Printer Maintenance tab. 3 Select System Settings from Panel Language, and then click Apply New Settings. Setting the Power Saving Timer Option NOTE: NOTE: A Password is required to enter the Admin Menu...For details about how to Enable. The System Settings page is set the power saving timer for the printer. In this case, enter the password you do not start copying after changing them on the operator panel. 1 Press the (Menu) button. 2 Press the button until System...
...; Dell Printers → Dell C1765 Color Multifunction Printer → Tool Box. The Tool Box opens. 2 Click the Printer Maintenance tab. 3 Select System Settings from Panel Language, and then click Apply New Settings. Setting the Power Saving Timer Option NOTE: NOTE: A Password is required to enter the Admin Menu...For details about how to Enable. The System Settings page is set the power saving timer for the printer. In this case, enter the password you do not start copying after changing them on the operator panel. 1 Press the (Menu) button. 2 Press the button until System...
Dell Users Guide
Page 106
...Adjust Altitude" "Reset Defaults" "Non-Dell Toner" "Clock Settings" "Web Link Customization" 104 Dell™ Printer Configuration Web Tool You can change the printer settings through the Dell Printer Configuration Web Tool. The default user name is admin, and the default password is left blank (NULL). When you... to change only the password in the Set Password page in the dialog box. Enter a user name and password of the administrator ...
...Adjust Altitude" "Reset Defaults" "Non-Dell Toner" "Clock Settings" "Web Link Customization" 104 Dell™ Printer Configuration Web Tool You can change the printer settings through the Dell Printer Configuration Web Tool. The default user name is admin, and the default password is left blank (NULL). When you... to change only the password in the Set Password page in the dialog box. Enter a user name and password of the administrator ...
Dell Users Guide
Page 111
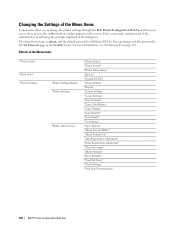
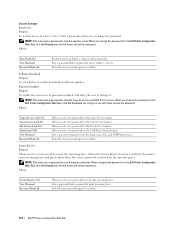
... Margin Middle Displays whether to limit access to enable download of firmware updates. Displays whether to Admin Menu with a password. Displays whether to enable the Copy service or to require a password to use the service. Displays whether to enable the USB-Print service or to require... a password to make copies in color or in black and white. Displays whether to use the service. Displays the default copy density level. Dell™ Printer Configuration Web...
... Margin Middle Displays whether to limit access to enable download of firmware updates. Displays whether to Admin Menu with a password. Displays whether to enable the Copy service or to require a password to use the service. Displays whether to enable the USB-Print service or to require... a password to make copies in color or in black and white. Displays whether to use the service. Displays the default copy density level. Dell™ Printer Configuration Web...
Dell Users Guide
Page 116
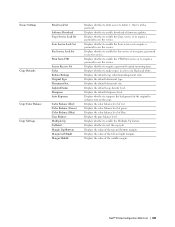
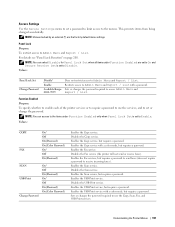
... printing incoming fax. NOTE: This menu sets a password to confirm. When changing the password for the USB-Print Service feature. When you to set a password for the Copy Service feature. Sets a password required to confirm. 114 Dell™ Printer Configuration Web Tool Sets a password that is required to access Admin Menu. Function Enabled Purpose: To enable the...
... printing incoming fax. NOTE: This menu sets a password to confirm. When changing the password for the USB-Print Service feature. When you to set a password for the Copy Service feature. Sets a password required to confirm. 114 Dell™ Printer Configuration Web Tool Sets a password that is required to access Admin Menu. Function Enabled Purpose: To enable the...

Dell Users Guide
Page 178
...wired or wireless network. See also: "Setting Group Dial" on . NOTE: For Dell C1765nfw Color Multifunction Printer, this case, enter the password you specified, and press the (Set) button. Admin Menu Use the Admin Menu menu to 99 frequently dialed numbers in speed dial locations. Uses 100base-TX ...full-duplex. Speed Dial Purpose: To store up to configure a variety of printer features. NOTE: A Password is required to enter the Admin Menu menu when Panel Lock Set is turned off and then on page 283. See also: "Storing a Number for Speed Dialing...
...wired or wireless network. See also: "Setting Group Dial" on . NOTE: For Dell C1765nfw Color Multifunction Printer, this case, enter the password you specified, and press the (Set) button. Admin Menu Use the Admin Menu menu to 99 frequently dialed numbers in speed dial locations. Uses 100base-TX ...full-duplex. Speed Dial Purpose: To store up to configure a variety of printer features. NOTE: A Password is required to enter the Admin Menu menu when Panel Lock Set is turned off and then on page 283. See also: "Storing a Number for Speed Dialing...
Dell Users Guide
Page 199
... service. Disables the USB-Print service. Restricts access to the menus. Secure Settings Use the Secure Settings menu to set a password to limit access to Admin Menu and Report / List with a password. NOTE: You can select Disable for Panel Lock Set when all items under Function Enabled only when Panel Lock Set is...
... service. Disables the USB-Print service. Restricts access to the menus. Secure Settings Use the Secure Settings menu to set a password to limit access to Admin Menu and Report / List with a password. NOTE: You can select Disable for Panel Lock Set when all items under Function Enabled only when Panel Lock Set is...
Dell Users Guide
Page 202
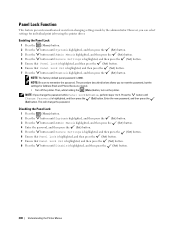
...Press the button until System is highlighted, and then press the (Set) button. 3 Press the button until Admin Menu is highlighted, and then press the (Set) button. 4 Enter the password, and then press the (Set) button. 5 Press the button until Secure Settings is highlighted, and then press... Panel Lock Set is highlighted, and then press the (Set) button. 7 Press the button until Change Password is 0000. NOTE: Be sure to reset the password, but the settings for individual print jobs using the printer driver. Panel Lock Function This feature prevents unauthorized users...
...Press the button until System is highlighted, and then press the (Set) button. 3 Press the button until Admin Menu is highlighted, and then press the (Set) button. 4 Enter the password, and then press the (Set) button. 5 Press the button until Secure Settings is highlighted, and then press... Panel Lock Set is highlighted, and then press the (Set) button. 7 Press the button until Change Password is 0000. NOTE: Be sure to reset the password, but the settings for individual print jobs using the printer driver. Panel Lock Function This feature prevents unauthorized users...
Dell Users Guide
Page 203
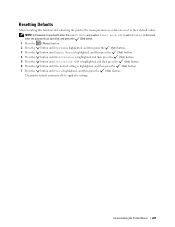
Resetting Defaults After executing this case, enter the password you specified, and press the (Set) button. 1 Press the (Menu) button. 2 Press the button until System is highlighted, and then press the (Set) button. 3 Press the button until Admin Menu is highlighted, and then press the (Set) button. 4 Press...button until the desired setting is highlighted, and then press the (Set) button. 7 Press the button until Yes is set to enter the Admin Menu menu when Panel Lock Set is highlighted, and then press the (Set) button. In this function and rebooting the printer, the menu ...
Resetting Defaults After executing this case, enter the password you specified, and press the (Set) button. 1 Press the (Menu) button. 2 Press the button until System is highlighted, and then press the (Set) button. 3 Press the button until Admin Menu is highlighted, and then press the (Set) button. 4 Press...button until the desired setting is highlighted, and then press the (Set) button. 7 Press the button until Yes is set to enter the Admin Menu menu when Panel Lock Set is highlighted, and then press the (Set) button. In this function and rebooting the printer, the menu ...

Dell Users Guide
Page 261
NOTE: The default user name is admin, and the default password is left blank (NULL). 5 Click the Server Address tab. 6 Select any unused number and click Create. Configuring the Printer Settings You can configure the printer ... of the printer, see "Verifying the IP Settings" on how to Server/Computer feature with the Dell Printer Configuration Web Tool or Address Book Editor. From the Dell Printer Configuration Web Tool 1 Open a web browser. 2 Type in the correct user name and password. Scanning 259 NOTE: For details on page 55. 3 Click Go.
NOTE: The default user name is admin, and the default password is left blank (NULL). 5 Click the Server Address tab. 6 Select any unused number and click Create. Configuring the Printer Settings You can configure the printer ... of the printer, see "Verifying the IP Settings" on how to Server/Computer feature with the Dell Printer Configuration Web Tool or Address Book Editor. From the Dell Printer Configuration Web Tool 1 Open a web browser. 2 Type in the correct user name and password. Scanning 259 NOTE: For details on page 55. 3 Click Go.
Dell Users Guide
Page 269
...your printer. 1 Press the (Menu) button. 2 Press the button until System is highlighted, and then press the (Set) button. 3 Press the button until Admin Menu is highlighted, and then press the (Set) button. 4 Press the button until Fax Settings is highlighted, and then press the (Set) button. 5 ...use the fax function. Faxing 267 21 Faxing NOTE: If the Function Enabled setting for Fax is set to On(Password), you need to enter the four digit password to enter the Admin Menu. For details, see "Function Enabled" on the display is correct. 8 Press the button until Country is ...
...your printer. 1 Press the (Menu) button. 2 Press the button until System is highlighted, and then press the (Set) button. 3 Press the button until Admin Menu is highlighted, and then press the (Set) button. 4 Press the button until Fax Settings is highlighted, and then press the (Set) button. 5 ...use the fax function. Faxing 267 21 Faxing NOTE: If the Function Enabled setting for Fax is set to On(Password), you need to enter the four digit password to enter the Admin Menu. For details, see "Function Enabled" on the display is correct. 8 Press the button until Country is ...
Dell Users Guide
Page 287
...the (Menu) button. 2 Press the button until Job Status is highlighted, and then press the (Set) button. 3 Press the button until Change Password is highlighted, and then press the (Set) button. 3 To return to prevent your printer stores it into memory and the Job Status screen displays ...on : 1 Press the (Menu) button. 2 Press the button until System is highlighted, and then press the (Set) button. 3 Press the button until Admin Menu is highlighted, and then press the (Set) button. 4 Press the button until Secure Settings is highlighted, and then press the (Set) button. 5 ...
...the (Menu) button. 2 Press the button until Job Status is highlighted, and then press the (Set) button. 3 Press the button until Change Password is highlighted, and then press the (Set) button. 3 To return to prevent your printer stores it into memory and the Job Status screen displays ...on : 1 Press the (Menu) button. 2 Press the button until System is highlighted, and then press the (Set) button. 3 Press the button until Admin Menu is highlighted, and then press the (Set) button. 4 Press the button until Secure Settings is highlighted, and then press the (Set) button. 5 ...
Dell Users Guide
Page 319
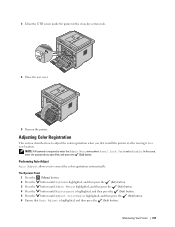
...case, enter the password you to Enable. Performing Auto Adjust Auto Adjust allows you specified, and press the (Set) button. The Operator Panel 1 Press the (Menu) button. 2 Press the button until System is highlighted, and then press the (Set) button. 3 Press the button until Admin Menu is highlighted...adjust the color registration when you first install the printer or after moving it to enter the Admin Menu menu when Panel Lock Set is highlighted, and then press the (Set) button. NOTE: A Password is required to a new location. 3 Clean the CTD sensor inside the printer with a clean...
...case, enter the password you to Enable. Performing Auto Adjust Auto Adjust allows you specified, and press the (Set) button. The Operator Panel 1 Press the (Menu) button. 2 Press the button until System is highlighted, and then press the (Set) button. 3 Press the button until Admin Menu is highlighted...adjust the color registration when you first install the printer or after moving it to enter the Admin Menu menu when Panel Lock Set is highlighted, and then press the (Set) button. NOTE: A Password is required to a new location. 3 Clean the CTD sensor inside the printer with a clean...
Dell Users Guide
Page 341
Action Settings in the printer. Printing Problems NOTE: A Password is required to enter the Admin Menu menu when Panel Lock Set is connected to the computer with your computer screen, follow the on-screen instructions to the printer. Troubleshooting 339 ... on page 295. If you are using the correct Ethernet or USB cable and that the spooler has not stalled. In this case, enter the password you are displayed on the operator panel or on your printer, check each of the above and still have no effect. Verify that print media...
Action Settings in the printer. Printing Problems NOTE: A Password is required to enter the Admin Menu menu when Panel Lock Set is connected to the computer with your computer screen, follow the on-screen instructions to the printer. Troubleshooting 339 ... on page 295. If you are using the correct Ethernet or USB cable and that the spooler has not stalled. In this case, enter the password you are displayed on the operator panel or on your printer, check each of the above and still have no effect. Verify that print media...
Dell Users Guide
Page 367
..., 151, 196 Adjust ColorRegi, 194 Adjust Fusing Unit, 111, 119, 149, 193 Adjust Transfer Roller, 111, 119, 149, 193 Adjusting Color Registration, 317 Admin Menu, 176 Administrator Password, 132 Alert Tone, 108, 113, 190 All Tones, 108, 113 Altitude, 302 Ans Machine/Fax, 270 Answer Machine/Fax, 117 Appendix, 359 Apply New...
..., 151, 196 Adjust ColorRegi, 194 Adjust Fusing Unit, 111, 119, 149, 193 Adjust Transfer Roller, 111, 119, 149, 193 Adjusting Color Registration, 317 Admin Menu, 176 Administrator Password, 132 Alert Tone, 108, 113, 190 All Tones, 108, 113 Altitude, 302 Ans Machine/Fax, 270 Answer Machine/Fax, 117 Appendix, 359 Apply New...


