Dell Laser MFP Users Guide
Page 6
... jam. [203 256 [x]‑page jam, remove tray 1 to clear duplex. [235-239 257 [x]‑page jam, open tray [x]. [24x]...258 [x]‑page jam, clear manual feeder. [250 259 [x]‑page jam, open automatic feeder top cover. [28y.xx 260
... jam. [203 256 [x]‑page jam, remove tray 1 to clear duplex. [235-239 257 [x]‑page jam, open tray [x]. [24x]...258 [x]‑page jam, clear manual feeder. [250 259 [x]‑page jam, open automatic feeder top cover. [28y.xx 260
Dell Laser MFP Users Guide
Page 35
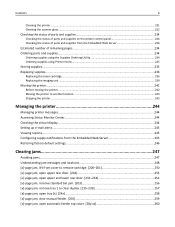
.... Additional printer setup 35 4 Push the card firmly into place as shown in the printer driver" on the card must touch and be necessary to manually add the options in the printer driver to the card and the controller board.
.... Additional printer setup 35 4 Push the card firmly into place as shown in the printer driver" on the card must touch and be necessary to manually add the options in the printer driver to the card and the controller board.
Dell Laser MFP Users Guide
Page 49
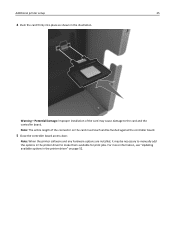
Additional printer setup 49 8 Connect the power cord to the printer, then to make them available for print jobs. For more information, see "Updating available options in the printer driver" on the printer. 1 2 Note: When the printer software and any optional trays are installed, you may need to manually add the options in the printer driver to a properly grounded electrical outlet, and then turn on page 52.
Additional printer setup 49 8 Connect the power cord to the printer, then to make them available for print jobs. For more information, see "Updating available options in the printer driver" on the printer. 1 2 Note: When the printer software and any optional trays are installed, you may need to manually add the options in the printer driver to a properly grounded electrical outlet, and then turn on page 52.
Dell Laser MFP Users Guide
Page 52
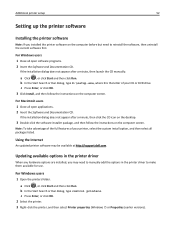
... control printers. Additional printer setup 52 Setting up the printer software Installing the printer software Note: If you may be available at http://support.dell.com. For Windows users 1 Open the printers folder. c Press Enter, or click OK. 3 Click Install, and then follow the instructions... on the computer before but need to manually add the options in the printer driver When any hardware options are installed, you installed the printer software on the computer screen. Note: To...
... control printers. Additional printer setup 52 Setting up the printer software Installing the printer software Note: If you may be available at http://support.dell.com. For Windows users 1 Open the printers folder. c Press Enter, or click OK. 3 Click Install, and then follow the instructions... on the computer before but need to manually add the options in the printer driver When any hardware options are installed, you installed the printer software on the computer screen. Note: To...
Dell Laser MFP Users Guide
Page 53
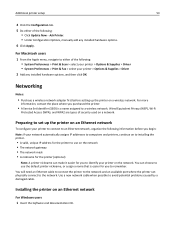
...) Note: A printer nickname can make it easier for you to either of the following: • Click Update Now ‑ Ask Printer. • Under Configuration Options, manually add any installed hardware options, and then click OK. Additional printer setup 53 4 Click the Configuration tab. 5 Do either of the following: • System Preferences...
...) Note: A printer nickname can make it easier for you to either of the following: • Click Update Now ‑ Ask Printer. • Under Configuration Options, manually add any installed hardware options, and then click OK. Additional printer setup 53 4 Click the Configuration tab. 5 Do either of the following: • System Preferences...

Dell Laser MFP Users Guide
Page 54
... if you are installed on the computer screen. Additional printer setup 54 If the installation dialog does not appear after a minute, then launch the CD manually: a Click , or click Start and then click Run. b In the Start Search or Run dialog, type D:\setup.exe, where D is activated on the computer screen...
... if you are installed on the computer screen. Additional printer setup 54 If the installation dialog does not appear after a minute, then launch the CD manually: a Click , or click Start and then click Run. b In the Start Search or Run dialog, type D:\setup.exe, where D is activated on the computer screen...
Dell Laser MFP Users Guide
Page 56
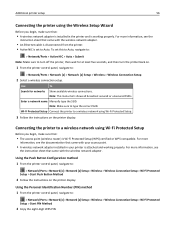
... begin , make sure that: • The access point (wireless router) is Wi‑Fi Protected Setup (WPS) certified or WPS‑compatible. Enter a network name Manually type the SSID. Note: Make sure to : > Network/Ports > Network [x] > Network [x] Setup > Wireless > Wireless Connection Setup > Wi‑Fi Protected Setup > Start PIN Method 2 Copy...
... begin , make sure that: • The access point (wireless router) is Wi‑Fi Protected Setup (WPS) certified or WPS‑compatible. Enter a network name Manually type the SSID. Note: Make sure to : > Network/Ports > Network [x] > Network [x] Setup > Wireless > Wireless Connection Setup > Wi‑Fi Protected Setup > Start PIN Method 2 Copy...
Dell Laser MFP Users Guide
Page 59
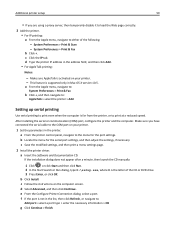
... have connected the serial cable to print at a reduced speed. b Click Install. If the installation dialog does not appear after a minute, then launch the CD manually: 1 Click , or click Start and then click Run. 2 In the Start Search or Run dialog, type D:\setup.exe, where D is the letter of the following...
... have connected the serial cable to print at a reduced speed. b Click Install. If the installation dialog does not appear after a minute, then launch the CD manually: 1 Click , or click Start and then click Run. 2 In the Start Search or Run dialog, type D:\setup.exe, where D is the letter of the following...

Dell Laser MFP Users Guide
Page 97
...to: Copy to > select the tray containing the letterhead > Copy It 5 If there are no trays that support letterhead, then navigate to: Manual Feeder > select the size of the letterhead > Letterhead 6 Load the letterhead faceup, top edge first into the multipurpose feeder, and then touch...3 Navigate to: Copy to > select the tray that contains transparencies > Copy It If there are no trays that contain transparencies, then navigate to: Manual Feeder > > select the size of the transparencies > > Transparency > 4 Load transparencies into the multipurpose feeder, and then touch Copy It. Notes: ...
...to: Copy to > select the tray containing the letterhead > Copy It 5 If there are no trays that support letterhead, then navigate to: Manual Feeder > select the size of the letterhead > Letterhead 6 Load the letterhead faceup, top edge first into the multipurpose feeder, and then touch...3 Navigate to: Copy to > select the tray that contains transparencies > Copy It If there are no trays that contain transparencies, then navigate to: Manual Feeder > > select the size of the transparencies > > Transparency > 4 Load transparencies into the multipurpose feeder, and then touch Copy It. Notes: ...

Dell Laser MFP Users Guide
Page 100
... 4 Touch the button that best represents the content type of the document you are copying. 5 Touch Copy It. Note: Auto is from " after setting Scale manually changes the scale value back to decrease or increase the value by 1%. Touching "Copy to" or "Copy from a newspaper. • Other-The original document was...
... 4 Touch the button that best represents the content type of the document you are copying. 5 Touch Copy It. Note: Auto is from " after setting Scale manually changes the scale value back to decrease or increase the value by 1%. Touching "Copy to" or "Copy from a newspaper. • Other-The original document was...

Dell Laser MFP Users Guide
Page 104
... screen, touch Cancel Job, or press 2 Touch the job you want to copy onto is not loaded in one of the trays, then touch Manual Feeder, and manually load the paper in the multipurpose feeder. • When "Copy to" is set to Auto Size Match, each copy matches the paper size of...
... screen, touch Cancel Job, or press 2 Touch the job you want to copy onto is not loaded in one of the trays, then touch Manual Feeder, and manually load the paper in the multipurpose feeder. • When "Copy to" is set to Auto Size Match, each copy matches the paper size of...

Dell Laser MFP Users Guide
Page 117
... the printer to pick up on any number of rings that came with an answering machine Connected to receive faxes automatically (Auto Answer On) or manually (Auto Answer Off). • If you want . Setup 2: Printer is sharing the line with the printer to the port of the printer. 2 Connect the other...
... the printer to pick up on any number of rings that came with an answering machine Connected to receive faxes automatically (Auto Answer On) or manually (Auto Answer Off). • If you want . Setup 2: Printer is sharing the line with the printer to the port of the printer. 2 Connect the other...

Dell Laser MFP Users Guide
Page 119
This setting works best if you subscribe to a distinctive ring service. When you answer the telephone and you hear fax tones, press *9* or the manual answer code on your line, then you need to turn off the voice mail service when you are using voice mail more often than fax. ... faxes automatically (Auto Answer On), but you have set it to receive faxes automatically. • If you need to set the printer to receive faxes manually (Auto Answer Off). Tips for the printer.
This setting works best if you subscribe to a distinctive ring service. When you answer the telephone and you hear fax tones, press *9* or the manual answer code on your line, then you need to turn off the voice mail service when you are using voice mail more often than fax. ... faxes automatically (Auto Answer On), but you have set it to receive faxes automatically. • If you need to set the printer to receive faxes manually (Auto Answer Off). Tips for the printer.
Dell Laser MFP Users Guide
Page 129
Note: It is recommended to load the Web page correctly. 2 Click Security > Set Date and Time. 3 In the Manually Set Date & Time field, enter the current date and time. 4 Click Submit. Faxing 129 Setting the date and time You can set to automatically adjust ...
Note: It is recommended to load the Web page correctly. 2 Click Security > Set Date and Time. 3 In the Manually Set Date & Time field, enter the current date and time. 4 Click Submit. Faxing 129 Setting the date and time You can set to automatically adjust ...
Dell Laser MFP Users Guide
Page 130
... the "Dialing prefix" field. 5 Select the appropriate paper size and page orientation. 6 If you want to verify the recipient information before it can be entered manually or by using a shortcut number Fax shortcuts are like the speed dial numbers on the scanner glass. If this check box is cleared, then the...
... the "Dialing prefix" field. 5 Select the appropriate paper size and page orientation. 6 If you want to verify the recipient information before it can be entered manually or by using a shortcut number Fax shortcuts are like the speed dial numbers on the scanner glass. If this check box is cleared, then the...

Dell Laser MFP Users Guide
Page 134
... incoming faxes that have a private caller ID or have been scanned to memory 1 On the home screen, touch Cancel Jobs. Held faxes can be released manually or at a scheduled day or time. 1 Open a Web browser, and then type the printer IP address in the address field. The IP address appears as...
... incoming faxes that have a private caller ID or have been scanned to memory 1 On the home screen, touch Cancel Jobs. Held faxes can be released manually or at a scheduled day or time. 1 Open a Web browser, and then type the printer IP address in the address field. The IP address appears as...

Dell Laser MFP Users Guide
Page 135
... Schedule. Understanding the fax options Content This option lets you specify the content type and source of the following: • Off • Always On • Manual • Scheduled 4 If you selected Scheduled, then continue with the following content types: • Graphics-The original document is a mixture of text, graphics, and photos...
... Schedule. Understanding the fax options Content This option lets you specify the content type and source of the following: • Off • Always On • Manual • Scheduled 4 If you selected Scheduled, then continue with the following content types: • Graphics-The original document is a mixture of text, graphics, and photos...

Dell Laser MFP Users Guide
Page 147
..., the print job continues using the linked tray. Cassette configures the multipurpose feeder as the automatic paper source. • Manual sets the multipurpose feeder only for manual‑feed print jobs. • First configures the multipurpose feeder as a menu setting. • If the same size... all print jobs. Understanding the printer menus Paper menu Default Source menu Use Default Source Tray [x] MP Feeder Manual Paper Manual Envelope Configure MP menu Use Configure MP Cassette Manual First 147 To Set a default paper source for MP Feeder to appear as the primary paper source.
..., the print job continues using the linked tray. Cassette configures the multipurpose feeder as the automatic paper source. • Manual sets the multipurpose feeder only for manual‑feed print jobs. • First configures the multipurpose feeder as a menu setting. • If the same size... all print jobs. Understanding the printer menus Paper menu Default Source menu Use Default Source Tray [x] MP Feeder Manual Paper Manual Envelope Configure MP menu Use Configure MP Cassette Manual First 147 To Set a default paper source for MP Feeder to appear as the primary paper source.

Dell Laser MFP Users Guide
Page 150
... B5 Envelope Other Envelope Specify the envelope size being manually loaded. DL Envelope is the U.S. factory default setting. factory default setting. Note: Only installed trays and feeders are listed in this menu. Manual Paper Type Plain Paper Card Stock Transparency Recycled Labels ...Colored Paper Light Paper Heavy Paper Rough/Cotton Custom Type [x] Specify the paper type being manually loaded. Manual Envelope Type Envelope Rough Envelope Custom Type [x] Specify the envelope type being manually loaded. A4 is the factory default setting. • From the Paper menu, set ...
... B5 Envelope Other Envelope Specify the envelope size being manually loaded. DL Envelope is the U.S. factory default setting. factory default setting. Note: Only installed trays and feeders are listed in this menu. Manual Paper Type Plain Paper Card Stock Transparency Recycled Labels ...Colored Paper Light Paper Heavy Paper Rough/Cotton Custom Type [x] Specify the paper type being manually loaded. Manual Envelope Type Envelope Rough Envelope Custom Type [x] Specify the envelope type being manually loaded. A4 is the factory default setting. • From the Paper menu, set ...

Dell Laser MFP Users Guide
Page 162
... menu is the factory default setting. Specify the Zero Configuration Networking setting. Enable the built-in network printers or printers attached to print servers. Note: Manually setting the IP address sets the Enable DHCP and Enable Auto IP settings to print a banner page. Note: Yes is the factory default setting. It...
... menu is the factory default setting. Specify the Zero Configuration Networking setting. Enable the built-in network printers or printers attached to print servers. Note: Manually setting the IP address sets the Enable DHCP and Enable Auto IP settings to print a banner page. Note: Yes is the factory default setting. It...


