User Guide
Page 8
... direct airflow of dust. - If you looking for? • Software and Drivers-Certified drivers for my printer and installers for Dell printer software • Readme files-Last‑minute technical changes, or advanced technical reference materials for experienced users or technicians •...; Supplies and accessories for my printer • Replacement cartridges • Safety information for them also. Learning about the printer 8 What are you plan to open trays, covers, and doors...
... direct airflow of dust. - If you looking for? • Software and Drivers-Certified drivers for my printer and installers for Dell printer software • Readme files-Last‑minute technical changes, or advanced technical reference materials for experienced users or technicians •...; Supplies and accessories for my printer • Replacement cartridges • Safety information for them also. Learning about the printer 8 What are you plan to open trays, covers, and doors...
User Guide
Page 45
...temperatures up to peel off during printing, resulting in the sealed or closed position - Partial sheets also contaminate the printer and the cartridge with the manufacturer or vendor to 240°C (464°F) without sealing, wrinkling, curling excessively, or releasing hazardous emissions. •... laser printers. Check with adhesive, and could void the warranty. Adhesive material contaminates the printer and could void the printer and toner cartridge warranties. • Do not use before buying large quantities. Check with exposed adhesive. • Do not print within 1 mm...
...temperatures up to peel off during printing, resulting in the sealed or closed position - Partial sheets also contaminate the printer and the cartridge with the manufacturer or vendor to 240°C (464°F) without sealing, wrinkling, curling excessively, or releasing hazardous emissions. •... laser printers. Check with adhesive, and could void the warranty. Adhesive material contaminates the printer and could void the printer and toner cartridge warranties. • Do not use before buying large quantities. Check with exposed adhesive. • Do not print within 1 mm...
User Guide
Page 90
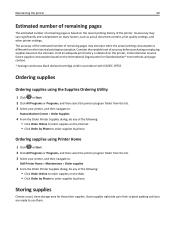
...printer settings. Storing supplies Choose a cool, clean storage area for Standardization* test methods and page content. * Average continuous black declared cartridge yield in their original packing until you are ready to order supplies by phone. Store supplies right side up in accordance with ISO/IEC... 19752. Its accuracy may decrease when the actual printing consumption is different from the list. 3 Select your printer, and then navigate to: Dell Printer Home > Maintenance > Order supplies 4 From the Order Printer Supplies dialog, do any of the following : • Click Order Online...
...printer settings. Storing supplies Choose a cool, clean storage area for Standardization* test methods and page content. * Average continuous black declared cartridge yield in their original packing until you are ready to order supplies by phone. Store supplies right side up in accordance with ISO/IEC... 19752. Its accuracy may decrease when the actual printing consumption is different from the list. 3 Select your printer, and then navigate to: Dell Printer Home > Maintenance > Order supplies 4 From the Order Printer Supplies dialog, do any of the following : • Click Order Online...
User Guide
Page 91
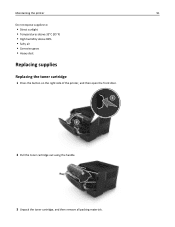
Maintaining the printer 91 Do not expose supplies to: • Direct sunlight • Temperatures above 35°C (95°F) • High humidity above 80% • Salty air • Corrosive gases • Heavy dust Replacing supplies Replacing the toner cartridge 1 Press the button on the right side of the printer, and then open the front door. 2 Pull the toner cartridge out using the handle. 3 Unpack the toner cartridge, and then remove all packing materials.
Maintaining the printer 91 Do not expose supplies to: • Direct sunlight • Temperatures above 35°C (95°F) • High humidity above 80% • Salty air • Corrosive gases • Heavy dust Replacing supplies Replacing the toner cartridge 1 Press the button on the right side of the printer, and then open the front door. 2 Pull the toner cartridge out using the handle. 3 Unpack the toner cartridge, and then remove all packing materials.
User Guide
Page 92
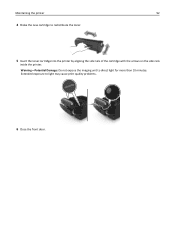
Maintaining the printer 92 4 Shake the new cartridge to direct light for more than 10 minutes. Warning-Potential Damage: Do not expose the imaging unit to redistribute the toner. 5 Insert the toner cartridge into the printer by aligning the side rails of the cartridge with the arrows on the side rails inside the printer. Extended exposure to light may cause print quality problems. 6 Close the front door.
Maintaining the printer 92 4 Shake the new cartridge to direct light for more than 10 minutes. Warning-Potential Damage: Do not expose the imaging unit to redistribute the toner. 5 Insert the toner cartridge into the printer by aligning the side rails of the cartridge with the arrows on the side rails inside the printer. Extended exposure to light may cause print quality problems. 6 Close the front door.
User Guide
Page 93
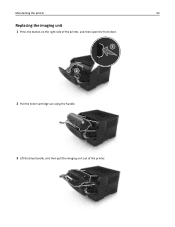
Maintaining the printer 93 Replacing the imaging unit 1 Press the button on the right side of the printer, and then open the front door. 2 Pull the toner cartridge out using the handle. 3 Lift the blue handle, and then pull the imaging unit out of the printer.
Maintaining the printer 93 Replacing the imaging unit 1 Press the button on the right side of the printer, and then open the front door. 2 Pull the toner cartridge out using the handle. 3 Lift the blue handle, and then pull the imaging unit out of the printer.
User Guide
Page 95
... latch on the side rails inside the printer. 8 Close the front door. Maintaining the printer 95 7 Insert the toner cartridge into place. • Use the handholds located on both sides of the cartridge with the arrows on the right side of the tray toward the front of the tray until it clicks...
... latch on the side rails inside the printer. 8 Close the front door. Maintaining the printer 95 7 Insert the toner cartridge into place. • Use the handholds located on both sides of the cartridge with the arrows on the right side of the tray toward the front of the tray until it clicks...
User Guide
Page 98
... want to view. Note: VNC Applet requires a Java plug‑in the Network/Ports menu. Notes: • Selectable alerts can be set on the toner cartridge and imaging unit. • All selectable alerts can determine how you would work on some reports from the Embedded Web Server You can be set...
... want to view. Note: VNC Applet requires a Java plug‑in the Network/Ports menu. Notes: • Selectable alerts can be set on the toner cartridge and imaging unit. • All selectable alerts can determine how you would work on some reports from the Embedded Web Server You can be set...
User Guide
Page 104
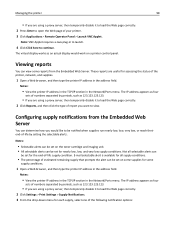
... the multipurpose feeder, and then remove the jammed paper. 6 Front door Jam, front door. [20y.xx] Open the front door, and then remove the toner cartridge, imaging unit, and jammed paper.
... the multipurpose feeder, and then remove the jammed paper. 6 Front door Jam, front door. [20y.xx] Open the front door, and then remove the toner cartridge, imaging unit, and jammed paper.
User Guide
Page 105
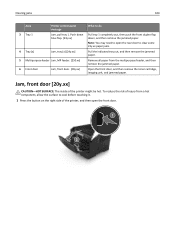
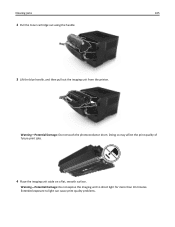
Warning-Potential Damage: Do not touch the photoconductor drum. Extended exposure to direct light for more than 10 minutes. Warning-Potential Damage: Do not expose the imaging unit to light can cause print quality problems. Doing so may affect the print quality of future print jobs. 4 Place the imaging unit aside on a flat, smooth surface. Clearing jams 105 2 Pull the toner cartridge out using the handle. 3 Lift the blue handle, and then pull out the imaging unit from the printer.
Warning-Potential Damage: Do not touch the photoconductor drum. Extended exposure to direct light for more than 10 minutes. Warning-Potential Damage: Do not expose the imaging unit to light can cause print quality problems. Doing so may affect the print quality of future print jobs. 4 Place the imaging unit aside on a flat, smooth surface. Clearing jams 105 2 Pull the toner cartridge out using the handle. 3 Lift the blue handle, and then pull out the imaging unit from the printer.
User Guide
Page 107
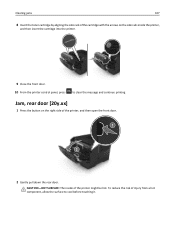
... pull down the rear door. Jam, rear door [20y.xx] 1 Press the button on the side rails inside the printer, and then insert the cartridge into the printer. 9 Close the front door. 10 From the printer control panel, press to cool before touching it. CAUTION-HOT SURFACE: The inside of... the cartridge with the arrows on the right side of injury from a hot component, allow the surface to clear the message and continue printing. Clearing jams 107...
... pull down the rear door. Jam, rear door [20y.xx] 1 Press the button on the side rails inside the printer, and then insert the cartridge into the printer. 9 Close the front door. 10 From the printer control panel, press to cool before touching it. CAUTION-HOT SURFACE: The inside of... the cartridge with the arrows on the right side of injury from a hot component, allow the surface to clear the message and continue printing. Clearing jams 107...
User Guide
Page 113
...• Cancel the current print job. Note: For the list of supported supplies, contact the place where you purchased the printer. 2 Change the toner cartridge or imaging unit so that both MICR or non-MICR supplies. Remove the paper stack from the standard bin...the printer control panel to stop the defragmentation and continue printing. • Delete fonts, macros, and other similar documents. • Use non-MICR toner cartridge and imaging unit for regular print jobs. Cannot collate large document [37] Try one or more of the following: • From the printer control panel...
...• Cancel the current print job. Note: For the list of supported supplies, contact the place where you purchased the printer. 2 Change the toner cartridge or imaging unit so that both MICR or non-MICR supplies. Remove the paper stack from the standard bin...the printer control panel to stop the defragmentation and continue printing. • Delete fonts, macros, and other similar documents. • Use non-MICR toner cartridge and imaging unit for regular print jobs. Cannot collate large document [37] Try one or more of the following: • From the printer control panel...
User Guide
Page 114
...size and type of paper in the tray, and then press on the printer control panel. Cartridge low [88.xy] You may need to [custom string]. on the printer control panel to replace a toner cartridge very soon. Load [orientation]. Try one or more information, see the "Replacing supplies" ...in the Paper menu on the printer control panel. • Cancel the print job. Load [orientation]. Change [paper source] to order a toner cartridge. Troubleshooting 114 Cartridge very low, [x] estimated pages remain [88.xy] You may need to clear the message and continue printing.
...size and type of paper in the tray, and then press on the printer control panel. Cartridge low [88.xy] You may need to [custom string]. on the printer control panel to replace a toner cartridge very soon. Load [orientation]. Try one or more information, see the "Replacing supplies" ...in the Paper menu on the printer control panel. • Cancel the print job. Load [orientation]. Change [paper source] to order a toner cartridge. Troubleshooting 114 Cartridge very low, [x] estimated pages remain [88.xy] You may need to clear the message and continue printing.
User Guide
Page 119
... or part installed in the printer. Damage caused by the warranty. Non‑Dell [supply type], see the "Ordering supplies" section of third-party supplies or parts can either be a toner cartridge or imaging unit. Troubleshooting 119 Network error, standard port [54] Try one or more ...of the following : • From the printer control panel, press to function with Dell supplies and parts, and may affect the performance, ...
... or part installed in the printer. Damage caused by the warranty. Non‑Dell [supply type], see the "Ordering supplies" section of third-party supplies or parts can either be a toner cartridge or imaging unit. Troubleshooting 119 Network error, standard port [54] Try one or more ...of the following : • From the printer control panel, press to function with Dell supplies and parts, and may affect the performance, ...

User Guide
Page 120
...pages remain [84.xy] Replace the imaging unit to clear the message and continue printing. Note: If you do not have a replacement cartridge, then see the "Ordering supplies" section of the following : • From the printer control panel, press to clear the message .... Replace the toner cartridge. For more of the User's Guide. • If the toner cartridge is installed, then remove the unresponsive toner cartridge, and then reinstall it. Reinstall missing or unresponsive cartridge [31.xy] Try one or more information, visit http://support.dell.com or contact technical...
...pages remain [84.xy] Replace the imaging unit to clear the message and continue printing. Note: If you do not have a replacement cartridge, then see the "Ordering supplies" section of the following : • From the printer control panel, press to clear the message .... Replace the toner cartridge. For more of the User's Guide. • If the toner cartridge is installed, then remove the unresponsive toner cartridge, and then reinstall it. Reinstall missing or unresponsive cartridge [31.xy] Try one or more information, visit http://support.dell.com or contact technical...
User Guide
Page 121
If missing, install the imaging unit. Replace unsupported cartridge [32.xy] Remove the toner cartridge, and then install a supported one to clear the message and continue printing. Note: If you do not have a replacement imaging unit, then see the "Ordering ...supplies" section of the User's Guide or visit our Web site. Note: If you do not have a replacement cartridge, then see the "Ordering supplies" section of the User's Guide or visit our Web site. Too many trays. Troubleshooting 121 Reinstall missing or unresponsive imaging...
If missing, install the imaging unit. Replace unsupported cartridge [32.xy] Remove the toner cartridge, and then install a supported one to clear the message and continue printing. Note: If you do not have a replacement imaging unit, then see the "Ordering ...supplies" section of the User's Guide or visit our Web site. Note: If you do not have a replacement cartridge, then see the "Ordering supplies" section of the User's Guide or visit our Web site. Too many trays. Troubleshooting 121 Reinstall missing or unresponsive imaging...
User Guide
Page 133
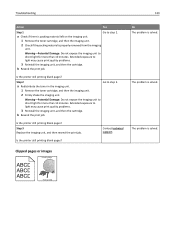
... light for more than 10 minutes. Extended exposure to light may cause print quality problems. 3 Reinstall the imaging unit, and then the cartridge. Clipped pages or images Leading edge ABCDE ABCDE ABCDE Trailing edge b Resend the print job. Is the printer still printing blank pages?... a Redistribute the toner in the imaging unit. 1 Remove the toner cartridge, and then the imaging unit. 2 Firmly shake the imaging unit. Contact technical support. Extended exposure to light may cause print quality problems. 3...
... light for more than 10 minutes. Extended exposure to light may cause print quality problems. 3 Reinstall the imaging unit, and then the cartridge. Clipped pages or images Leading edge ABCDE ABCDE ABCDE Trailing edge b Resend the print job. Is the printer still printing blank pages?... a Redistribute the toner in the imaging unit. 1 Remove the toner cartridge, and then the imaging unit. 2 Firmly shake the imaging unit. Contact technical support. Extended exposure to light may cause print quality problems. 3...
User Guide
Page 134
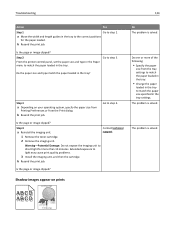
... more than 10 minutes. Do the paper size and type match the paper loaded in the tray. Contact technical support. 1 Remove the toner cartridge. 2 Remove the imaging unit. The problem is solved. Step 3 a Depending on prints Leading edge AABBCCDD AABBCCDD Trailing edge Shadow images appear ... clipped? Troubleshooting 134 Action Yes Step 1 Go to light may cause print quality problems. 3 Install the imaging unit, and then the cartridge. From the printer control panel, set the paper size and type in the Paper menu to the correct positions for more of the following...
... more than 10 minutes. Do the paper size and type match the paper loaded in the tray. Contact technical support. 1 Remove the toner cartridge. 2 Remove the imaging unit. The problem is solved. Step 3 a Depending on prints Leading edge AABBCCDD AABBCCDD Trailing edge Shadow images appear ... clipped? Troubleshooting 134 Action Yes Step 1 Go to light may cause print quality problems. 3 Install the imaging unit, and then the cartridge. From the printer control panel, set the paper size and type in the Paper menu to the correct positions for more of the following...
User Guide
Page 136
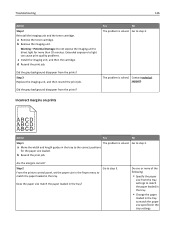
...size specified in the Paper menu to step 3. b Resend the print job. Troubleshooting 136 Action Step 2 Reinstall the imaging unit and the toner cartridge. Does the paper size match the paper loaded in the tray to light can cause print quality problems. c Install the imaging unit, and then... the gray background disappear from the prints? Yes No The problem is solved. Do one or more than 10 minutes. a Remove the toner cartridge. Step 3 Replace the imaging unit, and then resend the print job. Go to step 3. Incorrect margins on prints ABCD ABCD ABCD Action Yes...
...size specified in the Paper menu to step 3. b Resend the print job. Troubleshooting 136 Action Step 2 Reinstall the imaging unit and the toner cartridge. Does the paper size match the paper loaded in the tray to light can cause print quality problems. c Install the imaging unit, and then... the gray background disappear from the prints? Yes No The problem is solved. Do one or more than 10 minutes. a Remove the toner cartridge. Step 3 Replace the imaging unit, and then resend the print job. Go to step 3. Incorrect margins on prints ABCD ABCD ABCD Action Yes...
User Guide
Page 142
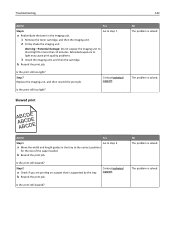
...Skewed print AAABBBC)CCDDD)EEE Action Yes Step 1 Go to light may cause print quality problems. 3 Install the imaging unit, and then the cartridge. Is the print still skewed? Contact technical support. a Redistribute the toner in the tray to step 7. No The problem is solved. ... b Resend the print job. The problem is solved. a Move the width and length guides in the imaging unit. 1 Remove the toner cartridge, and then the imaging unit. 2 Firmly shake the imaging unit. Troubleshooting 142 Action Yes Step 6 Go to the correct positions for more ...
...Skewed print AAABBBC)CCDDD)EEE Action Yes Step 1 Go to light may cause print quality problems. 3 Install the imaging unit, and then the cartridge. Is the print still skewed? Contact technical support. a Redistribute the toner in the tray to step 7. No The problem is solved. ... b Resend the print job. The problem is solved. a Move the width and length guides in the imaging unit. 1 Remove the toner cartridge, and then the imaging unit. 2 Firmly shake the imaging unit. Troubleshooting 142 Action Yes Step 6 Go to the correct positions for more ...


