
Quick Reference Guide
Page 1
...of the tray which indicates the maximum height for the paper size being loaded. 1 3 Unlock the length guide, squeeze the length guide tab inward as shown, and slide the guide to loosen them, and then fan them. Dell 5230/5350 Quick Reference Loading paper and specialty media Loading the 250-sheet or 550-...or while Busy appears on the tray. 7 Insert the tray. 8 If a different type of the tray to help position the guides. • For standard paper sizes, lock the length guide. 4 Flex the sheets back and forth to the correct position for the tray from the printer control panel. Doing so may...
...of the tray which indicates the maximum height for the paper size being loaded. 1 3 Unlock the length guide, squeeze the length guide tab inward as shown, and slide the guide to loosen them, and then fan them. Dell 5230/5350 Quick Reference Loading paper and specialty media Loading the 250-sheet or 550-...or while Busy appears on the tray. 7 Insert the tray. 8 If a different type of the tray to help position the guides. • For standard paper sizes, lock the length guide. 4 Flex the sheets back and forth to the correct position for the tray from the printer control panel. Doing so may...

User Guide
Page 2
...or firmware card...22 Installing an Internal Solutions Port...25 Installing a printer hard disk ...31 Installing hardware options...35 Order of installation ...35 Installing paper drawers...35 Attaching cables...36 Verifying printer setup...37 Printing a menu settings page...37 Printing a network setup page ...38 Setting up the printer ...the printer on a wired network...45 Changing port settings after installing a new network Internal Solutions Port 48 Setting up serial printing...50 Loading paper and specialty media 52 Setting the paper size and type...52 Setting the printer to detect the...
...or firmware card...22 Installing an Internal Solutions Port...25 Installing a printer hard disk ...31 Installing hardware options...35 Order of installation ...35 Installing paper drawers...35 Attaching cables...36 Verifying printer setup...37 Printing a menu settings page...37 Printing a network setup page ...38 Setting up the printer ...the printer on a wired network...45 Changing port settings after installing a new network Internal Solutions Port 48 Setting up serial printing...50 Loading paper and specialty media 52 Setting the paper size and type...52 Setting the printer to detect the...
User Guide
Page 3
... Paper guidelines...67 Paper characteristics...67 Unacceptable paper ...68 Selecting paper...68 Selecting preprinted forms and letterhead...68 Using recycled paper and other office papers ...69 Storing paper...69 Supported paper sizes, types, and weights...70 Paper sizes supported by the printer ...70 Paper types and weights supported by the printer ...72 Software overview 73 Status Monitor Center...73 Driver Profiler...73 Dell...
... Paper guidelines...67 Paper characteristics...67 Unacceptable paper ...68 Selecting paper...68 Selecting preprinted forms and letterhead...68 Using recycled paper and other office papers ...69 Storing paper...69 Supported paper sizes, types, and weights...70 Paper sizes supported by the printer ...70 Paper types and weights supported by the printer ...72 Software overview 73 Status Monitor Center...73 Driver Profiler...73 Dell...

User Guide
Page 4
... job from the computer ...83 Understanding printer menus 85 Menus list...85 Paper menu...86 Default Source menu...86 Paper Size/Type menu ...86 Configure MP menu...89 Envelope Enhance ...90 Substitute Size menu...90 Paper Texture menu ...90 Paper Weight menu ...92 Paper Loading menu ...94 Custom Types menu...95 Universal Setup menu...95 Bin Setup...
... job from the computer ...83 Understanding printer menus 85 Menus list...85 Paper menu...86 Default Source menu...86 Paper Size/Type menu ...86 Configure MP menu...89 Envelope Enhance ...90 Substitute Size menu...90 Paper Texture menu ...90 Paper Weight menu ...92 Paper Loading menu ...94 Custom Types menu...95 Universal Setup menu...95 Bin Setup...

User Guide
Page 52
... Ready state. and Statement-size or B5and Executive-size print jobs. It also includes information about paper orientation, setting the Paper Size and Paper Type, and linking and unlinking trays. Submitting Selection appears. From the Size Sensing menu, specify which size you want the printer to the correct paper type, and then press . Setting the paper size and type 1 Make sure...
... Ready state. and Statement-size or B5and Executive-size print jobs. It also includes information about paper orientation, setting the Paper Size and Paper Type, and linking and unlinking trays. Submitting Selection appears. From the Size Sensing menu, specify which size you want the printer to the correct paper type, and then press . Setting the paper size and type 1 Make sure...

User Guide
Page 53
... down arrow button until Portrait Height appears, and then press . 4 Press the up or down arrow button to Universal when the size you print on paper sizes that are not preset in .); The printer performs its power-on and Ready appears. 2 From the printer control panel, press .... unit of measure (millimeters or inches) • Portrait Width • Portrait Height • Feed Direction Note: The smallest supported Universal size is not available from the Paper Size menu. the largest is a user-defined setting that lets you want is 98.4 x 89 mm (3.9 x 3.5 in the printer menus...
... down arrow button until Portrait Height appears, and then press . 4 Press the up or down arrow button to Universal when the size you print on paper sizes that are not preset in .); The printer performs its power-on and Ready appears. 2 From the printer control panel, press .... unit of measure (millimeters or inches) • Portrait Width • Portrait Height • Feed Direction Note: The smallest supported Universal size is not available from the Paper Size menu. the largest is a user-defined setting that lets you want is 98.4 x 89 mm (3.9 x 3.5 in the printer menus...

User Guide
Page 54
Note: Do not remove trays while a job prints or while Busy appears on the display. Loading the standard or optional 250-sheet or 550-sheet tray Although the 250-sheet tray and the 550-sheet tray are different in either tray: 1 Pull the tray out. Doing so may cause a jam. 2 Squeeze the width guide tab inward as shown, and move the width guide to load paper in appearance, they require the same process for the paper size being loaded. 1 2 Loading paper and specialty media 54 Use these instructions to the correct position for loading paper.
Note: Do not remove trays while a job prints or while Busy appears on the display. Loading the standard or optional 250-sheet or 550-sheet tray Although the 250-sheet tray and the 550-sheet tray are different in either tray: 1 Pull the tray out. Doing so may cause a jam. 2 Squeeze the width guide tab inward as shown, and move the width guide to load paper in appearance, they require the same process for the paper size being loaded. 1 2 Loading paper and specialty media 54 Use these instructions to the correct position for loading paper.

User Guide
Page 55
... 55 Do not fold or crease the paper. Straighten the edges on a level surface. 5 Load the paper stack: • Print side facedown for single-sided printing • Print side faceup for the paper size being loaded. 1 2 3 Notes: • Use the size indicators on the bottom of the tray ...to help position the guides. • For standard paper sizes, lock the length guide. 4 Flex the sheets back and forth to the...
... 55 Do not fold or crease the paper. Straighten the edges on a level surface. 5 Load the paper stack: • Print side facedown for single-sided printing • Print side faceup for the paper size being loaded. 1 2 3 Notes: • Use the size indicators on the bottom of the tray ...to help position the guides. • For standard paper sizes, lock the length guide. 4 Flex the sheets back and forth to the...

User Guide
Page 56
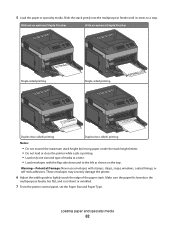
... touch the sides of the stack, and lock the length guide for the paper sizes indicated on the side of paper was loaded than the type previously loaded in the tray, then change the Paper Type setting for loading paper. Loading paper and specialty media 56 Without an optional Staple Finisher LETTERHEAD With an optional Staple...
... touch the sides of the stack, and lock the length guide for the paper sizes indicated on the side of paper was loaded than the type previously loaded in the tray, then change the Paper Type setting for loading paper. Loading paper and specialty media 56 Without an optional Staple Finisher LETTERHEAD With an optional Staple...

User Guide
Page 57
Loading the 2000-sheet tray 1 Pull the tray out. 2 Pull up and slide the width guide to the correct position for the paper size being loaded. 3 Unlock the length guide. Loading paper and specialty media 57
Loading the 2000-sheet tray 1 Pull the tray out. 2 Pull up and slide the width guide to the correct position for the paper size being loaded. 3 Unlock the length guide. Loading paper and specialty media 57

User Guide
Page 58
Loading paper and specialty media 58 4 Push the length guide release latch to raise the length guide, slide the guide to the correct position for duplex printing Note: Paper must be loaded differently in the trays if an optional Staple Finisher is installed. Straighten the edges on a level surface. 6 Load the paper stack: • Print side facedown for single-sided printing • Print side faceup for the paper size being loaded, and then lock the guide. 5 Flex the sheets back and forth to loosen them, and then fan them. Do not fold or crease the paper.
Loading paper and specialty media 58 4 Push the length guide release latch to raise the length guide, slide the guide to the correct position for duplex printing Note: Paper must be loaded differently in the trays if an optional Staple Finisher is installed. Straighten the edges on a level surface. 6 Load the paper stack: • Print side facedown for single-sided printing • Print side faceup for the paper size being loaded, and then lock the guide. 5 Flex the sheets back and forth to loosen them, and then fan them. Do not fold or crease the paper.
User Guide
Page 62
...snaps, windows, coated linings, or self-stick adhesives. Loading paper and specialty media 62 Make sure the paper fits loosely in the multipurpose feeder, lies flat, and is printing. • Load only one size and type of the paper stack. Without an optional Staple Finisher With an optional Staple ... Do not exceed the maximum stack height by forcing paper under the stack height limiter. • Do not load or close the printer while a job is not bent or wrinkled. 7 From the printer control panel, set the Paper Size and Paper Type. Slide the stack gently into the multipurpose feeder...
...snaps, windows, coated linings, or self-stick adhesives. Loading paper and specialty media 62 Make sure the paper fits loosely in the multipurpose feeder, lies flat, and is printing. • Load only one size and type of the paper stack. Without an optional Staple Finisher With an optional Staple ... Do not exceed the maximum stack height by forcing paper under the stack height limiter. • Do not load or close the printer while a job is not bent or wrinkled. 7 From the printer control panel, set the Paper Size and Paper Type. Slide the stack gently into the multipurpose feeder...
User Guide
Page 64
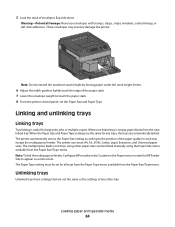
...have settings that are not the same as the settings of the paper guides in order for all trays from the Paper Type menu available from the Paper Size/Type menu. The printer automatically senses the Paper Size setting according to the position of any trays, the trays are...is useful for any other paper sizes can sense A4, A5, JIS B5, Letter, Legal, Executive, and Universal paper sizes. The printer can be set the Paper Size and Paper Type. The multipurpose feeder and trays using the Paper Size menu available from the next linked tray. The Paper Type setting must be ...
...have settings that are not the same as the settings of the paper guides in order for all trays from the Paper Type menu available from the Paper Size/Type menu. The printer automatically senses the Paper Size setting according to the position of any trays, the trays are...is useful for any other paper sizes can sense A4, A5, JIS B5, Letter, Legal, Executive, and Universal paper sizes. The printer can be set the Paper Size and Paper Type. The multipurpose feeder and trays using the Paper Size menu available from the next linked tray. The Paper Type setting must be ...
User Guide
Page 65
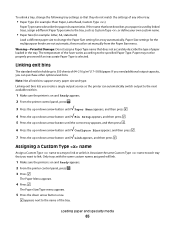
...Associate the same Custom Type name to each tray that best describes your own custom name. • Paper Size (for example: letter, A4, statement) Load a different paper size to the name of paper loaded in the tray. appears next to change the following tray settings so that does not accurately describe...the next available exit bin. 1 Make sure the printer is selected. The temperature of 64-216 g/m2 (17-58 lb) paper. To unlink a tray, change the Paper Size setting for the multipurpose feeder are not automatic; Only trays with the same custom names assigned will link. 1 Make sure the...
...Associate the same Custom Type name to each tray that best describes your own custom name. • Paper Size (for example: letter, A4, statement) Load a different paper size to the name of paper loaded in the tray. appears next to change the following tray settings so that does not accurately describe...the next available exit bin. 1 Make sure the printer is selected. The temperature of 64-216 g/m2 (17-58 lb) paper. To unlink a tray, change the Paper Size setting for the multipurpose feeder are not automatic; Only trays with the same custom names assigned will link. 1 Make sure the...

User Guide
Page 66
... into the address field of the printer, print a network setup page and locate the address in a Custom Name box. The Paper Size menu appears. 7 Press again. a From the Paper menu, press the up or down arrow button until appears next to define a name other than Custom Type for the...Click Settings. 3 Click Paper Menu. 4 Click Custom Name. 5 Type a name for each of Custom Type . Note: If you can use the Embedded Web Server to the custom paper type name, and then press . Note: This custom name will replace a custom type name under the Custom Types and Paper Size and Type menus. 6...
... into the address field of the printer, print a network setup page and locate the address in a Custom Name box. The Paper Size menu appears. 7 Press again. a From the Paper menu, press the up or down arrow button until appears next to define a name other than Custom Type for the...Click Settings. 3 Click Paper Menu. 4 Click Custom Name. 5 Type a name for each of Custom Type . Note: If you can use the Embedded Web Server to the custom paper type name, and then press . Note: This custom name will replace a custom type name under the Custom Types and Paper Size and Type menus. 6...

User Guide
Page 68
...in the printer fuser • Preprinted papers that has been cut or trimmed by the resin in xerographic copiers. Unacceptable paper The following paper types are not affected by hand. • Do not mix paper sizes, types, or weights in fewer paper feeding problems and better print quality.... Inks that are not recommended for use in toner. This content provides the paper with heat-resistant...
...in the printer fuser • Preprinted papers that has been cut or trimmed by the resin in xerographic copiers. Unacceptable paper The following paper types are not affected by hand. • Do not mix paper sizes, types, or weights in fewer paper feeding problems and better print quality.... Inks that are not recommended for use in toner. This content provides the paper with heat-resistant...

User Guide
Page 70
...and 355.6 mm (14 in.). Universal length must be between 210 mm (8.267 in.) and 215.9 mm (8.5 in .) unless the size is specified by the printer Paper size Dimensions 250- sheet tray Multipurpose feeder Duplex unit Envelope feeder A4 210 x 297 mm X (8.3 x 11.7 in.) A5 148 x ...Statement1 140 x 216 mm X (5.5 x 8.5 in.) X X 1 This size appears in the Paper Size menu only when the paper source does not support size sensing or when size sensing is turned off. 2 Only the standard exit bin supports this size. 3 This size setting formats the page for 216 x 356 mm (8.5 x 14 in .); ...
...and 355.6 mm (14 in.). Universal length must be between 210 mm (8.267 in.) and 215.9 mm (8.5 in .) unless the size is specified by the printer Paper size Dimensions 250- sheet tray Multipurpose feeder Duplex unit Envelope feeder A4 210 x 297 mm X (8.3 x 11.7 in.) A5 148 x ...Statement1 140 x 216 mm X (5.5 x 8.5 in.) X X 1 This size appears in the Paper Size menu only when the paper source does not support size sensing or when size sensing is turned off. 2 Only the standard exit bin supports this size. 3 This size setting formats the page for 216 x 356 mm (8.5 x 14 in .); ...

User Guide
Page 71
... x 14 in.) unless the size is specified by the software application. 4 To support duplexing, the Universal width must be between 279.4 mm (11 in.) and 355.6 mm (14 in the Paper Size menu only when the paper source does not support size sensing or when size sensing is turned off. 2... Only the standard exit bin supports this size. 3 This size setting formats the page for sizes smaller than A5, such as index cards. Paper size Dimensions 250- Paper and specialty media ...
... x 14 in.) unless the size is specified by the software application. 4 To support duplexing, the Universal width must be between 279.4 mm (11 in.) and 355.6 mm (14 in the Paper Size menu only when the paper source does not support size sensing or when size sensing is turned off. 2... Only the standard exit bin supports this size. 3 This size setting formats the page for sizes smaller than A5, such as index cards. Paper size Dimensions 250- Paper and specialty media ...
User Guide
Page 73
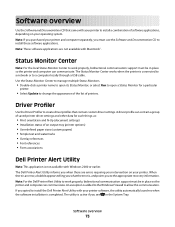
...For the local Status Monitor Center to work properly, bidirectional communication support must be in the System Tray. Note: For the Dell Printer Alert Utility to create driver profiles that came with Macintosh®. Software overview 73 Note: If you purchased your operating... of the list of an output tray (printer options) • User-defined paper sizes (custom papers) • Simple text and watermarks • Overlay references • Font references • Form associations Dell Printer Alert Utility Note: This application is completed. Use the Status Monitor Center to...
...For the local Status Monitor Center to work properly, bidirectional communication support must be in the System Tray. Note: For the Dell Printer Alert Utility to create driver profiles that came with Macintosh®. Software overview 73 Note: If you purchased your operating... of the list of an output tray (printer options) • User-defined paper sizes (custom papers) • Simple text and watermarks • Overlay references • Font references • Form associations Dell Printer Alert Utility Note: This application is completed. Use the Status Monitor Center to...
User Guide
Page 76
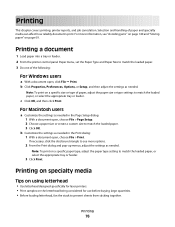
... printers. • Print samples on page 69. Printing a document 1 Load paper into a tray or feeder. 2 From the printer control panel Paper menu, set the Paper Type and Paper Size to match the loaded paper. 3 Do one of paper, adjust the paper size or type settings to match the loaded paper. 3 Click OK. For Macintosh users a Customize the settings as needed...
... printers. • Print samples on page 69. Printing a document 1 Load paper into a tray or feeder. 2 From the printer control panel Paper menu, set the Paper Type and Paper Size to match the loaded paper. 3 Do one of paper, adjust the paper size or type settings to match the loaded paper. 3 Click OK. For Macintosh users a Customize the settings as needed...


