
User Guide
Page 3
...Apple Inc., registered in the United States and other countries; Environmental Protection Agency. Our printer software uses some of the U.S. Other trademarks and trade names may be used in this text: Dell and the DELL logo are provided with the limits for a Class B digital device, pursuant to ... THEORY OF LIABILITY, ARISING OUT OF OR IN CONNECTION WITH THE USE OR PERFORMANCE OF THIS SOFTWARE. Dell Inc. A02 Red Hat and RPM are registered trademarks of Easy Software Products; and other countries; and other countries; has determined that this product meets the ENERGY ...
...Apple Inc., registered in the United States and other countries; Environmental Protection Agency. Our printer software uses some of the U.S. Other trademarks and trade names may be used in this text: Dell and the DELL logo are provided with the limits for a Class B digital device, pursuant to ... THEORY OF LIABILITY, ARISING OUT OF OR IN CONNECTION WITH THE USE OR PERFORMANCE OF THIS SOFTWARE. Dell Inc. A02 Red Hat and RPM are registered trademarks of Easy Software Products; and other countries; and other countries; has determined that this product meets the ENERGY ...
User Guide
Page 17
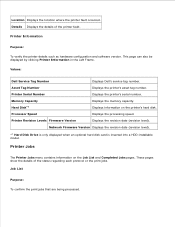
... The Printer Jobs menu contains information on the printer's hard disk. Printer Serial Number Displays the printer's serial number. Processor Speed Displays the processing speed. Printer Revision Levels Firmware Version Displays the revision date (revision level). Location Displays the location where the printer fault occurred. Printer Information Purpose: To verify the printer details such as hardware configuration and software...
... The Printer Jobs menu contains information on the printer's hard disk. Printer Serial Number Displays the printer's serial number. Processor Speed Displays the processing speed. Printer Revision Levels Firmware Version Displays the revision date (revision level). Location Displays the location where the printer fault occurred. Printer Information Purpose: To verify the printer details such as hardware configuration and software...
User Guide
Page 105
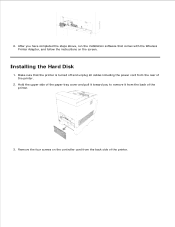
Make sure that comes with the Wireless Printer Adapter, and follow the instructions on the controller card from the back side of the printer. 3. After you to remove it from the rear of the printer. 2. Installing the Hard Disk 1. Hold the upper side of the paper tray cover and pull it toward you have completed the steps above, run the installation software that the printer is turned off and unplug all cables including the power cord from the back of the printer. Remove the four screws on the screen. 5. 6.
Make sure that comes with the Wireless Printer Adapter, and follow the instructions on the controller card from the back side of the printer. 3. After you to remove it from the rear of the printer. 2. Installing the Hard Disk 1. Hold the upper side of the paper tray cover and pull it toward you have completed the steps above, run the installation software that the printer is turned off and unplug all cables including the power cord from the back of the printer. Remove the four screws on the screen. 5. 6.
User Guide
Page 112
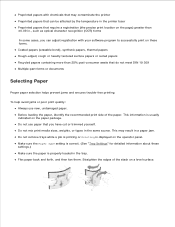
...the operator panel. To help avoid jams or poor print quality: Always use paper that you can be affected by the temperature in the printer fuser Preprinted papers that require a registration (the precise print location on the page) greater than 25% post-consumer waste that can adjust registration... stack on a level surface. Do not use new, undamaged paper. Flex paper back and forth, and then fan them. Preprinted papers with your software program to successfully print on these settings.) Make sure the paper is properly loaded in ., such as optical character recognition (OCR) forms In some...
...the operator panel. To help avoid jams or poor print quality: Always use paper that you can be affected by the temperature in the printer fuser Preprinted papers that require a registration (the precise print location on the page) greater than 25% post-consumer waste that can adjust registration... stack on a level surface. Do not use new, undamaged paper. Flex paper back and forth, and then fan them. Preprinted papers with your software program to successfully print on these settings.) Make sure the paper is properly loaded in ., such as optical character recognition (OCR) forms In some...

User Guide
Page 125
Loading Envelopes Select print media source, size, and type in your software program and select the print media size and type on the printer operator panel. 4. NOTE: Be careful not to the correct value for the multipurpose feeder is set to bend the print media. 5. Make sure the type setting for the print media you have loaded. 6. Slide the width guides until they rest lightly against the edge of the print media stack.
Loading Envelopes Select print media source, size, and type in your software program and select the print media size and type on the printer operator panel. 4. NOTE: Be careful not to the correct value for the multipurpose feeder is set to bend the print media. 5. Make sure the type setting for the print media you have loaded. 6. Slide the width guides until they rest lightly against the edge of the print media stack.

User Guide
Page 132
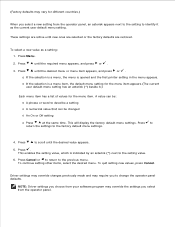
.... 5. These settings are preparing to send to check your software program, use the printer operator panel or the Dell Printer Configuration Web Tool. Changing a printer setting from the printer operator panel or from your printer is displayed. Printer Settings You can change most printer settings from the Dell Printer Configuration Web Tool makes that the options you installed are correctly listed...
.... 5. These settings are preparing to send to check your software program, use the printer operator panel or the Dell Printer Configuration Web Tool. Changing a printer setting from the printer operator panel or from your printer is displayed. Printer Settings You can change most printer settings from the Dell Printer Configuration Web Tool makes that the options you installed are correctly listed...
User Guide
Page 133
... asterisk appears next to the setting to identify it as a setting: 1. If the selection is opened and the first printer setting in the menu appears. NOTE: Driver settings you choose from your software program may require you to change the operator panel defaults. (Factory defaults may vary for the menu item. A value...
... asterisk appears next to the setting to identify it as a setting: 1. If the selection is opened and the first printer setting in the menu appears. NOTE: Driver settings you choose from your software program may require you to change the operator panel defaults. (Factory defaults may vary for the menu item. A value...
User Guide
Page 141
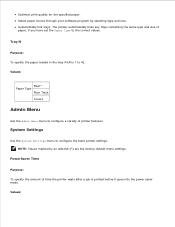
... containing the same type and size of time the printer waits after a job is 1 to the correct values. Tray N Purpose: To specify the paper loaded in the tray N (N is printed before it goes into the power saver mode. Select paper source through your software program by an asterisk (*) are the factory default...
... containing the same type and size of time the printer waits after a job is 1 to the correct values. Tray N Purpose: To specify the paper loaded in the tray N (N is printed before it goes into the power saver mode. Select paper source through your software program by an asterisk (*) are the factory default...
User Guide
Page 177
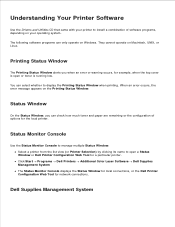
..., when the top cover is open a Status Window or Dell Printer Configuration Web Tool for network connections. Click Start Programs Dell Printers Additional Color Laser Software Dell Supplies Management System The Status Monitor Console displays the Status Window for local connections, or the Dell Printer Configuration Web Tool for a particular printer. Dell Supplies Management System Printing Status Window The Printing Status Window...
..., when the top cover is open a Status Window or Dell Printer Configuration Web Tool for network connections. Click Start Programs Dell Printers Additional Color Laser Software Dell Supplies Management System The Status Monitor Console displays the Status Window for local connections, or the Dell Printer Configuration Web Tool for a particular printer. Dell Supplies Management System Printing Status Window The Printing Status Window...
User Guide
Page 178
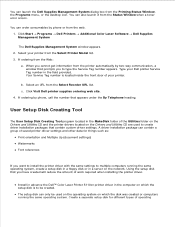
... Disk Creating Tool program located in the computer on the network. Install in advance the Dell™ Color Laser Printer 5110cn printer driver in the MakeDisk folder of your printer. The setup disk can order consumables by phone, call the number that contain custom driver... the setup disk that prompts you have created will reduce the amount of operating Click Start Programs Dell Printers Additional Color Laser Software Dell Supplies Management System The Dell Supplies Management System window appears. 2. Your Service Tag number is to create driver installation packages that...
... Disk Creating Tool program located in the computer on the network. Install in advance the Dell™ Color Laser Printer 5110cn printer driver in the MakeDisk folder of your printer. The setup disk can order consumables by phone, call the number that contain custom driver... the setup disk that prompts you have created will reduce the amount of operating Click Start Programs Dell Printers Additional Color Laser Software Dell Supplies Management System The Dell Supplies Management System window appears. 2. Your Service Tag number is to create driver installation packages that...

User Guide
Page 179
systems. Software Update The firmware and/or driver updates can be downloaded from www.dell.com/printers/.
systems. Software Update The firmware and/or driver updates can be downloaded from www.dell.com/printers/.

User Guide
Page 180
...for Successful Printing Sending a Job to Print To support all of information from a software program, a window representing the printer driver opens. Sending a Job to Print Canceling a Print Job Printing a Printer Settings Page Printing a Font Sample List Using the Print and Hold Function Tips for...job. For more information, see "Clearing Jams" for instructions on Storing Print Media Store your printer, and how to avoid most jams. See the following for instructions. Avoiding Jams NOTE: Dell recommends that you try a limited sample of any print media you experience a jam, see...
...for Successful Printing Sending a Job to Print To support all of information from a software program, a window representing the printer driver opens. Sending a Job to Print Canceling a Print Job Printing a Printer Settings Page Printing a Font Sample List Using the Print and Hold Function Tips for...job. For more information, see "Clearing Jams" for instructions on Storing Print Media Store your printer, and how to avoid most jams. See the following for instructions. Avoiding Jams NOTE: Dell recommends that you try a limited sample of any print media you experience a jam, see...
User Guide
Page 194
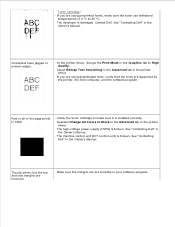
.... You can also select the resident fonts from your software program if you may need to purchase additional memory for your printer. Some of the most popular typefaces, like Courier and TimesNew (PCL 5/PCL 6)/Times New Roman (PostScript 3), are available for instructions on how to ...fonts from the operator panel if you are using PCL 5/PCL 6. Resident Fonts Your printer is equipped with resident fonts stored permanently in your printer. See "Printing a Font Sample List" for all the fonts resident in printer memory. If you plan to use many downloadable bitmapped or scalable fonts or if ...
.... You can also select the resident fonts from your software program if you may need to purchase additional memory for your printer. Some of the most popular typefaces, like Courier and TimesNew (PCL 5/PCL 6)/Times New Roman (PostScript 3), are available for instructions on how to ...fonts from the operator panel if you are using PCL 5/PCL 6. Resident Fonts Your printer is equipped with resident fonts stored permanently in your printer. See "Printing a Font Sample List" for all the fonts resident in printer memory. If you plan to use many downloadable bitmapped or scalable fonts or if ...
User Guide
Page 229
... Dell" in your software program. The job prints, but the top and side margins are incorrect. · Make sure the margins are set correctly in the Owner's Manual. See "Contacting Dell" in the Owner's Manual. · The machine control unit (IOT control unit) is broken. See "Contacting Dell"...sure it is installed correctly. · Deselect Change All Colors to High Quality. · Select Bitmap Text Smoothing in the Advanced tab in the printer driver. · The high-voltage power supply (HVPS) is damaged. Contact Dell. Streaks appear on the page. Characters have jagged or ...
... Dell" in your software program. The job prints, but the top and side margins are incorrect. · Make sure the margins are set correctly in the Owner's Manual. See "Contacting Dell" in the Owner's Manual. · The machine control unit (IOT control unit) is broken. See "Contacting Dell"...sure it is installed correctly. · Deselect Change All Colors to High Quality. · Select Bitmap Text Smoothing in the Advanced tab in the printer driver. · The high-voltage power supply (HVPS) is damaged. Contact Dell. Streaks appear on the page. Characters have jagged or ...
User Guide
Page 234
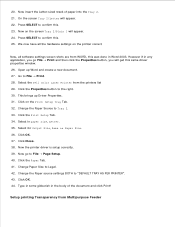
.... 8. Press SELECT to confirm this . 25. Select the Dell Color Laser Printer from WORD, this puts a * by it. 10. Click the Properties button to select Paper Type. 14. Press SELECT, once Plain 1 is displayed on the printer correct Now, all software settings screen shots are from the printers list 29. Press to the right. 30. 31. Now...
.... 8. Press SELECT to confirm this . 25. Select the Dell Color Laser Printer from WORD, this puts a * by it. 10. Click the Properties button to select Paper Type. 14. Press SELECT, once Plain 1 is displayed on the printer correct Now, all software settings screen shots are from the printers list 29. Press to the right. 30. 31. Now...
User Guide
Page 236
.... 36. Now press MENU to get to File Print. 28. Now, all the hardware settings on the screen Tray 1/Plain 1 will appear. 22. Select the Dell Color Laser Printer from WORD, this . 25. Change the Paper Source to Print. 20. Select in any application, you go File Print and then click the Properties button.... 38. 39. Press to get this . 23. We now have the Tray 1 Type set to Paper Type. 13. Now we have all software settings screen shots are from the printers list. 29. Click the Print Setup Tab. 34. Now insert the Letter-sized stack of paper into the Tray 1. 21. Press to...
.... 36. Now press MENU to get to File Print. 28. Now, all the hardware settings on the screen Tray 1/Plain 1 will appear. 22. Select the Dell Color Laser Printer from WORD, this . 25. Change the Paper Source to Print. 20. Select in any application, you go File Print and then click the Properties button.... 38. 39. Press to get this . 23. We now have the Tray 1 Type set to Paper Type. 13. Now we have all software settings screen shots are from the printers list. 29. Click the Print Setup Tab. 34. Now insert the Letter-sized stack of paper into the Tray 1. 21. Press to...
User Guide
Page 238
On the screen Tray 2/Letter will appear. 24. We now have all software settings screen shots are from WORD, this same driver properties window. 26. Select the Dell Color Laser Printer from Multipurpose Feeder 1. Click on the printer correct Now, all the hardware settings on the Print Setup Tray Tab. 32. Click the...File Print. 28. Now on the screen Tray 2/Plain 1 will appear. 22. Change the Paper Source to "DEFAULT TRAY AS PER PRINTER". 43. Now the printer driver is setup correctly. 39. Change the Paper source settings BOTH to Tray 2. 33. Setup printing Transparency from the...
On the screen Tray 2/Letter will appear. 24. We now have all software settings screen shots are from WORD, this same driver properties window. 26. Select the Dell Color Laser Printer from Multipurpose Feeder 1. Click on the printer correct Now, all the hardware settings on the Print Setup Tray Tab. 32. Click the...File Print. 28. Now on the screen Tray 2/Plain 1 will appear. 22. Change the Paper Source to "DEFAULT TRAY AS PER PRINTER". 43. Now the printer driver is setup correctly. 39. Change the Paper source settings BOTH to Tray 2. 33. Setup printing Transparency from the...
User Guide
Page 239
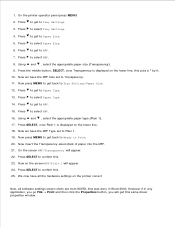
... press MENU. 2. Press to get to select Paper Type. 14. Press to Tray Settings. 3. Press the middle button, SELECT, once Transparency is displayed on the printer correct Now, all the hardware settings on the lower line. 18. Press to Paper Size. 5. Now on the lower line, this same driver properties window... to get to confirm this . 23. We now have the MPF Type set to Plain 1. 19. However if in Word 2003. Now we have all software settings screen shots are from WORD, this was done in any application, you go File Print and then click the Properties button, you will get...
... press MENU. 2. Press to get to select Paper Type. 14. Press to Tray Settings. 3. Press the middle button, SELECT, once Transparency is displayed on the printer correct Now, all the hardware settings on the lower line. 18. Press to Paper Size. 5. Now on the lower line, this same driver properties window... to get to confirm this . 23. We now have the MPF Type set to Plain 1. 19. However if in Word 2003. Now we have all software settings screen shots are from WORD, this was done in any application, you go File Print and then click the Properties button, you will get...

User Guide
Page 241
...Settings/Paper Size. 12. However if in any application, you go File Print and then click the Properties button, you will appear. 22. Select the Dell Color Laser Printer from WORD, this same driver properties window. 26. Click on the lower line. 18. Change the Paper Source to select MPF. 16. Press to MPF... button to Paper Type. 13. Click the Print Setup Tab. 34. Now we have all the hardware settings on the printer correct Now, all software settings screen shots are from the printers list 29. Press to get to select Paper Type. 14. Press to get to the right. 30. We now have...
...Settings/Paper Size. 12. However if in any application, you go File Print and then click the Properties button, you will appear. 22. Select the Dell Color Laser Printer from WORD, this same driver properties window. 26. Click on the lower line. 18. Change the Paper Source to select MPF. 16. Press to MPF... button to Paper Type. 13. Click the Print Setup Tab. 34. Now we have all the hardware settings on the printer correct Now, all software settings screen shots are from the printers list 29. Press to get to select Paper Type. 14. Press to get to the right. 30. We now have...
User Guide
Page 243
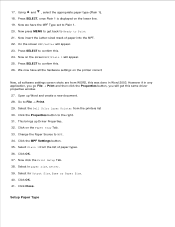
... File Print. 29. Click the MPF Settings button. 35. Select Plain 1 from the printers list 30. Click Close. Go to the right. 31. Now we have all software settings screen shots are from WORD, this . 26. Select the Dell Color Laser Printer from the list of paper into the MPF. 22. Now press MENU to Print...
... File Print. 29. Click the MPF Settings button. 35. Select Plain 1 from the printers list 30. Click Close. Go to the right. 31. Now we have all software settings screen shots are from WORD, this . 26. Select the Dell Color Laser Printer from the list of paper into the MPF. 22. Now press MENU to Print...
