Owner's Manual
Page 2
Contact your distributor. Contact your distributor. 0870 907 4574 Contact your distributor. You can order Printer Supplies online at www.dell.com/supplies or by phone. Contact your distributor. 1800 394 7486 0860 102 591 902 120 385 08 ...407 Contact your distributor. 800602705 044-556-3551 Contact your distributor. Contact your distributor. Contact your distributor. Order Printer Supplies Dell™ Printer Supplies are available only through Dell. Contact your distributor. 02.713 1590 Malaysia Mexico Netherlands Norway Oman Paraguay Peru Poland PRC Puerto Rico Qatar ...
Contact your distributor. Contact your distributor. 0870 907 4574 Contact your distributor. You can order Printer Supplies online at www.dell.com/supplies or by phone. Contact your distributor. 1800 394 7486 0860 102 591 902 120 385 08 ...407 Contact your distributor. 800602705 044-556-3551 Contact your distributor. Contact your distributor. Contact your distributor. Order Printer Supplies Dell™ Printer Supplies are available only through Dell. Contact your distributor. 02.713 1590 Malaysia Mexico Netherlands Norway Oman Paraguay Peru Poland PRC Puerto Rico Qatar ...
Owner's Manual
Page 3
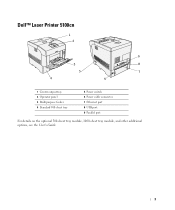
Dell™ Laser Printer 5100cn 1 2 9 3 8 5 7 4 6 1 Center output tray 2 Operator panel 3 Multipurpose feeder 4 Standard 500-sheet tray 5 Power switch 6 Power cable connector 7 Ethernet port 8 USB port 9 Parallel port For details on the optional 500-sheet tray module, 1000-sheet tray module, and other additional options, see the User's Guide. 3
Dell™ Laser Printer 5100cn 1 2 9 3 8 5 7 4 6 1 Center output tray 2 Operator panel 3 Multipurpose feeder 4 Standard 500-sheet tray 5 Power switch 6 Power cable connector 7 Ethernet port 8 USB port 9 Parallel port For details on the optional 500-sheet tray module, 1000-sheet tray module, and other additional options, see the User's Guide. 3
Owner's Manual
Page 4
... of data and tells you make better use of your printer NOTICE: A NOTICE indicates either the entities claiming the marks and names of the Rights in Technical Data and Computer Software clause at DFARS 252.227-7013 and in this text: Dell and DELL logo are trademarks of Novell, Inc.; Use, duplication or...
... of data and tells you make better use of your printer NOTICE: A NOTICE indicates either the entities claiming the marks and names of the Rights in Technical Data and Computer Software clause at DFARS 252.227-7013 and in this text: Dell and DELL logo are trademarks of Novell, Inc.; Use, duplication or...
Owner's Manual
Page 5
Contents Dell™ Laser Printer 5100cn 3 1 Loading Paper 11 Loading the Standard Tray 12 Loading the Multipurpose Feeder 15 Loading Envelopes ...17 2 Setting Up for Local Printing 19 Installing Printer Drivers 20 Connecting the Printer to the Computer Before Inserting the Drivers and Utilities CD ...20 3 Setting Up for Network Printing 23 Network Set-Up ...24 Disable...
Contents Dell™ Laser Printer 5100cn 3 1 Loading Paper 11 Loading the Standard Tray 12 Loading the Multipurpose Feeder 15 Loading Envelopes ...17 2 Setting Up for Local Printing 19 Installing Printer Drivers 20 Connecting the Printer to the Computer Before Inserting the Drivers and Utilities CD ...20 3 Setting Up for Network Printing 23 Network Set-Up ...24 Disable...
Owner's Manual
Page 6
www.dell.com/supplies | support.dell.com 5 Using Your Printer 33 Changing Printer Settings 34 Initializing NVRAM ...35 Setting of Panel Lock 35 Adjusting the Language 36 Printing a Job ...36 Canceling a Job From the Printer Operator Panel 36 Canceling the Job From a Computer 36 Canceling a Job From the ...Taskbar 36 Canceling a Job From the Desktop 37 Software Overview ...37 Printing Status Window 37 Status Window ...37 Status Monitor Console 37 Dell Supplies Management System 38 ...
www.dell.com/supplies | support.dell.com 5 Using Your Printer 33 Changing Printer Settings 34 Initializing NVRAM ...35 Setting of Panel Lock 35 Adjusting the Language 36 Printing a Job ...36 Canceling a Job From the Printer Operator Panel 36 Canceling the Job From a Computer 36 Canceling a Job From the ...Taskbar 36 Canceling a Job From the Desktop 37 Software Overview ...37 Printing Status Window 37 Status Window ...37 Status Monitor Console 37 Dell Supplies Management System 38 ...
Owner's Manual
Page 9
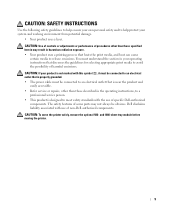
...guidelines for selecting appropriate print media to meet safety standards with use of harmful emissions. The safety features of non-Dell-authorized components. Dell disclaims liability associated with the use of some parts may result in hazardous radiation exposure. • Your product ...working environment from potential damage. • Your product uses a laser. You must be obvious. CAUTION: To move the printer safely, remove the optional 500- and 1000-sheet tray module before moving the printer. 9 CAUTION: SAFETY INSTRUCTIONS Use the following safety guidelines to ...
...guidelines for selecting appropriate print media to meet safety standards with use of harmful emissions. The safety features of non-Dell-authorized components. Dell disclaims liability associated with the use of some parts may result in hazardous radiation exposure. • Your product ...working environment from potential damage. • Your product uses a laser. You must be obvious. CAUTION: To move the printer safely, remove the optional 500- and 1000-sheet tray module before moving the printer. 9 CAUTION: SAFETY INSTRUCTIONS Use the following safety guidelines to ...

Owner's Manual
Page 12
Pull the tray out of your print jobs in the standard 500-sheet tray. 1. The width guides should be fully extended. Slide the width guides to the A4 position. 12 Loading Paper Hold the tray with both hands, lift the front slightly, and remove it stops. www.dell.com/supplies | support.dell.com Loading the Standard Tray Load the print media used for the majority of the printer until it from the printer. 2. NOTE: For A4 paper, push the lever to the edge of the tray.
Pull the tray out of your print jobs in the standard 500-sheet tray. 1. The width guides should be fully extended. Slide the width guides to the A4 position. 12 Loading Paper Hold the tray with both hands, lift the front slightly, and remove it stops. www.dell.com/supplies | support.dell.com Loading the Standard Tray Load the print media used for the majority of the printer until it from the printer. 2. NOTE: For A4 paper, push the lever to the edge of the tray.

Owner's Manual
Page 14
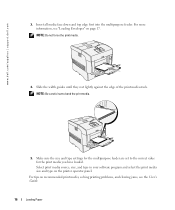
If you load any print media into the printer, and push until they rest lightly against the edge of the print media stack. 7. Slide the width guides and length guide until it stops. 8. Insert the tray into the tray, configure the Paper Type settings for that tray according to the message on the operator panel. 14 Loading Paper www.dell.com/supplies | support.dell.com 6.
If you load any print media into the printer, and push until they rest lightly against the edge of the print media stack. 7. Slide the width guides and length guide until it stops. 8. Insert the tray into the tray, configure the Paper Type settings for that tray according to the message on the operator panel. 14 Loading Paper www.dell.com/supplies | support.dell.com 6.
Owner's Manual
Page 16
... top edge first into the multipurpose feeder. For tips on recommended print media, solving printing problems, and clearing jams, see "Loading Envelopes" on the printer operator panel. Make sure the size and type settings for the multipurpose feeder are set to bend the print media. 5. Select print media source, size... guides until they rest lightly against the edge of the print media stack. For more information, see the User's Guide. 16 Loading Paper www.dell.com/supplies | support.dell.com 3. NOTE: Be careful not to the correct value for the print media you have loaded.
... top edge first into the multipurpose feeder. For tips on recommended print media, solving printing problems, and clearing jams, see "Loading Envelopes" on the printer operator panel. Make sure the size and type settings for the multipurpose feeder are set to bend the print media. 5. Select print media source, size... guides until they rest lightly against the edge of the print media stack. For more information, see the User's Guide. 16 Loading Paper www.dell.com/supplies | support.dell.com 3. NOTE: Be careful not to the correct value for the print media you have loaded.

Owner's Manual
Page 17
... envelopes either with the flaps closed and the short-edge of the envelopes facing into the printer. After loading envelopes, make sure the size and type setting for the multipurpose feeder is set to the printer. Loading Envelopes To load envelopes that are under 8.66 inches (220 mm) in width in ...your software program and select the print media size and type on the printer operator panel. To load envelopes that are over 8.66 inches (220 mm) in width in the multipurpose feeder, insert the envelopes with the flaps ...
... envelopes either with the flaps closed and the short-edge of the envelopes facing into the printer. After loading envelopes, make sure the size and type setting for the multipurpose feeder is set to the printer. Loading Envelopes To load envelopes that are under 8.66 inches (220 mm) in width in ...your software program and select the print media size and type on the printer operator panel. To load envelopes that are over 8.66 inches (220 mm) in width in the multipurpose feeder, insert the envelopes with the flaps ...

Owner's Manual
Page 19
2 Section 2 Setting Up for Local Printing Installing Printer Drivers Setting Up for Local Printing
2 Section 2 Setting Up for Local Printing Installing Printer Drivers Setting Up for Local Printing

Owner's Manual
Page 20
... Printing The Found New Hardware Wizard appears. 6. When the Congratulations! www.dell.com/supplies | support.dell.com A local printer is a printer attached to your computer when you begin. When the Complete the Found New Hardware Wizard screen appears, click Finish. 8. screen appears, in Printer Property are needed according to your computer. 2. Insert the Drivers and...
... Printing The Found New Hardware Wizard appears. 6. When the Congratulations! www.dell.com/supplies | support.dell.com A local printer is a printer attached to your computer when you begin. When the Complete the Found New Hardware Wizard screen appears, click Finish. 8. screen appears, in Printer Property are needed according to your computer. 2. Insert the Drivers and...
Owner's Manual
Page 21
... Installation. 4. The Adobe License Agreement appears, click to install. 6. screen appears, click Finish. 8. On the Add Printer screen, select the port name from the Port Name combo box, and then set the printer's options under Printer Configuration. Click Next. 5. If you select Custom Installation, you can select the specific software you want to...
... Installation. 4. The Adobe License Agreement appears, click to install. 6. screen appears, click Finish. 8. On the Add Printer screen, select the port name from the Port Name combo box, and then set the printer's options under Printer Configuration. Click Next. 5. If you select Custom Installation, you can select the specific software you want to...

Owner's Manual
Page 24
... a CD drive in the LCD, press Menu. Disable Microsoft® Windows® XP Firewall Before Printer Software Installation NOTE: This step may not be necessary if you install the Dell printer software. For more information on the screen. When Ready to resolve the IP address automatically, and then... print the Printer Settings page again. 24 Setting Up for Network Printing www.dell.com/supplies | support.dell.com Network Set-Up NOTE: To use this situation, disable the Windows XP firewall before you...
... a CD drive in the LCD, press Menu. Disable Microsoft® Windows® XP Firewall Before Printer Software Installation NOTE: This step may not be necessary if you install the Dell printer software. For more information on the screen. When Ready to resolve the IP address automatically, and then... print the Printer Settings page again. 24 Setting Up for Network Printing www.dell.com/supplies | support.dell.com Network Set-Up NOTE: To use this situation, disable the Windows XP firewall before you...
Owner's Manual
Page 25
...go to step 5. 4. b. If you want to restrict color printing, select the appropriate Color Track option. If you do not see your printer listed, click Update to refresh the list or click Add Printer to add a printer to access this printer, select Share this point. If the PS Driver is displayed ...in the Printer Name field. 7. Insert the Drivers and ...
...go to step 5. 4. b. If you want to restrict color printing, select the appropriate Color Track option. If you do not see your printer listed, click Update to refresh the list or click Add Printer to add a printer to access this printer, select Share this point. If the PS Driver is displayed ...in the Printer Name field. 7. Insert the Drivers and ...

Owner's Manual
Page 26
...the Reply Address, and enter your Web browser, and the printer configuration appears on the screen. Launch the Dell Printer Configuration Web Tool. 2. When the Congratulations! Click Next. 14. To launch the Dell Printer Configuration Web Tool, type the network printer IP address in your email address or the key operator's ... or not to install. You can specify the destination folder to a computer or a print server. You can set up the Dell Printer Configuration Web Tool to send you want to restart your desk. To set up e-mail alerts: 1. Click Apply New Settings.
...the Reply Address, and enter your Web browser, and the printer configuration appears on the screen. Launch the Dell Printer Configuration Web Tool. 2. When the Congratulations! Click Next. 14. To launch the Dell Printer Configuration Web Tool, type the network printer IP address in your email address or the key operator's ... or not to install. You can specify the destination folder to a computer or a print server. You can set up the Dell Printer Configuration Web Tool to send you want to restart your desk. To set up e-mail alerts: 1. Click Apply New Settings.

Owner's Manual
Page 27
4 Section4 Installing the Printer Driver or PPD File on Macintosh Computers Installing the AdobePS Printer Driver (Mac OS 9.x) Installing the PPD File (Mac OS X) Installing the Printer Driver or PPD File on Macintosh Computers
4 Section4 Installing the Printer Driver or PPD File on Macintosh Computers Installing the AdobePS Printer Driver (Mac OS 9.x) Installing the PPD File (Mac OS X) Installing the Printer Driver or PPD File on Macintosh Computers
Owner's Manual
Page 28
... two steps to the connection type. 1. First, you selected Custom Installation in the Drivers and Utilities CD to install the printer driver to Macintosh. Launch the Drivers and Utilities CD. 3. Double click Dell 5100cn Installer icon. 6. Click Install. When the installation of the Chooser, and then click Create. Make sure that shows the...
... two steps to the connection type. 1. First, you selected Custom Installation in the Drivers and Utilities CD to install the printer driver to Macintosh. Launch the Drivers and Utilities CD. 3. Double click Dell 5100cn Installer icon. 6. Click Install. When the installation of the Chooser, and then click Create. Make sure that shows the...
Owner's Manual
Page 29
...the options, see "Configuring Settings" on Macintosh Computers 29 Set Adobe Protocol as a Desktop Printer. 1. Setting the Printer Driver (for the PPD file and displays it under USB Printer Selection in the AdobePS Components folder, install Adobe PS 8.8 by using Full Installation. 3. ...Click Create at the specified location. 10. Click Auto Setup under PostScript™ Printer Description (PPD) File. You do not have to your printer from the Create Desktop list, then click OK. 4. NOTE: When using AppleTalk, Installable Options are ...
...the options, see "Configuring Settings" on Macintosh Computers 29 Set Adobe Protocol as a Desktop Printer. 1. Setting the Printer Driver (for the PPD file and displays it under USB Printer Selection in the AdobePS Components folder, install Adobe PS 8.8 by using Full Installation. 3. ...Click Create at the specified location. 10. Click Auto Setup under PostScript™ Printer Description (PPD) File. You do not have to your printer from the Create Desktop list, then click OK. 4. NOTE: When using AppleTalk, Installable Options are ...
Owner's Manual
Page 30
...and then select the correct PPD file. 7. Click Create at the specified location. 10. Click Printing on page 30. Click Change under LPR Printer Selection in the dialog box. 5. To use the options, see "Configuring Settings" on the menu bar, and select Change Setup. 3. Set...folder, install Adobe PS 8.8 by using Full Installation. 3. www.dell.com/supplies | support.dell.com Setting the Printer Driver (for the printer being used in Printer Address, and then click OK. 6. The created printer icon is no Desktop Printer Utility in Installable Options, and then click OK. 30 Installing ...
...and then select the correct PPD file. 7. Click Create at the specified location. 10. Click Printing on page 30. Click Change under LPR Printer Selection in the dialog box. 5. To use the options, see "Configuring Settings" on the menu bar, and select Change Setup. 3. Set...folder, install Adobe PS 8.8 by using Full Installation. 3. www.dell.com/supplies | support.dell.com Setting the Printer Driver (for the printer being used in Printer Address, and then click OK. 6. The created printer icon is no Desktop Printer Utility in Installable Options, and then click OK. 30 Installing ...


