User's Guide
Page 3
... by the printer ...49 Paper capacities...50 Software overview 51 Status Monitor Center...51 Driver Profiler...51 Dell Printer Alert Utility...51 Installing the optional XPS driver...52 Dell Toner Management System...53 Printing Status Window...53 Dell Printer Supplies Reorder Application ...53 Printing 54 Printing a document...54 Printing on specialty media...55 Tips...
... by the printer ...49 Paper capacities...50 Software overview 51 Status Monitor Center...51 Driver Profiler...51 Dell Printer Alert Utility...51 Installing the optional XPS driver...52 Dell Toner Management System...53 Printing Status Window...53 Dell Printer Supplies Reorder Application ...53 Printing 54 Printing a document...54 Printing on specialty media...55 Tips...

User's Guide
Page 5
... of supplies from a network computer 126 Ordering supplies...126 Printer attached to a network ...126 Printer attached locally to a computer ...127 Replacing supplies...127 Replacing the toner cartridge ...127 Replacing the photoconductor kit ...129 Moving the printer...132 Moving the printer to another location...132 Administrative support 133 Using the Embedded Web...
... of supplies from a network computer 126 Ordering supplies...126 Printer attached to a network ...126 Printer attached locally to a computer ...127 Replacing supplies...127 Replacing the toner cartridge ...127 Replacing the photoconductor kit ...129 Moving the printer...132 Moving the printer to another location...132 Administrative support 133 Using the Embedded Web...
User's Guide
Page 6
... images...145 Incorrect margins...146 Paper curl...146 Print is too dark...147 Print is too light ...148 Skewed print...149 Toner fog or background shading appears on the page 149 Toner rubs off...149 Toner specks...150 Transparency print quality is poor...150 Streaked horizontal lines...150 Streaked vertical lines ...151 Contents 6
... images...145 Incorrect margins...146 Paper curl...146 Print is too dark...147 Print is too light ...148 Skewed print...149 Toner fog or background shading appears on the page 149 Toner rubs off...149 Toner specks...150 Transparency print quality is poor...150 Streaked horizontal lines...150 Streaked vertical lines ...151 Contents 6
User's Guide
Page 45
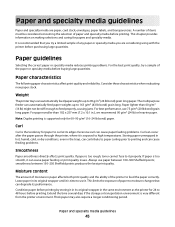
... paper stock. This limits the exposure of paper to it properly. Extend the time several days if the storage or transportation environment is too rough, toner cannot fuse to moisture changes that you try a sample of the printer to 90 g/m2 (24 lb bond) grain long paper. Moisture content The amount...
... paper stock. This limits the exposure of paper to it properly. Extend the time several days if the storage or transportation environment is too rough, toner cannot fuse to moisture changes that you try a sample of the printer to 90 g/m2 (24 lb bond) grain long paper. Moisture content The amount...

User's Guide
Page 47
... supplier. • Suitable sheet-to 230°C (446°F) without melting or releasing hazardous emissions. Use inks that are not affected by the resin in toner. Preprinted papers such as premium cotton papers, 200-300 Sheffield units) have been engineered to 230°C (446°F) without melting or releasing hazardous emissions...
... supplier. • Suitable sheet-to 230°C (446°F) without melting or releasing hazardous emissions. Use inks that are not affected by the resin in toner. Preprinted papers such as premium cotton papers, 200-300 Sheffield units) have been engineered to 230°C (446°F) without melting or releasing hazardous emissions...

User's Guide
Page 53
...Application The Order Supplies dialog box can be in place so the printer and computer can communicate. c Click Dell 3330dn Laser Printer. Software overview 53 You can : • Monitor the toner level for . 4 Follow the instructions on the screen. • If ordering from the Web, click...call the number that appears under the Order by phone or from the Printing Status window, the Programs window, or the desktop icon. Dell Toner Management System Printing Status Window Note: For the Printing Status Window to work properly, bidirectional communication support must be launched from the Web...
...Application The Order Supplies dialog box can be in place so the printer and computer can communicate. c Click Dell 3330dn Laser Printer. Software overview 53 You can : • Monitor the toner level for . 4 Follow the instructions on the screen. • If ordering from the Web, click...call the number that appears under the Order by phone or from the Printing Status window, the Programs window, or the desktop icon. Dell Toner Management System Printing Status Window Note: For the Printing Status Window to work properly, bidirectional communication support must be launched from the Web...
User's Guide
Page 64
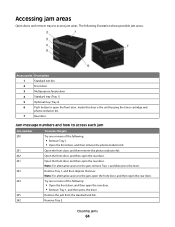
Inside this door is the unit housing the toner cartridge and photoconductor kit. 7 Rear door Jam message numbers and how to the jam, open the front door, and then open the rear door. Note: ...
Inside this door is the unit housing the toner cartridge and photoconductor kit. 7 Rear door Jam message numbers and how to the jam, open the front door, and then open the rear door. Note: ...
User's Guide
Page 65
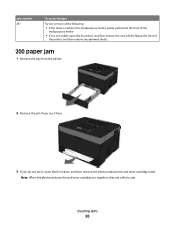
.... 3 If you do not see it is not visible, open the front door, and then remove the photoconductor kit and toner cartridge (unit). Clearing jams 65 Note: When the photoconductor kit and toner cartridge are together, they are called a unit. Jam number 251 To access the jam Try one or more of...
.... 3 If you do not see it is not visible, open the front door, and then remove the photoconductor kit and toner cartridge (unit). Clearing jams 65 Note: When the photoconductor kit and toner cartridge are together, they are called a unit. Jam number 251 To access the jam Try one or more of...

User's Guide
Page 104
... to enhance pictures horizontally or vertically, or to enhance fonts Note: Off is the factory default setting. You can help conserve toner. Adjusts the contrast of printed objects Note: 0 is the factory default setting. Automatically adjusts the contrast enhancement applied to images Note...tab; Lightens or darkens the printed output Notes: • 8 is the factory default setting. • Selecting a smaller number can conserve toner by lightening or darkening it. Adjusts the printed output either by lightening the output. Note: 0 is the factory default setting. Description Specifies ...
... to enhance pictures horizontally or vertically, or to enhance fonts Note: Off is the factory default setting. You can help conserve toner. Adjusts the contrast of printed objects Note: 0 is the factory default setting. Automatically adjusts the contrast enhancement applied to images Note...tab; Lightens or darkens the printed output Notes: • 8 is the factory default setting. • Selecting a smaller number can conserve toner by lightening or darkening it. Adjusts the printed output either by lightening the output. Note: 0 is the factory default setting. Description Specifies ...
User's Guide
Page 111
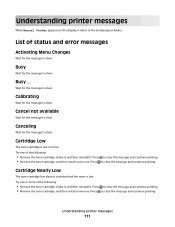
... to clear the message and continue printing. • Remove the toner cartridge, and then install a new one of the following : • Remove the toner cartridge, shake it, and then reinstall it . Cartridge Low The toner cartridge is low. Cancel not available Wait for the message to clear... the message and continue printing. Press to clear. Try one . Try one . List of the following : • Remove the toner cartridge, shake it, and then reinstall it . Calibrating Wait for the message to clear. Press to clear the message and continue printing. •...
... to clear the message and continue printing. • Remove the toner cartridge, and then install a new one of the following : • Remove the toner cartridge, shake it, and then reinstall it . Cartridge Low The toner cartridge is low. Cancel not available Wait for the message to clear... the message and continue printing. Press to clear. Try one . Try one . List of the following : • Remove the toner cartridge, shake it, and then reinstall it . Calibrating Wait for the message to clear. Press to clear the message and continue printing. •...
User's Guide
Page 112
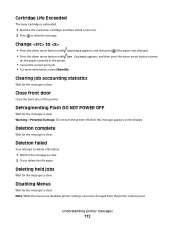
... clear. Defragmenting Flash DO NOT POWER OFF Wait for the message to clear. 2 Try to clear the message. Cartridge Life Exceeded The toner cartridge is exhausted. 1 Remove the used toner cartridge, and then install a new one. 2 Press to delete the file again. Close front door Close the front door of the printer...
... clear. Defragmenting Flash DO NOT POWER OFF Wait for the message to clear. 2 Try to clear the message. Cartridge Life Exceeded The toner cartridge is exhausted. 1 Remove the used toner cartridge, and then install a new one. 2 Press to delete the file again. Close front door Close the front door of the printer...

User's Guide
Page 116
...message to clear. Warning-Potential Damage: Do not turn the printer power off while Remote Management Active appears on the display. Replace Cartridge The toner cartridge is On, then the printer stops printing. Remove paper from standard output bin Remove the stack of paper from the "Verify PC ... not turn the printer power off while Programming System Code appears on the Embedded Web Server). If the setting is exhausted. 1 Remove the used toner cartridge, and then install a new one. 2 Press to On from the Supply Notifications Web page (located on the display. When the PC Kit...
...message to clear. Warning-Potential Damage: Do not turn the printer power off while Remote Management Active appears on the display. Replace Cartridge The toner cartridge is On, then the printer stops printing. Remove paper from standard output bin Remove the stack of paper from the "Verify PC ... not turn the printer power off while Programming System Code appears on the Embedded Web Server). If the setting is exhausted. 1 Remove the used toner cartridge, and then install a new one. 2 Press to On from the Supply Notifications Web page (located on the display. When the PC Kit...
User's Guide
Page 118
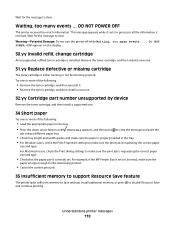
...-Potential Damage: Do not turn the printer off while Waiting, too many events ... Try one . 31.yy Replace defective or missing cartridge The toner cartridge is installed. Wait for the data being printed. • Cancel the current print job. 35 Insufficient memory to support Resource Save feature The... printer lacks sufficient memory to make sure the paper is correctly set. Remove the toner cartridge, and then install a new one or more of the following: • Load the appropriate paper in the tray. • Press ...
...-Potential Damage: Do not turn the printer off while Waiting, too many events ... Try one . 31.yy Replace defective or missing cartridge The toner cartridge is installed. Wait for the data being printed. • Cancel the current print job. 35 Insufficient memory to support Resource Save feature The... printer lacks sufficient memory to make sure the paper is correctly set. Remove the toner cartridge, and then install a new one or more of the following: • Load the appropriate paper in the tray. • Press ...
User's Guide
Page 119
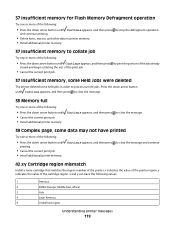
... following: • Press the down arrow button until Continue appears, and then press to clear the message and continue 42.xy Cartridge region mismatch Install a toner cartridge that matches the region number of the cartridge region. Continue appears, and then press to clear the message. 38 Memory full Try one or...
... following: • Press the down arrow button until Continue appears, and then press to clear the message and continue 42.xy Cartridge region mismatch Install a toner cartridge that matches the region number of the cartridge region. Continue appears, and then press to clear the message. 38 Memory full Try one or...
User's Guide
Page 121
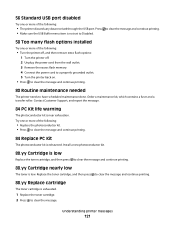
... maintenance kit, which contains a fuser and a transfer roller. Replace the toner cartridge, and then press to clear the message and continue printing. 88.yy Replace cartridge The toner cartridge is exhausted. 1 Replace the toner cartridge. 2 Press to clear the message and continue printing. 88.yy ...Cartridge nearly low The toner is low Replace the toner cartridge, and then press to clear the message. Press...
... maintenance kit, which contains a fuser and a transfer roller. Replace the toner cartridge, and then press to clear the message and continue printing. 88.yy Replace cartridge The toner cartridge is exhausted. 1 Replace the toner cartridge. 2 Press to clear the message and continue printing. 88.yy ...Cartridge nearly low The toner is low Replace the toner cartridge, and then press to clear the message. Press...

User's Guide
Page 122
...of the following: • Remove Tray 1. • Open the front door, and then remove the photoconductor kit and toner cartridge unit. 2 Remove the jam. 3 Replace the photoconductor kit and toner cartridge unit if you removed it. 4 Close any open doors or trays. 5 Press to continue printing. 201.yy ...is jammed or the number of pages jammed. 1 Open the front door, and then remove the photoconductor kit and toner cartridge unit. 2 Remove the jam. 3 Replace the photoconductor kit and toner cartridge unit. 4 Close the front door. 5 Press to continue printing. 202.yy Paper jam The message indicates ...
...of the following: • Remove Tray 1. • Open the front door, and then remove the photoconductor kit and toner cartridge unit. 2 Remove the jam. 3 Replace the photoconductor kit and toner cartridge unit if you removed it. 4 Close any open doors or trays. 5 Press to continue printing. 201.yy ...is jammed or the number of pages jammed. 1 Open the front door, and then remove the photoconductor kit and toner cartridge unit. 2 Remove the jam. 3 Replace the photoconductor kit and toner cartridge unit. 4 Close the front door. 5 Press to continue printing. 202.yy Paper jam The message indicates ...

User's Guide
Page 123
... one or more of the following: • Remove Tray 1. • Open the front door, and then remove the photoconductor kit and toner cartridge unit. • Remove Tray 2. 2 Remove the jam. 3 Replace the photoconductor kit and toner cartridge unit if you removed it. 4 Close any open doors or trays. 5 Press to continue printing.
... one or more of the following: • Remove Tray 1. • Open the front door, and then remove the photoconductor kit and toner cartridge unit. • Remove Tray 2. 2 Remove the jam. 3 Replace the photoconductor kit and toner cartridge unit if you removed it. 4 Close any open doors or trays. 5 Press to continue printing.
User's Guide
Page 126
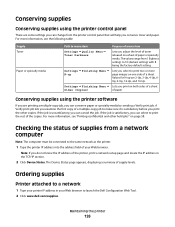
... before you do not know the IP address of a sheet. For more information, see the following table: Supply Toner Paper or specialty media Path to a network 1 Type your printer IP address in the TCP/IP section. 2 Click...-Up. Ordering supplies Printer attached to menu item Purpose of menu item Settings Quality Menu Toner Darkness Lets you conserve toner and paper. Settings Finishing Menu Lets you can select to print the rest of a ... other copies. Values for N-up Lets you select to launch the Dell Configuration Web Tool. 2 Click www...
... before you do not know the IP address of a sheet. For more information, see the following table: Supply Toner Paper or specialty media Path to a network 1 Type your printer IP address in the TCP/IP section. 2 Click...-Up. Ordering supplies Printer attached to menu item Purpose of menu item Settings Quality Menu Toner Darkness Lets you conserve toner and paper. Settings Finishing Menu Lets you can select to print the rest of a ... other copies. Values for N-up Lets you select to launch the Dell Configuration Web Tool. 2 Click www...

User's Guide
Page 127
...printing. Note: You can check to see approximately how much toner is located inside the front cover of the printer and lowering the door. c Click Dell 3330dn Laser Printer. Printer attached locally to redistribute the toner, and then reinsert it side-to-side and front-to-...1 In Windows VistaTM and later: a Click Programs. b Click Dell Printers. Replacing supplies Replacing the toner cartridge When 88 Cartridge low appears, or when you experience faded print, remove the toner cartridge. To replace the toner cartridge: 1 Open the front door by pressing the button on the left ...
...printing. Note: You can check to see approximately how much toner is located inside the front cover of the printer and lowering the door. c Click Dell 3330dn Laser Printer. Printer attached locally to redistribute the toner, and then reinsert it side-to-side and front-to-...1 In Windows VistaTM and later: a Click Programs. b Click Dell Printers. Replacing supplies Replacing the toner cartridge When 88 Cartridge low appears, or when you experience faded print, remove the toner cartridge. To replace the toner cartridge: 1 Open the front door by pressing the button on the left ...

User's Guide
Page 128
2 Press the button on the base of time. Maintaining the printer 128 Extended light exposure can cause print quality problems. 4 Rotate the cartridge in all directions to direct light for an extended period of the photoconductor kit, and then pull the toner cartridge out using the handle. 3 Unpack the new toner cartridge. Warning-Potential Damage: When replacing a toner cartridge, do not leave the photoconductor kit exposed to distribute the toner.
2 Press the button on the base of time. Maintaining the printer 128 Extended light exposure can cause print quality problems. 4 Rotate the cartridge in all directions to direct light for an extended period of the photoconductor kit, and then pull the toner cartridge out using the handle. 3 Unpack the new toner cartridge. Warning-Potential Damage: When replacing a toner cartridge, do not leave the photoconductor kit exposed to distribute the toner.


