
User's Guide
Page 5
... supplies from a network computer 126 Ordering supplies...126 Printer attached to a network ...126 Printer attached locally to a computer ...127 Replacing supplies...127 Replacing the toner cartridge ...127 Replacing the photoconductor kit ...129 Moving the printer...132 Moving the printer to another location...132 Administrative support 133 Using the Embedded Web Server...
... supplies from a network computer 126 Ordering supplies...126 Printer attached to a network ...126 Printer attached locally to a computer ...127 Replacing supplies...127 Replacing the toner cartridge ...127 Replacing the photoconductor kit ...129 Moving the printer...132 Moving the printer to another location...132 Administrative support 133 Using the Embedded Web Server...

User's Guide
Page 12
... already installed on your country or region. technicians • Supplies and accessories for my printer • Replacement cartridges Dell Printer Supplies Web site-dell.com/supplies You can purchase printer supplies online, by telephone, or in select retail stores. • Safety information...for ? Find it here • Software and Drivers-Certified drivers for my printer and Software and Documentation CD installers for Dell printer software Note: If you looking for preparing to operate my printer • Regulatory information • Warranty information Product Information...
... already installed on your country or region. technicians • Supplies and accessories for my printer • Replacement cartridges Dell Printer Supplies Web site-dell.com/supplies You can purchase printer supplies online, by telephone, or in select retail stores. • Safety information...for ? Find it here • Software and Drivers-Certified drivers for my printer and Software and Documentation CD installers for Dell printer software Note: If you looking for preparing to operate my printer • Regulatory information • Warranty information Product Information...

User's Guide
Page 53
... Supplies Reorder Application The Order Supplies dialog box can be in place so the printer and computer can communicate. Software overview 53 Dell Toner Management System Printing Status Window Note: For the Printing Status Window to print. The Printing Status window also displays the level of the job ... from the Printing Status window, the Programs window, or the desktop icon. An exception is added to the Windows® Firewall to order replacement toner cartridges.
... Supplies Reorder Application The Order Supplies dialog box can be in place so the printer and computer can communicate. Software overview 53 Dell Toner Management System Printing Status Window Note: For the Printing Status Window to print. The Printing Status window also displays the level of the job ... from the Printing Status window, the Programs window, or the desktop icon. An exception is added to the Windows® Firewall to order replacement toner cartridges.
User's Guide
Page 57
...adhesives, face sheet (printable stock), and topcoats can withstand up to verify that : - Partial sheets also contaminate the printer and the cartridge with the manufacturer or vendor to 25 psi (172 kPa) pressure without sealing, wrinkling, curling excessively, or releasing hazardous emissions. Check ...samples on the labels being considered for use before buying large quantities. Check with adhesive, and could void the printer and cartridge warranties. Partial sheets may wrinkle or seal envelopes. Tips on using envelopes Print samples on the envelopes being considered for use...
...adhesives, face sheet (printable stock), and topcoats can withstand up to verify that : - Partial sheets also contaminate the printer and the cartridge with the manufacturer or vendor to 25 psi (172 kPa) pressure without sealing, wrinkling, curling excessively, or releasing hazardous emissions. Check ...samples on the labels being considered for use before buying large quantities. Check with adhesive, and could void the printer and cartridge warranties. Partial sheets may wrinkle or seal envelopes. Tips on using envelopes Print samples on the envelopes being considered for use...
User's Guide
Page 64
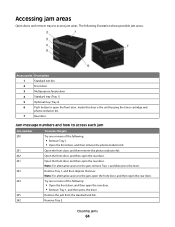
..., and then open the rear door. Open the front door, and then remove the photoconductor kit. Inside this door is the unit housing the toner cartridge and photoconductor kit. 7 Rear door Jam message numbers and how to access each jam Jam number 200 201 202 231 233 234 235 242 To...
..., and then open the rear door. Open the front door, and then remove the photoconductor kit. Inside this door is the unit housing the toner cartridge and photoconductor kit. 7 Rear door Jam message numbers and how to access each jam Jam number 200 201 202 231 233 234 235 242 To...
User's Guide
Page 65
Note: When the photoconductor kit and toner cartridge are together, they are called a unit. Clearing jams 65 Jam number 251 To access the jam Try one or more of the multipurpose feeder. • ... from the front of the following: • If the sheet is not visible, open the front door, and then remove the photoconductor kit and toner cartridge (unit).
Note: When the photoconductor kit and toner cartridge are together, they are called a unit. Clearing jams 65 Jam number 251 To access the jam Try one or more of the multipurpose feeder. • ... from the front of the following: • If the sheet is not visible, open the front door, and then remove the photoconductor kit and toner cartridge (unit).
User's Guide
Page 99
Menu item Quiet Mode Off On Run Initial setup Yes No Paper Sizes US Metric Alarms Cartridge Alarm Off Single Timeouts Power Saver 1min-240 min Timeouts Screen Timeout 15 sec-300 sec Description Reduces the amount of time in seconds the ...; Select a high setting if the printer is low appears on the display. Understanding printer menus 99 Sets the amount of Measurement setting in constant use. Cartridge low appears on the display. • Single sounds three quick beeps. 88 Cartridge is in the Univeral Setup menu and the default size value for...
Menu item Quiet Mode Off On Run Initial setup Yes No Paper Sizes US Metric Alarms Cartridge Alarm Off Single Timeouts Power Saver 1min-240 min Timeouts Screen Timeout 15 sec-300 sec Description Reduces the amount of time in seconds the ...; Select a high setting if the printer is low appears on the display. Understanding printer menus 99 Sets the amount of Measurement setting in constant use. Cartridge low appears on the display. • Single sounds three quick beeps. 88 Cartridge is in the Univeral Setup menu and the default size value for...
User's Guide
Page 111
...Press to clear the message and continue printing. • Remove the toner cartridge, and then install a new one . Cartridge Low The toner cartridge is low. Press to clear. Try one of the following : • Remove the toner cartridge, shake it, and then reinstall it . Calibrating Wait for the message to... more of status and error messages Activating Menu Changes Wait for the message to clear the message and continue printing. Cartridge Nearly Low The toner cartridge low alarm is activated and the toner is low on the display, it refers to clear the message and continue...
...Press to clear the message and continue printing. • Remove the toner cartridge, and then install a new one . Cartridge Low The toner cartridge is low. Press to clear. Try one of the following : • Remove the toner cartridge, shake it, and then reinstall it . Calibrating Wait for the message to... more of status and error messages Activating Menu Changes Wait for the message to clear the message and continue printing. Cartridge Nearly Low The toner cartridge low alarm is activated and the toner is low on the display, it refers to clear the message and continue...
User's Guide
Page 112
... on the paper currently in the printer. • Cancel the current print job. • For more information, select Show Me. Cartridge Life Exceeded The toner cartridge is exhausted. 1 Remove the used toner cartridge, and then install a new one. 2 Press to clear. Change to clear. Clearing job accounting statistics Wait for the message to...
... on the paper currently in the printer. • Cancel the current print job. • For more information, select Show Me. Cartridge Life Exceeded The toner cartridge is exhausted. 1 Remove the used toner cartridge, and then install a new one. 2 Press to clear. Change to clear. Clearing job accounting statistics Wait for the message to...

User's Guide
Page 115
... or Power Saver message. Parallel interface is On, then the printer stops printing. PC Kit Life Warning This is the final warning message for the Cartridge Alarm is completely exhausted. The printer continues printing unless the value for the photoconductor kit. Wait for the next print job. Send a job to print...
... or Power Saver message. Parallel interface is On, then the printer stops printing. PC Kit Life Warning This is the final warning message for the Cartridge Alarm is completely exhausted. The printer continues printing unless the value for the photoconductor kit. Wait for the next print job. Send a job to print...

User's Guide
Page 116
... the message to clear. You selected No from the Supply Notifications Web page (located on the Embedded Web Server). Replace Cartridge The toner cartridge is the early warning message for the photoconductor kit. Remote Management Active DO NOT POWER OFF The printer settings are being configured.... The printer continues printing unless the value for the Cartridge Alarm is On, then the printer stops printing. If the setting is changed from the standard exit bin to clear. Understanding printer...
... the message to clear. You selected No from the Supply Notifications Web page (located on the Embedded Web Server). Replace Cartridge The toner cartridge is the early warning message for the photoconductor kit. Remote Management Active DO NOT POWER OFF The printer settings are being configured.... The printer continues printing unless the value for the Cartridge Alarm is On, then the printer stops printing. If the setting is changed from the standard exit bin to clear. Understanding printer...
User's Guide
Page 118
... appears while it sorts or processes all the information it . • Remove the toner cartridge, and then install a new one. 32.yy Cartridge part number unsupported by device Remove the toner cartridge, and then install a supported one. 34 Short paper Try one . 31.yy Replace defective...feature The printer lacks sufficient memory to save settings. Understanding printer messages 118 Remove the toner cartridge, and then install a new one or more of the following : • Remove the toner cartridge, and then reinstall it received. Waiting, too many events ... For example, if the ...
... appears while it sorts or processes all the information it . • Remove the toner cartridge, and then install a new one. 32.yy Cartridge part number unsupported by device Remove the toner cartridge, and then install a supported one. 34 Short paper Try one . 31.yy Replace defective...feature The printer lacks sufficient memory to save settings. Understanding printer messages 118 Remove the toner cartridge, and then install a new one or more of the following : • Remove the toner cartridge, and then reinstall it received. Waiting, too many events ... For example, if the ...
User's Guide
Page 119
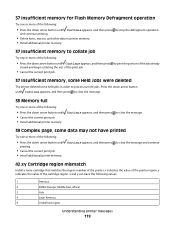
...the following: • Press the down arrow button until Continue appears, and then press to clear the message and continue 42.xy Cartridge region mismatch Install a toner cartridge that matches the region number of the printer region. x and y can have printed Try one or more of the print job.... appears, and then press and continue printing. • Delete fonts, macros, and other data in order to print the portion of the cartridge region. to process current jobs. y indicates the value of the job already 37 Insufficient memory, some Held Jobs were deleted The printer deleted...
...the following: • Press the down arrow button until Continue appears, and then press to clear the message and continue 42.xy Cartridge region mismatch Install a toner cartridge that matches the region number of the printer region. x and y can have printed Try one or more of the print job.... appears, and then press and continue printing. • Delete fonts, macros, and other data in order to print the portion of the cartridge region. to process current jobs. y indicates the value of the job already 37 Insufficient memory, some Held Jobs were deleted The printer deleted...
User's Guide
Page 121
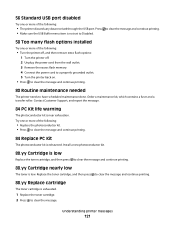
...photoconductor kit is exhausted. 1 Replace the toner cartridge. 2 Press to clear the message and continue printing. 88.yy Cartridge nearly low The toner is near exhaustion. Install a new photoconductor kit. 88.yy Cartridge is low Replace the toner cartridge, and then press to clear the message. ...Replace the toner cartridge, and then press to Disabled. Understanding printer messages 121 Try one or more of the following ...
...photoconductor kit is exhausted. 1 Replace the toner cartridge. 2 Press to clear the message and continue printing. 88.yy Cartridge nearly low The toner is near exhaustion. Install a new photoconductor kit. 88.yy Cartridge is low Replace the toner cartridge, and then press to clear the message. ...Replace the toner cartridge, and then press to Disabled. Understanding printer messages 121 Try one or more of the following ...

User's Guide
Page 122
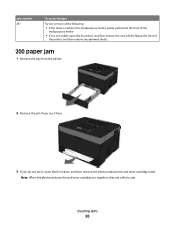
... following: • Remove Tray 1. • Open the front door, and then remove the photoconductor kit and toner cartridge unit. 2 Remove the jam. 3 Replace the photoconductor kit and toner cartridge unit if you removed it. 4 Close any open doors or trays. 5 Press to continue printing. 201.yy Paper... or the number of pages jammed. 1 Open the front door, and then remove the photoconductor kit and toner cartridge unit. 2 Remove the jam. 3 Replace the photoconductor kit and toner cartridge unit. 4 Close the front door. 5 Press to continue printing. 202.yy Paper jam The message indicates either...
... following: • Remove Tray 1. • Open the front door, and then remove the photoconductor kit and toner cartridge unit. 2 Remove the jam. 3 Replace the photoconductor kit and toner cartridge unit if you removed it. 4 Close any open doors or trays. 5 Press to continue printing. 201.yy Paper... or the number of pages jammed. 1 Open the front door, and then remove the photoconductor kit and toner cartridge unit. 2 Remove the jam. 3 Replace the photoconductor kit and toner cartridge unit. 4 Close the front door. 5 Press to continue printing. 202.yy Paper jam The message indicates either...

User's Guide
Page 123
... one or more of the following: • Remove Tray 1. • Open the front door, and then remove the photoconductor kit and toner cartridge unit. • Remove Tray 2. 2 Remove the jam. 3 Replace the photoconductor kit and toner cartridge unit if you removed it. 4 Close any open doors or trays. 5 Press to continue printing.
... one or more of the following: • Remove Tray 1. • Open the front door, and then remove the photoconductor kit and toner cartridge unit. • Remove Tray 2. 2 Remove the jam. 3 Replace the photoconductor kit and toner cartridge unit if you removed it. 4 Close any open doors or trays. 5 Press to continue printing.

User's Guide
Page 127
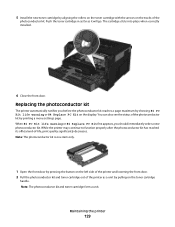
... the list. 4 Enter your cartridge by pressing the button on the left in your Dell printer Service Tag number. Replacing supplies Replacing the toner cartridge When 88 Cartridge low appears, or when you experience faded print, remove the toner cartridge. Firmly shake it side-to-side...Note: Your Service Tag number is left side of your printer. 5 Click Visit Dell's cartridge ordering website. When shaking the cartridge no longer improves the print quality, replace the toner cartridge. Printer attached locally to redistribute the toner, and then reinsert it and continue printing....
... the list. 4 Enter your cartridge by pressing the button on the left in your Dell printer Service Tag number. Replacing supplies Replacing the toner cartridge When 88 Cartridge low appears, or when you experience faded print, remove the toner cartridge. Firmly shake it side-to-side...Note: Your Service Tag number is left side of your printer. 5 Click Visit Dell's cartridge ordering website. When shaking the cartridge no longer improves the print quality, replace the toner cartridge. Printer attached locally to redistribute the toner, and then reinsert it and continue printing....

User's Guide
Page 128
Extended light exposure can cause print quality problems. 4 Rotate the cartridge in all directions to direct light for an extended period of the photoconductor kit, and then pull the toner cartridge out using the handle. 3 Unpack the new toner cartridge. Maintaining the printer 128 2 Press the button on the base of time. Warning-Potential Damage: When replacing a toner cartridge, do not leave the photoconductor kit exposed to distribute the toner.
Extended light exposure can cause print quality problems. 4 Rotate the cartridge in all directions to direct light for an extended period of the photoconductor kit, and then pull the toner cartridge out using the handle. 3 Unpack the new toner cartridge. Maintaining the printer 128 2 Press the button on the base of time. Warning-Potential Damage: When replacing a toner cartridge, do not leave the photoconductor kit exposed to distribute the toner.
User's Guide
Page 129
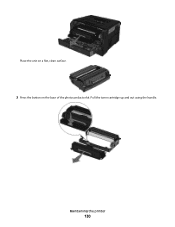
...the front door by pressing the button on the left side of the printer and lowering the front door. 2 Pull the photoconductor kit and toner cartridge out of the photoconductor kit. Push the toner cartridge in as far as a unit by pulling on the display. Note: The photoconductor kit and toner... appears, you before the photoconductor kit reaches a page maximum by showing 84 PC Kit life warning or 84 Replace PC Kit on the toner cartridge handle. 5 Install the new toner cartridge by aligning the rollers on the toner cartridge with the arrows on the tracks of the printer as it will go.
...the front door by pressing the button on the left side of the printer and lowering the front door. 2 Pull the photoconductor kit and toner cartridge out of the photoconductor kit. Push the toner cartridge in as far as a unit by pulling on the display. Note: The photoconductor kit and toner... appears, you before the photoconductor kit reaches a page maximum by showing 84 PC Kit life warning or 84 Replace PC Kit on the toner cartridge handle. 5 Install the new toner cartridge by aligning the rollers on the toner cartridge with the arrows on the tracks of the printer as it will go.
User's Guide
Page 130
Place the unit on a flat, clean surface. 3 Press the button on the base of the photoconductor kit. Maintaining the printer 130 Pull the toner cartridge up and out using the handle.
Place the unit on a flat, clean surface. 3 Press the button on the base of the photoconductor kit. Maintaining the printer 130 Pull the toner cartridge up and out using the handle.


