
User Guide
Page 8
... first screen to set the type of current memory and engine code levels. When print cartridge is running low, click the Order Supplies link on Job List page and Completed Jobs page. Printer Settings Change printer settings and view the operator panel remotely. Copy Printer Settings Quickly copy the printer's settings to use the color mode and the maximum number of the status regarding each printer's IP address. To assign one for : Printer Status Get immediate feedback on the network just by typing each protocol or the print jobs. Use the Dell Printer Configuration Web...
... first screen to set the type of current memory and engine code levels. When print cartridge is running low, click the Order Supplies link on Job List page and Completed Jobs page. Printer Settings Change printer settings and view the operator panel remotely. Copy Printer Settings Quickly copy the printer's settings to use the color mode and the maximum number of the status regarding each printer's IP address. To assign one for : Printer Status Get immediate feedback on the network just by typing each protocol or the print jobs. Use the Dell Printer Configuration Web...

User Guide
Page 23
...Fonts List Print Meter Color Test Page Click the Start button to print the PS fonts list. Click the Start button to print the error history report. Displays the width of paper loaded in the optional feeder. MPF Paper Size Displays the size of paper loaded in the multipurpose feeder. Displays the paper size and type when paper is loaded in the multipurpose feeder. Click the Start button to print the color test page. Displays a popup menu when paper is loaded in the multipurpose feeder. Exit the mode to print the job history report. Click the Start button to change the...
...Fonts List Print Meter Color Test Page Click the Start button to print the PS fonts list. Click the Start button to print the error history report. Displays the width of paper loaded in the optional feeder. MPF Paper Size Displays the size of paper loaded in the multipurpose feeder. Displays the paper size and type when paper is loaded in the multipurpose feeder. Click the Start button to print the color test page. Displays a popup menu when paper is loaded in the multipurpose feeder. Exit the mode to print the job history report. Click the Start button to change the...
User Guide
Page 92
... target printer that you are making wireless setting for IP address assignment, click Settings... On the Wireless configuration is the drive NOTE: For Windows Vista, click Continue when the User Account Control dialog box appears. 3. If you select the Fixed IP option button for , and then click Next. Scene 2. Construct new wireless network environment for both computer and printer (When wireless setting needs to be printed with the installed printer by AutoIP. 7. The Drivers and...
... target printer that you are making wireless setting for IP address assignment, click Settings... On the Wireless configuration is the drive NOTE: For Windows Vista, click Continue when the User Account Control dialog box appears. 3. If you select the Fixed IP option button for , and then click Next. Scene 2. Construct new wireless network environment for both computer and printer (When wireless setting needs to be printed with the installed printer by AutoIP. 7. The Drivers and...
User Guide
Page 93
... Next. Reset the wireless setting of the target printer that you are making wireless setting for Use Windows to the printer. 10. In the list on the Enter Wireless Network Settings screen is sent to configure my wireless network settings is set to display Wireless network properties. NOTE: If your computer following : When wireless ad-hoc mode is checked. At this tool. 3. Click Advanced. j. See the instructions below , and then click Next. d. Select Network Connections from Control Panel. c. When you enter a fixed IP address, avoid...
... Next. Reset the wireless setting of the target printer that you are making wireless setting for Use Windows to the printer. 10. In the list on the Enter Wireless Network Settings screen is sent to configure my wireless network settings is set to display Wireless network properties. NOTE: If your computer following : When wireless ad-hoc mode is checked. At this tool. 3. Click Advanced. j. See the instructions below , and then click Next. d. Select Network Connections from Control Panel. c. When you enter a fixed IP address, avoid...
User Guide
Page 94
... option button, and then click Install. 13. You can change the wireless settings using the tool provided by clicking the Print Test Page button. Reset the wireless setting of your computer provides a wireless LAN adapter tool, change the wireless settings using this printer on server check box on the Select Printer screen and also select the PostScript Driver check box on the Enter Printer Settings screen, the Adobe Systems Inc. NOTE: The Dell Printer Configuration Web Tool is not available when the printer is the drive...
... option button, and then click Install. 13. You can change the wireless settings using the tool provided by clicking the Print Test Page button. Reset the wireless setting of your computer provides a wireless LAN adapter tool, change the wireless settings using this printer on server check box on the Select Printer screen and also select the PostScript Driver check box on the Enter Printer Settings screen, the Adobe Systems Inc. NOTE: The Dell Printer Configuration Web Tool is not available when the printer is the drive...

User Guide
Page 96
... then type D:\setup.exe (where D is set to the printer in the list in Preferred Network group. Do either of the following: When wireless ad-hoc mode is the drive letter of your computer) 1. If you can change the wireless settings using the tool provided by clicking the Print Test Page button. Construct new wireless network environment for both computer and printer (When wireless setting needs to be printed with the installed printer by the operating system...
... then type D:\setup.exe (where D is set to the printer in the list in Preferred Network group. Do either of the following: When wireless ad-hoc mode is the drive letter of your computer) 1. If you can change the wireless settings using the tool provided by clicking the Print Test Page button. Construct new wireless network environment for both computer and printer (When wireless setting needs to be printed with the installed printer by the operating system...
User Guide
Page 101
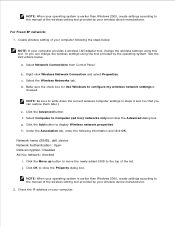
h. See the instructions below . Right-click Wireless Network Connection and select Properties. Make sure the check box for Use Windows to display Wireless network properties. Click the Advanced button. Click the Add button to configure my wireless network settings is checked. NOTE: When your operating system is earlier than Windows 2000, create settings according to the manual of the wireless setting tool provided by your wireless device manufacturer. Or you can change the wireless settings using the tool provided by your wireless device manufacturer...
h. See the instructions below . Right-click Wireless Network Connection and select Properties. Make sure the check box for Use Windows to display Wireless network properties. Click the Advanced button. Click the Add button to configure my wireless network settings is checked. NOTE: When your operating system is earlier than Windows 2000, create settings according to the manual of the wireless setting tool provided by your wireless device manufacturer. Or you can change the wireless settings using the tool provided by your wireless device manufacturer...
User Guide
Page 103
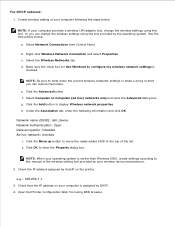
... from Control Panel. Click the Advanced button. h. j. For DHCP network: 1. Under the Association tab, enter the following the steps below . Make sure the check box for Use Windows to close the Advanced dialog box. Create wireless setting of the wireless setting tool provided by AutoIP on your wireless device manufacturer. 2. Or you can change the wireless settings using WEB browser. 5. Right-click Wireless Network Connection and select Properties. c. e. g. Network name (SSID): dell_device Network Authentication: Open Data encryption: Disabled...
... from Control Panel. Click the Advanced button. h. j. For DHCP network: 1. Under the Association tab, enter the following the steps below . Make sure the check box for Use Windows to close the Advanced dialog box. Create wireless setting of the wireless setting tool provided by AutoIP on your wireless device manufacturer. 2. Or you can change the wireless settings using WEB browser. 5. Right-click Wireless Network Connection and select Properties. c. e. g. Network name (SSID): dell_device Network Authentication: Open Data encryption: Disabled...

User Guide
Page 104
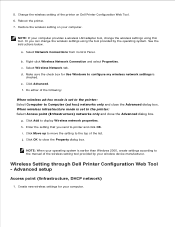
.... Make sure the check box for Use Windows to printer and click OK. h. i. Create wireless setting of the printer on your computer following : When wireless ad-hoc mode is checked. b. d. NOTE: WhenWhen your operating system is set to the printer: Select Computer to the printer: Select Access point (Infrastructure) networks only and close the Advanced dialog box. Do either of the list. Restore the wireless setting on Dell Printer Configuration Web Tool. 6. Select Network Connections from Control Panel...
.... Make sure the check box for Use Windows to printer and click OK. h. i. Create wireless setting of the printer on your computer following : When wireless ad-hoc mode is checked. b. d. NOTE: WhenWhen your operating system is set to the printer: Select Computer to the printer: Select Access point (Infrastructure) networks only and close the Advanced dialog box. Do either of the list. Restore the wireless setting on Dell Printer Configuration Web Tool. 6. Select Network Connections from Control Panel...

User Guide
Page 105
...d. e.g.: 1.2.3.4 3. Open Dell Printer Configuration Web Tool using the tool provided by your operating system is checked. Select Network Connections from Control Panel. b. e. Network name (SSID): dell_device Network Authentication: Open Data encryption: Disabled Ad hoc network: checked i. Click OK to the manual of the list. a. Make sure the check box for Use Windows to configure my wireless network settings is earlier than Windows 2000, create settings according to close the Advanced dialog box. Under the Association tab, enter the following information and...
...d. e.g.: 1.2.3.4 3. Open Dell Printer Configuration Web Tool using the tool provided by your operating system is checked. Select Network Connections from Control Panel. b. e. Network name (SSID): dell_device Network Authentication: Open Data encryption: Disabled Ad hoc network: checked i. Click OK to the manual of the list. a. Make sure the check box for Use Windows to configure my wireless network settings is earlier than Windows 2000, create settings according to close the Advanced dialog box. Under the Association tab, enter the following information and...
User Guide
Page 106
...your wireless device manufacturer. Click OK to display Wireless network properties. Or you send to the manual of the wireless setting tool provided by the operating system. e. i. Create new wireless settings for Use Windows to configure my wireless network settings is set to the printer: Select Computer to the printer: Select Access point (Infrastructure) networks only and close the Advanced dialog box. h. Select Network Connections from Control Panel. NOTE: When your computer. Wireless Setting through Dell Printer Configuration Web Tool - d. Click Add...
...your wireless device manufacturer. Click OK to display Wireless network properties. Or you send to the manual of the wireless setting tool provided by the operating system. e. i. Create new wireless settings for Use Windows to configure my wireless network settings is set to the printer: Select Computer to the printer: Select Access point (Infrastructure) networks only and close the Advanced dialog box. h. Select Network Connections from Control Panel. NOTE: When your computer. Wireless Setting through Dell Printer Configuration Web Tool - d. Click Add...
User Guide
Page 184
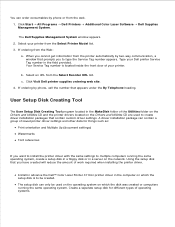
... same settings to multiple computers running the same operating system. Select an URL from the Select Printer Model list. 3. If ordering by two-way communication, a window that contain custom driver settings. Using the setup disk that appears under the By Telephone heading. Your Service Tag number is to be used to type the Service Tag number appears. Install in advance the Dell™ Color Laser Printer 3110cn printer driver in the computer on the network. When...
... same settings to multiple computers running the same operating system. Select an URL from the Select Printer Model list. 3. If ordering by two-way communication, a window that contain custom driver settings. Using the setup disk that appears under the By Telephone heading. Your Service Tag number is to be used to type the Service Tag number appears. Install in advance the Dell™ Color Laser Printer 3110cn printer driver in the computer on the network. When...
User Guide
Page 226
... operator panel, see "Understanding Printer Messages." All options are properly installed. NOTICE: If an error message appears, see "Understanding Printer Messages." This often fixes the problem. If a problem occurs with the printer, options, or print quality. Troubleshooting Guide Basic Printer Problems Display Problems Printing Problems Print Quality Problems Option Problems Other Problems Contacting Service Troubleshooting Guide Installing Printer Drivers Basic Printer Problems Some printer problems can be easy to replace Rollers Removing the Used Belt Unit The section will help...
... operator panel, see "Understanding Printer Messages." All options are properly installed. NOTICE: If an error message appears, see "Understanding Printer Messages." This often fixes the problem. If a problem occurs with the printer, options, or print quality. Troubleshooting Guide Basic Printer Problems Display Problems Printing Problems Print Quality Problems Option Problems Other Problems Contacting Service Troubleshooting Guide Installing Printer Drivers Basic Printer Problems Some printer problems can be easy to replace Rollers Removing the Used Belt Unit The section will help...

User Guide
Page 246
... a network and not your computer or a print server using a USB or parallel cable. Insert the Drivers and Utilities CD into your computer. Setup Paper Type Paper type Weight (gsm) Remarks Plain 60-80 - Coated 106-163 Inkjet Printer paper cannot be used . Coated Thick 164-216 Inkjet Printer paper cannot be used . Inkjet Printer paper cannot be used . Installing Printer Drivers Microsoft® Windows Vista™ 1. NOTE: Click Continue when the User Account Control dialog box appears. 2. Envelopes - - Connect...
... a network and not your computer or a print server using a USB or parallel cable. Insert the Drivers and Utilities CD into your computer. Setup Paper Type Paper type Weight (gsm) Remarks Plain 60-80 - Coated 106-163 Inkjet Printer paper cannot be used . Coated Thick 164-216 Inkjet Printer paper cannot be used . Inkjet Printer paper cannot be used . Installing Printer Drivers Microsoft® Windows Vista™ 1. NOTE: Click Continue when the User Account Control dialog box appears. 2. Envelopes - - Connect...

User Guide
Page 248
... Enable or disable Internet Connection Firewall and then follow the instructions on how to install and use these, refer to a network and not your computer or a print server using a CD drive in a Linux environment, you install the printer software does not limit the use this situation, disable the built-in the Owner's Manual. If you select Custom Installation, you can select the specific software you install the Dell printer software. USB Printing A local printer is attached to your User's Guide...
... Enable or disable Internet Connection Firewall and then follow the instructions on how to install and use these, refer to a network and not your computer or a print server using a CD drive in a Linux environment, you install the printer software does not limit the use this situation, disable the built-in the Owner's Manual. If you select Custom Installation, you can select the specific software you install the Dell printer software. USB Printing A local printer is attached to your User's Guide...
User Guide
Page 250
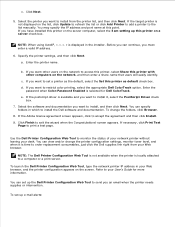
.... b. Enter the password when Color-Password Enabled is locally attached to the list manually. To change the printer configuration settings, monitor toner level, and when it , select the PostScript Driver check box. 7. To launch the Dell Printer Configuration Web Tool, type the network printer IP address in which to set a printer as the default, select the Set this printer on the screen. To set up e-mail alerts: 1. 2. If you an email when the printer needs supplies or intervention. Select the software and documentation...
.... b. Enter the password when Color-Password Enabled is locally attached to the list manually. To change the printer configuration settings, monitor toner level, and when it , select the PostScript Driver check box. 7. To launch the Dell Printer Configuration Web Tool, type the network printer IP address in which to set a printer as the default, select the Set this printer on the screen. To set up e-mail alerts: 1. 2. If you an email when the printer needs supplies or intervention. Select the software and documentation...

User Guide
Page 252
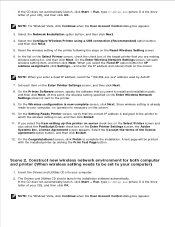
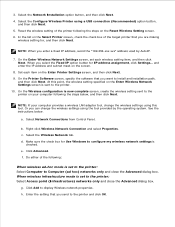
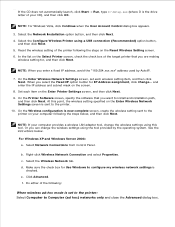
... you enter a fixed IP address, avoid the "169.254.xxx.xxx" address used by clicking the Print Test Page button. and enter the IP address and subnet mask on the Enter Printer Settings screen, the Adobe Systems Inc. Select the Configure Wireless Printer using a USB connection (Recommended) option button, and then click Next. 5. NOTE: For Windows Vista, click Continue when the User Account Control dialog box appears. 3. Select the Network Installation option button, and then click Next. 4. On the Setting-Ready Printer screen...
... you enter a fixed IP address, avoid the "169.254.xxx.xxx" address used by clicking the Print Test Page button. and enter the IP address and subnet mask on the Enter Printer Settings screen, the Adobe Systems Inc. Select the Configure Wireless Printer using a USB connection (Recommended) option button, and then click Next. 5. NOTE: For Windows Vista, click Continue when the User Account Control dialog box appears. 3. Select the Network Installation option button, and then click Next. 4. On the Setting-Ready Printer screen...
User Guide
Page 253
..., type D:\Setup.exe (where D is checked. On the Printer Software screen, specify the software that you enter a fixed IP address, avoid the "169.254.xxx.xxx" address used by the operating system. Or you select the Fixed IP option button for Use Windows to Computer (ad hoc) networks only and close the Advanced dialog box. b. d. f. Select Network Connections from Control Panel. Right-click Wireless Network Connection and select Properties. Click Advanced. 1. 2. In the list on the Enter Printer Settings screen, and...
..., type D:\Setup.exe (where D is checked. On the Printer Software screen, specify the software that you enter a fixed IP address, avoid the "169.254.xxx.xxx" address used by the operating system. Or you select the Fixed IP option button for Use Windows to Computer (ad hoc) networks only and close the Advanced dialog box. b. d. f. Select Network Connections from Control Panel. Right-click Wireless Network Connection and select Properties. Click Advanced. 1. 2. In the list on the Enter Printer Settings screen, and...

User Guide
Page 258
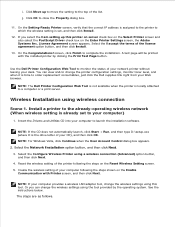
... new wireless network environment for Use Windows to configure my wireless network settings is the drive letter of your computer following the steps on the Reset Wireless Setting screen. 5. NOTE: If the CD does not automatically launch, click Start Run, and then type D:\setup.exe (where D is c. Make sure the check box for both computer and printer (When wireless setting needs to launch the installation software. Select the I am setting up this tool. Reset the wireless setting of...
... new wireless network environment for Use Windows to configure my wireless network settings is the drive letter of your computer following the steps on the Reset Wireless Setting screen. 5. NOTE: If the CD does not automatically launch, click Start Run, and then type D:\setup.exe (where D is c. Make sure the check box for both computer and printer (When wireless setting needs to launch the installation software. Select the I am setting up this tool. Reset the wireless setting of...
User Guide
Page 436
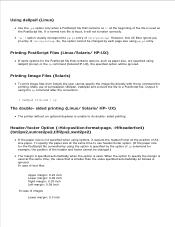
.... Printing Image Files (Solaris) To print image files from Solaris the user cannot specify the image file directly with the lp command for example, the position of A4size paper. sided printing. UX) The printer without an optional duplexer is not specified when using the lp command after the conversion. % xwd2ps2 file.xwd | lp The double- Header/footer Option (-Hd=position:format:page, -Hfheaderfont) (txt2ps2,sunras2ps2,tiff2ps2,xwd2ps2) If the paper size is unable...
.... Printing Image Files (Solaris) To print image files from Solaris the user cannot specify the image file directly with the lp command for example, the position of A4size paper. sided printing. UX) The printer without an optional duplexer is not specified when using the lp command after the conversion. % xwd2ps2 file.xwd | lp The double- Header/footer Option (-Hd=position:format:page, -Hfheaderfont) (txt2ps2,sunras2ps2,tiff2ps2,xwd2ps2) If the paper size is unable...


