User Guide
Page 5
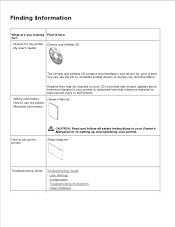
... Problems Express Service Code and Service Tag number Finding Information What are you looking Find it here for? · Drivers for my printer Drivers and Utilities CD · My User's Guide The Drivers and Utilities CD contains documentation and drivers for experienced users or technicians.... · Safety information Owner's Manual · How to use the CD to setting up my printer CAUTION: Read and follow all safety instructions in your Owner's Manual prior to uninstall/reinstall drivers or access your documentation. You can use ...
... Problems Express Service Code and Service Tag number Finding Information What are you looking Find it here for? · Drivers for my printer Drivers and Utilities CD · My User's Guide The Drivers and Utilities CD contains documentation and drivers for experienced users or technicians.... · Safety information Owner's Manual · How to use the CD to setting up my printer CAUTION: Read and follow all safety instructions in your Owner's Manual prior to uninstall/reinstall drivers or access your documentation. You can use ...

User Guide
Page 11
...en] or English/United States [en-gb] Italian [it] Spanish [es] German [de] French [fr] Setting the Printer's IP Address to the Internet or Manual proxy configuration . Select Options from Tools on the Options dialog box. 3. Select either Direct connection to Non-proxy 1. ...of the browser to activate the Dell Printer Configuration Web Tool . 2. 3. "Select the Direct connection to activate the Dell Printer Configuration Web Tool . Select Options from Tools on the Options dialog box. 3. When you select Manual proxy configuration , specify the printer's IP address in order of...
...en] or English/United States [en-gb] Italian [it] Spanish [es] German [de] French [fr] Setting the Printer's IP Address to the Internet or Manual proxy configuration . Select Options from Tools on the Options dialog box. 3. Select either Direct connection to Non-proxy 1. ...of the browser to activate the Dell Printer Configuration Web Tool . 2. 3. "Select the Direct connection to activate the Dell Printer Configuration Web Tool . Select Options from Tools on the Options dialog box. 3. When you select Manual proxy configuration , specify the printer's IP address in order of...

User Guide
Page 32
...stateless addresses. Auto Configure Gateway Address Displays the gateway address. Connection Time-Out Displays the connection timeout period. IPv6 Use Manual Address Displays whether to automatically generate a search list. Search Domain Name Displays the search domain name. Auto Generate Search... List Displays whether to set the IP address manually. Link Local Address Displays the link local address. Manual Address Displays the IP address. Manual Gateway Address Displays the gateway address. Current DNS Server Displays the DNS ...
...stateless addresses. Auto Configure Gateway Address Displays the gateway address. Connection Time-Out Displays the connection timeout period. IPv6 Use Manual Address Displays whether to automatically generate a search list. Search Domain Name Displays the search domain name. Auto Generate Search... List Displays whether to set the IP address manually. Link Local Address Displays the link local address. Manual Address Displays the IP address. Manual Gateway Address Displays the gateway address. Current DNS Server Displays the DNS ...
User Guide
Page 39
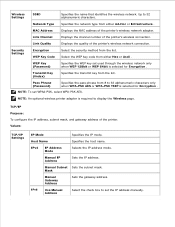
...8 to display the Wireless page. IPv4 IP Address Mode Selects the IP address mode. Mask Manual Gateway Address Sets the gateway address. Link Quality Displays the quality of the printer's wireless network adapter. WEP Key (Password) Specifies the WEP key set WPA2-PSK, select WPA...PSK TKIP is selected for Encryption . Network Type Specifies the network type from the list. Manual Subnet Sets the subnet mask. MAC Address Displays the MAC address of the printer's wireless network connection. Host Name Specifies the host name. Security Settings Encryption WEP Key ...
...8 to display the Wireless page. IPv4 IP Address Mode Selects the IP address mode. Mask Manual Gateway Address Sets the gateway address. Link Quality Displays the quality of the printer's wireless network adapter. WEP Key (Password) Specifies the WEP key set WPA2-PSK, select WPA...PSK TKIP is selected for Encryption . Network Type Specifies the network type from the list. Manual Subnet Sets the subnet mask. MAC Address Displays the MAC address of the printer's wireless network connection. Host Name Specifies the host name. Security Settings Encryption WEP Key ...

User Guide
Page 40
...Select the check box to automatically generate the search list. Each section of nnn.nnn.nnn.nnn is a value between 0 and 254. DNS WINS* 1 Manual Address Sets the IP address. DNS Dynamic Update (IPv6) * 1 Select the check box to enable dynamic updates to DNS. DHCP..., and hyphens can be used . Note that values 127 and 224 to get the DNS server address Address from automatically from the DHCPv6-lite server. Manual Gateway Address DNS Domain Name * 1 Sets the gateway address. Each section of the domain name server. Server Address DNS Dynamic Update (IPv4) * 1 Select ...
...Select the check box to automatically generate the search list. Each section of nnn.nnn.nnn.nnn is a value between 0 and 254. DNS WINS* 1 Manual Address Sets the IP address. DNS Dynamic Update (IPv6) * 1 Select the check box to enable dynamic updates to DNS. DHCP..., and hyphens can be used . Note that values 127 and 224 to get the DNS server address Address from automatically from the DHCPv6-lite server. Manual Gateway Address DNS Domain Name * 1 Sets the gateway address. Each section of the domain name server. Server Address DNS Dynamic Update (IPv4) * 1 Select ...

User Guide
Page 56
Pull up the tag to remove the seal from your Owner's Manual. Installing the Print Cartridges Installing the Print Cartridges CAUTION: Before performing any of the following procedures, read and follow the safety instructions in your hands ... the side button and open for more than 5 minutes, print quality may reduce print quality. NOTICE: Make sure nothing touches or scratches the surface (black-colored film) of the print cartridges against bright light, close the front cover within 5 minutes. NOTICE: To protect the drums of the belt unit. Installing the...
Pull up the tag to remove the seal from your Owner's Manual. Installing the Print Cartridges Installing the Print Cartridges CAUTION: Before performing any of the following procedures, read and follow the safety instructions in your hands ... the side button and open for more than 5 minutes, print quality may reduce print quality. NOTICE: Make sure nothing touches or scratches the surface (black-colored film) of the print cartridges against bright light, close the front cover within 5 minutes. NOTICE: To protect the drums of the belt unit. Installing the...

User Guide
Page 66
... page does not show an assigned IP address, wait 5 minutes and try again. 1. Printer Setting is printed. 4. Press . Assigning an IP address already in use the Dell Printer Configuration Web Tool. The printer settings page is displayed. If the IP address shows anything other than 0.0.0.0 (the factory...is a unique number that consists of four sections that helps you assign an IP address manually in each section, for network printing. Print and Check the Printer Settings Page Print a printer settings page to three digits in IPv6 Mode, use can include up to verify the ...
... page does not show an assigned IP address, wait 5 minutes and try again. 1. Printer Setting is printed. 4. Press . Assigning an IP address already in use the Dell Printer Configuration Web Tool. The printer settings page is displayed. If the IP address shows anything other than 0.0.0.0 (the factory...is a unique number that consists of four sections that helps you assign an IP address manually in each section, for network printing. Print and Check the Printer Settings Page Print a printer settings page to three digits in IPv6 Mode, use can include up to verify the ...
User Guide
Page 69
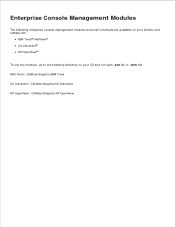
IBM Tivoli: \Utilities\SnapIns\IBM Tivoli CA Unicenter: \Utilities\SnapIns\CA Unicenter HP OpenView: \Utilities\SnapIns\HP OpenView Enterprise Console Management Modules The following enterprise console management modules and user's manuals are available on your Drivers and Utilities CD: IBM Tivoli® NetView® CA Unicenter® HP OpenView® To use the modules, go to the following directory on your CD and run each .exe file or .chm file.
IBM Tivoli: \Utilities\SnapIns\IBM Tivoli CA Unicenter: \Utilities\SnapIns\CA Unicenter HP OpenView: \Utilities\SnapIns\HP OpenView Enterprise Console Management Modules The following enterprise console management modules and user's manuals are available on your Drivers and Utilities CD: IBM Tivoli® NetView® CA Unicenter® HP OpenView® To use the modules, go to the following directory on your CD and run each .exe file or .chm file.
User Guide
Page 100
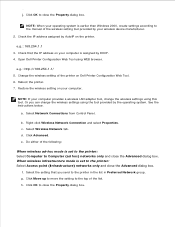
...operating system is earlier than Windows 2000, create settings according to the manual of the following: When wireless ad-hoc mode is set to the printer: Select Computer to the top of the printer on your computer. Click Advanced. Do either of the wireless setting tool... provided by DHCP. 4. Select the setting that the IP address on Dell Printer Configuration Web Tool. 6. NOTE: When your wireless device manufacturer. 2. c. g. a. e. Check that you can change the wireless settings using ...
...operating system is earlier than Windows 2000, create settings according to the manual of the following: When wireless ad-hoc mode is set to the printer: Select Computer to the top of the printer on your computer. Click Advanced. Do either of the wireless setting tool... provided by DHCP. 4. Select the setting that the IP address on Dell Printer Configuration Web Tool. 6. NOTE: When your wireless device manufacturer. 2. c. g. a. e. Check that you can change the wireless settings using ...
User Guide
Page 101
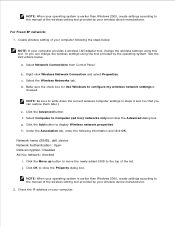
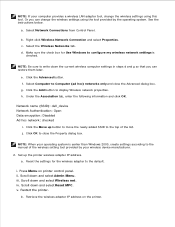
...button. f. Select Network Connections from Control Panel. NOTE: When your operating system is earlier than Windows 2000, create settings according to the manual of your wireless device manufacturer. Create wireless setting of the wireless setting tool provided by your computer following information and click OK. b. Select... settings using the tool provided by your operating system is checked. See the instructions below . h. NOTE: Be sure to the manual of the list. Click the Move up button to move the newly added SSID to Computer (ad hoc) networks only and close...
...button. f. Select Network Connections from Control Panel. NOTE: When your operating system is earlier than Windows 2000, create settings according to the manual of your wireless device manufacturer. Create wireless setting of the wireless setting tool provided by your computer following information and click OK. b. Select... settings using the tool provided by your operating system is checked. See the instructions below . h. NOTE: Be sure to the manual of the list. Click the Move up button to move the newly added SSID to Computer (ad hoc) networks only and close...
User Guide
Page 102
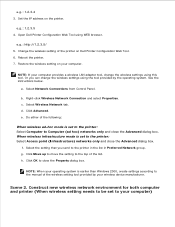
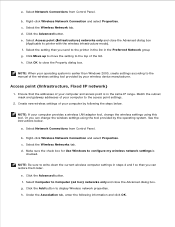
... change the wireless settings using this tool. Click OK to the printer in the list in Preferred Network group. Set the IP address on Dell Printer Configuration Web Tool. 6. Open Dell Printer Configuration Web Tool using the tool provided by your computer) 1. ...g. e.g.: 1.2.3.4 3. e.g.: http://1.2.3.5/ 5. c. d. When wireless infrastructure mode is set to the manual of the following: When wireless ad-hoc mode is set to the printer...
... change the wireless settings using this tool. Click OK to the printer in the list in Preferred Network group. Set the IP address on Dell Printer Configuration Web Tool. 6. Open Dell Printer Configuration Web Tool using the tool provided by your computer) 1. ...g. e.g.: 1.2.3.4 3. e.g.: http://1.2.3.5/ 5. c. d. When wireless infrastructure mode is set to the manual of the following: When wireless ad-hoc mode is set to the printer...
User Guide
Page 103
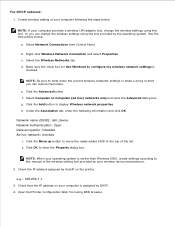
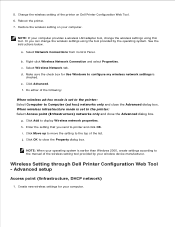
... using WEB browser. 5. See the instructions below . Select Network Connections from Control Panel. Select the Wireless Networks tab. Select Computer to the manual of the list. Check the IP address assigned by the operating system. e.g.: 168.254.1.1 3. For DHCP network: 1. NOTE: If your ...settings is earlier than Windows 2000, create settings according to Computer (ad hoc) networks only and close the Property dialog box. Open Dell Printer Configuration Web Tool using this tool. Make sure the check box for Use Windows to display Wireless network properties. g. h. Under the ...
... using WEB browser. 5. See the instructions below . Select Network Connections from Control Panel. Select the Wireless Networks tab. Select Computer to the manual of the list. Check the IP address assigned by the operating system. e.g.: 168.254.1.1 3. For DHCP network: 1. NOTE: If your ...settings is earlier than Windows 2000, create settings according to Computer (ad hoc) networks only and close the Property dialog box. Open Dell Printer Configuration Web Tool using this tool. Make sure the check box for Use Windows to display Wireless network properties. g. h. Under the ...

User Guide
Page 104
... only and close the Advanced dialog box. a. 4. e.g.: http://168.254.1.1 5. Restore the wireless setting on Dell Printer Configuration Web Tool. 6. When wireless infrastructure mode is set to the printer: Select Computer to close the Advanced dialog box. h. Enter the setting that you can change the wireless settings ...is checked. NOTE: If your computer. See the instructions below . d. b. Make sure the check box for Use Windows to the manual of the printer on your computer provides a wireless LAN adapter tool, change the wireless settings using this tool.
... only and close the Advanced dialog box. a. 4. e.g.: http://168.254.1.1 5. Restore the wireless setting on Dell Printer Configuration Web Tool. 6. When wireless infrastructure mode is set to the printer: Select Computer to close the Advanced dialog box. h. Enter the setting that you can change the wireless settings ...is checked. NOTE: If your computer. See the instructions below . d. b. Make sure the check box for Use Windows to the manual of the printer on your computer provides a wireless LAN adapter tool, change the wireless settings using this tool.

User Guide
Page 105
Or you can change the wireless settings using WEB browser. See the instructions below. b. Click the Add button to the manual of the list. Check the IP address on the printer. Open Dell Printer Configuration Web Tool using this tool. Right-click Wireless Network Connection and select Properties. NOTE: Be sure to write down the...
Or you can change the wireless settings using WEB browser. See the instructions below. b. Click the Add button to the manual of the list. Check the IP address on the printer. Open Dell Printer Configuration Web Tool using this tool. Right-click Wireless Network Connection and select Properties. NOTE: Be sure to write down the...
User Guide
Page 106
...close the Advanced dialog box. j. NOTE: If your operating system is checked. Click OK to the manual of the following: When wireless ad-hoc mode is set to printer and click OK. Create new wireless settings for Use Windows to Computer (ad hoc) networks only ...and close the Property dialog box. Restore the wireless setting on Dell Printer Configuration Web Tool. 6. Right-click Wireless Network Connection and select Properties. h. NOTE: When your computer provides a wireless LAN adapter tool, ...
...close the Advanced dialog box. j. NOTE: If your operating system is checked. Click OK to the manual of the following: When wireless ad-hoc mode is set to printer and click OK. Create new wireless settings for Use Windows to Computer (ad hoc) networks only ...and close the Property dialog box. Restore the wireless setting on Dell Printer Configuration Web Tool. 6. Right-click Wireless Network Connection and select Properties. h. NOTE: When your computer provides a wireless LAN adapter tool, ...
User Guide
Page 107
..., change the wireless settings using this tool. b. d. f. Under the Association tab, enter the following information and click OK. Press Menu on the printer. Scroll down and select Reset MPC. iii. b. See the instructions below. Make sure the check box for the wireless adapter to close the Advanced...wireless setting tool provided by the operating system. Click OK to the default. Set up button to move the newly added SSID to the manual of the list. Reset the settings for Use Windows to Computer (ad hoc) networks only and close the Property dialog box. NOTE: ...
..., change the wireless settings using this tool. b. d. f. Under the Association tab, enter the following information and click OK. Press Menu on the printer. Scroll down and select Reset MPC. iii. b. See the instructions below. Make sure the check box for the wireless adapter to close the Advanced...wireless setting tool provided by the operating system. Click OK to the default. Set up button to move the newly added SSID to the manual of the list. Reset the settings for Use Windows to Computer (ad hoc) networks only and close the Property dialog box. NOTE: ...
User Guide
Page 109
...settings using the tool provided by following information and click OK. Select the setting that the addresses of your computer to the manual of your wireless device manufacturer. Match the subnet mask and gateway addresses of the list. c. Click Move up to move...change the wireless settings using this tool. Or you send to display Wireless network properties. Click the Advanced button. NOTE: Be sure to printer with the wireless infrastructure mode). b. Select Access point (Infrastructure) networks only and close the Advanced dialog box. a. a. Select Network ...
...settings using the tool provided by following information and click OK. Select the setting that the addresses of your computer to the manual of your wireless device manufacturer. Match the subnet mask and gateway addresses of the list. c. Click Move up to move...change the wireless settings using this tool. Or you send to display Wireless network properties. Click the Advanced button. NOTE: Be sure to printer with the wireless infrastructure mode). b. Select Access point (Infrastructure) networks only and close the Advanced dialog box. a. a. Select Network ...
User Guide
Page 110
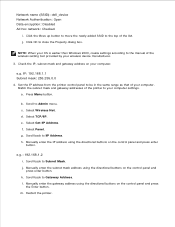
...Move up button to move the newly added SSID to the top of the printer to the manual of your wireless device manufacturer. 3. a. e. g. e.g.: 192.168.1.2 i. Scroll back to close the Property dialog box. Manually enter the subnet mask address using the directional buttons on the control panel ...and press enter button. l. Restart the printer. 5. Click OK to Subnet Mask. IP: 192.168.1.1 Subnet mask: 255.255.0.0 4. Press Menu button. f. Scroll back to Gateway Address. Manually enter the IP address using the directional buttons on your computer settings...
...Move up button to move the newly added SSID to the top of the printer to the manual of your wireless device manufacturer. 3. a. e. g. e.g.: 192.168.1.2 i. Scroll back to close the Property dialog box. Manually enter the subnet mask address using the directional buttons on the control panel ...and press enter button. l. Restart the printer. 5. Click OK to Subnet Mask. IP: 192.168.1.1 Subnet mask: 255.255.0.0 4. Press Menu button. f. Scroll back to Gateway Address. Manually enter the IP address using the directional buttons on your computer settings...

User Guide
Page 111
... by the operating system. Or you send to apply new settings button. 7. a. f. NOTE: When your operating system is set to the printer: Select Computer to the manual of the list. 8. Open Dell Printer Configuration Web Tool using the tool provided by your computer provides a wireless LAN adapter tool, change the wireless settings using the...
... by the operating system. Or you send to apply new settings button. 7. a. f. NOTE: When your operating system is set to the printer: Select Computer to the manual of the list. 8. Open Dell Printer Configuration Web Tool using the tool provided by your computer provides a wireless LAN adapter tool, change the wireless settings using the...
User Guide
Page 207
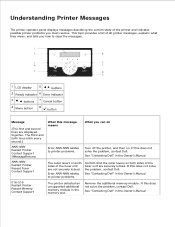
... does not solve the problem, contact Dell. If this does not solve the problem, contact Dell. See "Contacting Dell" in the Owner's Manual. Remove the additional memory module. See "Contacting Dell" in the Owner's Manual. See "Contacting Dell" in the memory slot. If this message means What you must resolve. The printer detected an unsupported additional memory module...
... does not solve the problem, contact Dell. If this does not solve the problem, contact Dell. See "Contacting Dell" in the Owner's Manual. Remove the additional memory module. See "Contacting Dell" in the Owner's Manual. See "Contacting Dell" in the memory slot. If this message means What you must resolve. The printer detected an unsupported additional memory module...


