User Guide
Page 4
... 1.Copy: Enters the copy menu. 2. Setup: Enters the advanced settings. 8. : Return to the machine setup and advanced settings. 5 Start button: Initiate operation. 6. Also you can use my printer Quick Reference Guide Dell 2355dn MFP Quick Reference Guide Quick Reference Guide Quick Reference Guide Front 2 1...Product Information Guide 3 Also you can set the option which is frequently uses on your country. • How to your machine. 3. Fax: Enters the fax menu. 3. Scan: Enters the scan menu. 4. None: You can set the option which is frequently uses on your ...
... 1.Copy: Enters the copy menu. 2. Setup: Enters the advanced settings. 8. : Return to the machine setup and advanced settings. 5 Start button: Initiate operation. 6. Also you can use my printer Quick Reference Guide Dell 2355dn MFP Quick Reference Guide Quick Reference Guide Quick Reference Guide Front 2 1...Product Information Guide 3 Also you can set the option which is frequently uses on your country. • How to your machine. 3. Fax: Enters the fax menu. 3. Scan: Enters the scan menu. 4. None: You can set the option which is frequently uses on your ...

User Guide
Page 10
... Overlay 125 Copying Loading Paper for Copying 128 Selecting the Paper Tray 128 Preparing a Document 128 Loading an Original Document 129 Making Copies 131 Setting Copy Options 132 Number of Copies 132 Enlarge/Reduce Copy 132 Contrast 133 Original Size 133 Original Type 133 Using Special Copy Features 134 ECO Copying 135... Copying 137 Poster Copying 137 ID Copying 138 2-up or 4-up copying (N-up 139 Printing Copies on Both Sides of Paper 139 Changing the Default Settings 140 Scanning Scanning Overview 142 9
... Overlay 125 Copying Loading Paper for Copying 128 Selecting the Paper Tray 128 Preparing a Document 128 Loading an Original Document 129 Making Copies 131 Setting Copy Options 132 Number of Copies 132 Enlarge/Reduce Copy 132 Contrast 133 Original Size 133 Original Type 133 Using Special Copy Features 134 ECO Copying 135... Copying 137 Poster Copying 137 ID Copying 138 2-up or 4-up copying (N-up 139 Printing Copies on Both Sides of Paper 139 Changing the Default Settings 140 Scanning Scanning Overview 142 9
User Guide
Page 18
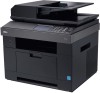
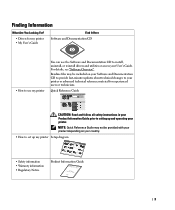
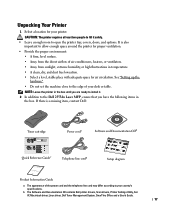
... diagram Product Information Guide a The appearance of your country's specifications. See "Setting up the hardware". • Do not set the option which is a missing item, contact Dell: Toner cartridge Dell 2355dn MFP Quick Reference Guide Quick Reference Guide Quick Reference Guide Front 2 1 Front...;ervice code 11. Scan: Enters the scan menu. 4. NOTE: Leave the printer in the box. Optional tray 2 11. b The Software and Documentation CD contains Dell printer drivers, Scan drivers, Printer Settings Utility, Set IP, Macintosh driver, Linux driver, Dell Toner Management System, ...
... diagram Product Information Guide a The appearance of your country's specifications. See "Setting up the hardware". • Do not set the option which is a missing item, contact Dell: Toner cartridge Dell 2355dn MFP Quick Reference Guide Quick Reference Guide Quick Reference Guide Front 2 1 Front...;ervice code 11. Scan: Enters the scan menu. 4. NOTE: Leave the printer in the box. Optional tray 2 11. b The Software and Documentation CD contains Dell printer drivers, Scan drivers, Printer Settings Utility, Set IP, Macintosh driver, Linux driver, Dell Toner Management System, ...

User Guide
Page 25
... panel allows user-friendly operation of the display screen. • : Shows the toner status. • : Start a job. • : Scroll through available options. 24 Also you press the home icon ( ) on the screen, it shows the home screen. • Copy: Enters the copy menu. •...; Scan: Enters the scan menu. • Fax: Enters the fax menu. • Setup: You can set the option which is inserted into the USB memory port on your machine. • Language: Changes the display language on...
... panel allows user-friendly operation of the display screen. • : Shows the toner status. • : Start a job. • : Scroll through available options. 24 Also you press the home icon ( ) on the screen, it shows the home screen. • Copy: Enters the copy menu. •...; Scan: Enters the scan menu. • Fax: Enters the fax menu. • Setup: You can set the option which is inserted into the USB memory port on your machine. • Language: Changes the display language on...
User Guide
Page 41
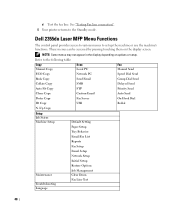
... to set up the machine or use the machine's functions. NOTE: Some menus may not appear in the display depending on the display screen. Dell 2355dn Laser MFP Menu Functions The control panel provides access to various menus to the following table: Copy Manual Copy Scan Local PC... USB Redial N -Up Copy Setup Job Status Machine Setup Maintenance Troubleshooting Language Default Setting Paper Setup Tray Behavior Email/Fax List Reports Fax Setup Email Setup Network Setup Initial Setup Restore Options Job Management Clear Drum Fax Line Test 40 See "Testing Fax line connection". 5...
... to set up the machine or use the machine's functions. NOTE: Some menus may not appear in the display depending on the display screen. Dell 2355dn Laser MFP Menu Functions The control panel provides access to various menus to the following table: Copy Manual Copy Scan Local PC... USB Redial N -Up Copy Setup Job Status Machine Setup Maintenance Troubleshooting Language Default Setting Paper Setup Tray Behavior Email/Fax List Reports Fax Setup Email Setup Network Setup Initial Setup Restore Options Job Management Clear Drum Fax Line Test 40 See "Testing Fax line connection". 5...
User Guide
Page 46
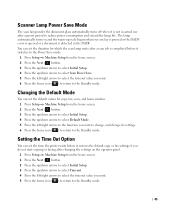
...timeout value you want. 5 Press the home icon ( ) to return to the Standby mode. 45 Setting the Time Out Option You can set the time the printer waits before it restores the default copy or fax settings if you do not start copying or faxing after a preset period to reduce power consumption and... extend the lamp life. Scanner Lamp Power Save Mode The scan lamp under the document glass ...
...timeout value you want. 5 Press the home icon ( ) to return to the Standby mode. 45 Setting the Time Out Option You can set the time the printer waits before it restores the default copy or fax settings if you do not start copying or faxing after a preset period to reduce power consumption and... extend the lamp life. Scanner Lamp Power Save Mode The scan lamp under the document glass ...
User Guide
Page 49
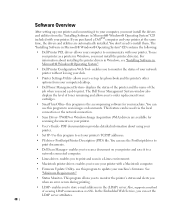
...phonebook and the printer's other options from the "Installing Software in Microsoft® Windows® Operating System" CD included with your printer. You don't need to order replacement toner cartridges. • SmarThru Office- this program to set up your printer and connecting it...Linux environment. • Macintosh printer driver- Use this program to print and scan in Microsoft® Windows® Operating System". • Dell Printer Configuration Web Tool- enables you to update your printer. • Set IP- enables you to your printer. • User's Guide- See "...
...phonebook and the printer's other options from the "Installing Software in Microsoft® Windows® Operating System" CD included with your printer. You don't need to order replacement toner cartridges. • SmarThru Office- this program to set up your printer and connecting it...Linux environment. • Macintosh printer driver- Use this program to print and scan in Microsoft® Windows® Operating System". • Dell Printer Configuration Web Tool- enables you to update your printer. • Set IP- enables you to your printer. • User's Guide- See "...
User Guide
Page 52
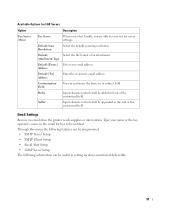
...Select the file format of an attachment. Customization Field You can be added in setting up above-mentioned deliverable: 51 Available Options for FAX Server Option Description Fax Server Menu Fax Server When you select Enable, you are able to ...be appended at the end of the customized field. Address Default [To:] Address Enter the recipient's email address. Type your email address. Email Settings Receive an email when the printer needs supplies or intervention. Default Scan...
...Select the file format of an attachment. Customization Field You can be added in setting up above-mentioned deliverable: 51 Available Options for FAX Server Option Description Fax Server Menu Fax Server When you select Enable, you are able to ...be appended at the end of the customized field. Address Default [To:] Address Enter the recipient's email address. Type your email address. Email Settings Receive an email when the printer needs supplies or intervention. Default Scan...

User Guide
Page 138
...menu button for making a clone copy. Press , and the copying will stop . Press , and the copying will stop . Your original document is scanned and printed one by one in the DADF, the Poster copying feature does not work . To make the Poster copying: 1 Place a single document face...: You can cancel the copy job at any time. See "Setting Copy Options". 5 Press to go to select Clone Copy. 4 If necessary, customize the copy settings including number of copies, contrast, original type, and original size by pressing Options. NOTE: You cannot adjust the copy size using the Zoom menu...
...menu button for making a clone copy. Press , and the copying will stop . Press , and the copying will stop . Your original document is scanned and printed one by one in the DADF, the Poster copying feature does not work . To make the Poster copying: 1 Place a single document face...: You can cancel the copy job at any time. See "Setting Copy Options". 5 Press to go to select Clone Copy. 4 If necessary, customize the copy settings including number of copies, contrast, original type, and original size by pressing Options. NOTE: You cannot adjust the copy size using the Zoom menu...
User Guide
Page 141
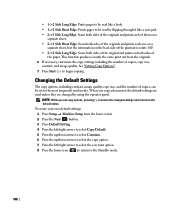
... Start ( ) to be read by using the operator panel. When you copy a document, the default settings are changed settings and returns to the default status. NOTE: While you want option. 8 Press the home icon ( ) to return to the Standby mode. 140 • 1->2 Side Long Edge: Prints pages to be ...read like a note pad. • 2->1 Side Long Edge: Scans both sides of the originals and prints each of...
... Start ( ) to be read by using the operator panel. When you copy a document, the default settings are changed settings and returns to the default status. NOTE: While you want option. 8 Press the home icon ( ) to return to the Standby mode. 140 • 1->2 Side Long Edge: Prints pages to be ...read like a note pad. • 2->1 Side Long Edge: Scans both sides of the originals and prints each of...

User Guide
Page 145
... in the tray area of the Windows taskbar to active the SmarThru Office launcher. 2 Click the printing icon to set more scan options. 4 Set scan settings and click Scan. NOTE: Click Advanced button to open the faxing window. 144 3 Scan Setting window opens. ➊ ➋ ➌ ➍ Property Description ➊ Select Scanner Allows you to select the scanner. ➋...
... in the tray area of the Windows taskbar to active the SmarThru Office launcher. 2 Click the printing icon to set more scan options. 4 Set scan settings and click Scan. NOTE: Click Advanced button to open the faxing window. 144 3 Scan Setting window opens. ➊ ➋ ➌ ➍ Property Description ➊ Select Scanner Allows you to select the scanner. ➋...

User Guide
Page 148
3 In the Set Scan Button window, select the scan setting option. • Scan Destination: You can change the add or delete application programs and file format. • Scan Property: You can change the saving destination, resolution, color, and scan size. 4 Press OK after the setting is done. 147
3 In the Set Scan Button window, select the scan setting option. • Scan Destination: You can change the add or delete application programs and file format. • Scan Property: You can change the saving destination, resolution, color, and scan size. 4 Press OK after the setting is done. 147
User Guide
Page 149
... ID and password using Options. 7 Press Start ( ). (on the touch screen or the operator panel) Scanning is started. 148 A new message window opens with top edge in the My Documents folder on the computer. If you want. See "Scanning Using Dell Scan Manager". 6 If necessary, customize the scan settings including original size, scan color, scan format, duplex, and image...
... ID and password using Options. 7 Press Start ( ). (on the touch screen or the operator panel) Scanning is started. 148 A new message window opens with top edge in the My Documents folder on the computer. If you want. See "Scanning Using Dell Scan Manager". 6 If necessary, customize the scan settings including original size, scan color, scan format, duplex, and image...

User Guide
Page 150
... image quality by using Options. 7 Press Start ( ). (on the document glass. NOTE: If you selected My Document scanned image is saved in first into the DADF. Adjust the scan settings and scan. Scanning and Sending an Email 1 Load the document(s) face up with top edge in computer's My Document → My Pictures → Dell folder. NOTE: You...
... image quality by using Options. 7 Press Start ( ). (on the document glass. NOTE: If you selected My Document scanned image is saved in first into the DADF. Adjust the scan settings and scan. Scanning and Sending an Email 1 Load the document(s) face up with top edge in computer's My Document → My Pictures → Dell folder. NOTE: You...

User Guide
Page 151
... You can select up with the machine in order to five destinations. 6 If necessary, customize the scan settings including original size, scan color, scan format, duplex, and image quality by using Options. 7 Press Start ( ). (on the document glass. Scanning and Sending to SMB Server Select the folder and share it with top edge in first into...
... You can select up with the machine in order to five destinations. 6 If necessary, customize the scan settings including original size, scan color, scan format, duplex, and image quality by using Options. 7 Press Start ( ). (on the document glass. Scanning and Sending to SMB Server Select the folder and share it with top edge in first into...

User Guide
Page 152
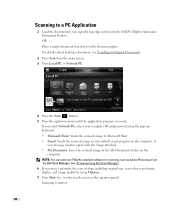
...with the machine in order to receive the scanned file. For details about loading a document, see "Loading an Original Document". 2 Press Scan from the Embedded Web Service before following the next steps. You need to set the FTP server setting from the home screen. 3 Press the ... an FTP server" 1 Load the document(s) face up to five destinations. 6 If necessary, customize the scan settings including original size, scan color, scan format, duplex, and image quality by using Options. 7 Press Start ( ). (on the document glass. Select the destination FTP server. OR Place a single document ...
...with the machine in order to receive the scanned file. For details about loading a document, see "Loading an Original Document". 2 Press Scan from the Embedded Web Service before following the next steps. You need to set the FTP server setting from the home screen. 3 Press the ... an FTP server" 1 Load the document(s) face up to five destinations. 6 If necessary, customize the scan settings including original size, scan color, scan format, duplex, and image quality by using Options. 7 Press Start ( ). (on the document glass. Select the destination FTP server. OR Place a single document ...

User Guide
Page 223
... "Loading an Original Document". 3 Start Applications and click Image Capture. If the problem persists, please refer to the Image Capture's help . 4 Set the scan options on the document glass. NOTE: When scanning does not operate, update Mac OS to TWAIN-compliant software. For details about using Image Capture, please refer to the Image Capture...
... "Loading an Original Document". 3 Start Applications and click Image Capture. If the problem persists, please refer to the Image Capture's help . 4 Set the scan options on the document glass. NOTE: When scanning does not operate, update Mac OS to TWAIN-compliant software. For details about using Image Capture, please refer to the Image Capture...
User Guide
Page 242
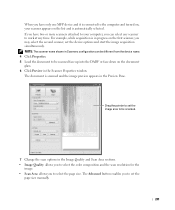
... the scan options in the Preview Pane. The Advanced button enables you have two or more scanners attached to your scanner appears on the document glass. 6 Click Preview in Scanners configuration can select any scanner to work at any time. When you to set the device options and start the image acquisition... simultaneously. NOTE: The scanner name shown in the Scanner Properties window. If you have only one MFP device and it is scanned and the image preview appears in the Image Quality and...
... the scan options in the Preview Pane. The Advanced button enables you have two or more scanners attached to your scanner appears on the document glass. 6 Click Preview in Scanners configuration can select any scanner to work at any time. When you to set the device options and start the image acquisition... simultaneously. NOTE: The scanner name shown in the Scanner Properties window. If you have only one MFP device and it is scanned and the image preview appears in the Image Quality and...

User Guide
Page 243
... where you want to use the toolbar. To cancel scanning, click Cancel. 9 The scanned image appears in the new Image Manager window. Adding Job Type Settings You can restore the default setting for your scan option settings to retrieve for a later scanning. For further details about the preset Job Type settings, see "Using the Image Editor". 10 When you...
... where you want to use the toolbar. To cancel scanning, click Cancel. 9 The scanned image appears in the new Image Manager window. Adding Job Type Settings You can restore the default setting for your scan option settings to retrieve for a later scanning. For further details about the preset Job Type settings, see "Using the Image Editor". 10 When you...

User Guide
Page 247
... memory and resets all of your settings to the factory default. • Paper Setup: Restores all of the Paper Setting options to the factory default. • Tray Behavior: Restores all of the Tray Behavior options to the factory default. •... Copy Default: Restores all of the copy options to the factory default. • Fax Default: Restores all of the Fax Setup options to the factory default. • Scan Default: Restores all of the scan options...
... memory and resets all of your settings to the factory default. • Paper Setup: Restores all of the Paper Setting options to the factory default. • Tray Behavior: Restores all of the Tray Behavior options to the factory default. •... Copy Default: Restores all of the copy options to the factory default. • Fax Default: Restores all of the Fax Setup options to the factory default. • Scan Default: Restores all of the scan options...


