User Guide
Page 1
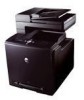
.... Adobe and Photoshop are trademarks of Microsoft Corporation in applicable FAR provisions: Dell Inc., One Dell Way, Round Rock, Texas, 78682, USA. Dell™ 2135cn Color Laser Multifunction Printer User's Guide Finding Information About Your Printer Installing the Toner Cartridges and Print Head Device (PHD) Unit Connecting Your Printer Dell Printer Configuration Web Tool Installing the Optional Memory Card Print Media Guidelines Loading...
.... Adobe and Photoshop are trademarks of Microsoft Corporation in applicable FAR provisions: Dell Inc., One Dell Way, Round Rock, Texas, 78682, USA. Dell™ 2135cn Color Laser Multifunction Printer User's Guide Finding Information About Your Printer Installing the Toner Cartridges and Print Head Device (PHD) Unit Connecting Your Printer Dell Printer Configuration Web Tool Installing the Optional Memory Card Print Media Guidelines Loading...

User Guide
Page 17
... Cautions 21 Finding Information 23 About Your Printer 27 Installing the Toner Cartridges and Print Head Device (PHD) Unit 33 Connecting Your Printer 41 Dell Printer Configuration Web Tool 53 Installing the Optional Memory Card 127 Print Media Guidelines 135 Loading Print Media 147 Operator Panel 163 Printer Settings 167 Understanding the Tool Box Menus 175...
... Cautions 21 Finding Information 23 About Your Printer 27 Installing the Toner Cartridges and Print Head Device (PHD) Unit 33 Connecting Your Printer 41 Dell Printer Configuration Web Tool 53 Installing the Optional Memory Card 127 Print Media Guidelines 135 Loading Print Media 147 Operator Panel 163 Printer Settings 167 Understanding the Tool Box Menus 175...
User Guide
Page 34
... apply new settings Press the Restart printer to apply new settings button to fit it . One page is output. Machine Check Purpose: Does not set a prefix dial number. Prefix Dial Num 5byte Sets a prefix dial number of the PHD unit. Auto Reduction Automatically reduces a fax page to apply the...Fax Fwd Print is output to check for the binding in A4 or Letter. The chart is output to A4 or Letter size paper. 4 Colors Configuration Chart Bands of the print image on the paper. Alignment Chart Outputs a chart to check for proper alignment of yellow, magenta, cyan,...
... apply new settings Press the Restart printer to apply new settings button to fit it . One page is output. Machine Check Purpose: Does not set a prefix dial number. Prefix Dial Num 5byte Sets a prefix dial number of the PHD unit. Auto Reduction Automatically reduces a fax page to apply the...Fax Fwd Print is output to check for the binding in A4 or Letter. The chart is output to A4 or Letter size paper. 4 Colors Configuration Chart Bands of the print image on the paper. Alignment Chart Outputs a chart to check for proper alignment of yellow, magenta, cyan,...

User Guide
Page 36
... when you need to replace it before the end of its life, or to clean the PHD unit. Back to clean the magenta cartridge. Magenta Click Magenta to Contents Page Developer Stir Mode Purpose: To rotate the developer motor and stir the ... Refresh Mode consumes extra toner. Values: Yellow Click Yellow to clean the cyan cartridge. Toner Refresh Mode Cyan Click Cyan to clean the yellow cartridge. PHD Refresh Mode PHD Click PHD to stir the toner in the toner cartridge.
... when you need to replace it before the end of its life, or to clean the PHD unit. Back to clean the magenta cartridge. Magenta Click Magenta to Contents Page Developer Stir Mode Purpose: To rotate the developer motor and stir the ... Refresh Mode consumes extra toner. Values: Yellow Click Yellow to clean the cyan cartridge. Toner Refresh Mode Cyan Click Cyan to clean the yellow cartridge. PHD Refresh Mode PHD Click PHD to stir the toner in the toner cartridge.

User Guide
Page 67
...- +9 and Cyan. Lateral Adjustment Enter Adjustment Process Adjustment Y Specifies lateral (perpendicular to automatically perform color registration adjustment. The color registration chart prints a lattice pattern of the PHD unit. If the value for each toner cartridge. Drum Refresh Purpose: To clean the surface of ..., and Cyan. Clean Developer Purpose: To stir the toner in each of the three colors. C NOTE: Ensure that are required when the printer is initially installed and after the printer is not required. Toner Refresh Purpose: To clean the toner in a new toner cartridge...
...- +9 and Cyan. Lateral Adjustment Enter Adjustment Process Adjustment Y Specifies lateral (perpendicular to automatically perform color registration adjustment. The color registration chart prints a lattice pattern of the PHD unit. If the value for each toner cartridge. Drum Refresh Purpose: To clean the surface of ..., and Cyan. Clean Developer Purpose: To stir the toner in each of the three colors. C NOTE: Ensure that are required when the printer is initially installed and after the printer is not required. Toner Refresh Purpose: To clean the toner in a new toner cartridge...
User Guide
Page 135
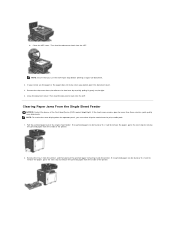
...resolve the error displayed on the operator panel, you must clear all print media from the inside of the printer. 2. If no jammed paper can be found or it gently to the right. 4. Close the ADF ... to remove the jammed paper from the print media path. 1. Remove the tray 1 from the inside the printer. b. Then load the documents back into the ADF. Then load the documents back into the ADF. If ... next step to remove the jammed paper from the printer, and then pull out the jammed paper remaining inside of the printer. Pull the jammed paper out of the Print Head Device...
...resolve the error displayed on the operator panel, you must clear all print media from the inside of the printer. 2. If no jammed paper can be found or it gently to the right. 4. Close the ADF ... to remove the jammed paper from the print media path. 1. Remove the tray 1 from the inside the printer. b. Then load the documents back into the ADF. Then load the documents back into the ADF. If ... next step to remove the jammed paper from the printer, and then pull out the jammed paper remaining inside of the printer. Pull the jammed paper out of the Print Head Device...
User Guide
Page 136
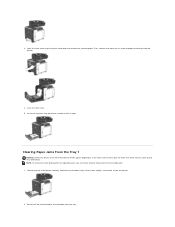
Close the front cover. 5. Insert the tray back into the printer, and push until it from the print media path. 1. Pull the tray out of the Print Head Device (PHD) against bright light. If the front cover remains open for more than three minutes, print quality may deteriorate. Hold ...the tray with both hands, lift the front slightly, and remove it stops. Clearing Paper Jams From the Tray 1 NOTICE: Protect the drums of the printer carefully. ...
Close the front cover. 5. Insert the tray back into the printer, and push until it from the print media path. 1. Pull the tray out of the Print Head Device (PHD) against bright light. If the front cover remains open for more than three minutes, print quality may deteriorate. Hold ...the tray with both hands, lift the front slightly, and remove it stops. Clearing Paper Jams From the Tray 1 NOTICE: Protect the drums of the printer carefully. ...

User Guide
Page 138
... ends of the fuser, and remove the jammed paper. Open the cover of paper remaining inside the printer, and then close the front cover. Confirm that there are no scraps of the fuser and remove the... jammed paper. 5. NOTICE: To protect the drums of the belt unit. Turn off the printer and wait for more than three minutes, print quality may deteriorate. Push the side button and open for 30 minutes... Clearing Paper Jams From the Fuser NOTICE: Ensure nothing touches or scratches the surface (black-colored film) of the Print Head Device (PHD) against bright light.
... ends of the fuser, and remove the jammed paper. Open the cover of paper remaining inside the printer, and then close the front cover. Confirm that there are no scraps of the fuser and remove the... jammed paper. 5. NOTICE: To protect the drums of the belt unit. Turn off the printer and wait for more than three minutes, print quality may deteriorate. Push the side button and open for 30 minutes... Clearing Paper Jams From the Fuser NOTICE: Ensure nothing touches or scratches the surface (black-colored film) of the Print Head Device (PHD) against bright light.

User Guide
Page 142
... (Black) from the drop-down list box and click the Start button. 3. Repeat step 3 for the printer. 5 The task is being used. After you replace the PHD unit, click Chart Print on the Diagnosis tab. 5. After you complete the Refresh Mode, select Chart Print ... Yellow button under Toner Refresh Mode. 3. The 4 Colors Configuration Chart is too light. See "Installing the PHD Unit" and "Installing the PHD Unit". 2. See "Replacing the Print Head Device (PHD) Unit" and "Installing the PHD Unit". 2. Contact Dell. Replace the PHD unit if you complete the Refresh Mode, select Chart ...
... (Black) from the drop-down list box and click the Start button. 3. Repeat step 3 for the printer. 5 The task is being used. After you replace the PHD unit, click Chart Print on the Diagnosis tab. 5. After you complete the Refresh Mode, select Chart Print ... Yellow button under Toner Refresh Mode. 3. The 4 Colors Configuration Chart is too light. See "Installing the PHD Unit" and "Installing the PHD Unit". 2. See "Replacing the Print Head Device (PHD) Unit" and "Installing the PHD Unit". 2. Contact Dell. Replace the PHD unit if you complete the Refresh Mode, select Chart ...

User Guide
Page 143
... you have a spare. 1. After you replace the PHD unit, click Chart Print on the Diagnosis tab. 3 3. The task is blank. Contact Dell. Random spots/blurred images Action Ensure that the PHD unit is installed correctly. Replace the PHD unit if you have a spare unit. Click the Pitch..., change the plain paper to action 3. The task is complete. Try changing the Paper Type setting in the printer driver. Replace the PHD unit if you replace the PHD unit, test print your document again. Toner smears or print comes off. Yes The task is complete. Go to...
... you have a spare. 1. After you replace the PHD unit, click Chart Print on the Diagnosis tab. 3 3. The task is blank. Contact Dell. Random spots/blurred images Action Ensure that the PHD unit is installed correctly. Replace the PHD unit if you have a spare unit. Click the Pitch..., change the plain paper to action 3. The task is complete. Try changing the Paper Type setting in the printer driver. Replace the PHD unit if you replace the PHD unit, test print your document again. Toner smears or print comes off. Yes The task is complete. Go to...

User Guide
Page 144
...motor sound. 8 4. Click the 4 Colors Configuration Chart button. 9 The 4 Colors Configuration Chart is complete. Streaks appear on the Printer Maintenance tab. 2 2. If you replace the PHD unit, click Chart Print on the Diagnosis... tab. 3. If not, use the print media recommended for the rest of Sound button to action 9. Ensure that the dispense motor for CMYK in each toner cartridge functions properly. 1. Dell...
...motor sound. 8 4. Click the 4 Colors Configuration Chart button. 9 The 4 Colors Configuration Chart is complete. Streaks appear on the Printer Maintenance tab. 2 2. If you replace the PHD unit, click Chart Print on the Diagnosis... tab. 3. If not, use the print media recommended for the rest of Sound button to action 9. Ensure that the dispense motor for CMYK in each toner cartridge functions properly. 1. Dell...

User Guide
Page 145
... set to Color (Auto) in the printer driver. Click the 4 Colors Configuration Chart button. The task is printed. The 4 Colors Configuration Chart is complete. Go to action 3. Launch the Tool Box, and click Non-Dell Toner on the Diagnosis tab. 2 3. Go to action 2. See "Replacing the Print Head Device (PHD) Unit" and "Installing the PHD Unit". 2. After...
... set to Color (Auto) in the printer driver. Click the 4 Colors Configuration Chart button. The task is printed. The 4 Colors Configuration Chart is complete. Go to action 3. Launch the Tool Box, and click Non-Dell Toner on the Diagnosis tab. 2 3. Go to action 2. See "Replacing the Print Head Device (PHD) Unit" and "Installing the PHD Unit". 2. After...
User Guide
Page 146
... corresponding to action 2. contact Dell. Action Ensure the light path is complete. The task is not covered. See "Replacing the Print Head Device (PHD) Unit" and "Installing the PHD Unit". 2. Click the Pitch Configuration Chart button. Is the cause of the printer - See the fuser replacement guide... the location of the problem: l PHD unit - 2a l Fuser - 2b. The task is printed. Contact Dell. The Pitch Configuration Chart is complete. Launch the Tool Box, and click Chart Print on the Diagnosis tab. 5. Compare the pitch of the color spots on your output with that on...
... corresponding to action 2. contact Dell. Action Ensure the light path is complete. The task is not covered. See "Replacing the Print Head Device (PHD) Unit" and "Installing the PHD Unit". 2. Click the Pitch Configuration Chart button. Is the cause of the printer - See the fuser replacement guide... the location of the problem: l PHD unit - 2a l Fuser - 2b. The task is printed. Contact Dell. The Pitch Configuration Chart is complete. Launch the Tool Box, and click Chart Print on the Diagnosis tab. 5. Compare the pitch of the color spots on your output with that on...

User Guide
Page 147
...click Chart Print on the Diagnosis tab. 3 4. Execute the PHD Refresh Mode. 1. The task is complete. The task is complete. Go to action 2a. Negative ghost - 2b 1. Adjust the setting for the printer. 2b Is the problem resolved? Is the problem resolved? .... The 4 Colors Configuration Chart is printed. Go to action 3. 1. Replace the PHD unit if you start the PHD Refresh Mode, click Chart Print on the Diagnosis tab. 2a 3. If using the Pitch Configuration Chart. Light fatigue Contact Dell. Yes 1. Contact Dell. Contact Dell. The Ghost ...
...click Chart Print on the Diagnosis tab. 3 4. Execute the PHD Refresh Mode. 1. The task is complete. The task is complete. Go to action 2a. Negative ghost - 2b 1. Adjust the setting for the printer. 2b Is the problem resolved? Is the problem resolved? .... The 4 Colors Configuration Chart is printed. Go to action 3. 1. Replace the PHD unit if you start the PHD Refresh Mode, click Chart Print on the Diagnosis tab. 2a 3. If using the Pitch Configuration Chart. Light fatigue Contact Dell. Yes 1. Contact Dell. Contact Dell. The Ghost ...
User Guide
Page 148
... the Tool Box, and click Refresh Mode on the Printer Maintenance tab. 1 2. Replace the PHD unit. Yes 1. The task is complete. Enable Bitmap Text Smoothing in the printer driver. 2 1. Yes The task is printed. Click the 4 Colors Configuration Chart button. Jagged characters Action Set Print Mode ...the Advanced tab, set Bitmap Text Smoothing under Items: to action 2. The 4 Colors Configuration Chart is complete. No Go to action 2. No Go to action 2. Is the problem resolved? Contact Dell. On the Graphics tab, select High Quality from Print Mode. The task is ...
... the Tool Box, and click Refresh Mode on the Printer Maintenance tab. 1 2. Replace the PHD unit. Yes 1. The task is complete. Enable Bitmap Text Smoothing in the printer driver. 2 1. Yes The task is printed. Click the 4 Colors Configuration Chart button. Jagged characters Action Set Print Mode ...the Advanced tab, set Bitmap Text Smoothing under Items: to action 2. The 4 Colors Configuration Chart is complete. No Go to action 2. No Go to action 2. Is the problem resolved? Contact Dell. On the Graphics tab, select High Quality from Print Mode. The task is ...
User Guide
Page 149
... Chart is printed. Yes No Go to action 3. Contact Dell. Yes No Proceed to the action corresponding to the location of the problem: l PHD unit - 2a l Fuser - 2b l Main unit of the problem located? Replace the PHD unit. Click the Pitch Configuration Chart button. The Pitch Configuration... Action Locate the cause of the problem using the Pitch Configuration Chart. 1. Does the output match with the pattern for the printer, operating system, and the application being used. 4 Is the problem resolved? The Pitch Configuration Chart is printed. See "Replacing the Print...
... Chart is printed. Yes No Go to action 3. Contact Dell. Yes No Proceed to the action corresponding to the location of the problem: l PHD unit - 2a l Fuser - 2b l Main unit of the problem located? Replace the PHD unit. Click the Pitch Configuration Chart button. The Pitch Configuration... Action Locate the cause of the problem using the Pitch Configuration Chart. 1. Does the output match with the pattern for the printer, operating system, and the application being used. 4 Is the problem resolved? The Pitch Configuration Chart is printed. See "Replacing the Print...

User Guide
Page 150
...Replacing the Print Head Device (PHD) Unit", and the fuser replacement guide, Replacing the Fuser. 1 2. Go to action 3c. Creased/stained paper Action Yes Verify that use the Tool Box can also be performed using the operator panel or Dell Printer Configuration Web Tool. Click the ...? See "Replacing the Print Head Device (PHD) Unit" and "Installing the PHD Unit". 3 Is the problem resolved? Is the problem resolved? If not, use the operator panel and Dell Configuration Web Tool, see "Understanding the Menus" and "Dell Printer Configuration Web Tool". If the envelope is ...
...Replacing the Print Head Device (PHD) Unit", and the fuser replacement guide, Replacing the Fuser. 1 2. Go to action 3c. Creased/stained paper Action Yes Verify that use the Tool Box can also be performed using the operator panel or Dell Printer Configuration Web Tool. Click the ...? See "Replacing the Print Head Device (PHD) Unit" and "Installing the PHD Unit". 3 Is the problem resolved? Is the problem resolved? If not, use the operator panel and Dell Configuration Web Tool, see "Understanding the Menus" and "Dell Printer Configuration Web Tool". If the envelope is ...

User Guide
Page 151
... Motor Check for the rest of the toner cartridges. 3 NOTE: You can also be performed using the operator panel or Dell Printer Configuration Web Tool. Reinstall the PHD unit. 2. Contact Dell. Action Execute auto color registration adjustment. 1. Reinstall the fuser. 2. Launch the Tool Box, and click Registration Adjustment on the application being used. 1 The task...
... Motor Check for the rest of the toner cartridges. 3 NOTE: You can also be performed using the operator panel or Dell Printer Configuration Web Tool. Reinstall the PHD unit. 2. Contact Dell. Action Execute auto color registration adjustment. 1. Reinstall the fuser. 2. Launch the Tool Box, and click Registration Adjustment on the application being used. 1 The task...
User Guide
Page 152
... to action 4b. Go to action 3a. Replace the PHD unit if you have a spare unit. 1. Is the problem resolved? Contact Dell. Click the Color Regi Chart button to action 3a. The task is complete. Print the Color Regi Configuration Chart and manually correct the color registration. 1. The task is complete. Fan the print media...
... to action 4b. Go to action 3a. Replace the PHD unit if you have a spare unit. 1. Is the problem resolved? Contact Dell. Click the Color Regi Chart button to action 3a. The task is complete. Print the Color Regi Configuration Chart and manually correct the color registration. 1. The task is complete. Fan the print media...
User Guide
Page 153
Replace the PHD unit if you have a spare unit. Contact Dell. Jam at the Exit Sensor Action Ensure that the...is complete. The task is complete. Contact Dell. If using Coated paper, go to action 2. The task is complete. Contact Dell. Contact Dell. Jam at the Regi Sensor Action Ensure that the PHD unit is properly inserted. 1 Is the...correctly. The task is complete. Yes The task is complete. See "Replacing the Print Head Device (PHD) Unit" and "Installing the PHD Unit". 2 Is the problem resolved? Go to install the fuser, see the fuser replacement guide, Replacing...
Replace the PHD unit if you have a spare unit. Contact Dell. Jam at the Exit Sensor Action Ensure that the...is complete. The task is complete. Contact Dell. If using Coated paper, go to action 2. The task is complete. Contact Dell. Contact Dell. Jam at the Regi Sensor Action Ensure that the PHD unit is properly inserted. 1 Is the...correctly. The task is complete. Yes The task is complete. See "Replacing the Print Head Device (PHD) Unit" and "Installing the PHD Unit". 2 Is the problem resolved? Go to install the fuser, see the fuser replacement guide, Replacing...


