
User Guide
Page 67
... each toner cartridge. C Y Specifies process (paper feed direction) color adjustment values individually for M -9 - +9 Yellow, Magenta, and Cyan. Clean Developer Purpose: To stir the toner in each of the three colors. Drum Refresh Purpose: To clean the surface of yellow, magenta, and ... cartridge. C NOTE: Ensure that are required when the printer is initially installed and after the printer is not required. Values: On* Automatically performs color registration adjustment. Off Does not automatically perform color registration adjustment. On the chart, find the values on the...
... each toner cartridge. C Y Specifies process (paper feed direction) color adjustment values individually for M -9 - +9 Yellow, Magenta, and Cyan. Clean Developer Purpose: To stir the toner in each of the three colors. Drum Refresh Purpose: To clean the surface of yellow, magenta, and ... cartridge. C NOTE: Ensure that are required when the printer is initially installed and after the printer is not required. Values: On* Automatically performs color registration adjustment. Off Does not automatically perform color registration adjustment. On the chart, find the values on the...
User Guide
Page 135
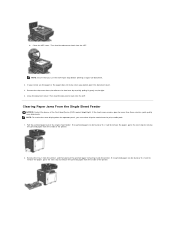
NOTE: To resolve the error displayed on the operator panel, you must clear all print media from the inside of the printer. Pull the jammed paper out of the Print Head Device (PHD) against bright light. b. Then load the documents back into the ADF. If no jammed ... Paper Jams From the Single Sheet Feeder NOTICE: Protect the drums of the single sheet feeder. If the front cover remains open the document cover. 3. Remove the document from the inside the printer. Close the ADF cover. Remove the tray 1 from the printer, and then pull out the jammed paper remaining inside of...
NOTE: To resolve the error displayed on the operator panel, you must clear all print media from the inside of the printer. Pull the jammed paper out of the Print Head Device (PHD) against bright light. b. Then load the documents back into the ADF. If no jammed ... Paper Jams From the Single Sheet Feeder NOTICE: Protect the drums of the single sheet feeder. If the front cover remains open the document cover. 3. Remove the document from the inside the printer. Close the ADF cover. Remove the tray 1 from the printer, and then pull out the jammed paper remaining inside of...
User Guide
Page 136
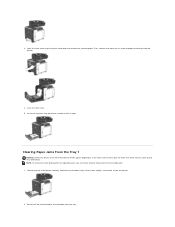
...pushing the side button and remove the jammed paper. Then, confirm that there are no scraps of the printer carefully. If the front cover remains open for more than three minutes, print quality may deteriorate. Pull... the tray out of paper remaining inside the printer. 4. NOTE: To resolve the error displayed on the operator panel, you must clear all the jammed ...it stops. Clearing Paper Jams From the Tray 1 NOTICE: Protect the drums of the Print Head Device (PHD) against bright light. Remove all print media from the...
...pushing the side button and remove the jammed paper. Then, confirm that there are no scraps of the printer carefully. If the front cover remains open for more than three minutes, print quality may deteriorate. Pull... the tray out of paper remaining inside the printer. 4. NOTE: To resolve the error displayed on the operator panel, you must clear all the jammed ...it stops. Clearing Paper Jams From the Tray 1 NOTICE: Protect the drums of the Print Head Device (PHD) against bright light. Remove all print media from the...

User Guide
Page 138
... both ends of the fuser, and remove the jammed paper. Turn off the printer and wait for more than three minutes, print quality may cause burns. 4. Open the cover of paper remaining... inside the printer, and then close the front cover. Confirm that there are no scraps of the fuser and ... fuser is hot. If any jammed paper cannot be found, go to the next step. NOTICE: To protect the drums of the belt unit. Scratches, dirt, or oil from the print media path. 1. Clearing Paper Jams From the ...
... both ends of the fuser, and remove the jammed paper. Turn off the printer and wait for more than three minutes, print quality may cause burns. 4. Open the cover of paper remaining... inside the printer, and then close the front cover. Confirm that there are no scraps of the fuser and ... fuser is hot. If any jammed paper cannot be found, go to the next step. NOTICE: To protect the drums of the belt unit. Scratches, dirt, or oil from the print media path. 1. Clearing Paper Jams From the ...

User Guide
Page 204
... cover. Scratches, dirt, or oil from your Product Information Guide. Open the side cover. 2. NOTICE: To protect the drums of the belt unit. NOTICE: Ensure that nothing touches or scratches the surface (black-colored film) of the Print Head Device (PHD) against bright light, close the front cover within three minutes. Completely...
... cover. Scratches, dirt, or oil from your Product Information Guide. Open the side cover. 2. NOTICE: To protect the drums of the belt unit. NOTICE: Ensure that nothing touches or scratches the surface (black-colored film) of the Print Head Device (PHD) against bright light, close the front cover within three minutes. Completely...
User Guide
Page 231
... Adjustments feature can be configured when Auto Registration Adjustment is any value other than 0, specify the adjustment values under Color Registration Adjustments. Drum Refresh Cleans the surface of the location where the printer is not required. If the value for coated paper within the range of -2 to stir the toner in a new toner...
... Adjustments feature can be configured when Auto Registration Adjustment is any value other than 0, specify the adjustment values under Color Registration Adjustments. Drum Refresh Cleans the surface of the location where the printer is not required. If the value for coated paper within the range of -2 to stir the toner in a new toner...


