
User Guide
Page 3
Auto Reset, 1, 2 Automatic Document Feeder (ADF), 1, 2, 3 Avoiding jam, 1, 2 B B5, 1 Base memory, 1 Base Tone, 1, 2 Basic Information, 1 Basic printer problem, 1 Belt unit, 1 Bitmapped font, 1 Blue plug, 1, 2 BOOTP, 1 C C5, 1 Cable, 1 Canceling a job, 1 Canceling print job From ... Clearing jam, 1 From ADF, 1 From fuser, 1 From single sheet feeder, 1 From tray, 1 Clock Settings, 1, 2 Coated, 1, 2, 3, 4, 5 Coated Thick, 1, 2, 3, 4, 5 Collated, 1, 2, 3 Color, 1, 2, 3, 4, 5 Color Mode Limitation, 1 Color Reg Adjust, 1 Color Regi Chart, 1 Color Registration Adjustments, 1 Color registration chart, 1
Auto Reset, 1, 2 Automatic Document Feeder (ADF), 1, 2, 3 Avoiding jam, 1, 2 B B5, 1 Base memory, 1 Base Tone, 1, 2 Basic Information, 1 Basic printer problem, 1 Belt unit, 1 Bitmapped font, 1 Blue plug, 1, 2 BOOTP, 1 C C5, 1 Cable, 1 Canceling a job, 1 Canceling print job From ... Clearing jam, 1 From ADF, 1 From fuser, 1 From single sheet feeder, 1 From tray, 1 Clock Settings, 1, 2 Coated, 1, 2, 3, 4, 5 Coated Thick, 1, 2, 3, 4, 5 Collated, 1, 2, 3 Color, 1, 2, 3, 4, 5 Color Mode Limitation, 1 Color Reg Adjust, 1 Color Regi Chart, 1 Color Registration Adjustments, 1 Color registration chart, 1

User Guide
Page 13
Removing toner cartridge, 1 Replacing retard roller, 1 Reports, 1 Resend Delay, 1, 2, 3 RESET button, 1 Reset Defaults, 1 Reset Print Server, 1 Resetting Defaults, 1, 2 Resident font, 1 Resident scalable fonts, 1 Resolution, 1, 2, 3, 4, 5 Restore Settings, 1 Return policy, 1 Right frame, 1 Ring Tone Volume, 1, 2, 3 S Safety information, 1 Scalable font, 1 Scan Defaults, 1, 2, 3 Scan Service Lock ...
Removing toner cartridge, 1 Replacing retard roller, 1 Reports, 1 Resend Delay, 1, 2, 3 RESET button, 1 Reset Defaults, 1 Reset Print Server, 1 Resetting Defaults, 1, 2 Resident font, 1 Resident scalable fonts, 1 Resolution, 1, 2, 3, 4, 5 Restore Settings, 1 Return policy, 1 Right frame, 1 Ring Tone Volume, 1, 2, 3 S Safety information, 1 Scalable font, 1 Scan Defaults, 1, 2, 3 Scan Service Lock ...
User Guide
Page 20
...Dell Service Tag Number Displays the service tag number of the tone that the tone is disabled. Off indicates that the tone is emitted when a job ends abnormally. Printer Serial Number Displays the serial number of the Machine Control Unit (MCU) firmware. Displays the volume of your printer. Color Laser... normally. Displays the amount of time before the printer automatically resets the settings on the printer. Printer Settings Report The Printer Settings Report tab includes the Printer Information, Menu Settings, Reports, TCP/IP Settings,...
...Dell Service Tag Number Displays the service tag number of the tone that the tone is disabled. Off indicates that the tone is emitted when a job ends abnormally. Printer Serial Number Displays the serial number of the Machine Control Unit (MCU) firmware. Displays the volume of your printer. Color Laser... normally. Displays the amount of time before the printer automatically resets the settings on the printer. Printer Settings Report The Printer Settings Report tab includes the Printer Information, Menu Settings, Reports, TCP/IP Settings,...

User Guide
Page 24
... not emit a tone when the printer becomes ready. Emits a tone at the specified volume when the printer becomes ready. Printer Maintenance The Printer Maintenance tab includes the System Settings, Clock Settings, Paper Density, Registration Adjustment, Adjust Altitude, Reset Defaults, NonDell Toner, Initialize PrintMeter,...setting of paper. Does not emit a tone when the operator panel input is complete. Specifies the time before the printer automatically resets the settings on the operator panel to the defaults when no additional settings are the factory default menu settings. Emits...
... not emit a tone when the printer becomes ready. Emits a tone at the specified volume when the printer becomes ready. Printer Maintenance The Printer Maintenance tab includes the System Settings, Clock Settings, Paper Density, Registration Adjustment, Adjust Altitude, Reset Defaults, NonDell Toner, Initialize PrintMeter,...setting of paper. Does not emit a tone when the operator panel input is complete. Specifies the time before the printer automatically resets the settings on the operator panel to the defaults when no additional settings are the factory default menu settings. Emits...

User Guide
Page 27
... you complete the settings, press the Apply New Settings button to use of the location where the printer is reset to apply the changes. Values: System Section Initializes system parameters. Purpose: To specify whether or not... to apply the changes. Web Link Customization Purpose: To set links used , the printer may be severely damaged and may not be covered by specifying the altitude of another manufacturer's toner cartridge. Regular* accessories.us.dell...
... you complete the settings, press the Apply New Settings button to use of the location where the printer is reset to apply the changes. Values: System Section Initializes system parameters. Purpose: To specify whether or not... to apply the changes. Web Link Customization Purpose: To set links used , the printer may be severely damaged and may not be covered by specifying the altitude of another manufacturer's toner cartridge. Regular* accessories.us.dell...

User Guide
Page 56
...127 and any value in the range of 224 to 169.254.254.255 that makes up to Dell Printer Configuration Web Tool embedded in the range of 169.254.1.0 to 254 cannot be specified for Filter... the IP address using RARP. Panel Use this function and rebooting the printer, all wired network settings are reset to 254 cannot be specified for LPD or Port9100. Each octet that makes...value in the range of 224 to their default values. The change becomes effective after the printer is set as the subnet mask. Disable Disables the Port9100 port. The subnet mask is ...
...127 and any value in the range of 224 to 169.254.254.255 that makes up to Dell Printer Configuration Web Tool embedded in the range of 169.254.1.0 to 254 cannot be specified for Filter... the IP address using RARP. Panel Use this function and rebooting the printer, all wired network settings are reset to 254 cannot be specified for LPD or Port9100. Each octet that makes...value in the range of 224 to their default values. The change becomes effective after the printer is set as the subnet mask. Disable Disables the Port9100 port. The subnet mask is ...

User Guide
Page 63
... Paper Medium* Emits a tone when the printer runs out of paper. High Off Does not emit a tone when a copy job is incorrect. Low Alert Tone Medium* Emits a tone when a problem occurs. Auto Reset Purpose: To automatically reset the settings for the specified time. Machine ...Ready Tone High Off Does not emit a tone when the printer is complete. Values: 45sec* 1min 2min 3min 4min Alert Tone Purpose: To...
... Paper Medium* Emits a tone when the printer runs out of paper. High Off Does not emit a tone when a copy job is incorrect. Low Alert Tone Medium* Emits a tone when a problem occurs. Auto Reset Purpose: To automatically reset the settings for the specified time. Machine ...Ready Tone High Off Does not emit a tone when the printer is complete. Values: 45sec* 1min 2min 3min 4min Alert Tone Purpose: To...

User Guide
Page 68
...: Off* Does not use another manufacturer's toner cartridge. Init Print Meter Purpose: To initialize the print meter of a new Dell brand toner cartridge is reset to poor printing quality, incorrect indication of the printer's reliability. See also: "Setting Panel Lock" Panel Lock NOTICE: An incorrect altitude adjustment setting leads to zero. System Section...
...: Off* Does not use another manufacturer's toner cartridge. Init Print Meter Purpose: To initialize the print meter of a new Dell brand toner cartridge is reset to poor printing quality, incorrect indication of the printer's reliability. See also: "Setting Panel Lock" Panel Lock NOTICE: An incorrect altitude adjustment setting leads to zero. System Section...

User Guide
Page 109
... or character. A pause must be entered in order for a second dial tone. NOTE: The following settings can be necessary to reset the correct time and date if loss of power to the printer occurs. Press until >Admin Menu appears, and then press . 3. Press until >SETUP appears, and then press . 2. Press until >System...
... or character. A pause must be entered in order for a second dial tone. NOTE: The following settings can be necessary to reset the correct time and date if loss of power to the printer occurs. Press until >Admin Menu appears, and then press . 3. Press until >SETUP appears, and then press . 2. Press until >System...

User Guide
Page 129
...fonts resident in print memory. The following examples illustrate two very different proportional fonts at the point size you turn off or reset the printer. Each time you may need to purchase additional memory for downloading fonts to print samples of the characters at 14 point: ...Bitmapped and Scalable Fonts The printer uses both bitmapped and scalable fonts. affect how the font looks. PCL 5/PCL 6 uses Intellifont and TrueType scalable fonts. Scalable fonts...
...fonts resident in print memory. The following examples illustrate two very different proportional fonts at the point size you turn off or reset the printer. Each time you may need to purchase additional memory for downloading fonts to print samples of the characters at 14 point: ...Bitmapped and Scalable Fonts The printer uses both bitmapped and scalable fonts. affect how the font looks. PCL 5/PCL 6 uses Intellifont and TrueType scalable fonts. Scalable fonts...
User Guide
Page 164
... Launch Utility dialog box opens. 2. Select Machine Check from Printer Name. 4. Resetting Defaults After executing this function and rebooting the printer, all the menu parameters, except the parameters for the network, are reset to apply the settings. Press until an error occurs. Press... NVM appears, and then press . 5. Click start® All Programs® Dell Printers® Additional Color Laser Software® Quick Launch Utility. The Tool Box dialog box opens. 3. From the Printer Operator Panel 1. Click E-Mail Alert link. 3. Click the Diagnosis tab. 6. ...
... Launch Utility dialog box opens. 2. Select Machine Check from Printer Name. 4. Resetting Defaults After executing this function and rebooting the printer, all the menu parameters, except the parameters for the network, are reset to apply the settings. Press until an error occurs. Press... NVM appears, and then press . 5. Click start® All Programs® Dell Printers® Additional Color Laser Software® Quick Launch Utility. The Tool Box dialog box opens. 3. From the Printer Operator Panel 1. Click E-Mail Alert link. 3. Click the Diagnosis tab. 6. ...

User Guide
Page 165
The Quick Launch Utility dialog box opens. 2. The Tool Box opens. 4. Click the Printer Maintenance tab. 5. The Tool Box dialog box opens. 3. Back to apply the settings. Click System Section button. The printer restarts automatically to Contents Page Select Reset Defaults from Printer Name. Select the printer from the list at the left side of the page. The Reset Defaults page is displayed. 6. From Your Computer 1. Click start® All Programs® Dell Printers® Additional Color Laser Software® Quick Launch Utility. Click the Tool Box button.
The Quick Launch Utility dialog box opens. 2. The Tool Box opens. 4. Click the Printer Maintenance tab. 5. The Tool Box dialog box opens. 3. Back to apply the settings. Click System Section button. The printer restarts automatically to Contents Page Select Reset Defaults from Printer Name. Select the printer from the list at the left side of the page. The Reset Defaults page is displayed. 6. From Your Computer 1. Click start® All Programs® Dell Printers® Additional Color Laser Software® Quick Launch Utility. Click the Tool Box button.
User Guide
Page 196
...Dell Printers® Additional Color Laser Software® Quick Launch Utility. The System Settings page is displayed. To find your web browser. Changing a system setting from the operator panel, Tool Box or from Printer Name. Press . The Quick Launch Utility dialog box opens. 2. Select the printer from the Dell Printer...Contents Page Printer Settings Printing a System Settings Page Using the Operator Panel to Change the Printer Settings Using Your Computer to Change the Printer Settings Using the Dell Printer Configuration Web Tool to Change the Printer Settings Resetting Defaults ...
...Dell Printers® Additional Color Laser Software® Quick Launch Utility. The System Settings page is displayed. To find your web browser. Changing a system setting from the operator panel, Tool Box or from Printer Name. Press . The Quick Launch Utility dialog box opens. 2. Select the printer from the Dell Printer...Contents Page Printer Settings Printing a System Settings Page Using the Operator Panel to Change the Printer Settings Using Your Computer to Change the Printer Settings Using the Dell Printer Configuration Web Tool to Change the Printer Settings Resetting Defaults ...
User Guide
Page 198
... then press . 3. Click start® All Programs® Dell Printers® Additional Color Laser Software® Quick Launch Utility. Click the System Settings button. The System Settings page is displayed. 6. Resetting Defaults After executing this function and rebooting the printer, all the printers on the network, choose Copy Printer Settings from the list at the left side of...
... then press . 3. Click start® All Programs® Dell Printers® Additional Color Laser Software® Quick Launch Utility. Click the System Settings button. The System Settings page is displayed. 6. Resetting Defaults After executing this function and rebooting the printer, all the printers on the network, choose Copy Printer Settings from the list at the left side of...
User Guide
Page 199
...® Dell Printers® Additional Color Laser Software® Quick Launch Utility. The Tool Box dialog box opens. 3. The printer is turned off automatically to apply the settings. From Your Computer 1. Press until >Panel Language appears, and then press . 3. Press until >System Section appears, and then press . 6. Press The printer is displayed. 6. Select Reset Defaults from Printer Name...
...® Dell Printers® Additional Color Laser Software® Quick Launch Utility. The Tool Box dialog box opens. 3. The printer is turned off automatically to apply the settings. From Your Computer 1. Press until >Panel Language appears, and then press . 3. Press until >System Section appears, and then press . 6. Press The printer is displayed. 6. Select Reset Defaults from Printer Name...
User Guide
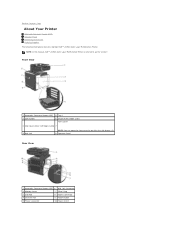
Page 201
... Connector 2 Memory Cover 7 "Blue" Plug 3 USB Port 8 Power Connector 4 Ethernet Port 9 RESET Button 5 Phone Connector 10 Power Switch NOTE: In this manual, Dell™ 2135cn Color Laser Multifunction Printer is referred to Contents Page About Your Printer Automatic Document Feeder (ADF) Operator Panel Protecting Your Printer Ordering Supplies The following illustrations show the standard Dell™ 2135cn Color Laser Multifunction Printer. Back to as the...
... Connector 2 Memory Cover 7 "Blue" Plug 3 USB Port 8 Power Connector 4 Ethernet Port 9 RESET Button 5 Phone Connector 10 Power Switch NOTE: In this manual, Dell™ 2135cn Color Laser Multifunction Printer is referred to Contents Page About Your Printer Automatic Document Feeder (ADF) Operator Panel Protecting Your Printer Ordering Supplies The following illustrations show the standard Dell™ 2135cn Color Laser Multifunction Printer. Back to as the...

User Guide
Page 207
... Edition support USB connections. Back to Contents Page Connecting Your Printer Choosing the Right Cable Connecting the Printer Directly to a Computer Turning On the Printer Connecting the Printer to the Network Connecting the Telephone Line Using the RESET Button Choosing the Right Cable Your Dell™ 2135cn Color Laser Multifunction Printer interconnection cable must meet the following requirements: Connection type Connection...
... Edition support USB connections. Back to Contents Page Connecting Your Printer Choosing the Right Cable Connecting the Printer Directly to a Computer Turning On the Printer Connecting the Printer to the Network Connecting the Telephone Line Using the RESET Button Choosing the Right Cable Your Dell™ 2135cn Color Laser Multifunction Printer interconnection cable must meet the following requirements: Connection type Connection...

User Guide
Page 212
... you are supplied with an electric leakage detector, which prevents an electric shock or fire due to turn the printer back on. If the RESET button is serial in your printer, plug the telephone or answering machine line cord into the phone connector ( ). Remove the "Blue" plug...an electric leakage by automatically cutting circuits inside the printer. To connect a telephone and/or answering machine to your country (such as Germany, Sweden, Denmark, Austria, Belgium, Italy, France and Switzerland), and that you press the RESET button, contact Dell. Plug one end of a telephone line cord ...
... you are supplied with an electric leakage detector, which prevents an electric shock or fire due to turn the printer back on. If the RESET button is serial in your printer, plug the telephone or answering machine line cord into the phone connector ( ). Remove the "Blue" plug...an electric leakage by automatically cutting circuits inside the printer. To connect a telephone and/or answering machine to your country (such as Germany, Sweden, Denmark, Austria, Belgium, Italy, France and Switzerland), and that you press the RESET button, contact Dell. Plug one end of a telephone line cord ...

User Guide
Page 213
At least once a month, check whether or not the electric leakage detector is turned off, the electric leakage detector functions correctly. l If the RESET button is tripped and the printer is functioning by following the steps below: 1. l If the RESET button is not functioning. Back to use the printer if the electric leakage detector is not tripped, contact Dell. Turn on . Do not continue to Contents Page Press the RESET button to turn the printer back on the printer, and then press the TEST button.
At least once a month, check whether or not the electric leakage detector is turned off, the electric leakage detector functions correctly. l If the RESET button is tripped and the printer is functioning by following the steps below: 1. l If the RESET button is not functioning. Back to use the printer if the electric leakage detector is not tripped, contact Dell. Turn on . Do not continue to Contents Page Press the RESET button to turn the printer back on the printer, and then press the TEST button.

User Guide
Page 219
... Report" "Reports" "System Settings" "PCL Settings" "Secure Settings" "Copy Defaults" "Printer Settings" "Copy Color Balance" "Copy Settings" "Scan Defaults" "Fax Defaults" "Fax Settings" "Printer Settings" "Paper Density" "Adjust BTR" "Adjust Fuser" "Auto Registration Adjustment" "Color Registration Adjustments" "Printer Maintenance" "Clean Developer" "Adjust Altitude" "Reset Defaults" "Non-Dell Toner" "Initialize PrintMeter" "Clock Settings" "Web Link Customization" "Print Server...
... Report" "Reports" "System Settings" "PCL Settings" "Secure Settings" "Copy Defaults" "Printer Settings" "Copy Color Balance" "Copy Settings" "Scan Defaults" "Fax Defaults" "Fax Settings" "Printer Settings" "Paper Density" "Adjust BTR" "Adjust Fuser" "Auto Registration Adjustment" "Color Registration Adjustments" "Printer Maintenance" "Clean Developer" "Adjust Altitude" "Reset Defaults" "Non-Dell Toner" "Initialize PrintMeter" "Clock Settings" "Web Link Customization" "Print Server...


