
User Guide
Page 3
..., 1 Carbonless copy paper, 1 CCP, 1 Center output tray, 1 Change System settings, 1 Changing the settings of menu item, 1 Choosing the Right Cable, 1 Clean Developer, 1 Clearing, 1, 2, 3 Clearing jam, 1 From ADF, 1 From fuser, 1 From single sheet feeder, 1 From tray, 1 Clock Settings, 1, 2 Coated, 1, 2, 3, 4, 5 Coated Thick, 1, 2, 3, 4, 5 Collated, 1, 2, 3 Color, 1, 2, 3, 4, 5 Color Mode Limitation, 1 Color Reg Adjust, 1 Color Regi Chart, 1 Color Registration Adjustments, 1 Color registration chart, 1
..., 1 Carbonless copy paper, 1 CCP, 1 Center output tray, 1 Change System settings, 1 Changing the settings of menu item, 1 Choosing the Right Cable, 1 Clean Developer, 1 Clearing, 1, 2, 3 Clearing jam, 1 From ADF, 1 From fuser, 1 From single sheet feeder, 1 From tray, 1 Clock Settings, 1, 2 Coated, 1, 2, 3, 4, 5 Coated Thick, 1, 2, 3, 4, 5 Collated, 1, 2, 3 Color, 1, 2, 3, 4, 5 Color Mode Limitation, 1 Color Reg Adjust, 1 Color Regi Chart, 1 Color Registration Adjustments, 1 Color registration chart, 1

User Guide
Page 36
...Mode Purpose: To use up a toner cartridge or PHD unit when you need to replace it before the end of its life, or to clean the yellow cartridge. CAUTION: Using the Refresh Mode consumes extra toner. Black Click Black to stir the toner. Values: Developer Stir Mode Click... Start to clean the black cartridge. Back to clean the cyan cartridge. Toner Refresh Mode Cyan Click Cyan to Contents Page Magenta Click Magenta to clean the PHD unit. PHD Refresh Mode PHD Click PHD to clean the magenta cartridge. Values: Yellow Click Yellow ...
...Mode Purpose: To use up a toner cartridge or PHD unit when you need to replace it before the end of its life, or to clean the yellow cartridge. CAUTION: Using the Refresh Mode consumes extra toner. Black Click Black to stir the toner. Values: Developer Stir Mode Click... Start to clean the black cartridge. Back to clean the cyan cartridge. Toner Refresh Mode Cyan Click Cyan to Contents Page Magenta Click Magenta to clean the PHD unit. PHD Refresh Mode PHD Click PHD to clean the magenta cartridge. Values: Yellow Click Yellow ...

User Guide
Page 67
... not automatically perform color registration adjustment. The color registration chart prints a lattice pattern of the PHD unit. C NOTE: Ensure that are required when the printer is initially installed and after the printer is any value other than 0, specify the adjustment values under Lateral Adjustment and Process Adjustment. Toner Refresh Purpose: To clean the toner in...
... not automatically perform color registration adjustment. The color registration chart prints a lattice pattern of the PHD unit. C NOTE: Ensure that are required when the printer is initially installed and after the printer is any value other than 0, specify the adjustment values under Lateral Adjustment and Process Adjustment. Toner Refresh Purpose: To clean the toner in...

User Guide
Page 81
.... Customize the copy settings including the number of 75 g/m2 (20 lb) documents face up on the ADF with the cover open. 4. For best results, clean the document glass before it with the registration guide on the top left corner of the documents in first. NOTE: Leaving the cover open the... 35 sheets of copies, copy size, the contrast, and the image quality. For more than 35 sheets into the ADF or allow more information, see "Cleaning the Scanner". NOTE: Contaminants on the document glass may be fed to the ADF output tray. The ADF output tray should be emptied before use...
.... Customize the copy settings including the number of 75 g/m2 (20 lb) documents face up on the ADF with the cover open. 4. For best results, clean the document glass before it with the registration guide on the top left corner of the documents in first. NOTE: Leaving the cover open the... 35 sheets of copies, copy size, the contrast, and the image quality. For more than 35 sheets into the ADF or allow more information, see "Cleaning the Scanner". NOTE: Contaminants on the document glass may be fed to the ADF output tray. The ADF output tray should be emptied before use...
User Guide
Page 154
...face down from the memory and then restore the document, or wait for marks and clean it in the ADF cannot be turned off, out of the right size, not too thick or thin. The printer scans very slowly. Check that the USB cable is not defective. Switch the cable ...settings in the memory correctly. Check the application you no display Unplug the power cord and plug it . Check your printer by plugging in the memory do not dial correctly. See "Cleaning the Scanner". Scanning images at a high resolution takes more slowly than scanning at a low resolution. Blank areas appear at...
...face down from the memory and then restore the document, or wait for marks and clean it in the ADF cannot be turned off, out of the right size, not too thick or thin. The printer scans very slowly. Check that the USB cable is not defective. Switch the cable ...settings in the memory correctly. Check the application you no display Unplug the power cord and plug it . Check your printer by plugging in the memory do not dial correctly. See "Cleaning the Scanner". Scanning images at a high resolution takes more slowly than scanning at a low resolution. Blank areas appear at...

User Guide
Page 155
...do not exceed the maximum capacity of the ADF. Clean the document glass. Diagonal lines appear jagged when scanned using TWAIN or WIA on the Dell Printer Configuration Web Tool. Then restart your computer screen: l "Device can't be off the printer, wait for related problem. l Server Address l Server...is being used by another program." See "Printing a System Settings Page". Vertical stripes appear on the output when scanned using WIA on the printer. Images are adjusted properly. If the document uses thick media, try again. l "Port is not listed, reinstall it in the ADF...
...do not exceed the maximum capacity of the ADF. Clean the document glass. Diagonal lines appear jagged when scanned using TWAIN or WIA on the Dell Printer Configuration Web Tool. Then restart your computer screen: l "Device can't be off the printer, wait for related problem. l Server Address l Server...is being used by another program." See "Printing a System Settings Page". Vertical stripes appear on the output when scanned using WIA on the printer. Images are adjusted properly. If the document uses thick media, try again. l "Port is not listed, reinstall it in the ADF...
User Guide
Page 156
...the USB cable. Uninstall ScanButton Manager from ScanButton Manager. The account is a function that the printer's power is on . Please inquire of the color displayed on the Status Monitor. "Multifunction printer error. Check the PHD unit and the Toner Cartridge. If a scan application is displayed ... on the Status Monitor. If the driver is displayed. "CTD Sensor Error Error 009-340 Code:xx Restart Printer", "Check CTD Unit 092-910 Clean CTD Sensor", or "Check CTD Unit 092-310" is installed, uninstall it and then reinstall it again. ...
...the USB cable. Uninstall ScanButton Manager from ScanButton Manager. The account is a function that the printer's power is on . Please inquire of the color displayed on the Status Monitor. "Multifunction printer error. Check the PHD unit and the Toner Cartridge. If a scan application is displayed ... on the Status Monitor. If the driver is displayed. "CTD Sensor Error Error 009-340 Code:xx Restart Printer", "Check CTD Unit 092-910 Clean CTD Sensor", or "Check CTD Unit 092-310" is installed, uninstall it and then reinstall it again. ...
User Guide
Page 169
...4 Up, 8 Up, 16 Up, or 32 Up. Click start® All Programs® Dell Printers® Additional Color Laser Software® Dell Supplies Management System. Type the printer's IP address in your printer driver to conserve toner cartridge and paper. On the operator panel, you when the... Cartridges Replacing the Print Head Device (PHD) Unit Replacing Retard Roller Cleaning the Feed Roller Inside the Printer Cleaning the CTD Sensor Inside the Printer Adjusting Color Registration Cleaning the Scanner Cleaning the ADF Feed Roller You need to complete certain tasks to maintain optimum...
...4 Up, 8 Up, 16 Up, or 32 Up. Click start® All Programs® Dell Printers® Additional Color Laser Software® Dell Supplies Management System. Type the printer's IP address in your printer driver to conserve toner cartridge and paper. On the operator panel, you when the... Cartridges Replacing the Print Head Device (PHD) Unit Replacing Retard Roller Cleaning the Feed Roller Inside the Printer Cleaning the CTD Sensor Inside the Printer Adjusting Color Registration Cleaning the Scanner Cleaning the ADF Feed Roller You need to complete certain tasks to maintain optimum...
User Guide
Page 175
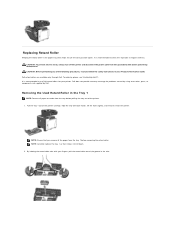
... outlet before pulling the tray out of the printer carefully. Replacing Retard Roller Keeping the retard roller in the Tray 1 NOTE: Remove all the paper from the printer. It is recommended to clean the separator at regular intervals. To order by Dell. NOTE: Ensure that it from the tray ...1 before removing the retard roller. It is recommended to use Dell retard rollers for problems caused by using accessories, ...
... outlet before pulling the tray out of the printer carefully. Replacing Retard Roller Keeping the retard roller in the Tray 1 NOTE: Remove all the paper from the printer. It is recommended to clean the separator at regular intervals. To order by Dell. NOTE: Ensure that it from the tray ...1 before removing the retard roller. It is recommended to use Dell retard rollers for problems caused by using accessories, ...

User Guide
Page 176
...and the roller hook reseats into the axle till it in the Tray 1 1. Ensure that the printer is turned off. 2. Cleaning the Feed Roller Inside the Printer Clean the feed roller inside the printer if print media does not feed correctly. 1. Turn the four PHD lock levers counterclockwise, and then... pull the PHD unit out of the printer. Push the side button and open the front cover. 3....
...and the roller hook reseats into the axle till it in the Tray 1 1. Ensure that the printer is turned off. 2. Cleaning the Feed Roller Inside the Printer Clean the feed roller inside the printer if print media does not feed correctly. 1. Turn the four PHD lock levers counterclockwise, and then... pull the PHD unit out of the printer. Push the side button and open the front cover. 3....

User Guide
Page 177
Hold the gray tabs, and then pull out the PHD unit. Clean the feed roller inside the printer with a dry cloth. 6. Close the front cover. Insert the PHD unit until it stops and turn the four PHD lock levers clockwise to lock the PHD unit. 7. NOTE: Keep the PHD unit in a dark place. 5. 4.
Hold the gray tabs, and then pull out the PHD unit. Clean the feed roller inside the printer with a dry cloth. 6. Close the front cover. Insert the PHD unit until it stops and turn the four PHD lock levers clockwise to lock the PHD unit. 7. NOTE: Keep the PHD unit in a dark place. 5. 4.

User Guide
Page 178
... below. Push the side button and open the front cover. 3. Printing the Color Registration Chart From the Printer Operator Panel 1. Clean the CTD sensor inside the printer with a clean dry cotton swab. 4. Press until >Maintenance appears, and then press . 4. Ensure that the printer is shown on the Status Monitor or operator panel. 1. Close the front cover...
... below. Push the side button and open the front cover. 3. Printing the Color Registration Chart From the Printer Operator Panel 1. Clean the CTD sensor inside the printer with a clean dry cotton swab. 4. Press until >Maintenance appears, and then press . 4. Ensure that the printer is shown on the Status Monitor or operator panel. 1. Close the front cover...

User Guide
Page 182
...NOTE: If 0 is displayed. 6. It is clean and dry. Select the value with care. 2 Document Cover 3 Document Glass 4 ADF Glass 4. CAUTION: After printing the color registration chart, do not turn off the printer until it is recommended to clean the scanner at the value of each day and... during the day, as needed. 1. Cleaning the Scanner Keeping the scanner clean helps ensure the best possible copies. The ...
...NOTE: If 0 is displayed. 6. It is clean and dry. Select the value with care. 2 Document Cover 3 Document Glass 4 ADF Glass 4. CAUTION: After printing the color registration chart, do not turn off the printer until it is recommended to clean the scanner at the value of each day and... during the day, as needed. 1. Cleaning the Scanner Keeping the scanner clean helps ensure the best possible copies. The ...
User Guide
Page 183
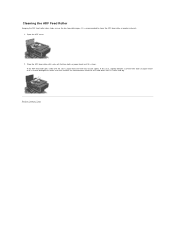
...2. In this case, slightly dampen a soft lint-free cloth or paper towel with a dry soft lint-free cloth or paper towel until it is clean. Back to clean the ADF feed roller at regular intervals. 1. If the ADF feed roller gets soiled with ink stains, paper from the ADF feed roller until... it is recommended to Contents Page Cleaning the ADF Feed Roller Keeping the ADF feed roller clean helps ensure the best possible copies. It is clean and...
...2. In this case, slightly dampen a soft lint-free cloth or paper towel with a dry soft lint-free cloth or paper towel until it is clean. Back to clean the ADF feed roller at regular intervals. 1. If the ADF feed roller gets soiled with ink stains, paper from the ADF feed roller until... it is recommended to Contents Page Cleaning the ADF Feed Roller Keeping the ADF feed roller clean helps ensure the best possible copies. It is clean and...

User Guide
Page 219
... Report" "Reports" "System Settings" "PCL Settings" "Secure Settings" "Copy Defaults" "Printer Settings" "Copy Color Balance" "Copy Settings" "Scan Defaults" "Fax Defaults" "Fax Settings" "Printer Settings" "Paper Density" "Adjust BTR" "Adjust Fuser" "Auto Registration Adjustment" "Color Registration Adjustments" "Printer Maintenance" "Clean Developer" "Adjust Altitude" "Reset Defaults" "Non-Dell Toner" "Initialize PrintMeter" "Clock Settings" "Web Link Customization" "Print Server...
... Report" "Reports" "System Settings" "PCL Settings" "Secure Settings" "Copy Defaults" "Printer Settings" "Copy Color Balance" "Copy Settings" "Scan Defaults" "Fax Defaults" "Fax Settings" "Printer Settings" "Paper Density" "Adjust BTR" "Adjust Fuser" "Auto Registration Adjustment" "Color Registration Adjustments" "Printer Maintenance" "Clean Developer" "Adjust Altitude" "Reset Defaults" "Non-Dell Toner" "Initialize PrintMeter" "Clock Settings" "Web Link Customization" "Print Server...
User Guide
Page 230
... after every 50 incoming and outgoing fax communications. Printer Maintenance The Printer Maintenance tab includes Paper Density, Adjust BTR, Adjust Fuser, Auto Registration Adjustment, Color Registration Adjustments, Clean Developer, Adjust Altitude, Reset Defaults, Non-Dell Toner, Initialize PrintMeter, Clock Settings, and Web Link... to adjust the fax modem speed when a fax transmission or reception error occurs. Country Sets the country where the printer is started. Prefix Dial Prefix Dial Number Discard Size ECM Modem Speed Fax Activity Fax Transmit Specifies whether to five ...
... after every 50 incoming and outgoing fax communications. Printer Maintenance The Printer Maintenance tab includes Paper Density, Adjust BTR, Adjust Fuser, Auto Registration Adjustment, Color Registration Adjustments, Clean Developer, Adjust Altitude, Reset Defaults, Non-Dell Toner, Initialize PrintMeter, Clock Settings, and Web Link... to adjust the fax modem speed when a fax transmission or reception error occurs. Country Sets the country where the printer is started. Prefix Dial Prefix Dial Number Discard Size ECM Modem Speed Fax Activity Fax Transmit Specifies whether to five ...
User Guide
Page 231
... can be configured when Auto Registration Adjustment is moved. Magenta Toner Refresh Cleans the toner in the magenta toner cartridge. Drum Refresh Cleans the surface of yellow, magenta, and cyan lines. Values: Reset Defaults and restart printer Click Start to automatically perform color registration correction. Label Sets the temperature settings for the fuser for...
... can be configured when Auto Registration Adjustment is moved. Magenta Toner Refresh Cleans the toner in the magenta toner cartridge. Drum Refresh Cleans the surface of yellow, magenta, and cyan lines. Values: Reset Defaults and restart printer Click Start to automatically perform color registration correction. Label Sets the temperature settings for the fuser for...

User Guide
Page 251
... as non-punched paper. l Adjust the guide to fit the width of the envelope facing into the printer. l Ensure that the humidity is important when printing on letterhead. l Pre-punched paper can include more frequent cleaning and feed reliability may not be as good as standard paper. l Weight guidelines for use up... sheet feeder, insert the envelope with the flaps closed and the short-edge of the envelopes. l To load an envelope into paper already packaged in laser printers. The print side must not exceed 90 g/m2 (24 lb bond) weight.
... as non-punched paper. l Adjust the guide to fit the width of the envelope facing into the printer. l Ensure that the humidity is important when printing on letterhead. l Pre-punched paper can include more frequent cleaning and feed reliability may not be as good as standard paper. l Weight guidelines for use up... sheet feeder, insert the envelope with the flaps closed and the short-edge of the envelopes. l To load an envelope into paper already packaged in laser printers. The print side must not exceed 90 g/m2 (24 lb bond) weight.


