User Guide
Page 5
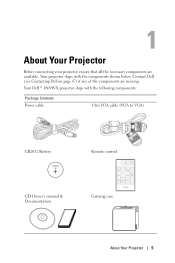
Your Dell™ 1609WX projector ships with the components shown below. Contact Dell (see Contacting Dell on page 47) if any of the components are available. Your projector ships with the following components: Package Contents Power cable 1.8m VGA cable (VGA to VGA) CR2032 Battery CR2032 3V CD Owner's manual & Documentation Remote control Carrying case DELL About Your Projector 5 1 About Your Projector Before connecting your projector ensure that all the necessary components are missing.
Your Dell™ 1609WX projector ships with the components shown below. Contact Dell (see Contacting Dell on page 47) if any of the components are available. Your projector ships with the following components: Package Contents Power cable 1.8m VGA cable (VGA to VGA) CR2032 Battery CR2032 3V CD Owner's manual & Documentation Remote control Carrying case DELL About Your Projector 5 1 About Your Projector Before connecting your projector ensure that all the necessary components are missing.

User Guide
Page 26
manually select the input signal. If you press the Source button when the Auto Source mode is...to lock the current input signal. AUTO SOURCE-Select On (the default) to detect Composite Video signal. 26 Using Your Projector COMPOSITE VIDEO-Press Enter to autodetect the available input signals. Main Menu INPUT SELECT The Input Select menu allows you can ...VGA-A-Press Enter to detect S-Video signal. DVI-D-Press Enter to select your projectors input source. To go back to Main menu, go to Back tab and press the Enter button on , it automatically...
manually select the input signal. If you press the Source button when the Auto Source mode is...to lock the current input signal. AUTO SOURCE-Select On (the default) to detect Composite Video signal. 26 Using Your Projector COMPOSITE VIDEO-Press Enter to autodetect the available input signals. Main Menu INPUT SELECT The Input Select menu allows you can ...VGA-A-Press Enter to detect S-Video signal. DVI-D-Press Enter to select your projectors input source. To go back to Main menu, go to Back tab and press the Enter button on , it automatically...

User Guide
Page 28
...mode is activated. The Picture menu, provides the following options: BRIGHTNESS-Use and to adjust the color temperature. CONTRAST-Use and to manually adjust the colours red, green, and blue. COLOR ADJUST-Allows you can adjust the display settings of the image. COLOR TEMP-Allows ...you adjust the values in the Custom mode. 28 Using Your Projector - Component cable (720p/1080i/1080p) PROJECTOR INFO-Displays the projector model name, the present input source and projector series number (PPID#). The screen appears cooler at higher color temperatures and warmer at ...
...mode is activated. The Picture menu, provides the following options: BRIGHTNESS-Use and to adjust the color temperature. CONTRAST-Use and to manually adjust the colours red, green, and blue. COLOR ADJUST-Allows you can adjust the display settings of the image. COLOR TEMP-Allows ...you adjust the values in the Custom mode. 28 Using Your Projector - Component cable (720p/1080i/1080p) PROJECTOR INFO-Displays the projector model name, the present input source and projector series number (PPID#). The screen appears cooler at higher color temperatures and warmer at ...
User Guide
Page 29
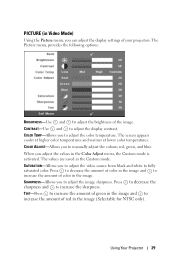
...-Allows you to adjust the image sharpness. SHARPNESS-Allows you to adjust the video source from black and white to increase the amount of your projectors. TINT-Press to increase the amount of green in the image and to fully saturated color. When you adjust the values in the Custom mode.... The Picture menu, provides the following options: BRIGHTNESS-Use and to adjust the brightness of color in the image and to manually adjust the colours red, green, and blue. CONTRAST-Use and to increase the sharpness. COLOR TEMP-Allows you to increase the amount of the image...
...-Allows you to adjust the image sharpness. SHARPNESS-Allows you to adjust the video source from black and white to increase the amount of your projectors. TINT-Press to increase the amount of green in the image and to fully saturated color. When you adjust the values in the Custom mode.... The Picture menu, provides the following options: BRIGHTNESS-Use and to adjust the brightness of color in the image and to manually adjust the colours red, green, and blue. CONTRAST-Use and to increase the sharpness. COLOR TEMP-Allows you to increase the amount of the image...

User Guide
Page 30
... PC, Movie, sRGB (provides more accurate color representation), Game, and Custom (set your projectors. DEGAMMA-Allows you to adjust among the 4 preset values (1, 2, 3, 4) to Custom. ZOOM-Press to manually select signal type RGB, YCbCr, or YPbPr. WHITE INTENSITY-Set 0 to maximize the color... reproduction and 10 to navigate projection screen. If you to digitally magnify an image up . 30 Using Your Projector ZOOM NAVIGATION-Press to maximize the brightness...
... PC, Movie, sRGB (provides more accurate color representation), Game, and Custom (set your projectors. DEGAMMA-Allows you to adjust among the 4 preset values (1, 2, 3, 4) to Custom. ZOOM-Press to manually select signal type RGB, YCbCr, or YPbPr. WHITE INTENSITY-Set 0 to maximize the color... reproduction and 10 to navigate projection screen. If you to digitally magnify an image up . 30 Using Your Projector ZOOM NAVIGATION-Press to maximize the brightness...
User Guide
Page 31
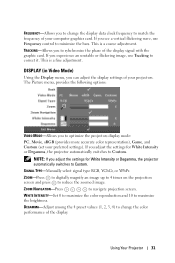
... Tracking to correct it. This is a coarse adjustment. If you adjust the settings for White Intensity or Degamma, the projector automatically switches to navigate projection screen. WHITE INTENSITY-Set 0 to maximize the color reproduction and 10 to Custom. FREQUENCY-Allows...projector automatically switches to maximize the brightness. NOTE: If you experience an unstable or flickering image, use Frequency control to change the display data clock frequency to sybchronize the phase of your computer graphics card. ZOOM NAVIGATION-Press to Custom. SIGNAL TYPE-Manually...
... Tracking to correct it. This is a coarse adjustment. If you adjust the settings for White Intensity or Degamma, the projector automatically switches to navigate projection screen. WHITE INTENSITY-Set 0 to maximize the color reproduction and 10 to Custom. FREQUENCY-Allows...projector automatically switches to maximize the brightness. NOTE: If you experience an unstable or flickering image, use Frequency control to change the display data clock frequency to sybchronize the phase of your computer graphics card. ZOOM NAVIGATION-Press to Custom. SIGNAL TYPE-Manually...


