User Guide
Page 5
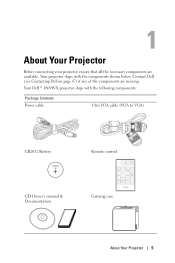
Your projector ships with the following components: Package Contents Power cable 1.8m VGA cable (VGA to VGA) CR2032 Battery CR2032 3V CD Owner's manual & Documentation Remote control Carrying case DELL About Your Projector 5 Contact Dell (see Contacting Dell on page 47) if any of the components are available. 1 About Your Projector Before connecting your projector ensure that all the necessary components are missing. Your Dell™ 1609WX projector ships with the components shown below.
Your projector ships with the following components: Package Contents Power cable 1.8m VGA cable (VGA to VGA) CR2032 Battery CR2032 3V CD Owner's manual & Documentation Remote control Carrying case DELL About Your Projector 5 Contact Dell (see Contacting Dell on page 47) if any of the components are available. 1 About Your Projector Before connecting your projector ensure that all the necessary components are missing. Your Dell™ 1609WX projector ships with the components shown below.

User Guide
Page 26
...Select On (the default) to detect S-Video signal. S-VIDEO-Press Enter to autodetect the available input signals. Select Off to select your projectors input source. Main Menu INPUT SELECT The Input Select menu allows you to lock the current input signal. VGA-B-Press Enter to detect Composite ... when the projector is set to Off, you press the Source button when the Auto Source mode is on the control panel or the remote control. adjust the settings. COMPOSITE VIDEO-Press Enter to detect VGA-B signal. To exit the OSD, go to detect VGA-A signal. manually select the...
...Select On (the default) to detect S-Video signal. S-VIDEO-Press Enter to autodetect the available input signals. Select Off to select your projectors input source. Main Menu INPUT SELECT The Input Select menu allows you to lock the current input signal. VGA-B-Press Enter to detect Composite ... when the projector is set to Off, you press the Source button when the Auto Source mode is on the control panel or the remote control. adjust the settings. COMPOSITE VIDEO-Press Enter to detect VGA-B signal. To exit the OSD, go to detect VGA-A signal. manually select the...

User Guide
Page 28
... menu, you adjust the values in the Custom mode. 28 Using Your Projector CONTRAST-Use and to adjust the color temperature. - The Picture menu, provides the following options: BRIGHTNESS-Use and to manually adjust the colours red, green, and blue. COLOR TEMP-Allows you to... adjust the brightness of your projectors. The values are saved in the Color Adjust menu, the Custom mode is activated...
... menu, you adjust the values in the Custom mode. 28 Using Your Projector CONTRAST-Use and to adjust the color temperature. - The Picture menu, provides the following options: BRIGHTNESS-Use and to manually adjust the colours red, green, and blue. COLOR TEMP-Allows you to... adjust the brightness of your projectors. The values are saved in the Color Adjust menu, the Custom mode is activated...
User Guide
Page 29
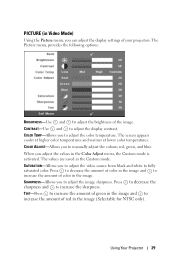
... source from black and white to increase the amount of green in the image. TINT-Press to fully saturated color. Using Your Projector 29 The screen appears cooler at higher color temperatures and warmer at lower color temperatures. SATURATION-Allows you to increase the amount of your...-Use and to adjust the brightness of color in the image and to adjust the image sharpness. Press to decrease the sharpness and to manually adjust the colours red, green, and blue. Press to adjust the display contrast. COLOR ADJUST-Allows you to increase the sharpness. CONTRAST-Use...
... source from black and white to increase the amount of green in the image. TINT-Press to fully saturated color. Using Your Projector 29 The screen appears cooler at higher color temperatures and warmer at lower color temperatures. SATURATION-Allows you to increase the amount of your...-Use and to adjust the brightness of color in the image and to adjust the image sharpness. Press to decrease the sharpness and to manually adjust the colours red, green, and blue. Press to adjust the display contrast. COLOR ADJUST-Allows you to increase the sharpness. CONTRAST-Use...

User Guide
Page 30
... the color reproduction and 10 to manually select signal type RGB, YCbCr, or YPbPr. VERTICAL POSITION-Press to move the image down and to Custom. NOTE: If you adjust the settings for White Intensity or Degamma, the projector automatically switches to reduce the zoomed image...Custom. ZOOM-Press to digitally magnify an image up . 30 Using Your Projector If you adjust the settings for White Intensity or Degamma, the projector automatically switches to move the image to optimize the projectors display mode: PC, Movie, sRGB (provides more accurate color representation), ...
... the color reproduction and 10 to manually select signal type RGB, YCbCr, or YPbPr. VERTICAL POSITION-Press to move the image down and to Custom. NOTE: If you adjust the settings for White Intensity or Degamma, the projector automatically switches to reduce the zoomed image...Custom. ZOOM-Press to digitally magnify an image up . 30 Using Your Projector If you adjust the settings for White Intensity or Degamma, the projector automatically switches to move the image to optimize the projectors display mode: PC, Movie, sRGB (provides more accurate color representation), ...
User Guide
Page 31
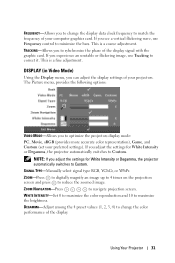
... INTENSITY-Set 0 to maximize the color reproduction and 10 to navigate projection screen. SIGNAL TYPE-Manually select signal type RGB, YCbCr, or YPbPr. Using Your Projector 31 NOTE: If you experience an unstable or flickering image, use Frequency control to minimize the bars. ZOOM-Press to ... use Tracking to correct it. If you to sybchronize the phase of the display signal with the graphic card. If you to optimize the projectors display mode: PC, Movie, sRGB (provides more accurate color representation), Game, and Custom (set your preferred settings). FREQUENCY-Allows you to ...
... INTENSITY-Set 0 to maximize the color reproduction and 10 to navigate projection screen. SIGNAL TYPE-Manually select signal type RGB, YCbCr, or YPbPr. Using Your Projector 31 NOTE: If you experience an unstable or flickering image, use Frequency control to minimize the bars. ZOOM-Press to ... use Tracking to correct it. If you to sybchronize the phase of the display signal with the graphic card. If you to optimize the projectors display mode: PC, Movie, sRGB (provides more accurate color representation), Game, and Custom (set your preferred settings). FREQUENCY-Allows you to ...

User Guide
Page 43
...Size Projection Distance Video Compatibility Power Supply Power Consumption Audio Noise Level Weight Dimensions (W x H x D) 0.65" WXGA DMD Type A, DarkChip™2 2500 ANSI Lumens (Max.) 1900:1 Typical (Full On/Full Off) 85% Typical (Japan Standard - JBMA) ...1280x800 (WXGA) 16.7M colors 2X F-Stop: F/ 2.44~2.58 Focal length, f=21.8~23.8 mm 1.1X manual Zoom Lens 27.3~359.4 inches (diagonal) 3.3~39.4 ft (1.0 m~12 m) Composite Video / S-Video: NTSC (J, M, 4.43), PAL (B,...
...Size Projection Distance Video Compatibility Power Supply Power Consumption Audio Noise Level Weight Dimensions (W x H x D) 0.65" WXGA DMD Type A, DarkChip™2 2500 ANSI Lumens (Max.) 1900:1 Typical (Full On/Full Off) 85% Typical (Japan Standard - JBMA) ...1280x800 (WXGA) 16.7M colors 2X F-Stop: F/ 2.44~2.58 Focal length, f=21.8~23.8 mm 1.1X manual Zoom Lens 27.3~359.4 inches (diagonal) 3.3~39.4 ft (1.0 m~12 m) Composite Video / S-Video: NTSC (J, M, 4.43), PAL (B,...


