Owner Manual
Page 8
... Changing the quantity 17 CLEANING 17 Cleaning the coffee maker 17 Cleaning the coffee grounds container........... 17 Cleaning the drip tray 18 Cleaning the water tank 18 Cleaning the coffee nozzles 18 Cleaning the pre-ground coffee feed funnel.... 18 Cleaning the inside of the machine 18 Cleaning the brew group 18 Cleaning the milk container 19 DESCALING 19 SETTING WATER HARDNESS 20 Measuring water hardness 20 Setting water hardness 20 Using compartment for latte glass.20 DISPLAYED MESSAGES 21 TROUBLESHOOTING 22 Limited Warranty...
... Changing the quantity 17 CLEANING 17 Cleaning the coffee maker 17 Cleaning the coffee grounds container........... 17 Cleaning the drip tray 18 Cleaning the water tank 18 Cleaning the coffee nozzles 18 Cleaning the pre-ground coffee feed funnel.... 18 Cleaning the inside of the machine 18 Cleaning the brew group 18 Cleaning the milk container 19 DESCALING 19 SETTING WATER HARDNESS 20 Measuring water hardness 20 Setting water hardness 20 Using compartment for latte glass.20 DISPLAYED MESSAGES 21 TROUBLESHOOTING 22 Limited Warranty...

Owner Manual
Page 9
... machine. • Do not touch hot surfaces. The manufacturer declines all instructions carefully. • Make sure the voltage of your obsolete outlet. Repair should be done by improper, incorrect, or irresponsible use of accessory attachments not recommended by children or tripped over. - If you are available and may result in their use and before cleaning. • Do not operate with 3- wire...
... machine. • Do not touch hot surfaces. The manufacturer declines all instructions carefully. • Make sure the voltage of your obsolete outlet. Repair should be done by improper, incorrect, or irresponsible use of accessory attachments not recommended by children or tripped over. - If you are available and may result in their use and before cleaning. • Do not operate with 3- wire...
Owner Manual
Page 10
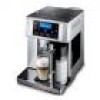
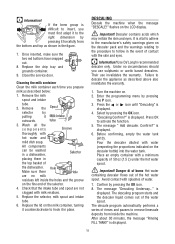
.... Display A10. Brew group A13. C1. C3. Important! Troubleshooting and repairs In the event of problems, first try and resolve them following the information given in using your country is not among those listed on the sheet, call the number given in the warranty certificate provided with the machine. DESCRIPTION Description of milk container (page 3 - Cover for coffee beans A3. Cup warmer shelf A8. Water tank A14. Coffee...
.... Display A10. Brew group A13. C1. C3. Important! Troubleshooting and repairs In the event of problems, first try and resolve them following the information given in using your country is not among those listed on the sheet, call the number given in the warranty certificate provided with the machine. DESCRIPTION Description of milk container (page 3 - Cover for coffee beans A3. Cup warmer shelf A8. Water tank A14. Coffee...
Owner Manual
Page 11
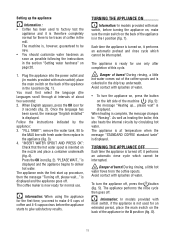
... work top, leave a space of espresso with hot surfaces (e.g. HOT MILK icon: to the value indicated on the rating plate on top. C8. CAPPUCCINO icon: to rinse or deliver hot water. C11. C13. C14. C15. After positioning the appliance on the appliance, have the outlet replaced with a minimum current rating of the appliance. Connect the appliance to activate the icon. coffee. Information : A light...
... work top, leave a space of espresso with hot surfaces (e.g. HOT MILK icon: to the value indicated on the rating plate on top. C8. CAPPUCCINO icon: to rinse or deliver hot water. C11. C13. C14. C15. After positioning the appliance on the appliance, have the outlet replaced with a minimum current rating of the appliance. Connect the appliance to activate the icon. coffee. Information : A light...
Owner Manual
Page 12
... "Setting water hardness" on the back of the appliance in the mill. To turn the appliance on, press the button on the back of burns! When heating is displayed and the appliance goes off. Danger of water. Follow the instructions indicated by circulating hot water. "FILL TANK!": remove the water tank, fill to the MAX line with main switch, if the appliance is not used to...
... "Setting water hardness" on the back of the appliance in the mill. To turn the appliance on, press the button on the back of burns! When heating is displayed and the appliance goes off. Danger of water. Follow the instructions indicated by circulating hot water. "FILL TANK!": remove the water tank, fill to the MAX line with main switch, if the appliance is not used to...

Owner Manual
Page 13
... icon until "Set language" is displayed; 3. is displayed; Setting the temperature To modify the temperature (low, medium, high) of the water used for example in order to have been set to switch automatically to stand-by if not used to cancel the operation): the minutes flash on the display; 3. Press the P icon to change the minutes; 7. Press the or icon until "Auto-start Enabled?" Press...
... icon until "Set language" is displayed; 3. is displayed; Setting the temperature To modify the temperature (low, medium, high) of the water used for example in order to have been set to switch automatically to stand-by if not used to cancel the operation): the minutes flash on the display; 3. Press the P icon to change the minutes; 7. Press the or icon until "Auto-start Enabled?" Press...
Owner Manual
Page 14
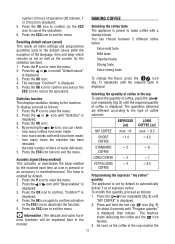
... the required quantity of coffee is displayed; 3. Information : The descale and water hardness functions will be explained later in the cup To select the quantity of coffee, press the icon repeatedly (fig. 8) until "Beep enabled" is displayed. Selecting the quantity of coffee in the manual. how many coffees have been made ; - how many times the machine has been descaled; - number of hours of operation (30 minutes, 1 or...
... the required quantity of coffee is displayed; 3. Information : The descale and water hardness functions will be explained later in the cup To select the quantity of coffee, press the icon repeatedly (fig. 8) until "Beep enabled" is displayed. Selecting the quantity of coffee in the manual. how many coffees have been made ; - how many times the machine has been descaled; - number of hours of operation (30 minutes, 1 or...
Owner Manual
Page 15
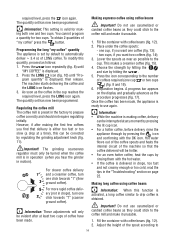
... in the "Troubleshooting" section on page 22. Hot water flows out of the coffee spouts and heats the internal circuit of LONG coffee. Adjust the height of the spout according to the number of "my coffee" press the button. Information: This setting is valid for two cups. Programming the long "my coffee" quantity The appliance is ready to use caramelized or candied coffee beans as they...
... in the "Troubleshooting" section on page 22. Hot water flows out of the coffee spouts and heats the internal circuit of LONG coffee. Adjust the height of the spout according to the number of "my coffee" press the button. Information: This setting is valid for two cups. Programming the long "my coffee" quantity The appliance is ready to use caramelized or candied coffee beans as they...
Owner Manual
Page 16
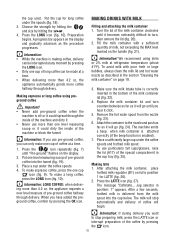
...). 7. Remove the hot water spout from the milk spout into the funnel (fig. 19). 3. Information: • While the machine is making coffee, delivery can be interrupted at a time. 1. Jug selector in the section "Cleaning the milk container" on the display and gradually advances as it will begin. Put the cup for LATTE (fig. 26). 2. Information: LONG COFFEE: when delivering more than 4.2 oz, the appliance automatically grinds more...
...). 7. Remove the hot water spout from the milk spout into the funnel (fig. 19). 3. Information: • While the machine is making coffee, delivery can be interrupted at a time. 1. Jug selector in the section "Cleaning the milk container" on the display and gradually advances as it will begin. Put the cup for LATTE (fig. 26). 2. Information: LONG COFFEE: when delivering more than 4.2 oz, the appliance automatically grinds more...
Owner Manual
Page 17
... of water. Leave the jug attached to the machine (you use 1. or interrupt preparation of 1. Programming the size for ITALIAN MACCHIATO (fig. 28) delivered the last cup before cleaning the 2. pos. 2 = abundant froth). Information! • When "Press CLEAN button" flashes on lid to 4. Press the icon corresponding to the function Making hot milk you have to make a number frothed milk regulator (B1) on the Making Italian macchiato display, you...
... of water. Leave the jug attached to the machine (you use 1. or interrupt preparation of 1. Programming the size for ITALIAN MACCHIATO (fig. 28) delivered the last cup before cleaning the 2. pos. 2 = abundant froth). Information! • When "Press CLEAN button" flashes on lid to 4. Press the icon corresponding to the function Making hot milk you have to make a number frothed milk regulator (B1) on the Making Italian macchiato display, you...
Owner Manual
Page 18
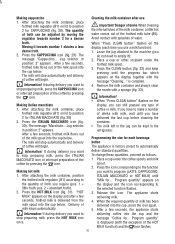
... clean thoroughly to automatically deliver 8.5 oz (250ml). HOT WATER Preparation Important! Place a container under the spouts. 2. brew group (A12), - As soon as they could scratch metal or plastic surfaces. function (the selected message flashes on the bottom. Position a container under the spout (as close as follows: 1. 6. Important! Never leave the machine unsupervised while delivering hot water. The message "Rinsing" "Hot water..." drip tray (A16), - CLEANING Cleaning the coffee maker...
... clean thoroughly to automatically deliver 8.5 oz (250ml). HOT WATER Preparation Important! Place a container under the spouts. 2. brew group (A12), - As soon as they could scratch metal or plastic surfaces. function (the selected message flashes on the bottom. Position a container under the spout (as close as follows: 1. 6. Important! Never leave the machine unsupervised while delivering hot water. The message "Rinsing" "Hot water..." drip tray (A16), - CLEANING Cleaning the coffee maker...
Owner Manual
Page 19
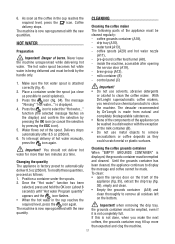
... the machine. 1. After cleaning, replace the brew group by sliding it clicks into place. If the drip tray is on or the surrounding area. Cleaning the drip tray Important! Open the service door (fig. 35); 2. Cleaning the water tank 1. Clean the water tank (A13) regularly (about once a month ) that the holes in until it onto the internal support and pin at the same time pull the brew...
... the machine. 1. After cleaning, replace the brew group by sliding it clicks into place. If the drip tray is on or the surrounding area. Cleaning the drip tray Important! Open the service door (fig. 35); 2. Cleaning the water tank 1. Clean the water tank (A13) regularly (about once a month ) that the holes in until it onto the internal support and pin at the same time pull the brew...
Owner Manual
Page 20
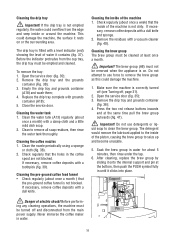
... of water. 7. Replace the selector, milk spout and intake tube. 6. DESCALING Descale the machine when the message "DESCALE!" flashes on . 2. Information! Their use sulphamic or acetic based descalers. Turn the machine on the LCD display. Press the or icon until "Descaling" is displayed. "Descaling Confirm?" Press OK to hook it to remove limescale deposits from the bottom and top as described above also invalidates the warranty. 1. The message " Add descaler. is displayed. Pour the descaler...
... of water. 7. Replace the selector, milk spout and intake tube. 6. DESCALING Descale the machine when the message "DESCALE!" flashes on . 2. Information! Their use sulphamic or acetic based descalers. Turn the machine on the LCD display. Press the or icon until "Descaling" is displayed. "Descaling Confirm?" Press OK to hook it to remove limescale deposits from the bottom and top as described above also invalidates the warranty. 1. The message " Add descaler. is displayed. Pour the descaler...
Owner Manual
Page 21
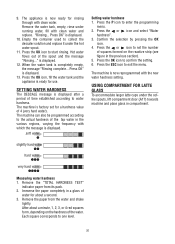
... displayed. 13. The machine can also be programmed according to the actual hardness of time established according to confirm the setting. 6. Using compartment for latte glass To accommodate larger latte cups under the coffee spouts, lift compartment door (A17) towards machine and place glass in the various regions, varying the frequency with which the message is ready for rinsing through with clean water. Remove the water tank...
... displayed. 13. The machine can also be programmed according to the actual hardness of time established according to confirm the setting. 6. Using compartment for latte glass To accommodate larger latte cups under the coffee spouts, lift compartment door (A17) towards machine and place glass in the various regions, varying the frequency with which the message is ready for rinsing through with clean water. Remove the water tank...
Owner Manual
Page 22
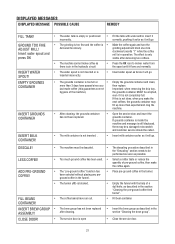
... • CONTAINER! grinding adjustment knob one click clockwise towards "7" while the coffee mill is in the "Descaling" section needs to deliver water from the spout until it will go . If grounds container is inside the machine and message is still displayed, there may fill up more than expected and clog the machine. DISPLAYED MESSAGES DISPLAYED MESSAGE POSSIBLE CAUSE REMEDY FILL TANK! • The water tank is empty...
... • CONTAINER! grinding adjustment knob one click clockwise towards "7" while the coffee mill is in the "Descaling" section needs to deliver water from the spout until it will go . If grounds container is inside the machine and message is still displayed, there may fill up more than expected and clog the machine. DISPLAYED MESSAGES DISPLAYED MESSAGE POSSIBLE CAUSE REMEDY FILL TANK! • The water tank is empty...
Owner Manual
Page 23
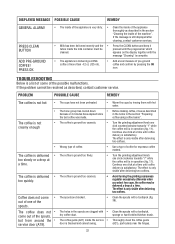
... Warm the cups by pressing the OK icon. DISPLAYED MESSAGE POSSIBLE CAUSE REMEDY GENERAL ALARM! PRESS CLEAN BUTTON ADD PRE-GROUND COFFEE! Use a type of the appliance is delivered • too slowly or a drop at a time. The effect is only visible after cleaning, contact customer services. • Milk has been delivered recently and the • Press the CLEAN button and keep it tubes inside of coffee for espresso coffee makers.
... Warm the cups by pressing the OK icon. DISPLAYED MESSAGE POSSIBLE CAUSE REMEDY GENERAL ALARM! PRESS CLEAN BUTTON ADD PRE-GROUND COFFEE! Use a type of the appliance is delivered • too slowly or a drop at a time. The effect is only visible after cleaning, contact customer services. • Milk has been delivered recently and the • Press the CLEAN button and keep it tubes inside of coffee for espresso coffee makers.
Owner Manual
Page 24
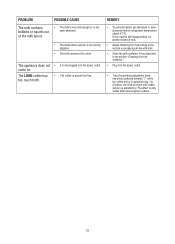
... ideally use skimmed or semiskimmed milk at a time until coffee delivery is in the section "Cleaning the milk container". • Plug into the power outlet. It is not bubbles or squirts out semi-skimmed. Continue one click clockwise towards "7" while the coffee mill is satisfactory. of milk. • Adjust following the instructions in the section on . PROBLEM POSSIBLE CAUSE The milk contains...
... ideally use skimmed or semiskimmed milk at a time until coffee delivery is in the section "Cleaning the milk container". • Plug into the power outlet. It is not bubbles or squirts out semi-skimmed. Continue one click clockwise towards "7" while the coffee mill is satisfactory. of milk. • Adjust following the instructions in the section on . PROBLEM POSSIBLE CAUSE The milk contains...
Owner Manual
Page 25
.... What is used in connection with De'Longhi. This warranty applies to Super Automatic Espresso Machines with the factory directions, which accompany it, and on an alternating current ( AC ) circuit. How do not allow the exclusion or limitation of incidental or consequential damage, so the above warranty is limited to repair at our factory or authorized service center of...
.... What is used in connection with De'Longhi. This warranty applies to Super Automatic Espresso Machines with the factory directions, which accompany it, and on an alternating current ( AC ) circuit. How do not allow the exclusion or limitation of incidental or consequential damage, so the above warranty is limited to repair at our factory or authorized service center of...


