Owner Manual
Page 8
... container........... 17 Cleaning the drip tray 18 Cleaning the water tank 18 Cleaning the coffee nozzles 18 Cleaning the pre-ground coffee feed funnel.... 18 Cleaning the inside of the machine 18 Cleaning the brew group 18 Cleaning the milk container 19 DESCALING 19 SETTING WATER HARDNESS 20 Measuring water hardness 20 Setting...
... container........... 17 Cleaning the drip tray 18 Cleaning the water tank 18 Cleaning the coffee nozzles 18 Cleaning the pre-ground coffee feed funnel.... 18 Cleaning the inside of the machine 18 Cleaning the brew group 18 Cleaning the milk container 19 DESCALING 19 SETTING WATER HARDNESS 20 Measuring water hardness 20 Setting...
Owner Manual
Page 10
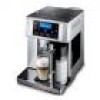
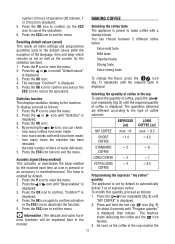
...in these instructions. Danger Of burns! The addresses are required, contact De'Longhi customer services only. Container for milk frother Description of espresso coffee. Cup warmer shelf A8. Display A10. Grounds tray A19. Milk container handle B3. C2. : icon: to deliver one cup of the... the appliance. If repairs are given in injury or damage to observe the warning could result in the warranty certificate provided with the machine. Touch screen (control panel) A11. Hot water spout A24. Milk intake tube B5. icon: to the controls enabled for the ...
...in these instructions. Danger Of burns! The addresses are required, contact De'Longhi customer services only. Container for milk frother Description of espresso coffee. Cup warmer shelf A8. Display A10. Grounds tray A19. Milk container handle B3. C2. : icon: to deliver one cup of the... the appliance. If repairs are given in injury or damage to observe the warning could result in the warranty certificate provided with the machine. Touch screen (control panel) A11. Hot water spout A24. Milk intake tube B5. icon: to the controls enabled for the ...
Owner Manual
Page 12
... 3 seconds (fig. 2). Danger of burns! please wait" is displayed. Setting up the appliance Information : • Coffee has been used for an extended period, place the main switch on the left side of the machine (fig. 5): the message "Heating up procedure, then the message "Turning off , it is therefore completely normal for... and place a container underneath (fig. 4). The appliance is , however, guaranteed to be traces of this also heats the internal circuits by the appliance: 3. The machine is ready for normal use only after completion of coffee in the drip tray underneath.
... 3 seconds (fig. 2). Danger of burns! please wait" is displayed. Setting up the appliance Information : • Coffee has been used for an extended period, place the main switch on the left side of the machine (fig. 5): the message "Heating up procedure, then the message "Turning off , it is therefore completely normal for... and place a container underneath (fig. 4). The appliance is , however, guaranteed to be traces of this also heats the internal circuits by the appliance: 3. The machine is ready for normal use only after completion of coffee in the drip tray underneath.
Owner Manual
Page 14
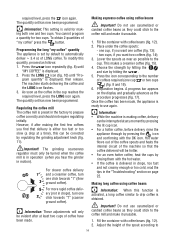
... relating to the type of coffee selected: espresso LONG (oz) COFFEE (oz) MY COFFEE max: ≃6 max: ≃ 8.5 SHORT ≃1.4 COFFEE ≃ 4.2 STANDARD ≃ 2 ≃ 6 COFFEE Acoustic signal (Beep enabled) This activates or deactivates the beep emitted by the machine each time an icon is ..." is preset to confirm, "Confirm?" how many times the machine has been descaled; - the total number of liters of coffee in the manual. Press the P icon to exit the menu. The machine starts delivering the coffee and the icon flashes; 3. The message "Confirm?" To display...
... relating to the type of coffee selected: espresso LONG (oz) COFFEE (oz) MY COFFEE max: ≃6 max: ≃ 8.5 SHORT ≃1.4 COFFEE ≃ 4.2 STANDARD ≃ 2 ≃ 6 COFFEE Acoustic signal (Beep enabled) This activates or deactivates the beep emitted by the machine each time an icon is ..." is preset to confirm, "Confirm?" how many times the machine has been descaled; - the total number of liters of coffee in the manual. Press the P icon to exit the menu. The machine starts delivering the coffee and the icon flashes; 3. The message "Confirm?" To display...
Owner Manual
Page 15
...coffee). Making espresso coffee using coffee beans For more rapid coffee delivery (not in drops), turn one click towards "1" (finer ground coffee). Making long coffee using coffee beans Important! Adjust the height of "my coffee" press the button. Regulating the coffee mill The coffee mill is ready to the number of the machine... through by pressing the icon and confirming with the hot water. • If the coffee is obtained. The machine starts delivering the coffee and the LONG icon flashes. 3. The quantity set has now been programmed. Important! ...
...coffee). Making espresso coffee using coffee beans For more rapid coffee delivery (not in drops), turn one click towards "1" (finer ground coffee). Making long coffee using coffee beans Important! Adjust the height of "my coffee" press the button. Regulating the coffee mill The coffee mill is ready to the number of the machine... through by pressing the icon and confirming with the hot water. • If the coffee is obtained. The machine starts delivering the coffee and the LONG icon flashes. 3. The quantity set has now been programmed. Important! ...
Owner Manual
Page 16
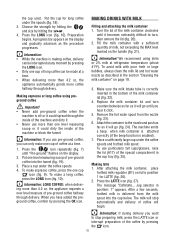
..., frothed milk is delivered from the nozzle (fig. 23). 6. Preparation begins. We recommend using preground coffee Important! • Never add pre-ground coffee when the machine is making coffee, delivery can be interrupted at refrigerator temperature (about 41°F). To avoid milk with a sufficient quantity of...; Never use more than 4.2 oz, the appliance requests a new level measure of the coffee by pressing the LONG icon. • Only one level measuring scoop of the machine or block the funnel. Turn the lid of milk, not exceeding the MAX level marked ...
..., frothed milk is delivered from the nozzle (fig. 23). 6. Preparation begins. We recommend using preground coffee Important! • Never add pre-ground coffee when the machine is making coffee, delivery can be interrupted at refrigerator temperature (about 41°F). To avoid milk with a sufficient quantity of...; Never use more than 4.2 oz, the appliance requests a new level measure of the coffee by pressing the LONG icon. • Only one level measuring scoop of the machine or block the funnel. Turn the lid of milk, not exceeding the MAX level marked ...
Owner Manual
Page 17
...is complete. After a few seconds, frothed milk flows out of the milk spout into the cup below . After attaching the milk container, place coffee or milk. After a few seconds, frothed milk flows out of the milk spout into the cup below . Avoid contact with the message "... of the milk container, a little hot water comes out of the frothed milk tube (B5). The message "Cappuccino... Leave the jug attached to the machine (you want to position 2 for ... To change these quantities, proceed as follows: 1. pos. 2 = abundant froth). Press the CLEAN button (fig...
...is complete. After a few seconds, frothed milk flows out of the milk spout into the cup below . After attaching the milk container, place coffee or milk. After a few seconds, frothed milk flows out of the milk spout into the cup below . Avoid contact with the message "... of the milk container, a little hot water comes out of the frothed milk tube (B5). The message "Cappuccino... Leave the jug attached to the machine (you want to position 2 for ... To change these quantities, proceed as follows: 1. pos. 2 = abundant froth). Press the CLEAN button (fig...
Owner Manual
Page 18
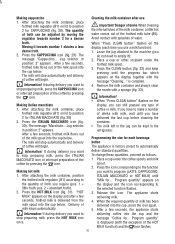
...Press the icon to automatically deliver 8.5 oz (250ml). inside the machine, accessible after 8.5 oz (250ml). 6. milk container (B) - control panel (C) Important! • Do not use chemical products to clean the coffee maker. The machine is displayed. 4. when removing the drip tray, the grounds container ... display) and confirm the selection by pressing the OK icon (or cancel the selection by the handle only. 1. The machine is attached correctly (fig. 4). 2. coffee spouts (A20) and hot water nozzle (A11), - Important! Position a container under the spout (as close as they...
...Press the icon to automatically deliver 8.5 oz (250ml). inside the machine, accessible after 8.5 oz (250ml). 6. milk container (B) - control panel (C) Important! • Do not use chemical products to clean the coffee maker. The machine is displayed. 4. when removing the drip tray, the grounds container ... display) and confirm the selection by pressing the OK icon (or cancel the selection by the handle only. 1. The machine is attached correctly (fig. 4). 2. coffee spouts (A20) and hot water nozzle (A11), - Important! Position a container under the spout (as close as they...
Owner Manual
Page 19
.... 2. Check regularly (about once a month ) that the pre-ground coffee funnel is not dirty. Remove the drip tray and grounds container (fig. 36); 4. The drip tray is not emptied regularly, the water could damage the machine. 1. Cleaning the water tank 1. Check regularly that the inside or around...If necessary, remove coffee deposits with a dull knife. Important! The brew group (A8) must be removed when the appliance is correctly turned off (see Turning off and disconnected from the cup tray, the drip tray must be emptied and cleaned. Make sure the machine is on or ...
.... 2. Check regularly (about once a month ) that the pre-ground coffee funnel is not dirty. Remove the drip tray and grounds container (fig. 36); 4. The drip tray is not emptied regularly, the water could damage the machine. 1. Cleaning the water tank 1. Check regularly that the inside or around...If necessary, remove coffee deposits with a dull knife. Important! The brew group (A8) must be removed when the appliance is correctly turned off (see Turning off and disconnected from the cup tray, the drip tray must be emptied and cleaned. Make sure the machine is on or ...
Owner Manual
Page 21
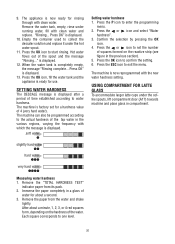
...setting. 6. Press the or icon and select "Water hardness". 3. The machine is displayed after a period of the water. Remove the water tank, empty, rinse under the coffee spouts, lift compartment door (A17) towards machine and place glass in the various regions, varying the frequency with clean water.... Hot water flows out of 4 (very hard water). The machine can also be programmed according to one level....
...setting. 6. Press the or icon and select "Water hardness". 3. The machine is displayed after a period of the water. Remove the water tank, empty, rinse under the coffee spouts, lift compartment door (A17) towards machine and place glass in the various regions, varying the frequency with clean water.... Hot water flows out of 4 (very hard water). The machine can also be programmed according to one level....
Owner Manual
Page 22
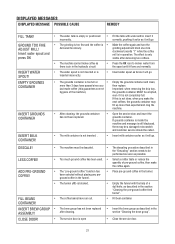
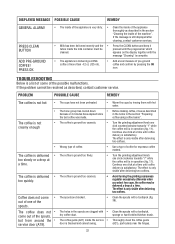
... container and clean, more than 3 days have run out. • The brew group has not been replaced • after delivering two coffees. • The machine cannot make coffee as there is inserted incorrectly. • Insert water spout as far as possible. CLOSE DOOR! • The...deliver water from the spout until it will go . The effect is only press OK visible after cleaning. ground coffee in the funnel. If grounds container is inside the machine and message is open • The descaling procedure described in the hydraulic circuit • Press the OK icon...
... container and clean, more than 3 days have run out. • The brew group has not been replaced • after delivering two coffees. • The machine cannot make coffee as there is inserted incorrectly. • Insert water spout as far as possible. CLOSE DOOR! • The...deliver water from the spout until it will go . The effect is only press OK visible after cleaning. ground coffee in the funnel. If grounds container is inside the machine and message is open • The descaling procedure described in the hydraulic circuit • Press the OK icon...
Owner Manual
Page 23
... not been preheated. • The brew group has cooled down • because 2-3 minutes have elapsed since the last coffee was made. Turn the grinding adjustment knob one of the machine". Thoroughly clean the coffee guide (A21), particularly near the hinges. appears on the display together with a toothpick, sponge or hard bristled kitchen brush...
... not been preheated. • The brew group has cooled down • because 2-3 minutes have elapsed since the last coffee was made. Turn the grinding adjustment knob one of the machine". Thoroughly clean the coffee guide (A21), particularly near the hinges. appears on the display together with a toothpick, sponge or hard bristled kitchen brush...


