Owner Manual
Page 8
... (touch screen)..... 9 PRELIMINARY CHECKS 10 Controls after transport 10 Installing the appliance 10 Connecting the appliance 10 Setting up the appliance 11 TURNING THE APPLIANCE ON 11 TURNING THE APPLIANCE OFF 11 CHANGING THE MENU SETTINGS............12 Setting the language 12 Setting the clock 12 Setting auto-start time 12 Setting the temperature...
... (touch screen)..... 9 PRELIMINARY CHECKS 10 Controls after transport 10 Installing the appliance 10 Connecting the appliance 10 Setting up the appliance 11 TURNING THE APPLIANCE ON 11 TURNING THE APPLIANCE OFF 11 CHANGING THE MENU SETTINGS............12 Setting the language 12 Setting the clock 12 Setting auto-start time 12 Setting the temperature...
Owner Manual
Page 12
... is displayed. Information: When using the appliance for an extended period, place the main switch on the back of the appliance in the 0 position (fig. 6). 11 The appliance is ready for there to be interrupted. Danger of burns! As well as possible following the instructions in the section "Setting water hardness...
... is displayed. Information: When using the appliance for an extended period, place the main switch on the back of the appliance in the 0 position (fig. 6). 11 The appliance is ready for there to be interrupted. Danger of burns! As well as possible following the instructions in the section "Setting water hardness...
Owner Manual
Page 15
... this function is activated, a long coffee similar to the number of the machine so that delivery is set by regulating the grinding adjustment knob (fig. 11). For slower coffee delivery and a creamier coffee, turn one cup or two cups ) (fig. 9 and 16). 6.
... this function is activated, a long coffee similar to the number of the machine so that delivery is set by regulating the grinding adjustment knob (fig. 11). For slower coffee delivery and a creamier coffee, turn one cup or two cups ) (fig. 9 and 16). 6.
Owner Manual
Page 21
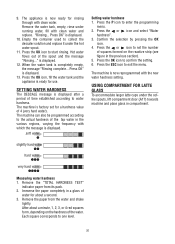
... ESC icon to enter the programming menu. 2. The machine is now ready for latte glass To accommodate larger latte cups under the hot water spout. 11. The machine can also be programmed according to water hardness. Remove the paper from its pack. 2. Press the P icon to exit the menu. Press the...
... ESC icon to enter the programming menu. 2. The machine is now ready for latte glass To accommodate larger latte cups under the hot water spout. 11. The machine can also be programmed according to water hardness. Remove the paper from its pack. 2. Press the P icon to exit the menu. Press the...
Owner Manual
Page 23
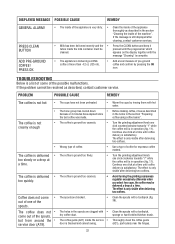
... grinding coarseness regulator excessively otherwise when you select two cups, the coffee may be resolved as described in the notes in operation (fig. 11). DISPLAYED MESSAGE POSSIBLE CAUSE REMEDY GENERAL ALARM! If the problem cannot be delivered a drop at a time. The coffee is ground too ..." is complete. • The appliance is very dirty. • Clean the inside of the appliance thoroughly as described in operation (fig. 11). The effect is only visible after cleaning, contact customer services. • Milk has been delivered recently and the • Press the CLEAN ...
... grinding coarseness regulator excessively otherwise when you select two cups, the coffee may be resolved as described in the notes in operation (fig. 11). DISPLAYED MESSAGE POSSIBLE CAUSE REMEDY GENERAL ALARM! If the problem cannot be delivered a drop at a time. The coffee is ground too ..." is complete. • The appliance is very dirty. • Clean the inside of the appliance thoroughly as described in operation (fig. 11). The effect is only visible after cleaning, contact customer services. • Milk has been delivered recently and the • Press the CLEAN ...
Owner Manual
Page 24
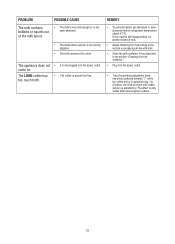
... out semi-skimmed. The appliance does not • come on preparing drinks with milk. • Clean the milk container lid as described in operation (fig. 11).
... out semi-skimmed. The appliance does not • come on preparing drinks with milk. • Clean the milk container lid as described in operation (fig. 11).