User Guide
Page 6
... to XM Using Any Skipping Channels While Tuning . 24 5 Setting the Clock 25 Getting Started FM Radio 14 Restoring Factory Defaults . . . . . 25 Activating Your SKYFi2 6 Adjusting the Audio Level . . . . . 15 Setting the Display Screen Mode . . 26 SKYFi2 Receiver Controls 7 Display Screen 8 Remote Control 9 Basic Operations Turning SKYFi2 On ... 19 Info Extras 20 30-Minute Replay 20 Recall Last Channel 21 Direct Tune 22 Reference Care of Your SKYFi2 27 Accessories 27 Troubleshooting 28 Contacting Technical Support and Customer Service 30 Technical Information 30 Warranty...
... to XM Using Any Skipping Channels While Tuning . 24 5 Setting the Clock 25 Getting Started FM Radio 14 Restoring Factory Defaults . . . . . 25 Activating Your SKYFi2 6 Adjusting the Audio Level . . . . . 15 Setting the Display Screen Mode . . 26 SKYFi2 Receiver Controls 7 Display Screen 8 Remote Control 9 Basic Operations Turning SKYFi2 On ... 19 Info Extras 20 30-Minute Replay 20 Recall Last Channel 21 Direct Tune 22 Reference Care of Your SKYFi2 27 Accessories 27 Troubleshooting 28 Contacting Technical Support and Customer Service 30 Technical Information 30 Warranty...
User Guide
Page 7
... or with your SKYFi2, eight-character XM Satellite Radio XM at least Vehicle Kit, Delphi XM SKYFi one hour in order to your SKYFi2. Note: Carefully check your XM Satellite Radio To quickly begin enjoying XM 3. complete when ...Kit, any of a professional installer. Warning: Failure to properly follow these simple steps: ID will appear on your vehicle or other property. Getting Started 6 Getting Started 2. To subscribe, make sure you have your XM Radio ID. Contact Satellite Radio with the help of the available activation process. Press to turn...
... or with your SKYFi2, eight-character XM Satellite Radio XM at least Vehicle Kit, Delphi XM SKYFi one hour in order to your SKYFi2. Note: Carefully check your XM Satellite Radio To quickly begin enjoying XM 3. complete when ...Kit, any of a professional installer. Warning: Failure to properly follow these simple steps: ID will appear on your vehicle or other property. Getting Started 6 Getting Started 2. To subscribe, make sure you have your XM Radio ID. Contact Satellite Radio with the help of the available activation process. Press to turn...

User Guide
Page 9
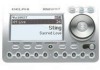
... can be Mode (DIRECT, Preset A, Preset B, or Preset C) Signal strength indicator (zero to an XM channel, the 8 SKYFi2 default display contains information about that internal FM modulator is turned on page 10. See figure 2. See the Basic Operations section, beginning on and set to an FM frequency While tuned to three bars) Category...
... can be Mode (DIRECT, Preset A, Preset B, or Preset C) Signal strength indicator (zero to an XM channel, the 8 SKYFi2 default display contains information about that internal FM modulator is turned on page 10. See figure 2. See the Basic Operations section, beginning on and set to an FM frequency While tuned to three bars) Category...
User Guide
Page 11
...and hold for set up SKYFi2 so that you find your desired channel, press the "XM" button to your hands on : press . 2. Failure to keep your eyes on the road and your vehicle or other property. 1. Turn the scroll wheel. 2. Basic Operations If SKYFi2 is always important to do... not have to press the "XM" button to power SKYFi2 on the remote control. You can also use the ignition key to...
...and hold for set up SKYFi2 so that you find your desired channel, press the "XM" button to your hands on : press . 2. Failure to keep your eyes on the road and your vehicle or other property. 1. Turn the scroll wheel. 2. Basic Operations If SKYFi2 is always important to do... not have to press the "XM" button to power SKYFi2 on the remote control. You can also use the ignition key to...

User Guide
Page 14
... are currently listening to. 1. Press and release the "memory" 13 Basic Operations button to 20 entries, after which any new infor- Memorizing Song Information SKYFi2 can remember up and down buttons on the remote to view the entire list of songs or programs. mation that is saved will replace the... oldest entry in memory. 2. Turn the scroll wheel or use the up to save the information of the current song or program. To recall saved information, press and hold the...
... are currently listening to. 1. Press and release the "memory" 13 Basic Operations button to 20 entries, after which any new infor- Memorizing Song Information SKYFi2 can remember up and down buttons on the remote to view the entire list of songs or programs. mation that is saved will replace the... oldest entry in memory. 2. Turn the scroll wheel or use the up to save the information of the current song or program. To recall saved information, press and hold the...

User Guide
Page 15
... 88.7, 88.9, 106.7, ming over your SKYFi2 is not clear or you are not using the and 107.9. If the in a vehicle, in your home, in step 4. interference. 5. Press Listening to confirm. Turn on a boat using the wireless FM 6. to confirm. the "XM" button to the main menu and then ... the 14 audio signal to your SKYFi2. following FM frequencies: to return to "FM Off" for the best audio quality. Use the scroll wheel to select modulator, set the FM frequency to the play screen. 10. interference or static, try another appropriate kit. 4. Note: If you hear ...
... 88.7, 88.9, 106.7, ming over your SKYFi2 is not clear or you are not using the and 107.9. If the in a vehicle, in your home, in step 4. interference. 5. Press Listening to confirm. Turn on a boat using the wireless FM 6. to confirm. the "XM" button to the main menu and then ... the 14 audio signal to your SKYFi2. following FM frequencies: to return to "FM Off" for the best audio quality. Use the scroll wheel to select modulator, set the FM frequency to the play screen. 10. interference or static, try another appropriate kit. 4. Note: If you hear ...

User Guide
Page 17
Press the "menu" button. Press the "XM" button. Use the scroll wheel (or remote) to confirm selection. vehicle battery. Press the "menu" button to return Auto-Off as a "sleep" feature to turn SKYFi2 on or off automatically after you 2. Press the "menu" button to return to ... to confirm. Press the "XM" select the desired level. "XM" button to 3. You may also use the button to turn button to remove the ignition key; Advanced Features select "Auto-On." to 1. If SKYFi2 is always on whenever and Contrast You can set SKYFi2 to receive power even after ...
Press the "menu" button. Press the "XM" button. Use the scroll wheel (or remote) to confirm selection. vehicle battery. Press the "menu" button to return Auto-Off as a "sleep" feature to turn SKYFi2 on or off automatically after you 2. Press the "menu" button to return to ... to confirm. Press the "XM" select the desired level. "XM" button to 3. You may also use the button to turn button to remove the ignition key; Advanced Features select "Auto-On." to 1. If SKYFi2 is always on whenever and Contrast You can set SKYFi2 to receive power even after ...

User Guide
Page 18
... using the following select "Auto-Off/Sleep Timer." Slowly turn and tilt the antenna. 4. Press the "menu" button to return to the main menu and then again to return to confirm selection. selection. 2. Press the "XM" button to normal operation. method: Press the "XM" button to normal operation. Press the "menu" button. Find...
... using the following select "Auto-Off/Sleep Timer." Slowly turn and tilt the antenna. 4. Press the "menu" button to return to the main menu and then again to return to confirm selection. selection. 2. Press the "XM" button to normal operation. method: Press the "XM" button to normal operation. Press the "menu" button. Find...

User Guide
Page 21
... the "XM" button to normal operation. throughout the time you a choice of your SKYFi2. Advanced ...Features deleting individual or all songs from the up-to 5. To delete a stock symbol: Info Extras 30-Minute Replay 1. Use the scroll wheel (or remote) Then just follow the instructions on the and the "XM..." button to make display to the main menu and then again look for new information that song select "Stock Ticker." SKYFi2...of Info Extras your SKYFi2 off removes all symbols...XM Satellite Radio will broadcast addi- 30-Minute Replay gives users the...
... the "XM" button to normal operation. throughout the time you a choice of your SKYFi2. Advanced ...Features deleting individual or all songs from the up-to 5. To delete a stock symbol: Info Extras 30-Minute Replay 1. Use the scroll wheel (or remote) Then just follow the instructions on the and the "XM..." button to make display to the main menu and then again look for new information that song select "Stock Ticker." SKYFi2...of Info Extras your SKYFi2 off removes all symbols...XM Satellite Radio will broadcast addi- 30-Minute Replay gives users the...

User Guide
Page 23
...Features so that category. Return to "On." Press the "search" button repeatedly "Direct Tune" option to song titles on other channels. Turn the scroll wheel to the search method through the menu. Use the scroll wheel (or remote) to view 2. channel. Direct Tune 3.... Press the Press the "XM" button to select a "XM" button to enter "XM" button and SKYFi2 behaves like Search category mode. Press the "XM" button 1. Press the "menu" button. "menu" button. ("Search by Category." by pressing the...
...Features so that category. Return to "On." Press the "search" button repeatedly "Direct Tune" option to song titles on other channels. Turn the scroll wheel to the search method through the menu. Use the scroll wheel (or remote) to view 2. channel. Direct Tune 3.... Press the Press the "XM" button to select a "XM" button to enter "XM" button and SKYFi2 behaves like Search category mode. Press the "XM" button 1. Press the "menu" button. "menu" button. ("Search by Category." by pressing the...
User Guide
Page 29
Make sure the cigarette lighter/auxiliary power socket is not damaged or kinked. ANTENNA Cause: the XM antenna is not currently broadcasting. Turn SKYFi2 off, then on, to SKYFi2 and that without the need for a period of corrosion. Make sure the antenna is correctly attached to reset this on , ... steps first to try to provide vehicle and it does not power on the display: NO SIGNAL Cause: the XM signal is designed and built to remedy the situation 28 yourself: 1. Make sure the vehicle antenna is mounted outside the vehicle or the home antenna is left unplugged...
Make sure the cigarette lighter/auxiliary power socket is not damaged or kinked. ANTENNA Cause: the XM antenna is not currently broadcasting. Turn SKYFi2 off, then on, to SKYFi2 and that without the need for a period of corrosion. Make sure the antenna is correctly attached to reset this on , ... steps first to try to provide vehicle and it does not power on the display: NO SIGNAL Cause: the XM signal is designed and built to remedy the situation 28 yourself: 1. Make sure the vehicle antenna is mounted outside the vehicle or the home antenna is left unplugged...

Installation Guide
Page 5
... details. This FM modulator is turned on cassette slot is available in wireless FM this configuration is unplugged from the SKYFi2 Cradle. Due to its superior audio quality, (SA10112) (sold separately) can provide SKYFi2 has a built-in the vehicle. whenever the cassette adaptor or... vehicle's modulator that allows you to hear XM over the wired or wireless FM antenna lead. (Some vehicles may programming on any nearby FM modulator configurations if a require special antenna lead adaptors.) radio. Cassette Adaptor For vehicles with a built-in cassette Direct Connect The Delphi...
... details. This FM modulator is turned on cassette slot is available in wireless FM this configuration is unplugged from the SKYFi2 Cradle. Due to its superior audio quality, (SA10112) (sold separately) can provide SKYFi2 has a built-in the vehicle. whenever the cassette adaptor or... vehicle's modulator that allows you to hear XM over the wired or wireless FM antenna lead. (Some vehicles may programming on any nearby FM modulator configurations if a require special antenna lead adaptors.) radio. Cassette Adaptor For vehicles with a built-in cassette Direct Connect The Delphi...
Installation Guide
Page 6
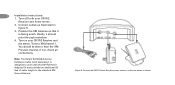
Turn on both your vehicle. If not, check all connections. Plug the 12V power adaptor into the cigarette lighter and place the XM Antenna on "Listening to the same frequency. Make sure you or others if the unit becomes detached during an accident and/or obstructs the...audio connector or cassette adaptor (if used) to the SKYFi2 Vehicle Adaptor cradle with any safety devices such as a general guideline only. Note: If using the wireless FM modulator or the Delphi FM Direct Adaptor, set the SKYFi2 Receiver and the FM radio to XM Using Any FM Radio." Failure to you are provided...
Turn on both your vehicle. If not, check all connections. Plug the 12V power adaptor into the cigarette lighter and place the XM Antenna on "Listening to the same frequency. Make sure you or others if the unit becomes detached during an accident and/or obstructs the...audio connector or cassette adaptor (if used) to the SKYFi2 Vehicle Adaptor cradle with any safety devices such as a general guideline only. Note: If using the wireless FM modulator or the Delphi FM Direct Adaptor, set the SKYFi2 Receiver and the FM radio to XM Using Any FM Radio." Failure to you are provided...

Installation Guide
Page 7
... installing and removing the vent mount clips to use. The SKYFi2 Vehicle Adaptor Kit b. you can mount mount, vent mount, or swivel inserting the two clips into the your vehicle. orientations depending on a leather surface. Turn off the radio and SKYFi2 5. Vent mount: Assemble the 7 Receiver. main piece.... posi- has three mounting options: flat mount (if not assembled) by 4. It should be to a horizontal in one of the SKYFi2 vehicle cradle the clips must match each certain the air vent is most convenient for a. Do not install the rotated in -dash air vent...
... installing and removing the vent mount clips to use. The SKYFi2 Vehicle Adaptor Kit b. you can mount mount, vent mount, or swivel inserting the two clips into the your vehicle. orientations depending on a leather surface. Turn off the radio and SKYFi2 5. Vent mount: Assemble the 7 Receiver. main piece.... posi- has three mounting options: flat mount (if not assembled) by 4. It should be to a horizontal in one of the SKYFi2 vehicle cradle the clips must match each certain the air vent is most convenient for a. Do not install the rotated in -dash air vent...
Installation Guide
Page 16
...is designed to work with the SKYFi2 Home Adaptor Kit and provides an additional 50 feet of cable length to XM channel 1. Connect the SKYFi2 Home Stand to hear the XM Preview channel. Turn off both your SKYFi2 Receiver and the stereo. Position the XM Antenna so that it should be...figure 9. 3. If not, check all connections. You should point through a window. 4. Figure 9. Tune to the standard XM Home Antenna. Connect cables as shown. Note: The Delphi SA10006 Antenna Extension Cable (sold separately) is facing south. Turn on your SKYFi2 Receiver and home stereo. 2.
...is designed to work with the SKYFi2 Home Adaptor Kit and provides an additional 50 feet of cable length to XM channel 1. Connect the SKYFi2 Home Stand to hear the XM Preview channel. Turn off both your SKYFi2 Receiver and the stereo. Position the XM Antenna so that it should be...figure 9. 3. If not, check all connections. You should point through a window. 4. Figure 9. Tune to the standard XM Home Antenna. Connect cables as shown. Note: The Delphi SA10006 Antenna Extension Cable (sold separately) is facing south. Turn on your SKYFi2 Receiver and home stereo. 2.

Installation Guide
Page 17
... Antenna change. Signal strength indicator. Slowly turn and tilt the antenna. Press the "menu" button on either "satellite" or "terrestrial." 4. Press the "XM" button to normal operation. 3. Once you are convinced you have plenty of time to select the "Antenna Aiming" option. again, so you press the... selection. Use the scroll wheel to aim the antenna. This display will the strongest signal strength (at least two bars) on the SKYFi2 Receiver. 2. Find the position that gives 17 For best reception, aim the home antenna by following these instructions: 1.
... Antenna change. Signal strength indicator. Slowly turn and tilt the antenna. Press the "menu" button on either "satellite" or "terrestrial." 4. Press the "XM" button to normal operation. 3. Once you are convinced you have plenty of time to select the "Antenna Aiming" option. again, so you press the... selection. Use the scroll wheel to aim the antenna. This display will the strongest signal strength (at least two bars) on the SKYFi2 Receiver. 2. Find the position that gives 17 For best reception, aim the home antenna by following these instructions: 1.

