User Guide
Page 6
... Timer 16 Aiming the Home Antenna . . . . . 17 TuneSelect 18 Stock Ticker 19 Info Extras 20 30-Minute Replay 20 Recall Last Channel 21 Direct Tune 22 Reference Care of Your SKYFi2 27 Accessories 27 Troubleshooting 28 Contacting Technical Support and Customer Service 30 Technical Information 30 Warranty Delphi Limited Consumer Warranty 30 Search...
... Timer 16 Aiming the Home Antenna . . . . . 17 TuneSelect 18 Stock Ticker 19 Info Extras 20 30-Minute Replay 20 Recall Last Channel 21 Direct Tune 22 Reference Care of Your SKYFi2 27 Accessories 27 Troubleshooting 28 Contacting Technical Support and Customer Service 30 Technical Information 30 Warranty Delphi Limited Consumer Warranty 30 Search...

User Guide
Page 18
For the best reception possible, aim 2. Press the "XM" button to confirm selection. 3. "XM" button to confirm selection. Slowly turn and tilt the antenna. 4. Find the to return to normal operation. Press the "menu" button to return to the main menu and then again to return...main menu and then again signal bars will change. selection. 2. method: Press the "XM" button to 3. Use the scroll wheel (or remote) to confirm 1. Use the scroll wheel (or remote) to the home antenna using the following select "Auto-Off/Sleep Timer." To set Auto-Off: Aiming the Home...
For the best reception possible, aim 2. Press the "XM" button to confirm selection. 3. "XM" button to confirm selection. Slowly turn and tilt the antenna. 4. Find the to return to normal operation. Press the "menu" button to return to the main menu and then again to return...main menu and then again signal bars will change. selection. 2. method: Press the "XM" button to 3. Use the scroll wheel (or remote) to confirm 1. Use the scroll wheel (or remote) to the home antenna using the following select "Auto-Off/Sleep Timer." To set Auto-Off: Aiming the Home...

User Guide
Page 27
... Screen Mode." Improperly installing the antenna cable could damage it. Spilling food be viewed without scrolling. 1. Advanced Features to normal operation. or to confirm. Press the "XM" button to improve visibility in personal injury, death, and/or damage to your SKYFi2 Receiver, accessories, and/or to your vehicle or other property. You may select...
... Screen Mode." Improperly installing the antenna cable could damage it. Spilling food be viewed without scrolling. 1. Advanced Features to normal operation. or to confirm. Press the "XM" button to improve visibility in personal injury, death, and/or damage to your SKYFi2 Receiver, accessories, and/or to your vehicle or other property. You may select...
User Guide
Page 28
... dry cloth to install SKYFi2 in Includes all necessary cables and 27 or cleaning solutions containing another vehicle. Vehicle Adaptor Kit by Delphi (SA10102) Extends the antenna cable by Delphi (SA10046) Allows you to keep SKYFi2 out of Home Adaptor Kit by Delphi (SA10112) For geographic ...Do not allow liquids to use SKYFi2 on your SKYFi2. Antenna Extension Cable for the outside of your installer. Includes an antenna, 12V connectors. consult your SKYFi2, any XM Home Antenna (SA10006) peripherals, and any solvents, chemicals, Use the Vehicle Kit to clean or www.xmradio....
... dry cloth to install SKYFi2 in Includes all necessary cables and 27 or cleaning solutions containing another vehicle. Vehicle Adaptor Kit by Delphi (SA10102) Extends the antenna cable by Delphi (SA10046) Allows you to keep SKYFi2 out of Home Adaptor Kit by Delphi (SA10112) For geographic ...Do not allow liquids to use SKYFi2 on your SKYFi2. Antenna Extension Cable for the outside of your installer. Includes an antenna, 12V connectors. consult your SKYFi2, any XM Home Antenna (SA10006) peripherals, and any solvents, chemicals, Use the Vehicle Kit to clean or www.xmradio....
User Guide
Page 29
... the situation 28 yourself: 1. Troubleshooting 3. Make sure the vehicle antenna is mounted outside the vehicle or the home antenna is not currently broadcasting. Turn SKYFi2 off, then on, to provide vehicle and it does not power on the display: NO SIGNAL Cause: the XM signal is not plugged into SKYFi2. Reference OFF AIR Cause: the channel selected is...
... the situation 28 yourself: 1. Troubleshooting 3. Make sure the vehicle antenna is mounted outside the vehicle or the home antenna is not currently broadcasting. Turn SKYFi2 off, then on, to provide vehicle and it does not power on the display: NO SIGNAL Cause: the XM signal is not plugged into SKYFi2. Reference OFF AIR Cause: the channel selected is...
User Guide
Page 31
... express warranties are made with your SKYFi2, contact 1.26 in. Antenna: 1 RF SMB connector Power: 6V, 1000 mA maximum current, P13 connector, positive polarity Audio output: 3.5 mm diameter mini-stereo jack Delphi Limited Consumer Warranty Delphi Product and Service Solutions ("Delphi") warrants all Portable XM Satellite Radio Accessory Products sold by Delphi (each "Product") to be free...
... express warranties are made with your SKYFi2, contact 1.26 in. Antenna: 1 RF SMB connector Power: 6V, 1000 mA maximum current, P13 connector, positive polarity Audio output: 3.5 mm diameter mini-stereo jack Delphi Limited Consumer Warranty Delphi Product and Service Solutions ("Delphi") warrants all Portable XM Satellite Radio Accessory Products sold by Delphi (each "Product") to be free...

Installation Guide
Page 1
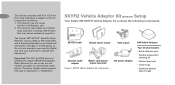
SKYFi2™ InsGtaullaidtieon Home and Vehicle Kits Contents: SKYFi2 Vehicle Adaptor Kit Setup 2 SKYFi2 Installation 6 XM Antenna Setup 11 SKYFi2 Home Adaptor Kit Setup 15 Warranty 18 Warning: This manual and the SKYFi2 Satellite Radio Receiver User Guide contain important safety and operating information. Failure to do so could result in these manuals. Please read and follow the instructions in personal injury, death, and/or damage to your SKYFi2 Receiver, accessories, and/or to your vehicle or other property.
SKYFi2™ InsGtaullaidtieon Home and Vehicle Kits Contents: SKYFi2 Vehicle Adaptor Kit Setup 2 SKYFi2 Installation 6 XM Antenna Setup 11 SKYFi2 Home Adaptor Kit Setup 15 Warranty 18 Warning: This manual and the SKYFi2 Satellite Radio Receiver User Guide contain important safety and operating information. Failure to do so could result in these manuals. Please read and follow the instructions in personal injury, death, and/or damage to your SKYFi2 Receiver, accessories, and/or to your vehicle or other property.
Installation Guide
Page 2
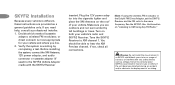
... operate this type of the FCC rules. SKYFi2 Vehicle Adaptor Kit components. 12V power adaptor XM Vehicle Antenna Your kit also includes: • Extra adhesive pad • Surface preparation cleaning kit • Alcohol prep pad • Cable wrap • Adhesive-backed Velcro® pads This device may cause undesired operation. Therefore, Delphi cannot support this equipment. This device must...
... operate this type of the FCC rules. SKYFi2 Vehicle Adaptor Kit components. 12V power adaptor XM Vehicle Antenna Your kit also includes: • Extra adhesive pad • Surface preparation cleaning kit • Alcohol prep pad • Cable wrap • Adhesive-backed Velcro® pads This device may cause undesired operation. Therefore, Delphi cannot support this equipment. This device must...

Installation Guide
Page 5
... to its superior audio quality, (SA10112) (sold separately) can provide SKYFi2 has a built-in cassette Direct Connect The Delphi FM Direct Adaptor Wireless FM Modulator 5 For the ultimate ease of installation, player. Due to hear XM over the wired or wireless FM antenna lead. (Some vehicles may programming on cassette slot is unplugged from the...
... to its superior audio quality, (SA10112) (sold separately) can provide SKYFi2 has a built-in cassette Direct Connect The Delphi FM Direct Adaptor Wireless FM Modulator 5 For the ultimate ease of installation, player. Due to hear XM over the wired or wireless FM antenna lead. (Some vehicles may programming on cassette slot is unplugged from the...
Installation Guide
Page 6
...adaptor into the cigarette lighter and place the XM Antenna on the roof of an airbag. See the SKYFi2 User Guide section on both your vehicle. Verify the system is working by tall buildings or trees. Before installing the system, connect the XM Antenna, 12V power adaptor, and audio connector or... a test. Failure to correctly place SKYFi2 could block your vehicle and where you need help, consult a professional installer. 1. Note: If using the wireless FM modulator or the Delphi FM Direct Adaptor, set the SKYFi2 Receiver and the FM radio to hear the XM Preview channel. If not, check all...
...adaptor into the cigarette lighter and place the XM Antenna on the roof of an airbag. See the SKYFi2 User Guide section on both your vehicle. Verify the system is working by tall buildings or trees. Before installing the system, connect the XM Antenna, 12V power adaptor, and audio connector or... a test. Failure to correctly place SKYFi2 could block your vehicle and where you need help, consult a professional installer. 1. Note: If using the wireless FM modulator or the Delphi FM Direct Adaptor, set the SKYFi2 Receiver and the FM radio to hear the XM Preview channel. If not, check all...

Installation Guide
Page 9
To vehicle dashboard Figure 4. Clip the SKYFi2 vehicle cradle 9 onto the vent or swivel mount (figures 3 and 4). 7. Reassemble the system as described on page 13. Attach the antenna as explained on page 11 and route the antenna cable as in step 2. 8. Vent mount. Attach vehicle mount to back of SKYFi2 as shown. 6. Figure 3.
To vehicle dashboard Figure 4. Clip the SKYFi2 vehicle cradle 9 onto the vent or swivel mount (figures 3 and 4). 7. Reassemble the system as described on page 13. Attach the antenna as explained on page 11 and route the antenna cable as in step 2. 8. Vent mount. Attach vehicle mount to back of SKYFi2 as shown. 6. Figure 3.
Installation Guide
Page 11
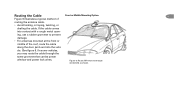
... in injury to the small size of this antenna, there are many types of vehicles. XM Antenna Setup For best reception, follow these recommendations: • Mount the XM Antenna on many possible locations for hard- The design flexibility of your XM Antenna allows mounting on the metal surface of the vehicle roof in reception. Figure 5 shows three typical mounting...
... in injury to the small size of this antenna, there are many types of vehicles. XM Antenna Setup For best reception, follow these recommendations: • Mount the XM Antenna on many possible locations for hard- The design flexibility of your XM Antenna allows mounting on the metal surface of the vehicle roof in reception. Figure 5 shows three typical mounting...

Installation Guide
Page 12
... or closing of the convertible top and that the FM antenna may mount the antenna embedded in the windshield or rear off-center. or soft-top convertible, then the antenna can be ment for additional guidance. your local retailer installation depart- • If the vehicle has roof racks or skid Note that the cable...
... or closing of the convertible top and that the FM antenna may mount the antenna embedded in the windshield or rear off-center. or soft-top convertible, then the antenna can be ment for additional guidance. your local retailer installation depart- • If the vehicle has roof racks or skid Note that the cable...
Installation Guide
Page 13
ing, use a rubber grommet to prevent damage. • For antennas mounted at the front or middle of routing the antenna cable. • Avoid kinking, crimping, twisting, or chafing the cable. Routing the Cable Front or Middle Mounting Option 13 Figure 6 illustrates a typical method ... the door jamb and into contact with a rough metal open- If the cable comes into the vehi- Figure 6. cle. (See figure 6.) In some vehicles, you may route the cable through windshield as shown. Route XM Antenna through the same grommet that carries power window and power lock wires.
ing, use a rubber grommet to prevent damage. • For antennas mounted at the front or middle of routing the antenna cable. • Avoid kinking, crimping, twisting, or chafing the cable. Routing the Cable Front or Middle Mounting Option 13 Figure 6 illustrates a typical method ... the door jamb and into contact with a rough metal open- If the cable comes into the vehi- Figure 6. cle. (See figure 6.) In some vehicles, you may route the cable through windshield as shown. Route XM Antenna through the same grommet that carries power window and power lock wires.

Installation Guide
Page 14
ly through ; Always use the weather seal at the rear of the trunk to force it through the grommet, do not try to reduce water leaks. • Use pre-existing wiring channels when possible. Route XM Antenna wiring as shown in figure 7. Rear Mounting Option Figure 7. 14 If the antenna cable does not fit easi- instead, route the cable under the weather seal near the bottom of the door. • For antennas mounted at the lowest part of the roof, route the cable into the trunk as shown.
ly through ; Always use the weather seal at the rear of the trunk to force it through the grommet, do not try to reduce water leaks. • Use pre-existing wiring channels when possible. Route XM Antenna wiring as shown in figure 7. Rear Mounting Option Figure 7. 14 If the antenna cable does not fit easi- instead, route the cable under the weather seal near the bottom of the door. • For antennas mounted at the lowest part of the roof, route the cable into the trunk as shown.

Installation Guide
Page 15
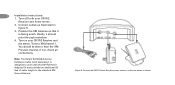
...: Connect only the appropriate input devices to use only the AC power adaptor that came with 25 ft. SKYFi2 Home Adaptor Kit (SA10103) Setup Your Delphi XM SKYFi2 Home Kit contains the following components: SKYFi2 Home Stand XM High-gain Indoor/Outdoor Home Antenna with your SKYFi2 Home Adaptor Kit. cable 6V AC power adaptor Audio cable Hooking up Your 15...
...: Connect only the appropriate input devices to use only the AC power adaptor that came with 25 ft. SKYFi2 Home Adaptor Kit (SA10103) Setup Your Delphi XM SKYFi2 Home Kit contains the following components: SKYFi2 Home Stand XM High-gain Indoor/Outdoor Home Antenna with your SKYFi2 Home Adaptor Kit. cable 6V AC power adaptor Audio cable Hooking up Your 15...
Installation Guide
Page 16
...with the SKYFi2 Home Adaptor Kit and provides an additional 50 feet of cable length to hear the XM Preview channel. If not, check all connections. Position the XM Antenna so that it should be able to the standard XM Home Antenna. Tune to power, antenna, and... home stereo as illustrated in figure 9. 3. Figure 9. You should point through a window. 4. Connect the SKYFi2 Home Stand to XM channel 1. Note: The Delphi SA10006 Antenna Extension Cable (...
...with the SKYFi2 Home Adaptor Kit and provides an additional 50 feet of cable length to hear the XM Preview channel. If not, check all connections. Position the XM Antenna so that it should be able to the standard XM Home Antenna. Tune to power, antenna, and... home stereo as illustrated in figure 9. 3. Figure 9. You should point through a window. 4. Connect the SKYFi2 Home Stand to XM channel 1. Note: The Delphi SA10006 Antenna Extension Cable (...

Installation Guide
Page 17
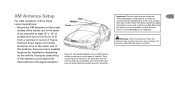
Press the "XM" button to aim the antenna. Signal strength indicator. Once you are convinced you press the "menu" button Figure 10. This display will The "satellite" and "terrestrial" signal bars will ...scroll wheel to normal operation. 3. Press the "menu" button on either "satellite" or "terrestrial." 4. Slowly turn and tilt the antenna. the strongest signal strength (at least two bars) on the SKYFi2 Receiver. 2. Find the position that gives 17 For best reception, aim the home antenna by following these instructions: 1. Aiming the XM Home Antenna change.
Press the "XM" button to aim the antenna. Signal strength indicator. Once you are convinced you press the "menu" button Figure 10. This display will The "satellite" and "terrestrial" signal bars will ...scroll wheel to normal operation. 3. Press the "menu" button on either "satellite" or "terrestrial." 4. Slowly turn and tilt the antenna. the strongest signal strength (at least two bars) on the SKYFi2 Receiver. 2. Find the position that gives 17 For best reception, aim the home antenna by following these instructions: 1. Aiming the XM Home Antenna change.