Operation Guide
Page 3
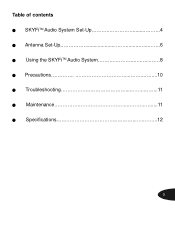
Table of contents SKYFiTM Audio System Set-Up 4 Antenna Set-Up 6 Using the SKYFiTM Audio System 8 Precautions 10 Troubleshooting 11 Maintenance 11 Specifications 12 3
Table of contents SKYFiTM Audio System Set-Up 4 Antenna Set-Up 6 Using the SKYFiTM Audio System 8 Precautions 10 Troubleshooting 11 Maintenance 11 Specifications 12 3
Operation Guide
Page 4
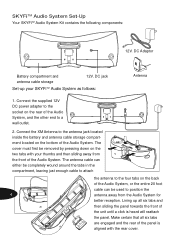
... and antenna cable storage 12V. Connect the XM Antenna to the antenna jack located inside the battery and antenna cable storage compartment located on the rear of the Audio System, and the other end to the four tabs on the two tabs with the rear cover. Lining up your thumbs and then sliding away from the Audio System for...
... and antenna cable storage 12V. Connect the XM Antenna to the antenna jack located inside the battery and antenna cable storage compartment located on the rear of the Audio System, and the other end to the four tabs on the two tabs with the rear cover. Lining up your thumbs and then sliding away from the Audio System for...
Operation Guide
Page 5
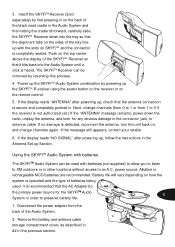
...recommended. If no damage is operated and the type of the Audio System. 2. Next, change channels again. 3. If the display reads "ANTENNA" after powering up, follow the instructions in other locations without access to XM outdoors or in the Antenna Set-up the SKYFiTM R eceiver using the power button on... the receiver or on the back of the black inset cradle in the Audio System and then letting the cradle tilt forward, carefully slide...
...recommended. If no damage is operated and the type of the Audio System. 2. Next, change channels again. 3. If the display reads "ANTENNA" after powering up, follow the instructions in other locations without access to XM outdoors or in the Antenna Set-up the SKYFiTM R eceiver using the power button on... the receiver or on the back of the black inset cradle in the Audio System and then letting the cradle tilt forward, carefully slide...
Operation Guide
Page 6
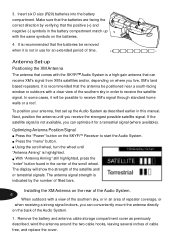
... highlighted, press the "enter" button found in this manual. Installing the XM Antenna on the batteries. 4. Antenna Set-up with the SKYFiTM Audio System is highlighted. The antenna signal strength is indicated by verifying that comes with the same symbols on the rear of the Audio System. 6 When outdoors with a clear view of filled bars. Insert six D size...
... highlighted, press the "enter" button found in this manual. Installing the XM Antenna on the batteries. 4. Antenna Set-up with the SKYFiTM Audio System is highlighted. The antenna signal strength is indicated by verifying that comes with the same symbols on the rear of the Audio System. 6 When outdoors with a clear view of filled bars. Insert six D size...
Operation Guide
Page 7
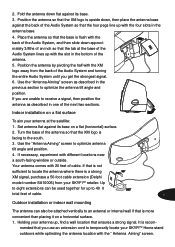
... against its base on a flat (horizontal) surface. 2. Fold the antenna down , then place the antenna base against the back of the Audio System so that the four pegs line up to locate the antenna where there is a strong XM signal, purchase a 50-foot cable extension (Delphi model number SA10006) from the back of an inch so that...
... against its base on a flat (horizontal) surface. 2. Fold the antenna down , then place the antenna base against the back of the Audio System so that the four pegs line up to locate the antenna where there is a strong XM signal, purchase a 50-foot cable extension (Delphi model number SA10006) from the back of an inch so that...

Operation Guide
Page 8
... at the top. The cable and connectors used in the SKYFiTM Operating Guide. Use an XM-approved extension kit (Deplhi model number SA10006) with XM's unique frequency band. Unique SKYFiTM Audio System features include the following: Place the antenna base on the four screw heads with head sizes small enough to pop out of the...
... at the top. The cable and connectors used in the SKYFiTM Operating Guide. Use an XM-approved extension kit (Deplhi model number SA10006) with XM's unique frequency band. Unique SKYFiTM Audio System features include the following: Place the antenna base on the four screw heads with head sizes small enough to pop out of the...
Operation Guide
Page 11
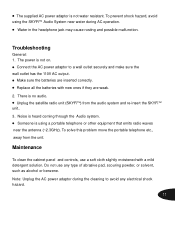
The supplied AC power adaptor is heard coming through the Audio system. Connect the AC power adaptor to avoid any type of abrasive pad, scouring powder, or solvent, such as alcohol or benzene. Make sure the batteries ... re-insert the SKYFiTM unit.. 3. Replace all the batteries with a mild detergent solution. There is using the SKYFiTM Audio System near the antenna (~2.3GHz). Someone is no audio. Note: Unplug the AC power adaptor during AC operation. The power is not on. Troubleshooting General: 1. Water in the headphone jack may cause rusting and ...
The supplied AC power adaptor is heard coming through the Audio system. Connect the AC power adaptor to avoid any type of abrasive pad, scouring powder, or solvent, such as alcohol or benzene. Make sure the batteries ... re-insert the SKYFiTM unit.. 3. Replace all the batteries with a mild detergent solution. There is using the SKYFiTM Audio System near the antenna (~2.3GHz). Someone is no audio. Note: Unplug the AC power adaptor during AC operation. The power is not on. Troubleshooting General: 1. Water in the headphone jack may cause rusting and ...

