Product Manual
Page 4
... package) you enable the new 4x feature (when used with an Access Point.) Please take full advantage of typical network setups using the 802.1x feature. *Maximum wireless signal rate derived from IEEE Standard 802.11b specifications. It is an enhanced 802.11b high-performance... D-Link AirPlus products such as the D-Link AirPlus family of up to 22 Mbps* (compared to read through the Windows XP Operating System. Take a moment to the standard 11 Mbps) when used with the 4x-enabled DI-614+ Wireless Broadband Router or the 4x-enabled DWL-900AP+ Wireless Access Point.) The DWL-650+ is...
... package) you enable the new 4x feature (when used with an Access Point.) Please take full advantage of typical network setups using the 802.1x feature. *Maximum wireless signal rate derived from IEEE Standard 802.11b specifications. It is an enhanced 802.11b high-performance... D-Link AirPlus products such as the D-Link AirPlus family of up to 22 Mbps* (compared to read through the Windows XP Operating System. Take a moment to the standard 11 Mbps) when used with the 4x-enabled DI-614+ Wireless Broadband Router or the 4x-enabled DWL-900AP+ Wireless Access Point.) The DWL-650+ is...
Product Manual
Page 10
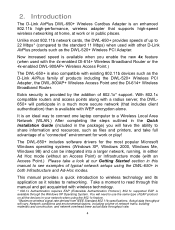
...that D-Link AirPlus wireless devices are using the 802.1x protocol in your network, your setup may be different than that came with your Cable/DSL provider for further tips on setting up a more secure network. 10 Consult with your D-Link 802.1x compatible router or... together, right out of the modem. Install the drivers for the DWL-520+ wireless network adapter into the laptop computer. See the Quick Installation Guide included with the DWL-650+. Please refer to a wireless Broadband router (the D-Link DI-614+.) See the Quick Installation Guide included with the default settings....
...that D-Link AirPlus wireless devices are using the 802.1x protocol in your network, your setup may be different than that came with your Cable/DSL provider for further tips on setting up a more secure network. 10 Consult with your D-Link 802.1x compatible router or... together, right out of the modem. Install the drivers for the DWL-520+ wireless network adapter into the laptop computer. See the Quick Installation Guide included with the DWL-650+. Please refer to a wireless Broadband router (the D-Link DI-614+.) See the Quick Installation Guide included with the default settings....
Product Manual
Page 13
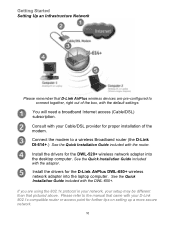
... Fig. 5.2.2 If it does, proceed to Section 2. • Go to the InstallShield Wizard for D-Link AirPlus DWL-650+ Utility and Driver. Your CD-ROM drive may be a different drive letter. To continue, click Next. • Click Next Fig. 5.2.1 Setup will look similar to install the Utility program in the following folder. • Click Next...
... Fig. 5.2.2 If it does, proceed to Section 2. • Go to the InstallShield Wizard for D-Link AirPlus DWL-650+ Utility and Driver. Your CD-ROM drive may be a different drive letter. To continue, click Next. • Click Next Fig. 5.2.1 Setup will look similar to install the Utility program in the following folder. • Click Next...
Product Manual
Page 26
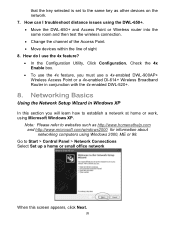
How can I use a 4x-enabled DWL-900AP+ Wireless Access Point or a 4x-enabled DI-614+ Wireless Broadband Router in Windows XP In this screen appears, click Next. 26 Networking Basics Using the Network Setup Wizard in conjunction with the 4x-enabled DWL-520+. 8. Check the 4x Enable box. • ... as other devices on the network. 7. How do I troubleshoot distance issues using the DWL-650+. • Move the DWL-650+ and Access Point or Wireless router into the same room and then test the wireless connection. • Change the channel of the Access Point. • Move devices within...
How can I use a 4x-enabled DWL-900AP+ Wireless Access Point or a 4x-enabled DI-614+ Wireless Broadband Router in Windows XP In this screen appears, click Next. 26 Networking Basics Using the Network Setup Wizard in conjunction with the 4x-enabled DWL-520+. 8. Check the 4x Enable box. • ... as other devices on the network. 7. How do I troubleshoot distance issues using the DWL-650+. • Move the DWL-650+ and Access Point or Wireless router into the same room and then test the wireless connection. • Change the channel of the Access Point. • Move devices within...

Product Manual
Page 27
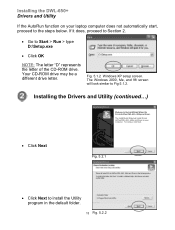
If your computer. Fig. 8.3 Click Next 27 Networking Basics Using the Network Setup Wizard in Windows XP Please follow all the instructions in this window: Fig. 8.2 Click Next In the following window, select the best description of your computer connects to the Internet through a gateway/router, select the second option as shown.
If your computer. Fig. 8.3 Click Next 27 Networking Basics Using the Network Setup Wizard in Windows XP Please follow all the instructions in this window: Fig. 8.2 Click Next In the following window, select the best description of your computer connects to the Internet through a gateway/router, select the second option as shown.

Product Manual
Page 30
Click Next. Fig. 8.8 Insert a disk into the Floppy Disk Drive, in this example, Create a Network Setup Disk has been selected. Networking Basics In the window below, select the best option. In this case drive A: Fig. 8.9 Format the disk if you wish, and click Next. 30 You will run this disk on each of the computers on your network.
Click Next. Fig. 8.8 Insert a disk into the Floppy Disk Drive, in this example, Create a Network Setup Disk has been selected. Networking Basics In the window below, select the best option. In this case drive A: Fig. 8.9 Format the disk if you wish, and click Next. 30 You will run this disk on each of the computers on your network.

Product Manual
Page 31
After you complete the Network Setup Wizard you will use the Network Setup Disk to run the Network Setup Wizard once on each of the computers on your network. Fig. 8.10 Please read the information under Here's how in the screen below. To continue, click Next Fig. 8.11 31 Networking Basics Please wait while the wizard copies the files.
After you complete the Network Setup Wizard you will use the Network Setup Disk to run the Network Setup Wizard once on each of the computers on your network. Fig. 8.10 Please read the information under Here's how in the screen below. To continue, click Next Fig. 8.11 31 Networking Basics Please wait while the wizard copies the files.

Product Manual
Page 32
Networking Basics Please read the information on your new wireless network will need to run the Network Setup Disk on all your computers, your network. Click Yes to complete the Network Setup Wizard. Fig. 8.12 The new settings will take effect when you will be ready to use. 32 Fig. 8.13 You have completed configuring this screen, then click Finish to restart the computer. Next, you restart the computer. After running the Network Setup Disk on all the other computers on this computer.
Networking Basics Please read the information on your new wireless network will need to run the Network Setup Disk on all your computers, your network. Click Yes to complete the Network Setup Wizard. Fig. 8.12 The new settings will take effect when you will be ready to use. 32 Fig. 8.13 You have completed configuring this screen, then click Finish to restart the computer. Next, you restart the computer. After running the Network Setup Disk on all the other computers on this computer.

Product Manual
Page 40
... one computer,) share an LPR printer (a printer connected to a print server) or share a network printer (a printer connected to your network through a Gateway/Router,) use the Add Printer Wizard 1. Whether you 3 ways to add or share a printer on your network. Sharing an network printer 3. Please follow the... an LPR printer 40 Adding a local printer 2. Adding and Sharing Printers in Windows XP After you have run the Network Setup Wizard on all the computers in your network (please see the Network Setup Wizard section at the beginning of Networking Basics,) you have run the Network...
... one computer,) share an LPR printer (a printer connected to a print server) or share a network printer (a printer connected to your network through a Gateway/Router,) use the Add Printer Wizard 1. Whether you 3 ways to add or share a printer on your network. Sharing an network printer 3. Please follow the... an LPR printer 40 Adding a local printer 2. Adding and Sharing Printers in Windows XP After you have run the Network Setup Wizard on all the computers in your network (please see the Network Setup Wizard section at the beginning of Networking Basics,) you have run the Network...

Product Manual
Page 45
Fig. 8.38 Setting up a Network Printer After you can run the Network Setup Wizard on all the computers on your network. Networking Basics Adding a local printer • Go to share the printer on your network, you have successfully added a local printer. Please follow these directions to use the Add Printer Wizard to Start> Printers and Faxes A successful installation will display the printer icon as shown at right. You have run the Add Printer Wizard on all the computers on your network: • Go to Start> Printers and Faxes Fig. 8.39 45
Fig. 8.38 Setting up a Network Printer After you can run the Network Setup Wizard on all the computers on your network. Networking Basics Adding a local printer • Go to share the printer on your network, you have successfully added a local printer. Please follow these directions to use the Add Printer Wizard to Start> Printers and Faxes A successful installation will display the printer icon as shown at right. You have run the Add Printer Wizard on all the computers on your network: • Go to Start> Printers and Faxes Fig. 8.39 45

Product Manual
Page 48
... for proper installation: • Go to Start> Printers and Faxes The printer icon will appear at right, indicating proper installation. After you run the Network Setup Wizard on all the network computers.
... for proper installation: • Go to Start> Printers and Faxes The printer icon will appear at right, indicating proper installation. After you run the Network Setup Wizard on all the network computers.

Product Manual
Page 49
To share an LPR printer, please follow these directions: • Go to the right will need a Print Server such as the DP-101P+. Networking Basics Setting up an LPR printer To share an LPR printer (using a print server,) you have run the Network Setup Wizard on all the computers on Add a Printer The screen to Start> Printers and Faxes • Click on your network. Please make sure that you will display. • Click Next • Select Local Printer Fig. 8.48 • Click Next Fig. 8.49 49
To share an LPR printer, please follow these directions: • Go to the right will need a Print Server such as the DP-101P+. Networking Basics Setting up an LPR printer To share an LPR printer (using a print server,) you have run the Network Setup Wizard on all the computers on Add a Printer The screen to Start> Printers and Faxes • Click on your network. Please make sure that you will display. • Click Next • Select Local Printer Fig. 8.48 • Click Next Fig. 8.49 49

Product Manual
Page 53
... remember the name of the printer. • Please run the Add Printer Wizard on all the computers on your network before you run the Network Setup Wizard on all the computers on your network in order to print a test page. Fig. 8.59 Fig. 8.60 Note: You must run the Add Printer...
... remember the name of the printer. • Please run the Add Printer Wizard on all the computers on your network before you run the Network Setup Wizard on all the computers on your network in order to print a test page. Fig. 8.59 Fig. 8.60 Note: You must run the Add Printer...
