
Product Manual
Page 2
Contents Package Contents 3 Introduction 4 Connections 5 Features and Benefits 6 LEDs ...7 Getting Started 8 Connecting the DVG-1402S Directly to a Modem and Computer 8 Configuring the DVG-1402S for DSL Connection 10 Connecting the DVG-1402S in Front of a Router 13 Configuring the DVG-1402S for DSL Connection 15 Connecting the DVG-1402S Behind a Router 18 MAC Cloning for Cable Connection 21 Web-based Management 22 Frequently Asked Questions 44 Technical Specifications 47 Technical Support 50 Warranty 51 2
Contents Package Contents 3 Introduction 4 Connections 5 Features and Benefits 6 LEDs ...7 Getting Started 8 Connecting the DVG-1402S Directly to a Modem and Computer 8 Configuring the DVG-1402S for DSL Connection 10 Connecting the DVG-1402S in Front of a Router 13 Configuring the DVG-1402S for DSL Connection 15 Connecting the DVG-1402S Behind a Router 18 MAC Cloning for Cable Connection 21 Web-based Management 22 Frequently Asked Questions 44 Technical Specifications 47 Technical Support 50 Warranty 51 2

Product Manual
Page 3
System Requirements For Configuration: A compter with Internet Explorer or Netscape Navigator 6.x or above items are missing, please contact your reseller. If any of Package: D-Link DVG-1402S Broadband Phone Service VoIP Router 12V DC/1.25A Power Adapter CD-ROM with Manual Quick Installation Guide Ethernet Cable Standard (RJ-11) Telephone Cable Note: Using a power supply with a different voltage rating than the one included with the DVG-1402S will cause damage and void the warranty for this product. Package Contents Contents of the above with Javascript enabled. 3
System Requirements For Configuration: A compter with Internet Explorer or Netscape Navigator 6.x or above items are missing, please contact your reseller. If any of Package: D-Link DVG-1402S Broadband Phone Service VoIP Router 12V DC/1.25A Power Adapter CD-ROM with Manual Quick Installation Guide Ethernet Cable Standard (RJ-11) Telephone Cable Note: Using a power supply with a different voltage rating than the one included with the DVG-1402S will cause damage and void the warranty for this product. Package Contents Contents of the above with Javascript enabled. 3

Product Manual
Page 4
...and five Ethernet ports. Corporations can reduce or eliminate long distance or inter-office phone charges. Introduction The D-LINK DVG-1402S Broadband Phone Service VoIP Router links traditional telephony networks to create a home or small office local area network (LAN). The built-in DHCP ...router can also enjoy the benefits of network consolidation and reduction of leased lines by relying on the Internet service providers to share a single Internet connection. The DVG-1402S includes two RJ-11 telephone jacks that provide voice communication over the IP networks. 4 It can be configured...
...and five Ethernet ports. Corporations can reduce or eliminate long distance or inter-office phone charges. Introduction The D-LINK DVG-1402S Broadband Phone Service VoIP Router links traditional telephony networks to create a home or small office local area network (LAN). The built-in DHCP ...router can also enjoy the benefits of network consolidation and reduction of leased lines by relying on the Internet service providers to share a single Internet connection. The DVG-1402S includes two RJ-11 telephone jacks that provide voice communication over the IP networks. 4 It can be configured...

Product Manual
Page 6
Features & Benefits Two analog RJ-11 phone connectors One 10/100Mbps WAN port for connecting to a DSL/Cable Modem or other WAN devices Four 10/100Mbps LAN ports for connecting to a local network IP address assignment using DHCP (Dynamic Host Configuration Protocol) or static configuration Remote software download/update Supports IP sharing to allow multiple users to access the Internet via a single IP address Supports Caller ID Supports QoS to guarantee voice quality Optional features may be supported by your service provider such as call waiting, caller ID, and voicemail. 6
Features & Benefits Two analog RJ-11 phone connectors One 10/100Mbps WAN port for connecting to a DSL/Cable Modem or other WAN devices Four 10/100Mbps LAN ports for connecting to a local network IP address assignment using DHCP (Dynamic Host Configuration Protocol) or static configuration Remote software download/update Supports IP sharing to allow multiple users to access the Internet via a single IP address Supports Caller ID Supports QoS to guarantee voice quality Optional features may be supported by your service provider such as call waiting, caller ID, and voicemail. 6

Product Manual
Page 8
After the steps are completed, your setup should look similar to install your computer connects directly to a DSL or Cable modem and does not connect to a router, follow the steps below to the diagram below. Note: This is the most common setup configuration for the DVG-1402S. If you do not require the use of more than four LAN ports, you do not need an additional router. 8 Getting Started Connecting the DVG-1402S Directly to a Modem and Computer If your DVG-1402S.
After the steps are completed, your setup should look similar to install your computer connects directly to a DSL or Cable modem and does not connect to a router, follow the steps below to the diagram below. Note: This is the most common setup configuration for the DVG-1402S. If you do not require the use of more than four LAN ports, you do not need an additional router. 8 Getting Started Connecting the DVG-1402S Directly to a Modem and Computer If your DVG-1402S.

Product Manual
Page 10
... on to automatically be assigned an IP address from the DVG-1402S) regardless of what type of internet connection you have a PPPoE connection, you must configure your DVG-1402S. Connect the Power Adapter to a Modem and Computer (No Router) 10. Connect the other end of connecting clients. Restart... require a MAC address, setup of the DVG-1402S with a PPPoE or DHCP connection, you must follow the steps below to your computer's IP settings to DHCP (to the following section. If you have . (Please refer to complete the configuration of your connection type, please check with...
... on to automatically be assigned an IP address from the DVG-1402S) regardless of what type of internet connection you have a PPPoE connection, you must configure your DVG-1402S. Connect the Power Adapter to a Modem and Computer (No Router) 10. Connect the other end of connecting clients. Restart... require a MAC address, setup of the DVG-1402S with a PPPoE or DHCP connection, you must follow the steps below to your computer's IP settings to DHCP (to the following section. If you have . (Please refer to complete the configuration of your connection type, please check with...

Product Manual
Page 11
Enter your User Name and Authentication Password and Confirm Password. Click Configure WAN/LAN Access. Click Save. 11 Getting Started (continued) Connecting the DVG-1402S Directly to a Modem and Computer (No Router) Click Login to the webbased management module. Select PPPoE from the pull-down menu. Click Configure WAN Port.
Enter your User Name and Authentication Password and Confirm Password. Click Configure WAN/LAN Access. Click Save. 11 Getting Started (continued) Connecting the DVG-1402S Directly to a Modem and Computer (No Router) Click Login to the webbased management module. Select PPPoE from the pull-down menu. Click Configure WAN Port.

Product Manual
Page 15
.... If you are using a Cable Modem, and your cable service provider does not require a MAC address, setup of the DVG-1402S with a PPPoE or DHCP connection, you are unsure of a Router 17. Configuring the DVG-1402S for Cable Connection." If you have . (Please refer to your NIC card's manual for detailed information.) If your service provider...
.... If you are using a Cable Modem, and your cable service provider does not require a MAC address, setup of the DVG-1402S with a PPPoE or DHCP connection, you are unsure of a Router 17. Configuring the DVG-1402S for Cable Connection." If you have . (Please refer to your NIC card's manual for detailed information.) If your service provider...

Product Manual
Page 16
Click Configure WAN Port. Enter your User Name and Authentication Password and Confirm Password. Select PPPoE from the pull-down menu. Click Save. 16 Click Configure WAN/LAN Access. Getting Started (continued) Connecting the DVG-1402S in Front of a Router Click Login to the webbased management module.
Click Configure WAN Port. Enter your User Name and Authentication Password and Confirm Password. Select PPPoE from the pull-down menu. Click Save. 16 Click Configure WAN/LAN Access. Getting Started (continued) Connecting the DVG-1402S in Front of a Router Click Login to the webbased management module.
Product Manual
Page 20
... existing Router (plug in or turn on the power switch). 18. Reconnect the power to your PC. By default the unit is already configured to an available electrical outlet (Wall Socket or Surge Protector). 17. Restart your NIC card's manual for detailed information.) Installation behind a router. Getting Started (continued) Connecting the DVG-1402S Behind a Router 16...
... existing Router (plug in or turn on the power switch). 18. Reconnect the power to your PC. By default the unit is already configured to an available electrical outlet (Wall Socket or Surge Protector). 17. Restart your NIC card's manual for detailed information.) Installation behind a router. Getting Started (continued) Connecting the DVG-1402S Behind a Router 16...

Product Manual
Page 21
... with your service provider. The physical address listed is your system's MAC address (from the connection type pull down the MAC address of the DVG-1402S (default is 192.168.15.1). In the MAC Cloning field, enter your system's MAC address. The physical address listed is your settings. 7....22:33. 3. For Windows 98/Me users: Go to Start> Run > cmd. Click the Save button to System Preferences > Network and click on Configure WAN Port. Go to save your system's MAC address. Open a Web browser and type in ipconfig/ all . Type in the IP address of ...
... with your service provider. The physical address listed is your system's MAC address (from the connection type pull down the MAC address of the DVG-1402S (default is 192.168.15.1). In the MAC Cloning field, enter your system's MAC address. The physical address listed is your settings. 7....22:33. 3. For Windows 98/Me users: Go to Start> Run > cmd. Click the Save button to System Preferences > Network and click on Configure WAN Port. Go to save your system's MAC address. Open a Web browser and type in ipconfig/ all . Type in the IP address of ...
Product Manual
Page 22
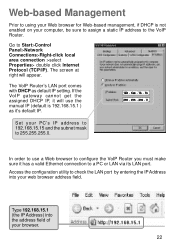
... use the manual IP (default is not enabled on your web browser address field. Access the configuration utility to check the LAN port by entering the IP Address into the address field of your PC...IP address to 192.168.15.15 and the subnet mask to 255.255.255.0. Go to configure the VoIP Router you must make sure it 's default IP. 192 . 168 . 15 . 15 255 . 255 . 255...15.1 (the IP Address) into your computer, be sure to assign a static IP address to the VoIP Router. The screen at right will use a Web browser to Start>Control Panel>Network Connections>Right-click local area ...
... use the manual IP (default is not enabled on your web browser address field. Access the configuration utility to check the LAN port by entering the IP Address into the address field of your PC...IP address to 192.168.15.15 and the subnet mask to 255.255.255.0. Go to configure the VoIP Router you must make sure it 's default IP. 192 . 168 . 15 . 15 255 . 255 . 255...15.1 (the IP Address) into your computer, be sure to assign a static IP address to the VoIP Router. The screen at right will use a Web browser to Start>Control Panel>Network Connections>Right-click local area ...

Product Manual
Page 23
Manually enter your type of connection. Choose your DNS address (if applicable). 23 Web-based Management (continued) Click on Login to the Web-based Management module Setting Up the Connection To configure the WAN port, please do the following: Click on Configure WAN Port.
Manually enter your type of connection. Choose your DNS address (if applicable). 23 Web-based Management (continued) Click on Login to the Web-based Management module Setting Up the Connection To configure the WAN port, please do the following: Click on Configure WAN Port.
Product Manual
Page 24
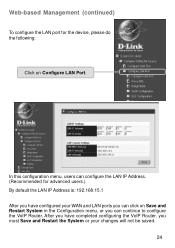
Web-based Management (continued) To configure the LAN port for advanced users.) By default the LAN IP Address is: 192.168.15.1 After you have completed configuring the VoIP Router, you must Save and Restart the System or your WAN and LAN ports you can click on Configure LAN Port. After you can continue to configure the VoIP Router. In this configuration menu, users can configure the LAN IP Address. (Recommended for the device, please do the following: Click on Save and Restart System in the Configuration menu, or you have configured your changes will not be saved. 24
Web-based Management (continued) To configure the LAN port for advanced users.) By default the LAN IP Address is: 192.168.15.1 After you have completed configuring the VoIP Router, you must Save and Restart the System or your WAN and LAN ports you can click on Configure LAN Port. After you can continue to configure the VoIP Router. In this configuration menu, users can configure the LAN IP Address. (Recommended for the device, please do the following: Click on Save and Restart System in the Configuration menu, or you have configured your changes will not be saved. 24

Product Manual
Page 25
This toggles On and Off to save the settings. This toggles Enable and Disable for Static Public IP assignment. Configure LAN Port > Bridge Mode Bridge Mode - Enter the Proxy DNS IP address if instructed by your service provider. Proxy DNS IP Address - Click Save to save the settings. 25 Click Save to turn NAT on or off for the Proxy DNS function. Web-based Management (continued) Configure LAN Port > Proxy DNS State -
This toggles On and Off to save the settings. This toggles Enable and Disable for Static Public IP assignment. Configure LAN Port > Bridge Mode Bridge Mode - Enter the Proxy DNS IP address if instructed by your service provider. Proxy DNS IP Address - Click Save to save the settings. 25 Click Save to turn NAT on or off for the Proxy DNS function. Web-based Management (continued) Configure LAN Port > Proxy DNS State -

Product Manual
Page 26
... IP Address above. Domain Name - This is the base (starting) address for the host part. Netmask - Web-based Management (continued) Configure LAN Port > DHCP Configuration > Dynamic IP Assignment Use the Dynamic IP Assignment to configure the device to save the settings. 26 This specifies the amount of the WINS server or leave blank.
... IP Address above. Domain Name - This is the base (starting) address for the host part. Netmask - Web-based Management (continued) Configure LAN Port > DHCP Configuration > Dynamic IP Assignment Use the Dynamic IP Assignment to configure the device to save the settings. 26 This specifies the amount of the WINS server or leave blank.

Product Manual
Page 27
... be assigned to those in the Dynamic IP Assignment, in much the same way as the Dynamic IP Assignment. Web-based Management (continued) Configure LAN Port > DHCP Configuration > Static IP Assignment The Static IP Assignment functions in the previous section. Click the edit icon on the window above to access the second...
... be assigned to those in the Dynamic IP Assignment, in much the same way as the Dynamic IP Assignment. Web-based Management (continued) Configure LAN Port > DHCP Configuration > Static IP Assignment The Static IP Assignment functions in the previous section. Click the edit icon on the window above to access the second...

Product Manual
Page 28
Click Save to view the current virtual server configuration settings. Configure LAN Port > NAT Configuration > Virtual Server Configuration This window allows you to save the settings. Click the edit icon on this window to access the second Virtual Server Configuration window: 28 Web-based Management (continued) Configure LAN Port > NAT Configuration Select enabled or disabled for the NAT function.
Click Save to view the current virtual server configuration settings. Configure LAN Port > NAT Configuration > Virtual Server Configuration This window allows you to save the settings. Click the edit icon on this window to access the second Virtual Server Configuration window: 28 Web-based Management (continued) Configure LAN Port > NAT Configuration Select enabled or disabled for the NAT function.

Product Manual
Page 29
Web-based Management (continued) Configure LAN Port > NAT Configuration > Virtual Server Configuration (continued) The items on the LAN or use a well-known port. Protocol - Local Port Range - State - This toggles Disable and Enable for the particular protocol ...packet you would like to edit (Form 1 to 6). Global Port Range Enter the designated TCP or UDP protocol port number for the Virtual Server Configuration function. Choose the index number that you wish to save the settings. 29 Click Save to redirect. Server IP - Enter the port number used by...
Web-based Management (continued) Configure LAN Port > NAT Configuration > Virtual Server Configuration (continued) The items on the LAN or use a well-known port. Protocol - Local Port Range - State - This toggles Disable and Enable for the particular protocol ...packet you would like to edit (Form 1 to 6). Global Port Range Enter the designated TCP or UDP protocol port number for the Virtual Server Configuration function. Choose the index number that you wish to save the settings. 29 Click Save to redirect. Server IP - Enter the port number used by...

Product Manual
Page 30
... Host IP Address - Select to view the current Dynamic NAT settings. Web-based Management (continued) Configure LAN Port > NAT Configuration > Virtual Server Configuration (continued) The items on this window are described below: DMZ Forwarding Mode - Configure LAN Port > NAT Configuration > Dynamic NAT This window allows you to enable or disable the DMZ. The DMZ (Demilitarized...
... Host IP Address - Select to view the current Dynamic NAT settings. Web-based Management (continued) Configure LAN Port > NAT Configuration > Virtual Server Configuration (continued) The items on this window are described below: DMZ Forwarding Mode - Configure LAN Port > NAT Configuration > Dynamic NAT This window allows you to enable or disable the DMZ. The DMZ (Demilitarized...

